Note
Access to this page requires authorization. You can try signing in or changing directories.
Access to this page requires authorization. You can try changing directories.
Hosted machines allow you to build, test, and run attended and unattended desktop flows without providing or setting up any physical machines.
You can create hosted machines directly through the Power Automate portal. Power Automate automatically provisions a Windows machine based on your configuration and registers it to your environment. Access your hosted machines in the Power Automate portal and start building your desktop flows within minutes. Hosted machines use Windows 365 for provisioning and access.
Here are some of the highlights of what you can do with hosted machines:
- Build and test desktop flows using Power Automate for desktop.
- Run attended and unattended desktop flows.
- To distribute your automation workload, assign your hosted machines to machine groups.
Key capabilities:
Work or school account integration: Enables access to resources that are part of the business plan linked to your organization, such as Office, SharePoint, and Azure.
Vanilla or custom VM images for your hosted machine: Use a vanilla virtual machine (VM) image provided by Microsoft or personalize your hosted machines by providing your own Windows image directly from your Azure Compute Gallery. Providing your own Windows image allows you to have all your applications installed on the provisioned hosted machines.
Connect to your own virtual network: Securely communicate with each other, the Internet, and your on-premises networks.
Note
- Sign-in access is only available to the creator of the hosted machine.
- You can run unattended desktop flows using a work or school account that is different from the creator of the hosted machine, provided that you add the account on the hosted machine.
Licensing requirements
To use hosted machines, you need the Power Automate Hosted Process license (previously Power Automate hosted RPA add-on). Assign to your environment as much capacity as the number of hosted machines you want to run in your environment.
You also need the following prerequisite licenses: Windows, Intune, Microsoft Entra ID.
Note
The Hosted Process licenses the machines and not the user. The Premium user plan is required to run attended RPA, and for RPA developers to build and manage desktop flows on the Power Automate portal. To learn more about the Premium RPA features that come with the Premium user plan, go to Premium RPA features.
Prerequisites
This section presents all the prerequisites to create and use hosted machines.
Microsoft Entra and Intune requirements
- A valid and working Intune and Microsoft Entra tenant.
- Ensure that Intune device type enrollment restrictions are set to Allow Windows (MDM) platform for corporate enrollment.
To find more information about the Microsoft Entra and Intune requirements, go to Windows 365 requirements.
Windows 365 Cloud PC and Azure Virtual Desktop service principal
Note
The Windows 365 and Azure Virtual Desktop service principals should automatically be created in your tenant. You can skip this step, unless you face an error with service principals not created in your tenant when you provision the hosted machine.
Validate if the Windows 365 service principal is already created:
Sign in to the Azure portal.
Navigate to Microsoft Entra > Enterprise applications > All applications.
Remove filter Application type == Enterprise Applications.
Fill filter Application ID starts with with the Windows 365 application ID 0af06dc6-e4b5-4f28-818e-e78e62d137a5.
If the service principal is provisioned in your Microsoft Entra, the page should look like the following screenshot:

If the application is like the presented screenshot, you don't need to perform any extra steps. However, you must create the service principal if the application isn't showing up.
Create the Windows 365 service principal.
You can create an Azure service principal with the az ad sp create command from the Azure Command-Line Interface (CLI).
az ad sp create --id 0af06dc6-e4b5-4f28-818e-e78e62d137a5Create other service principals related to Azure Virtual Desktop.
To create a hosted machine, you must create the following Azure Virtual Desktop services in your tenant.
Application name Application ID Azure Virtual Desktop 9cdead84-a844-4324-93f2-b2e6bb768d07 Azure Virtual Desktop Client a85cf173-4192-42f8-81fa-777a763e6e2c Azure Virtual Desktop ARM Provider 50e95039-b200-4007-bc97-8d5790743a63 Follow the same instruction as for creating the Windows 365 application to check and create the service principals.
Other requirements
If you use unattended mode, review the requirements to run unattended desktop flows
Get access to the default VM image
Note
- The default VM image provided by Power Automate with Microsoft Edge preinstalled is based on the Windows 365 Cloud PC image template: Windows 11 Enterprise Cloud PC 24H2. If you have specific software, configuration, or security constraints, use the custom VM image capability.
The default VM image is available to all users in the environment. If you can't see the default VM image, your admin disabled sharing of default VM images with users. In this case:
- Users need either the System Administrator or Desktop Flows Machine Configuration Admin role to see and manage the default image.
- For other users, the System Administrator or Desktop Flows Machine Configuration Admin must share the default image with them before they can use it.
View the default image in Monitors > Machines > VM images.
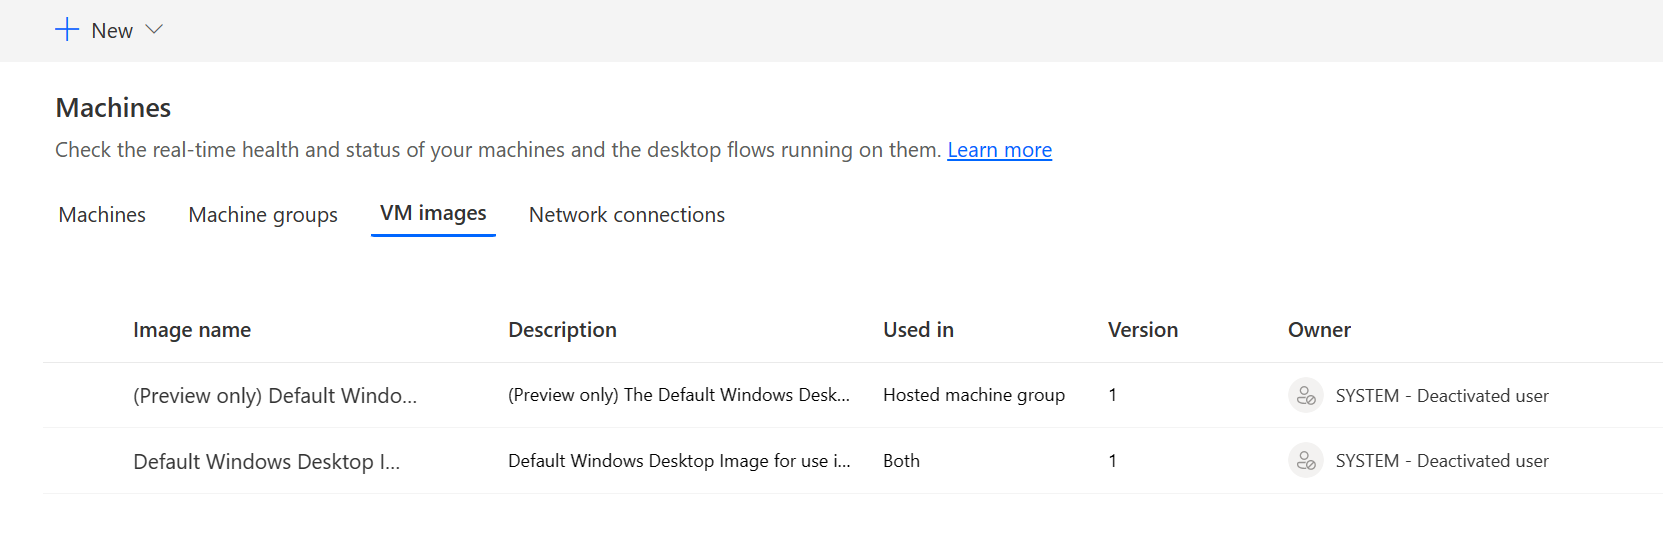
Share the default image
Sign in to Power Automate.
Go to Monitor > Machines > VM images.
Select the default Windows desktop image from the list.
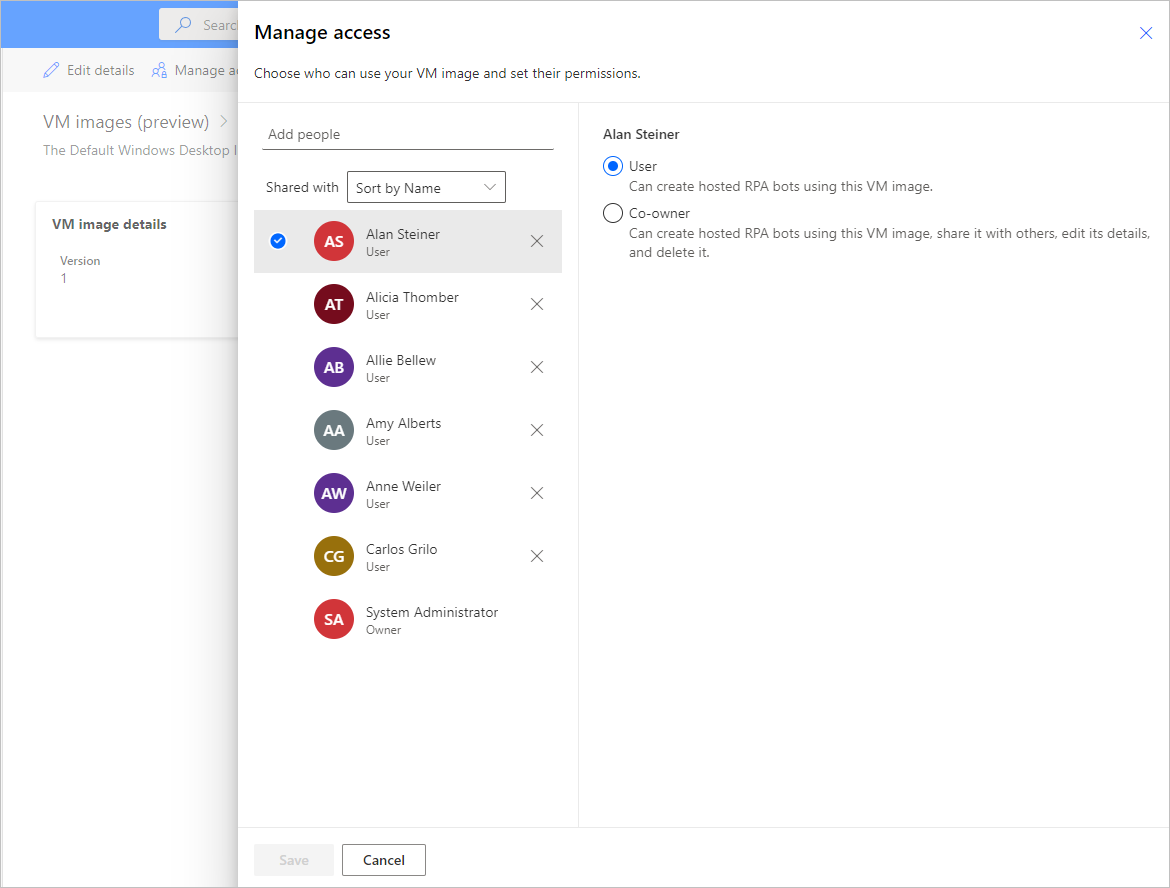
Select Manage access.
Select Add people and enter the name of the person in your organization with whom you’d like to share the image.
Select the names of the persons and choose which permissions they can access the machine with.
Select Save.
Create a hosted machine
To create a hosted machine:
Sign in to Power Automate.
Go to Monitor > Machines.
Select New > Hosted machine.
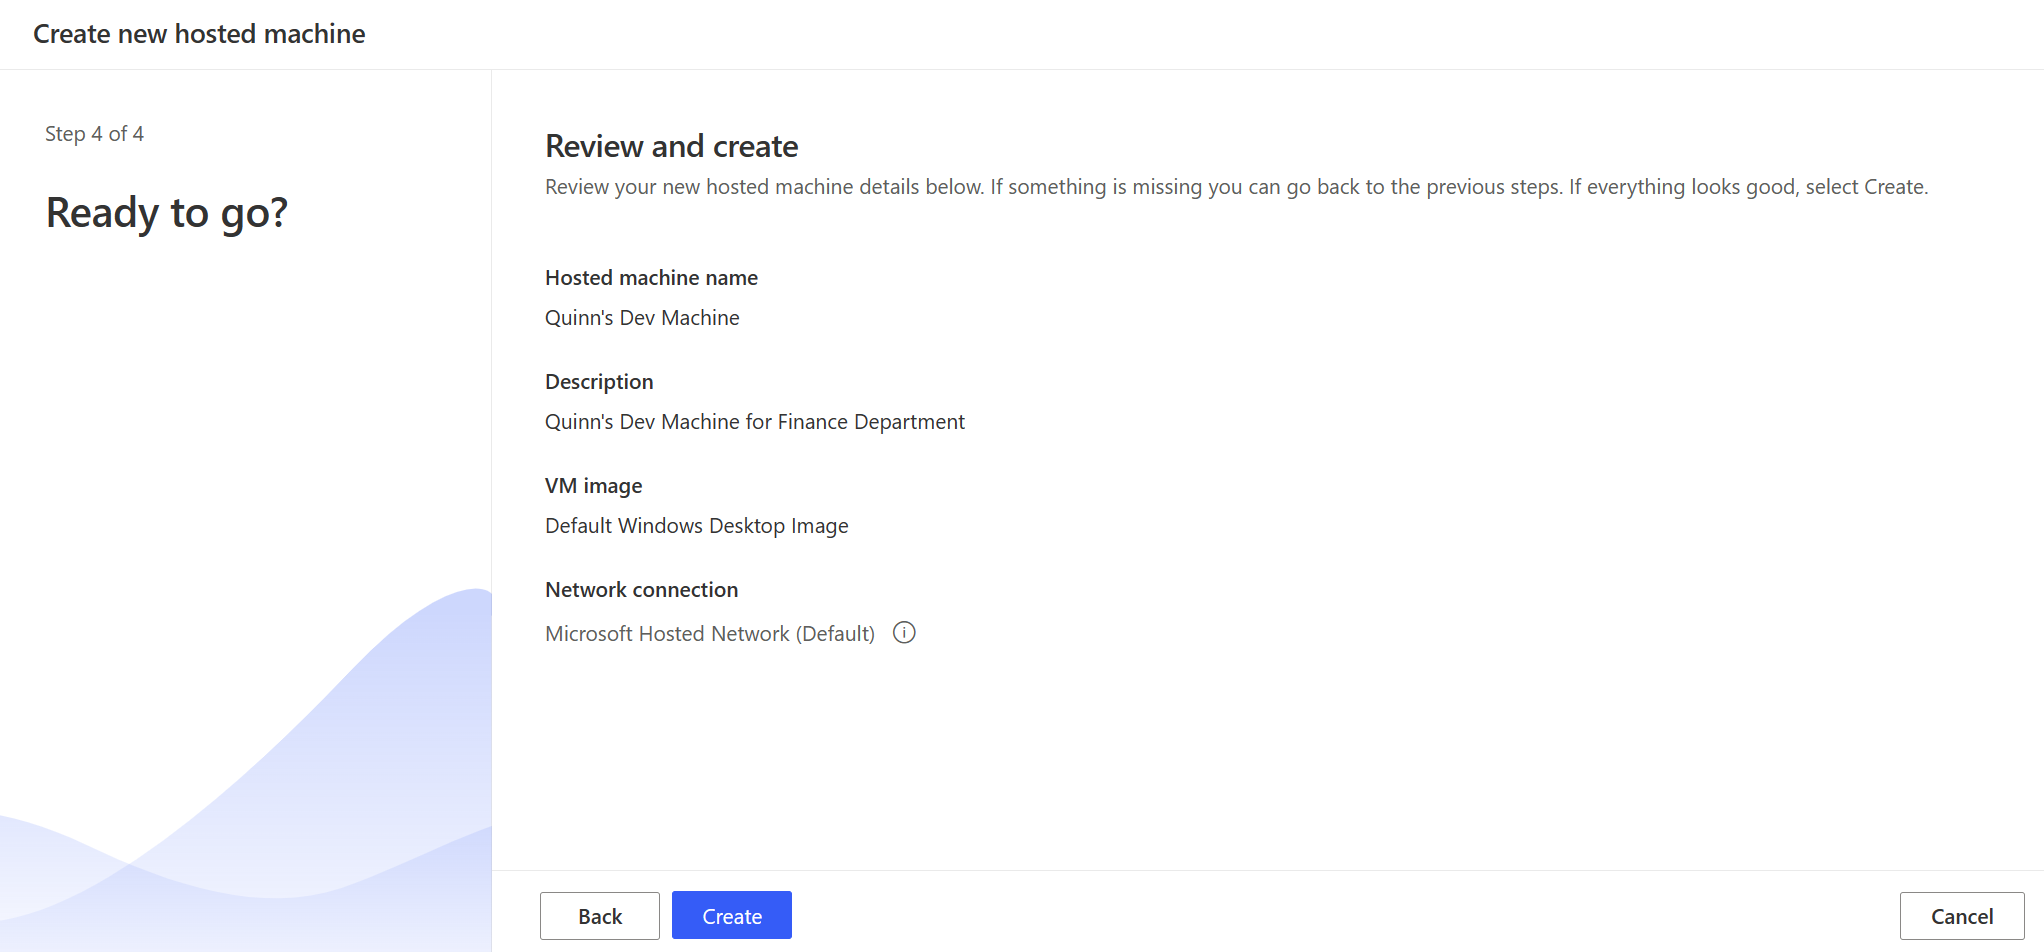
In the hosted machine creation wizard:
Enter a name for your hosted machine and optionally add a description.
Select the VM image to use for your hosted machine. A proposed default Windows 11 image called Default Windows Desktop Image is available. If you don't see it, make sure you followed the steps described in Prerequisites.
Alternatively, you can select a custom VM image that is shared with your account.
Optionally, select the custom network connection you want your hosted machine to be provisioned with. Otherwise, you automatically connect to the Microsoft Hosted Network.
Review and create your hosted machine.
Note
The time needed to provision a hosted machine varies depending on the configuration of the hosted machine. It can take over 30 minutes for the machine to be ready for access.
Access a hosted machine
Sign in to Power Automate.
Go to Monitor > Machines.
Select the Machines tab
Select your hosted machine from the list of machines.
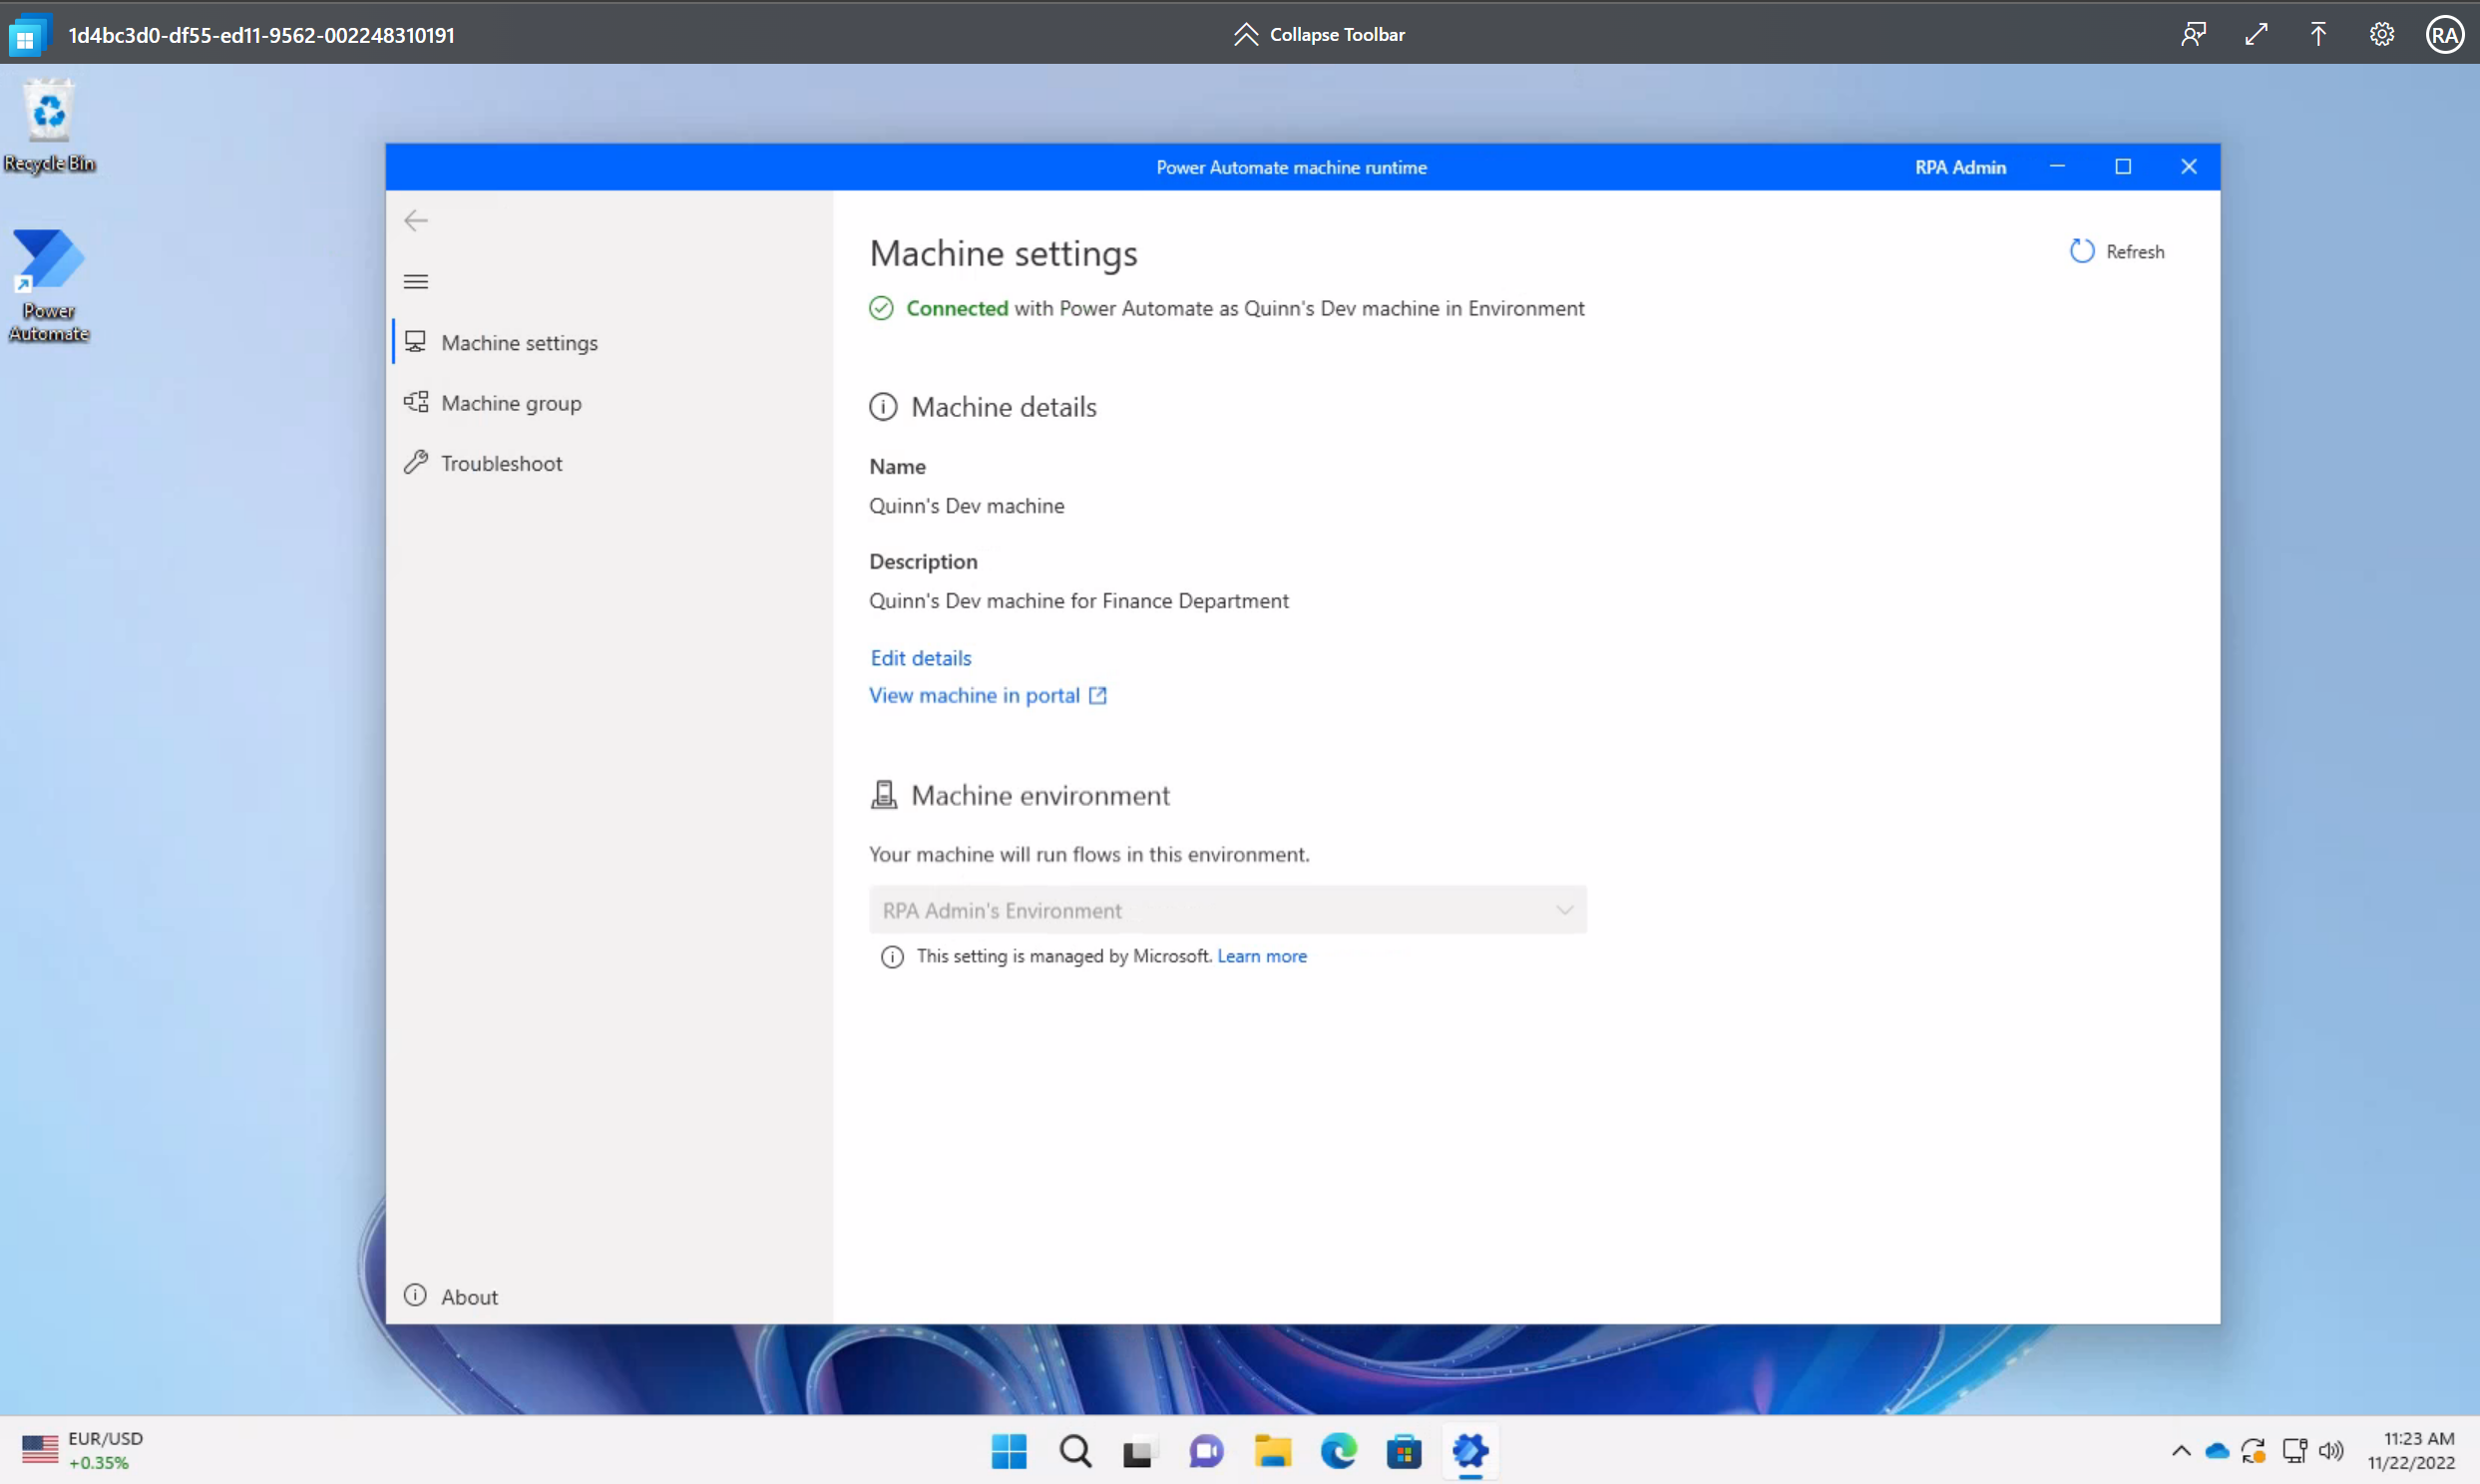
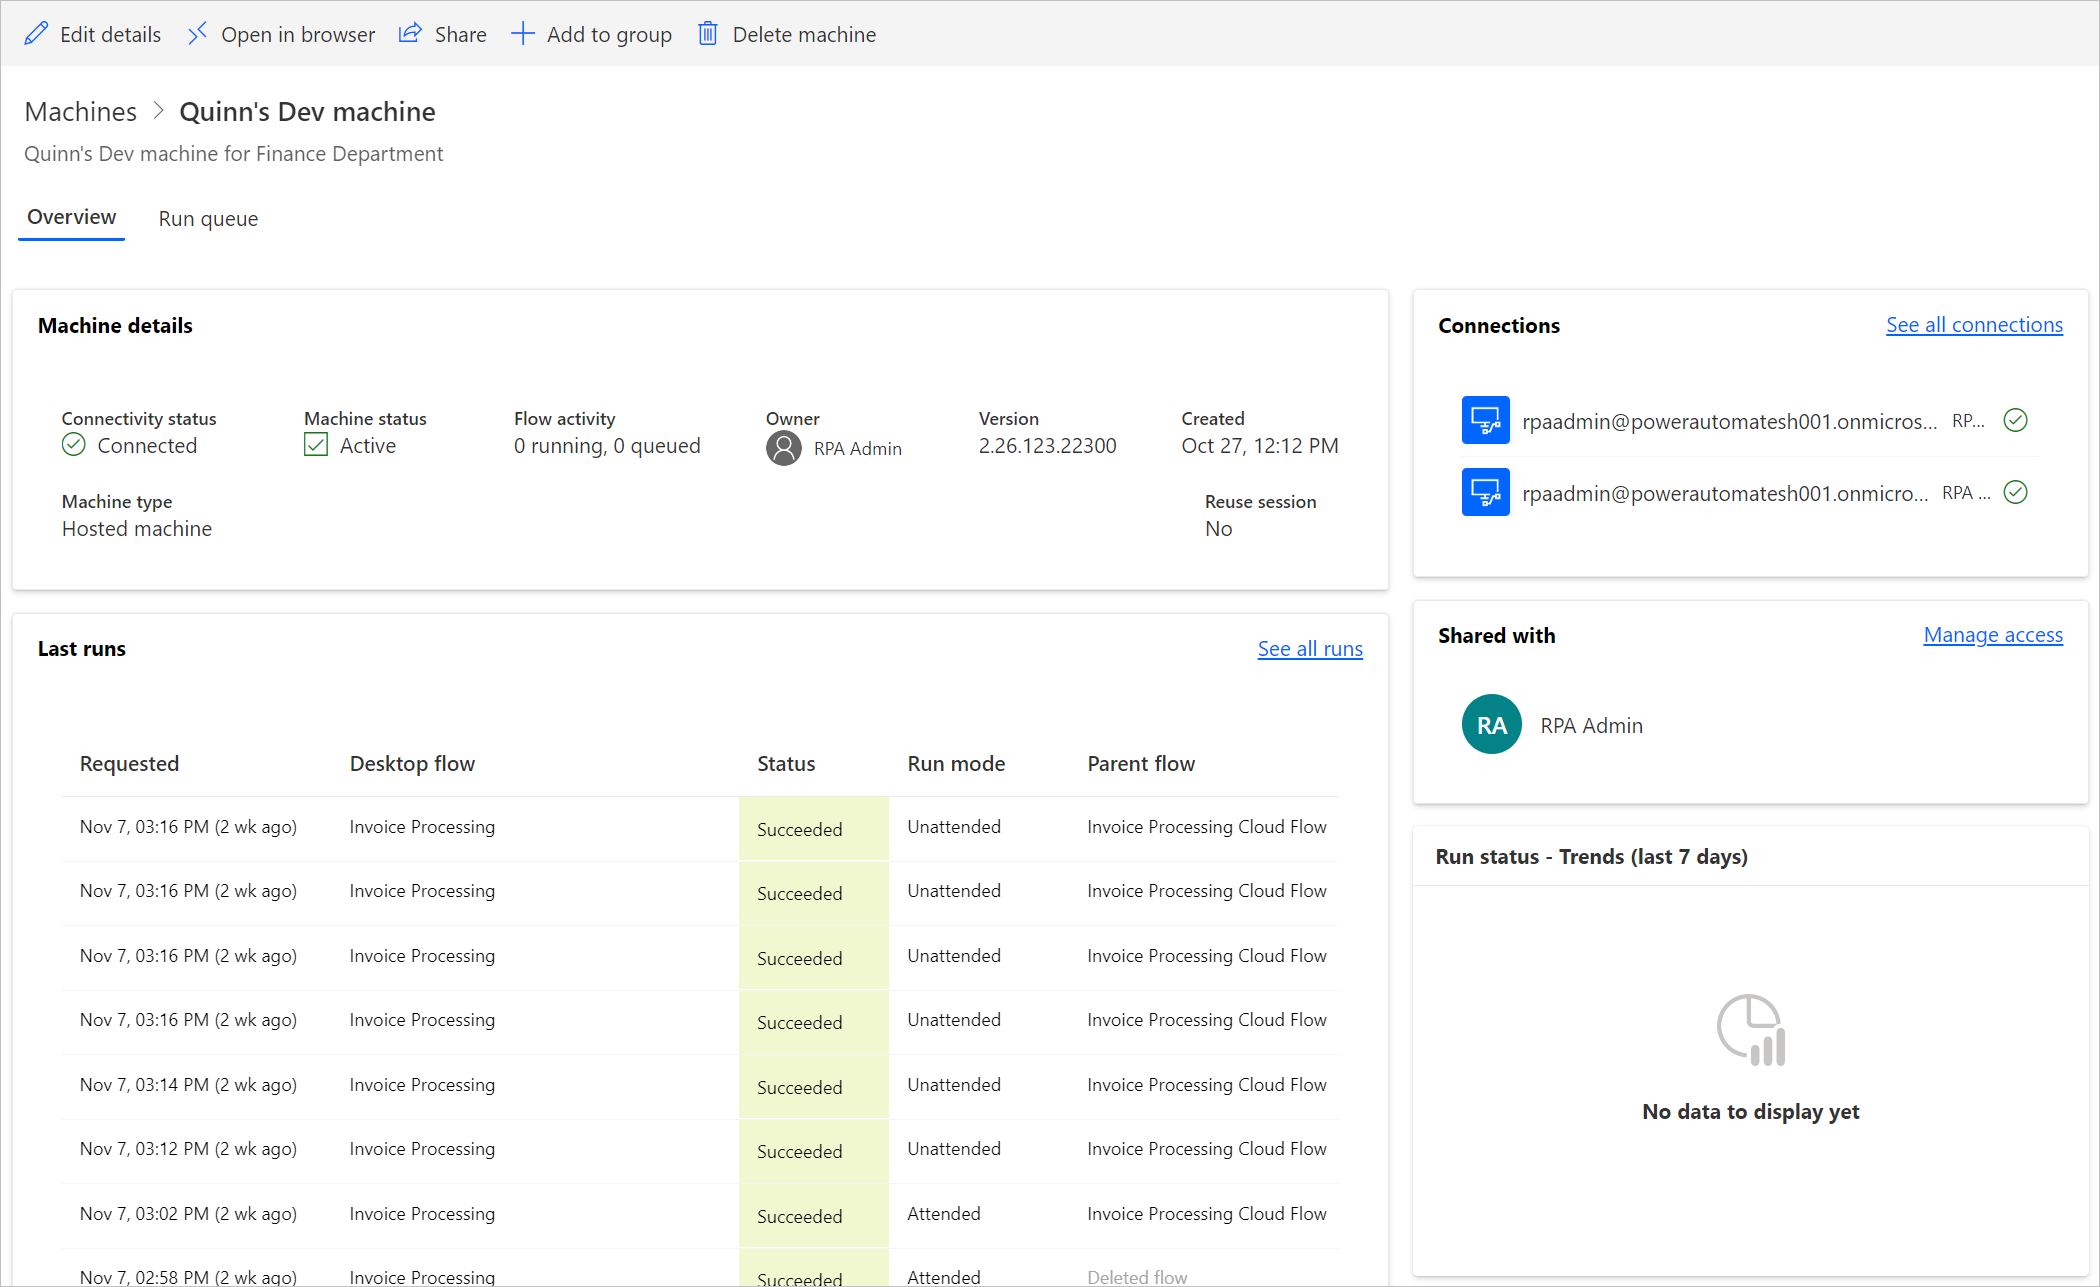
In the machine details page, you should observe the following details:
- Machine type: Hosted machine
- Connectivity status: Connected
- Machine status: Active
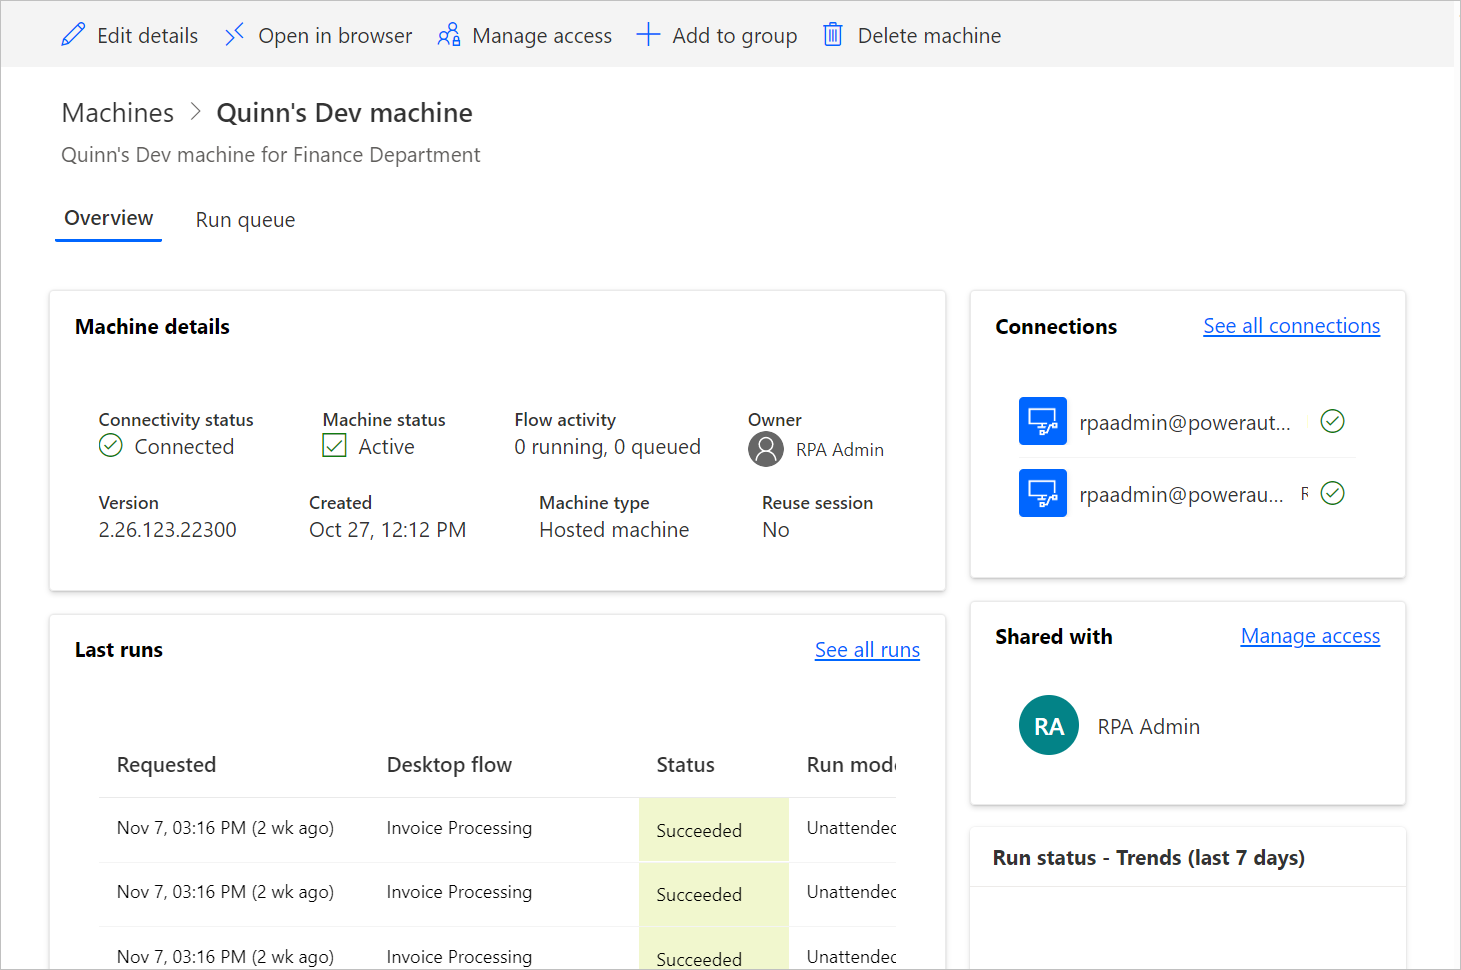
Select Open in browser.
A new tab in the browser should open and load the hosted machine access. Sign in with your work or school account.
The hosted machine is preregistered into the Power Automate environment.
Use custom VM images for your hosted machine
You can personalize your hosted machines by providing your own Windows image directly from your Azure Compute Gallery. This feature allows you to have all your applications installed on your hosted machines.
Create an Azure Compute Gallery in Azure and add an image
Go to the Azure portal.
Create a new Azure Compute Gallery and select Role based access control (RBAC) in the Sharing tab.
Select Review + create, and once you validated all the settings, select Create.
Once you created an Azure Compute Gallery, create an image definition following the steps in Create an image definition and an image version. You should create the image in the exact location where we deploy your hosted machines. You can find the following mapping with your environment Geo:
- Australia: Australia East
- Asia: East Asia
- Brazil: Brazil South
- Canada: Canada Central
- Europe: North Europe
- France: France Central
- Germany: Germany West Central
- India: Central India
- Japan: Japan East
- Korea: Korea Central
- Norway: Norway East
- Singapore: Southeast Asia (Allowlisted tenants only)
- Switzerland: Switzerland North
- United Arab Emirates: UAE North
- United Kingdom: UK South
- United States: East US
Image requirements
Custom VM images must meet the following requirements:
- Windows 10 Enterprise version 20H2 or later
- Windows 11 Enterprise 21H2 or later
- Generation 2 image
- Generalized VM image. Learn more in generalize VM image.
- Single Session VM images (multi-session isn’t supported)
- No recovery partition. To find more information about how to remove a recovery partition, go to Windows Server command: delete partition
- Default 64-GB OS disk size. The OS disk size is automatically adjusted to 256 GB
- The image definition must have trusted launch enabled as the security type
Use a specific version of Power Automate for desktop
When you use custom VM images, the latest version of Power Automate for desktop installs automatically during hosted machine provisioning.
To use a specific version of Power Automate for desktop:
Install the version of Power Automate for desktop you want, and include it in your custom VM image.
Add the following registry key to the image:
Hive Key Name Type Value HKEY_LOCAL_MACHINE SOFTWARE\WOW6432Node\Microsoft\Power Automate Desktop\Global UseInstalledPADForHosted String True Caution
Modifying Windows registry settings incorrectly can cause serious problems that might prevent your computer from booting properly. Microsoft can't guarantee that any problems resulting from the configuring of registry settings can be solved. Modification of these settings is at your own risk. We strongly recommend that you back up your Windows registry before proceeding.
This configuration ensures that your hosted machine uses the version of Power Automate for desktop included in your custom VM image.
Share the reader permission on Azure subscription with Windows 365 service principal
To use your VM image for hosted machines, you need to grant Windows 365 service principal with the following permissions:
- Reader permission on the Azure subscription.
When you upload a custom image, you must be signed in with an account that is an owner or admin of the subscription.
Share the Azure Compute Gallery with Power Automate makers
The last step before using your image in Power Automate is to share the image with the Power Automate makers.
In the Azure portal, go to your Azure Compute Gallery.
Go to the Access Control (IAM) settings.
Select Add > Add role assignment.
Assign at least Reader permissions access to the Power Automate makers you want to share the gallery with. Then select Next.
Select Select members and search for the Power Automate makers you want to share with.
Once you selected all the members to add, review the permissions and users, and assign them.
Add a new custom VM image
Sign in to Power Automate.
Go to Monitor > Machines.
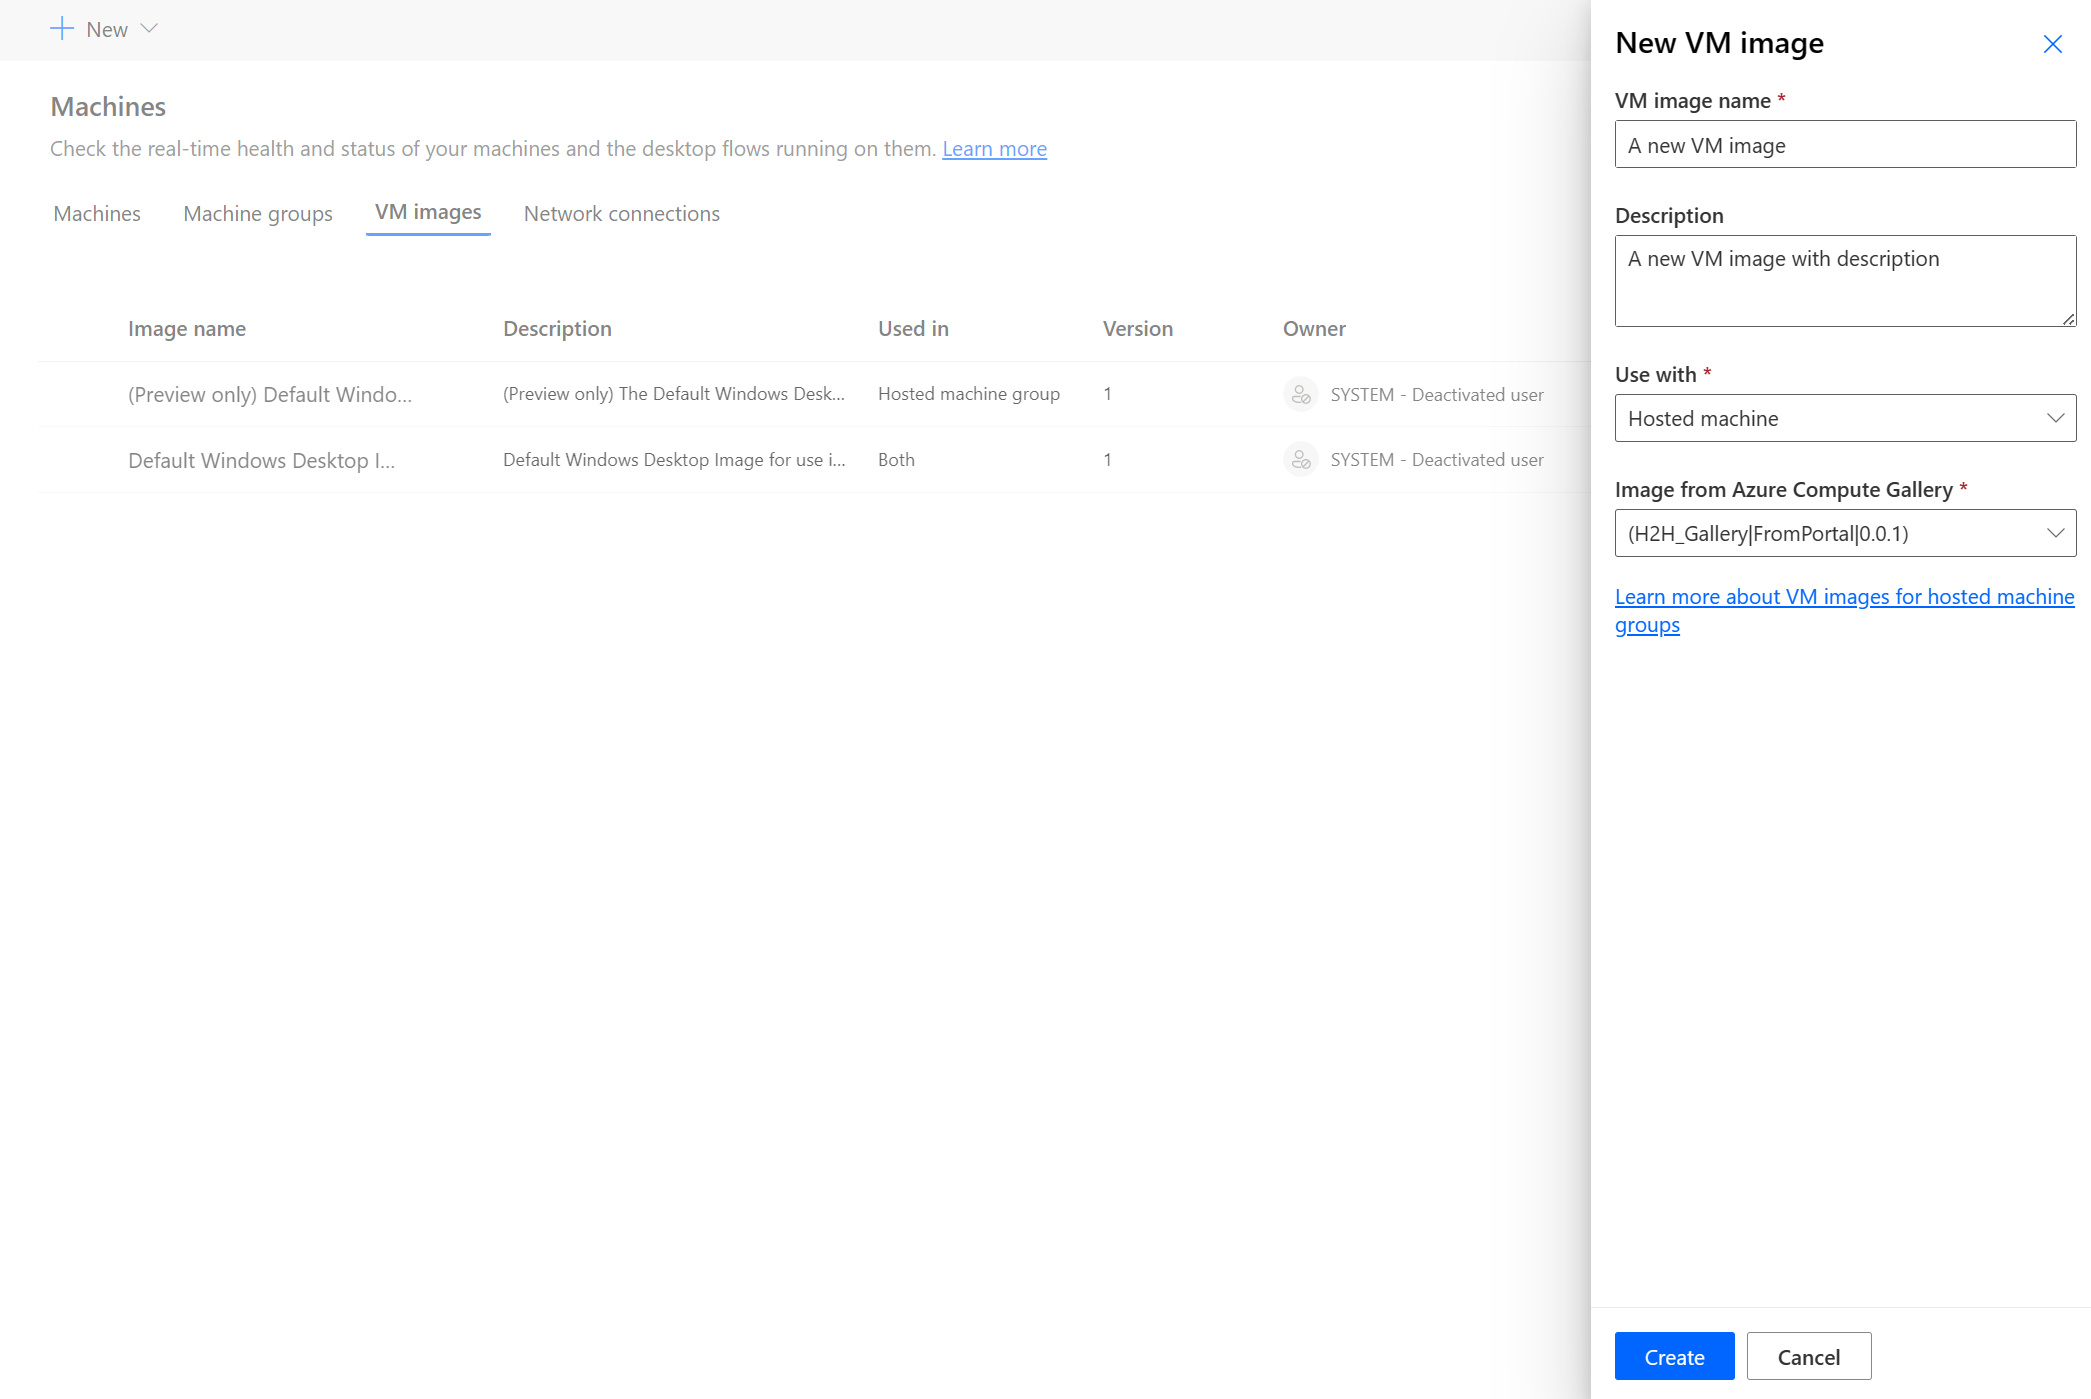
Select New > VM image.
Enter a VM image name, a description, and the usage.
- VM Image name: A unique name to identify the image.
- VM Image description: An optional description for the image.
- Use with: Select either Hosted machine or Both, if you want the image to work with both hosted machines and hosted machine groups.
Select one of the images that you have access to from the Azure Compute Gallery.
Note
- The image needs to be replicated in the same Azure region as the hosted machine.
- The list of images available may vary depending on the usage you are selecting.
Share the image
Sign in to Power Automate.
Go to Monitor > Machines > VM images.
Select the image you created.
Select Manage access.
Select Add people and enter the names of the persons in your organization with whom you'd like to share the image.
Select the names of the persons and choose with which permissions they can access the image.
Select Save.

Note
When a user isn't part of an environment anymore, you can continue to see the user as deactivated. You are notified in the Manage access section of the image if it's shared with deactivated users. In this situation, remove access to them.
Use a custom virtual network for your hosted machines
You can connect to your own virtual network with your hosted machines to securely communicate with each other, the Internet, and on-premises networks. Providing your own virtual network from your Azure subscription allows your hosted machines to be provisioned with your virtual network automatically.
Note
You can have up to 30 custom virtual networks configured per tenant.
General network requirements
To use your own network with hosted machines, you must meet the following requirements:
- You must have a virtual network in your Azure subscription in the same region where you created the hosted machines.
- Follow Azure’s Network guidelines.
- A subnet within the virtual network and available IP address space.
- Allow network connectivity to required services.
The virtual network needs to be created in the same location as your hosted machines. You can find the following mapping with your environment Geo:
- Australia: Australia East
- Asia: East Asia
- Brazil: Brazil South
- Canada: Canada Central
- Europe: North Europe
- France: France Central
- Germany: Germany West Central
- India: Central India
- Japan: Japan East
- Korea: Korea Central
- Norway: Norway East
- Singapore: Southeast Asia (Allowlisted tenants only)
- Switzerland: Switzerland North
- United Arab Emirates: UAE North
- United Kingdom: UK South
- United States: East US
Additional requirements for Microsoft Entra hybrid joined hosted machines
To use your own network and provision Microsoft Entra hybrid joined machines, you must meet the following requirements:
Domain requirements
- You must configure your infrastructure to automatically Microsoft Entra hybrid join any devices that domain joins to the on-premises Active Directory. This configuration lets them be recognized and managed in the cloud.
- Microsoft Entra hybrid joined hosted machines require network line of sight to your on-premises domain controllers periodically. Without this connection, devices become unusable. For more information, see Plan your Microsoft Entra hybrid join deployment.
- If an organizational unit is specified, ensure it exists and is valid.
- An Active Directory user account with sufficient permissions to join the computer into the specified organizational unit within the Active Directory domain. If you don't specify an organizational unit, the user account must have sufficient permissions to join the computer to the Active Directory domain.
- User accounts that are creators of hosted machines must have a synced identity available in both Active Directory and Microsoft Entra ID.
Role and identity requirements
Hosted machines users must be configured with hybrid identities so that they can authenticate with resources both on-premises and in the cloud.
DNS requirements
As part of the Microsoft Entra hybrid join requirements, your hosted machines must be able to join on-premises Active Directory. That requires that the hosted machines be able to resolve DNS records for your on-premises AD environment. Configure your Azure Virtual Network where the hosted machines are provisioned as follows:
- Make sure your Azure Virtual Network has network connectivity to DNS servers that can resolve your Active Directory domain.
- From the Azure Virtual Network's Settings, select DNS Servers and then choose Custom.
- Enter the IP address of DNS servers that environment that can resolve your Active Directory Domain Services domain.
Share the virtual network with Windows 365 service principal
To use your virtual network for hosted machines, you need to grant Windows 365 service principal with the following permissions:
- Reader permission on the Azure subscription
- Windows 365 Network Interface Contributor permission on the specified resource group
- Windows 365 Network User permission on the virtual network
Note
Ensure the resources have the specified role requirements assigned to the Windows 365 service principal, even if other roles with the same or higher permissions are already assigned.
Note
For virtual networks created before November 26, 2023, the Network Contributor role is used to apply permissions on both the resource group and virtual network. The new RBAC roles have more specific permissions. To manually remove the existing roles and add the new roles, refer to the following table for the existing roles used on each Azure resource. Before removing the existing roles, make sure that the updated roles are assigned.
| Azure resource | Existing role (before November 26, 2023) | Updated role (after November 26, 2023) |
|---|---|---|
| Resource group | Network Contributor | Windows 365 Network Interface Contributor |
| Virtual network | Network Contributor | Windows 365 Network User |
| Subscription | Reader | Reader |
Share the virtual network with Power Automate makers
The last step before being able to reference your virtual network from Power Automate is to share the virtual network with the Power Automate makers.
Go to the Azure portal.
In the Azure portal, go to your Virtual network.
Go to the Access Control (IAM) settings.
Select Add > Add role assignment.
Assign at least Reader permissions access to the Power Automate makers you want to share the virtual network with. Then select Next.
Select Select members and search for the Power Automate makers you want to share with.
Once you selected all the members to add, review the permissions and users, and assign them.
Add a new network connection
Sign in to Power Automate.
Go to Monitor > Machines.
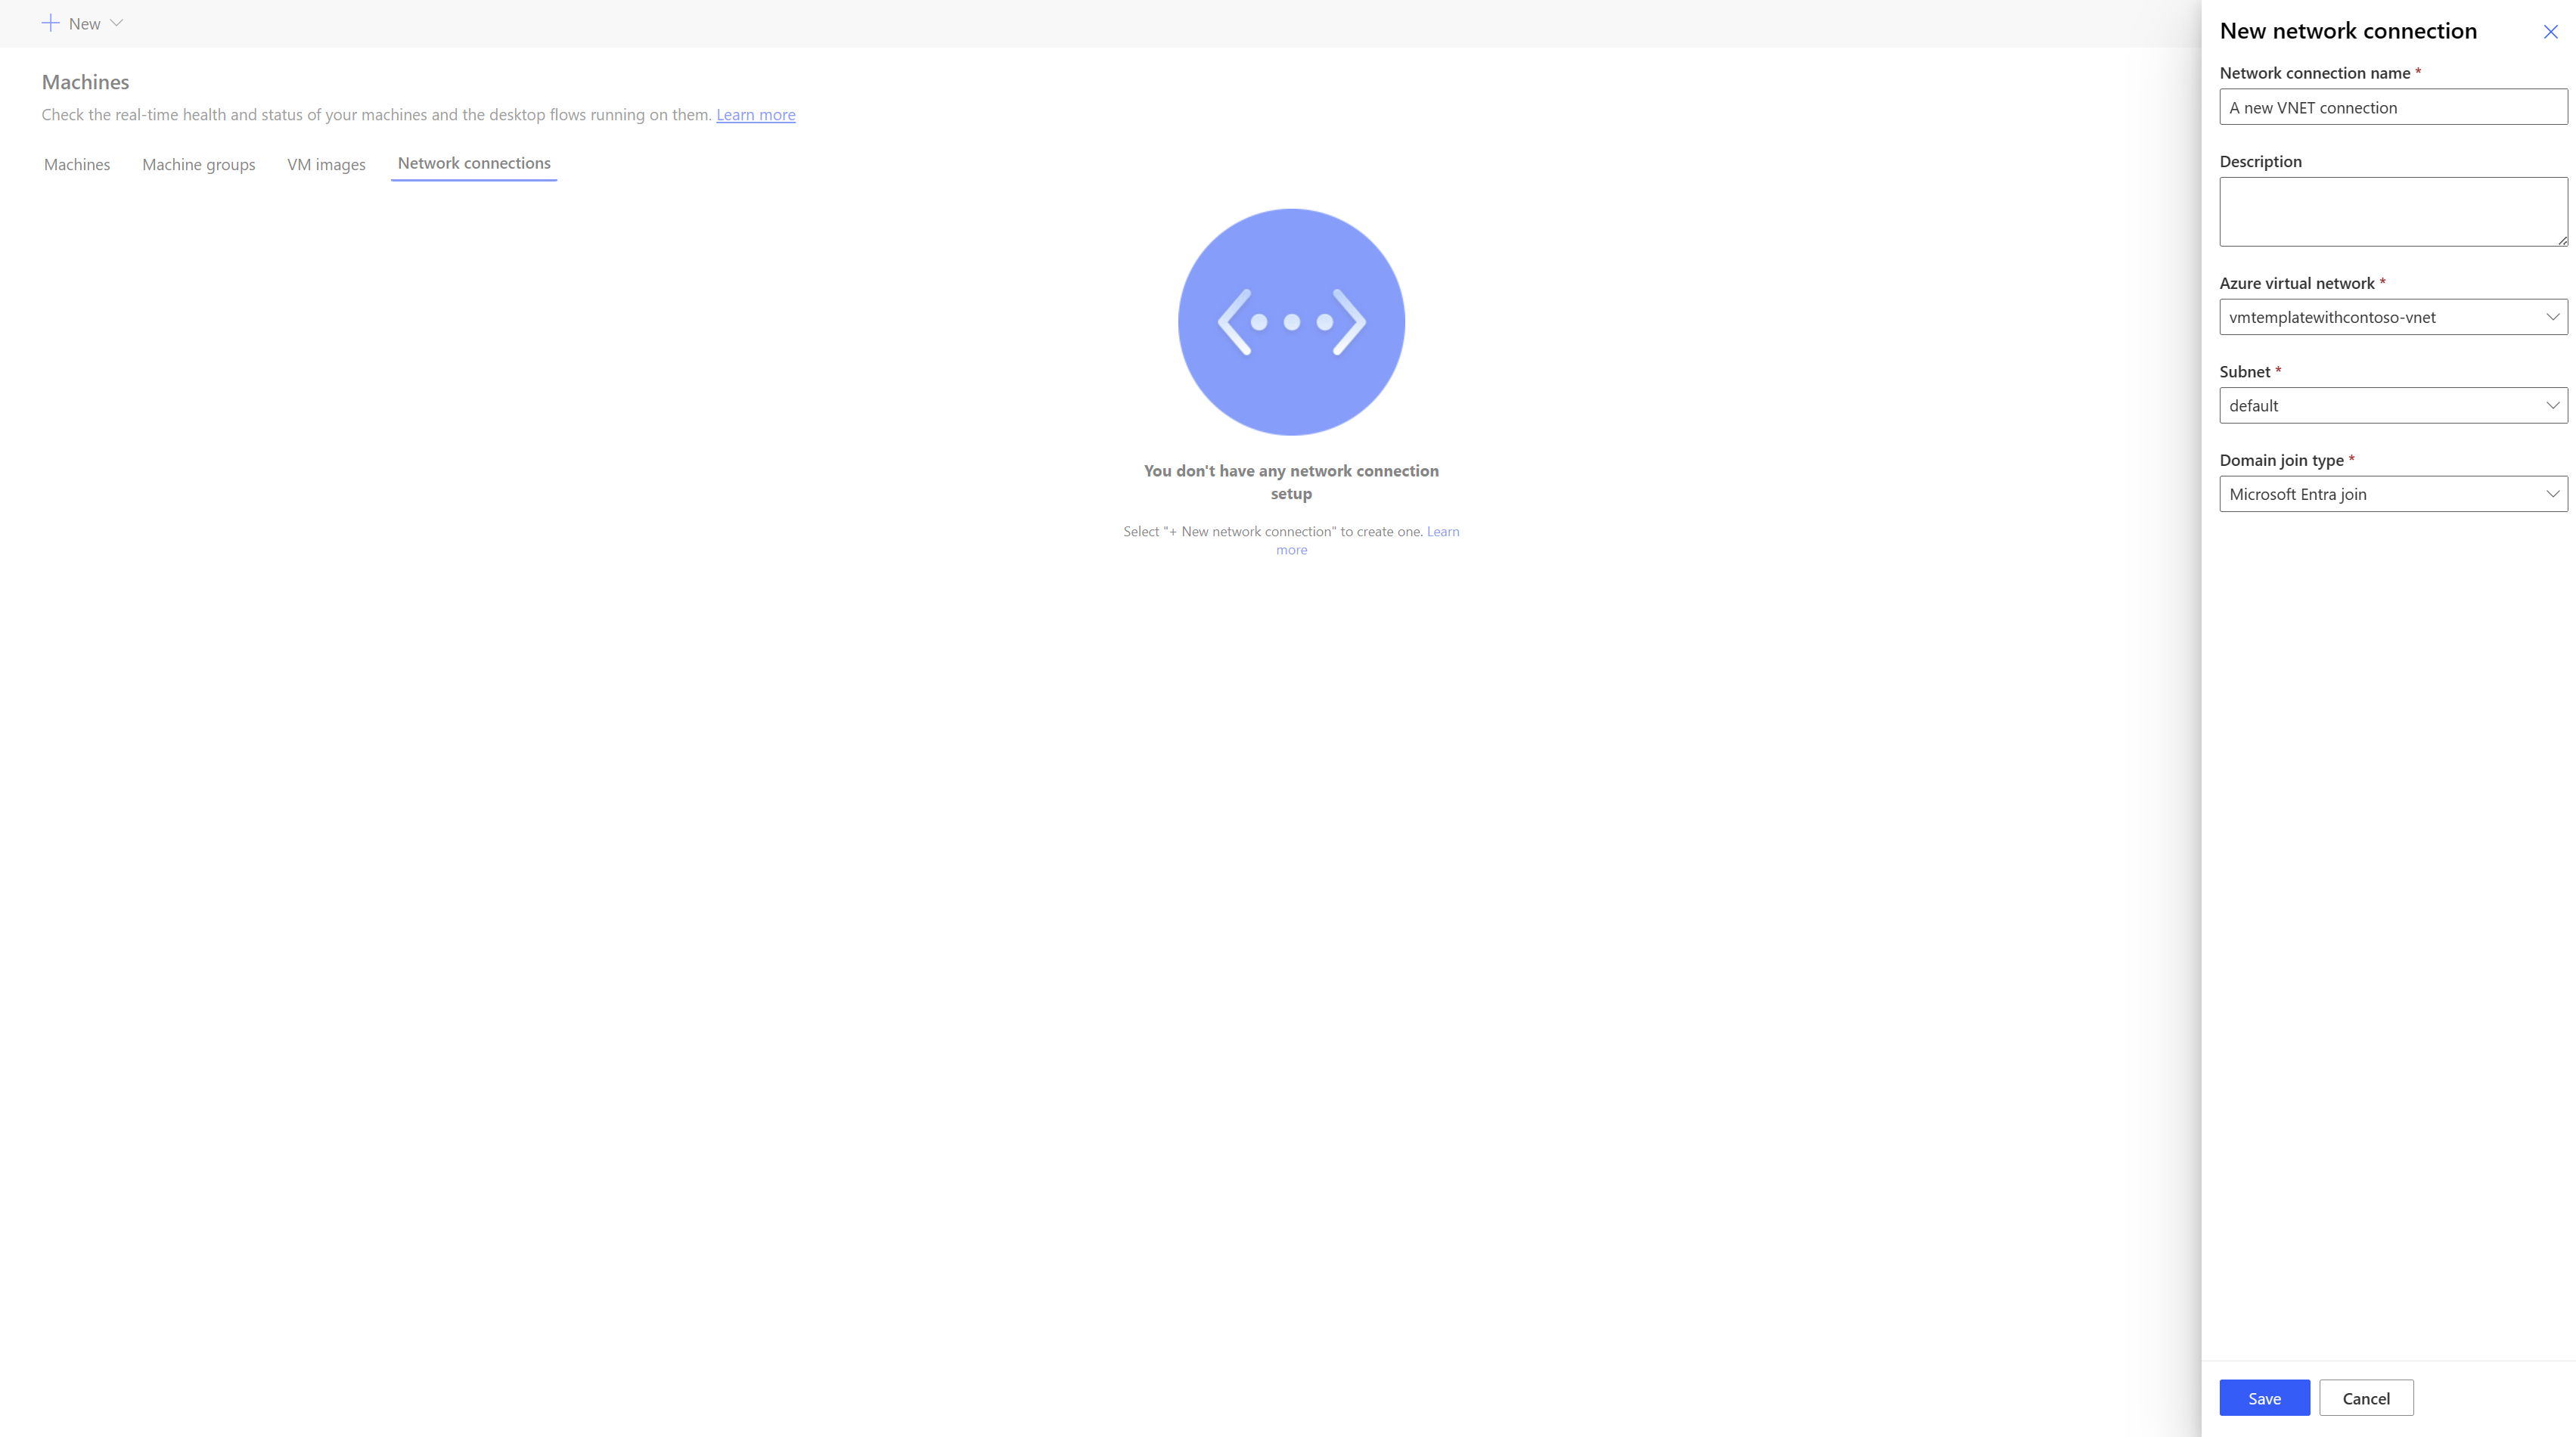
Select New > Network connection.
Enter a network connection name, a description, and the usage.
- Network connection name: A unique name to identify the network connection.
- Description: An optional description for the network connection.
- Use with: Select hosted machine.
Select one of the Azure virtual network available in Azure that meets the network requirements.
Select the Subnet the hosted machine uses.
Select the Domain join type the machine uses.
If the 'Microsoft Entra hybrid join' is selected, the following information is required:
- DNS domain name : The DNS name of the Active Directory domain you want to use for connecting and provisioning hosted machines. For example, corp.contoso.com.
- Organizational unit (optional) : An organizational unit (OU) is a container within an Active Directory domain, which can hold users, groups, and computers. Make sure that this OU is enabled to sync with Microsoft Entra Connect. Provisioning fails if this OU isn't syncing.
- Username UPN : The username, in user principal name (UPN) format, you want to use for connecting the hosted machines to your Active Directory domain. For example, svcDomainJoin@corp.contoso.com. This service account must have permission to join computers to the domain and, if set, the target OU.
- Domain password : The password for the user.
Note
It takes 10-15 minutes to provision a new network connection with Microsoft Entra hybrid join domain join type.
Share the network connection
Sign in to Power Automate.
Go to Monitor > Machines > Network connection.
Select the network connection you created.
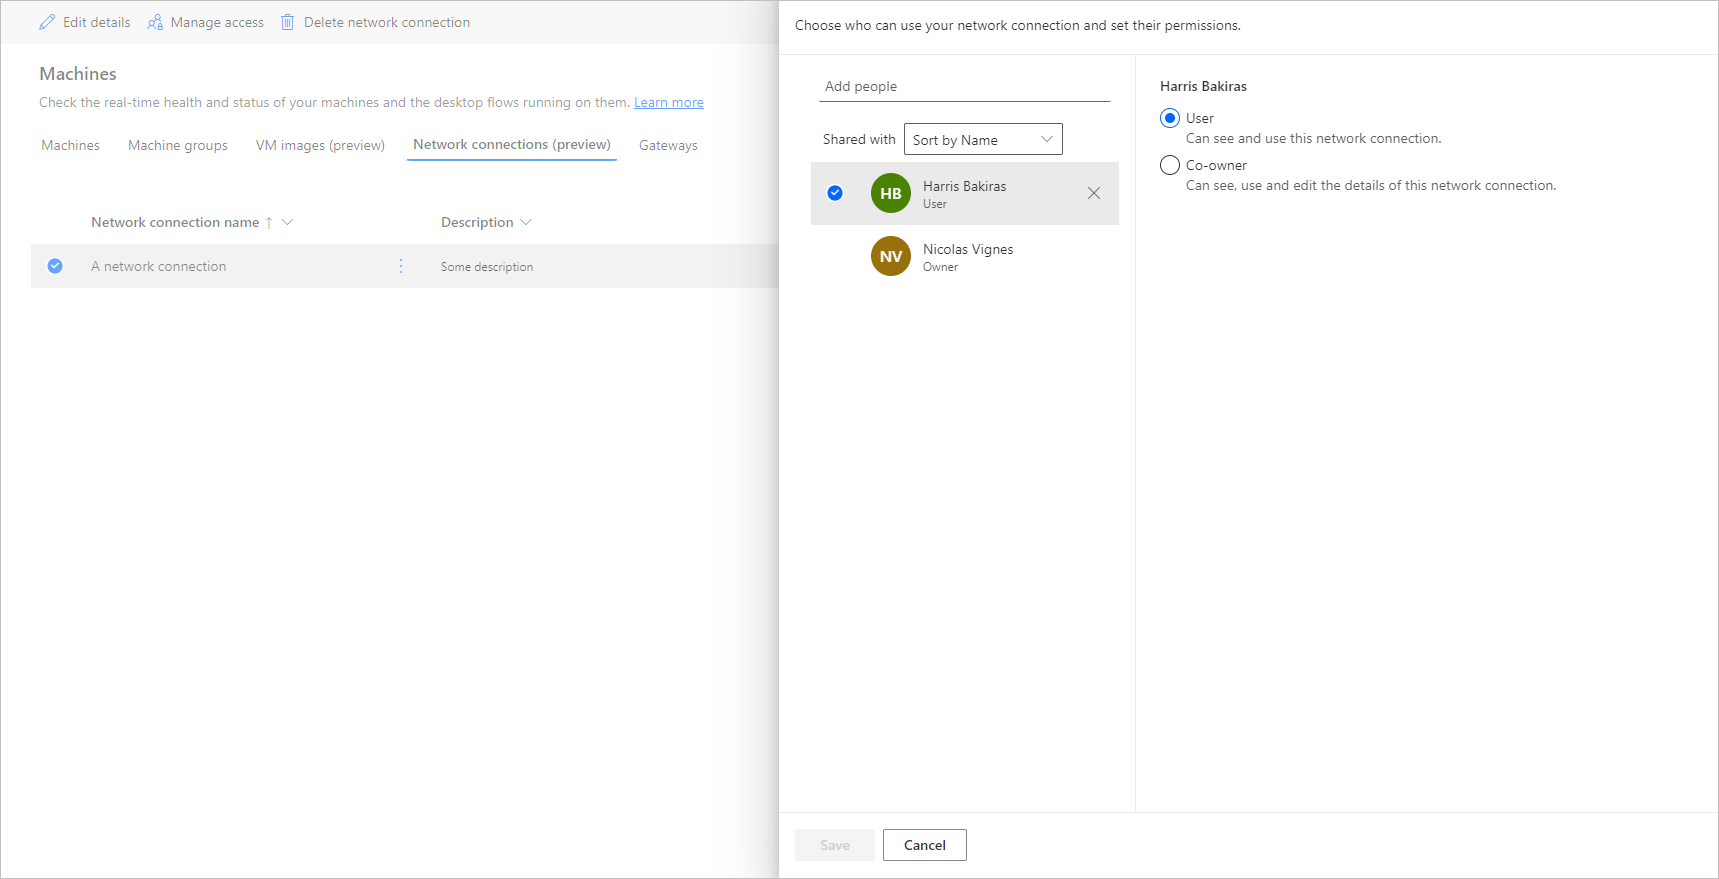
Select Manage access.
Select Add people and enter the names of the persons in your organization with whom you’d like to share the network connection.
Select the names of the persons and choose which permissions they can access the network connection with.
Select Save.
Note
When a user isn't part of an environment anymore, you can continue to see the user as deactivated. You are notified in the Manage access section of the network connection if it's shared with deactivated users. In this situation, remove access to them.
View list of hosted machines
Once you created your hosted machine in an environment, you can view its details in the Power Automate portal.
- Sign in to Power Automate.
- Go to Monitor > Machines.
- Select Machines.
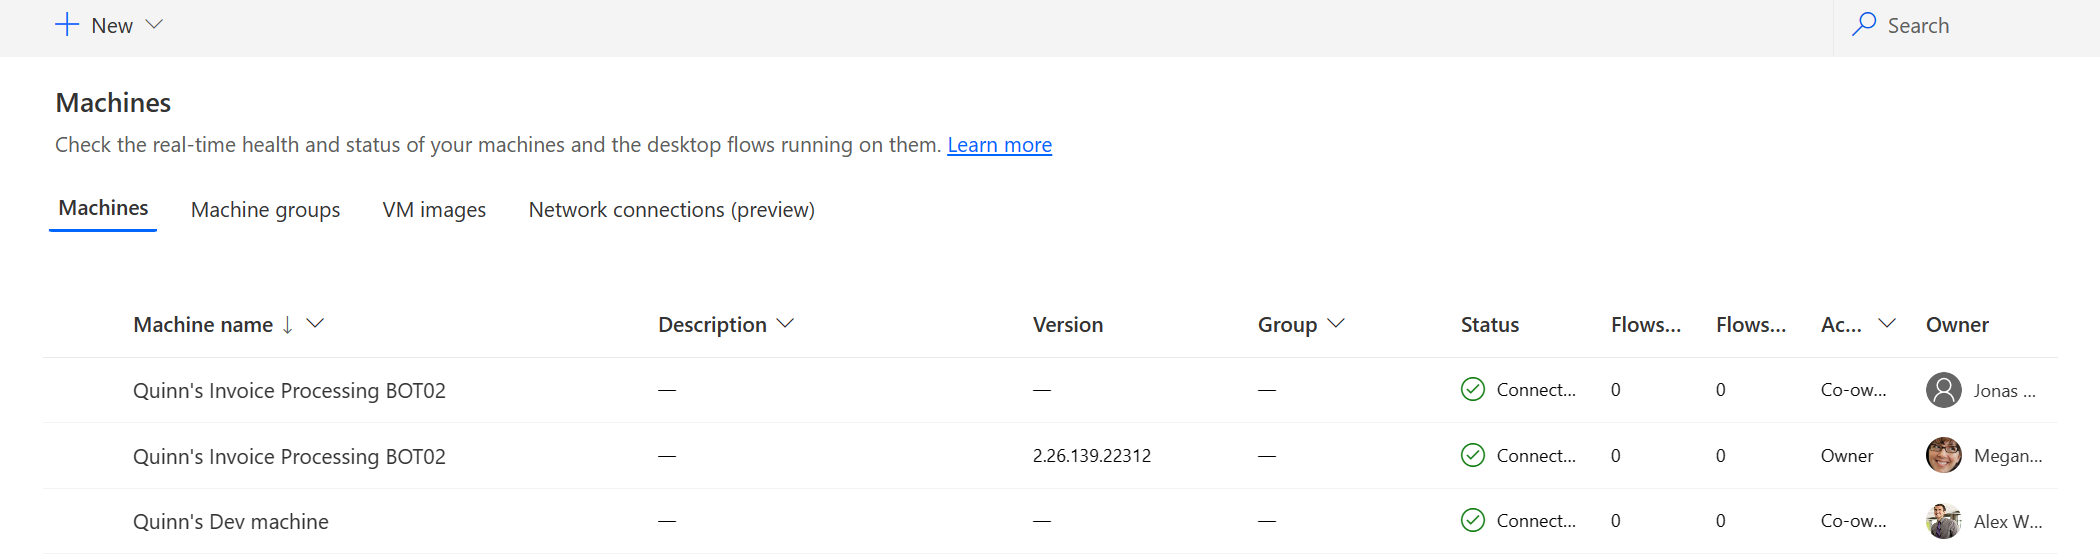
The list contains both hosted machines and standard machines. For each item in the list, you can view:
- The name of the machine.
- The description of the machine.
- The Power Automate for desktop version of the machine
- The machine group it belongs to, if it's part of a machine group.
- The number of flows running in the machine.
- The number of flows queued in the machine.
- The type of access you have to the machine.
- The owner of the machine.
Selecting a hosted machine in the list takes you to the hosted machine details page where you can:
- View and edit the details of the machine.
- Access the machine.
- Add the machine to a machine group.
- Monitor the run queue.
- View past runs.
- List existing connections referencing the machine.
- View provisioning errors on the machine, if any.
- Manage access of the machine.
- Delete the machine.
Share hosted machines
You can share your hosted machines with other users so they can run desktop flows with the creator's connection on them. To share a hosted machine:
Sign in to Power Automate.
Go to Monitor > Machines.
Select the Machines tab.
Select a hosted machine in the list and navigate to the details page of it.
Select Manage access.
Enter the username or email you want to share the hosted machine with, and select the user you want to add.
For each user, you can grant different permissions: User or Co-owner.
User permission only allows the targeted user to run desktop flows on the selected hosted machine. A Co-Owner can also edit the hosted machine details.
Note
- Sign-in access is only available to the creator of the hosted machine.
- You can run unattended desktop flow using a work or school account that is different from the creator of the hosted machine, provided that you add the account on the hosted machine.
- When a user isn't part of an environment anymore, you may continue to see the user as deactivated. You'll be notified in the Manage access section of the hosted machine if it's shared with deactivated users. In this situation, remove access to them.
Run desktop flows on hosted machines
Power Automate enables you to trigger desktop flows on your hosted machines as you do on standard machines. To implement this functionality, you need a desktop flow connection to your hosted machine.
To find more information about triggering desktop flows from cloud flows, go to Trigger desktop flows from cloud flows.
Note
If you intend to run unattended desktop flows on your hosted machine using the default virtual machine (VM) image option, you need to disable Network Level Authentication on your machine.
Restart hosted machines
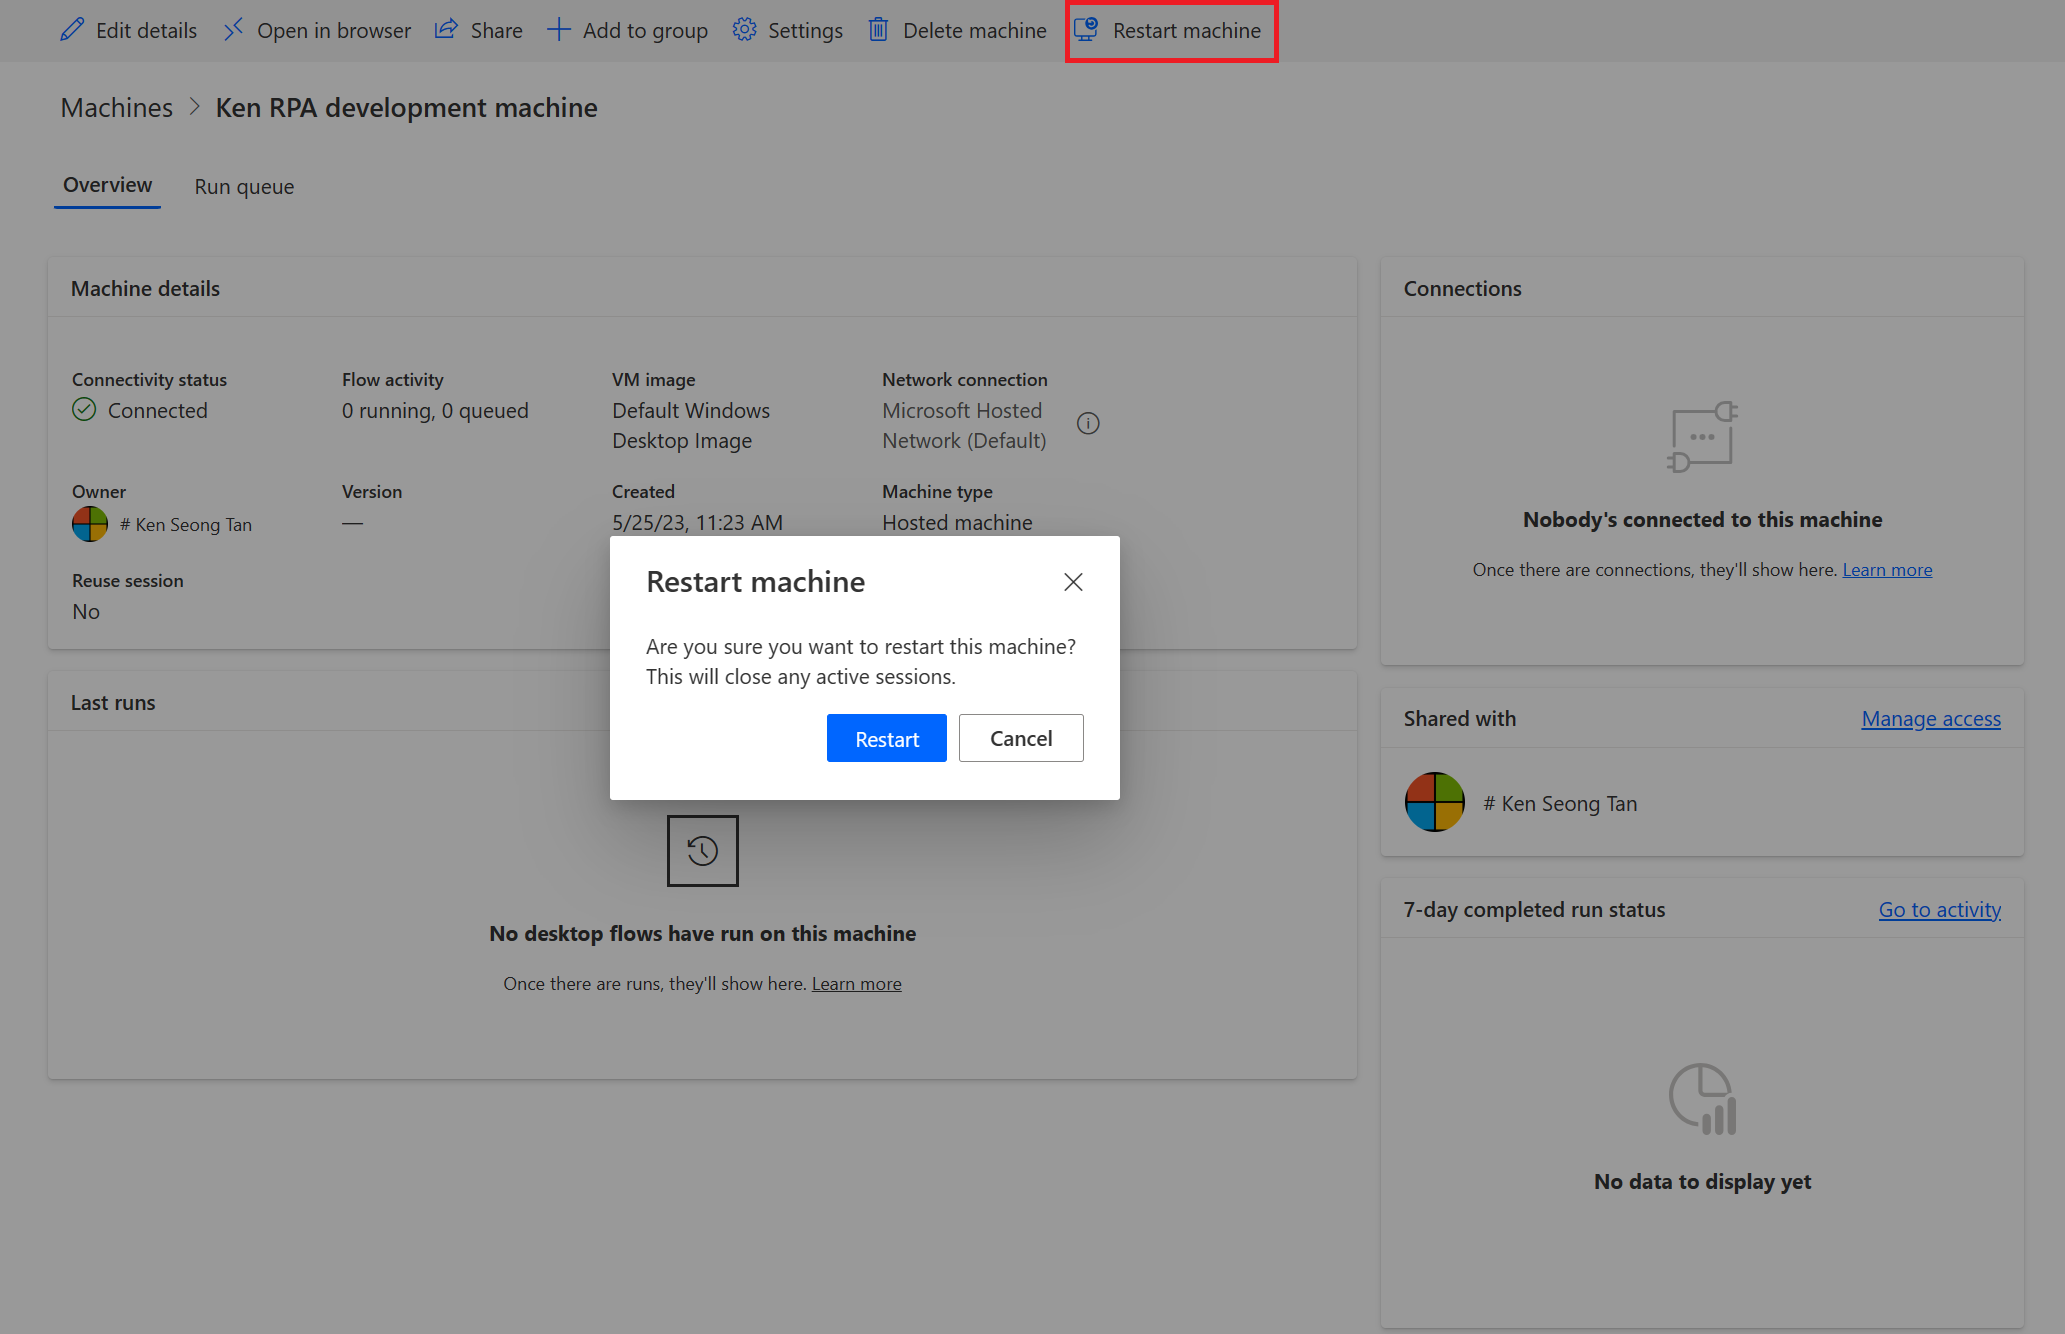
Power Automate enables you to restart your hosted machines from the Power Automate portal. To restart your hosted machine:
Sign in to Power Automate.
Go to Monitor > Machines.
Select the Machines tab.
Select a hosted machine in the list and navigate to the details page of it.
Select Restart machine.
Note
The hosted machine is restart may take a few minutes to complete. Please wait for a few minutes before trying to access the hosted machine.
Permissions based on security roles
Hosted machine permissions and roles are iterations on top of Desktop Flows Machine Management permissions and roles. A hosted machine group follows the same rules and privileges as a regular group.
Creation of hosted machine and privileges
This section describes the permissions for hosted machines.
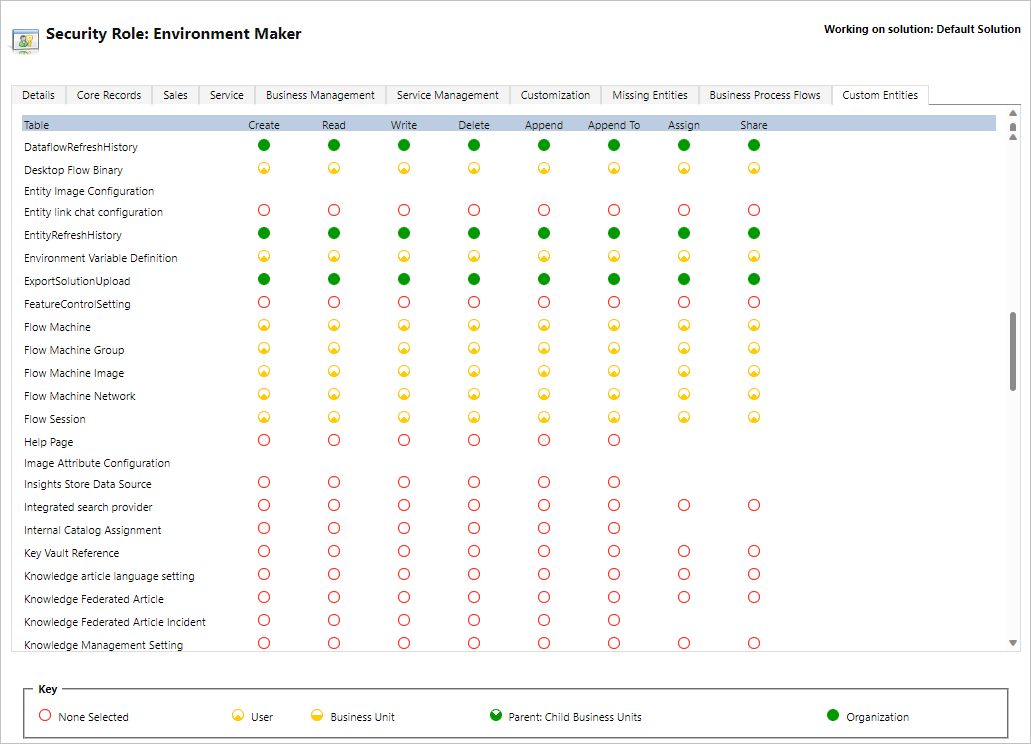
Environment Maker role
By default, the Environment Maker role can create hosted machines in their environment. The entities that require privileges to use hosted machines are:
- Flow Machine
- Flow Machine Group
- Flow Machine Image
- Flow Machine Network (if using custom virtual network for your hosted machine)
The Environment Maker role can create and share custom VM images, as these actions require create and append privileges on the Flow Machine Image.
The Environment Maker role can create and share custom virtual network, as these actions require create and append privileges on the Flow Machine Network.
Admins can also use the roles provided as part of Desktop Flows. You can find more information about desktop flow security roles in Manage Machines.
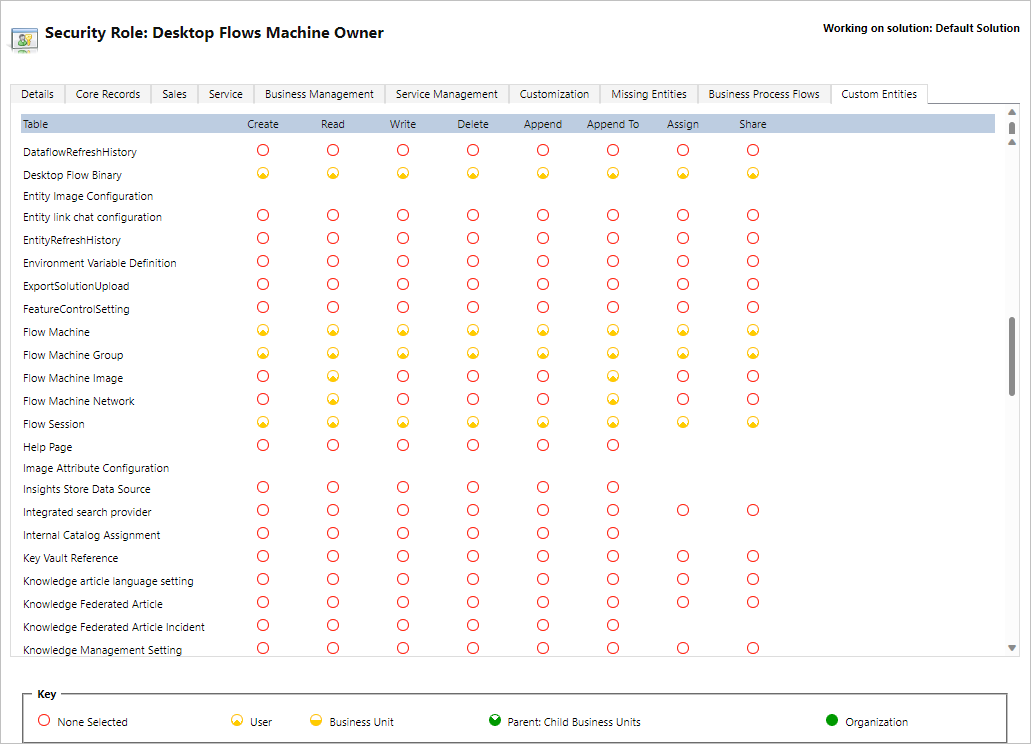
Desktop Flows Machine Owner role
By default, the Desktop Flows Machine owner can create hosted machines, but can't create custom VM images or custom virtual network. They can only use previously shared custom VM images or custom virtual networks in their own hosted machine.
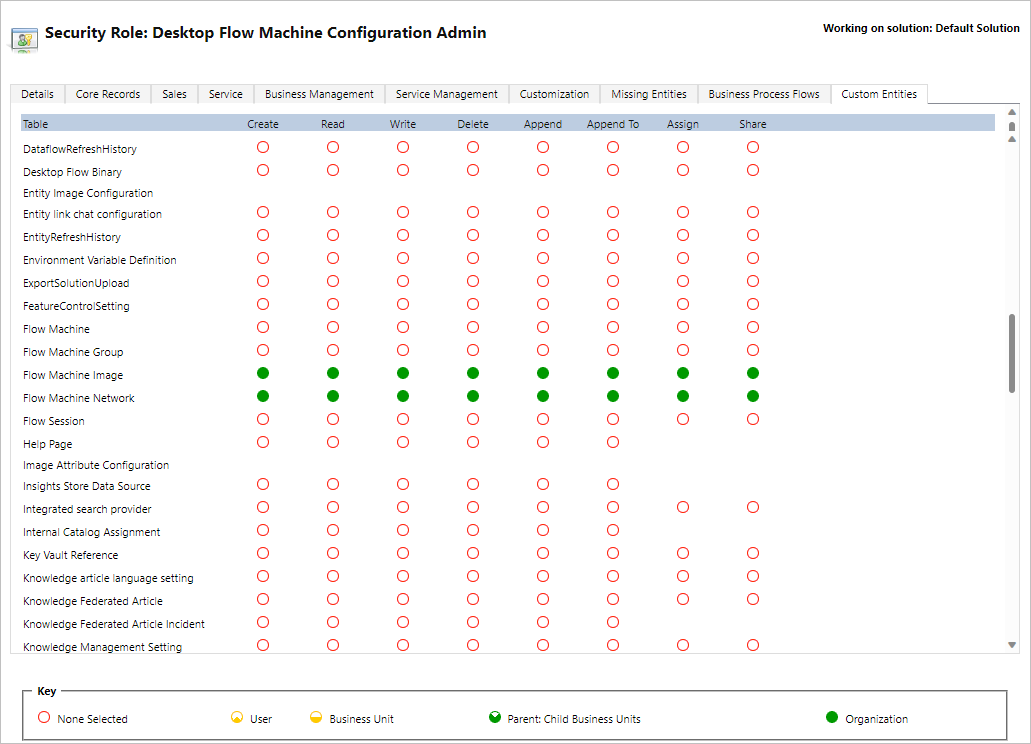
Desktop Flows Machine Configuration Admin role
The Desktop Flows Machine Configuration Admin role role only brings full privileges on the Flow Machine Image and Flow Machine Network entities. In particular, it allows users with this role to share/unshare VM images and virtual network to be used for created hosted machines in their environment. You can find more information about sharing pre-provisioned VM images and virtual network in Create hosted machines.
Custom virtual network permissions
The custom virtual network feature requires permissions to the Flow Machine Network table. You can grant or deny privileges to this table to control which user can create and share custom virtual networks.
Hosted machines limitations
This section presents the limitations of hosted machines.
Geographical availabilities/restrictions
The following list displays all the supported Power Platform geographies in the public cloud:
- Australia
- Asia
- Brazil
- Canada
- Europe
- France
- Germany
- India
- Japan
- Korea
- Norway
- Singapore (Allowlisted tenants only)
- Switzerland
- United Arab Emirates
- United Kingdom
- United States
Note
Hosted machines aren't yet available in sovereign clouds.
Azure tenant country/region and supported geographies in the public cloud
A hosted machine stores limited metadata in the geography of your tenant's country/region, which can be different from the region of your Power Automate environment. By default, the cross-geo support for hosted machines is enabled. System admins and environment admins can disable or enable the feature from the Power Platform admin center.
Sign in to the Power Platform admin center.
Go to Environments, and select the appropriate environment.
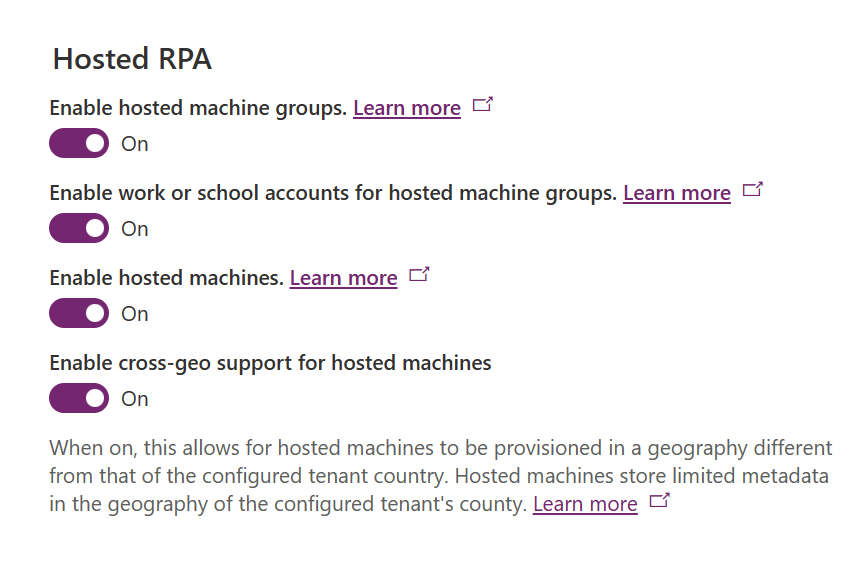
Select Settings > Features.
Under Hosted RPA, select the toggle for Enable cross-geo support for hosted machines to disable or enable this feature.
Select Save.
Note
Disabling this feature at the environment level will restrict creation of hosted machines when your tenant's country or region on Azure don't fall within the same scope of the region for your Power Automate environment. To check the tenant country/region on Azure:
Go to the Azure portal.
Open the Tenant properties service. The Country or region is available as one of the properties.

Deletion of unused resources
For environments without the Power Automate Hosted Process license, we clean unused resources to ensure our service is available for everyone. A hosted machine that is inactive for 14 days is automatically deleted. The deleted hosted machine is still visible but can't be used anymore. An inactive hosted machine is a machine that has no flow runs and no usage of Power Automate for desktop for the last 14 days.
Note
You need to delete the inactive hosted machine and recreate a new one to continue using the hosted machines feature. You need to reconfigure the connections associated with your cloud flows.
Note
When a hosted machine is deleted, its data is retained for a grace period of 15 days. During this period, the data might be recoverable by contacting Microsoft support. After the grace period expires, the machine and its data are permanently removed.
Service account change
Changing the service account (NT SERVICE\UIFlowService) isn't supported on hosted machines.
Troubleshoot hosted machines
To find information on how to troubleshoot hosted machines, go to Troubleshoot hosted machines.