Note
Access to this page requires authorization. You can try signing in or changing directories.
Access to this page requires authorization. You can try changing directories.
This tutorial allows you to experience the process mining capability with sample data. In this tutorial, you create a process, import data, and then analyze it.
Note
If you don't see all of the features described in this article and are using your default environment, create a new environment and retry.
Download the sample data
For the process mining tutorial, download the sample event log CSV file:
The sample data in this tutorial is for illustration only and is fictitious. No real association is intended or inferred.
Create a process
Note
If you encounter an error message while attempting to create and analyze a process, it may be due to a missing security role. To resolve this, please contact the administrator of your environment and request that they assign you the Environment Maker security role.
- Sign in to Power Automate.
- Select your environment.
- On the navigation pane to the left, select Process mining.
- In the Create new process section, select Start here.
- In the Create a new process screen, enter a process name, and then select Import data.
- (Optional) Enter a description for your process.
- Select Continue.
- (Optional) Select a Power BI workspace to attach your process to and give your report a name.
- Select Continue.
Import data
In the Choose a data source screen, select Text/CSV.
Under the Connection settings heading, select Upload file (Preview).
Select Browse.
Find and select SampleData_AP_Refunds_Financial_EventLog.csv, which you downloaded previously.
Select Open.

If you're asked to authenticate, select Sign in and follow the prompts.
Select Next.
When you see the power query, which allows you to transform your data, select Next.
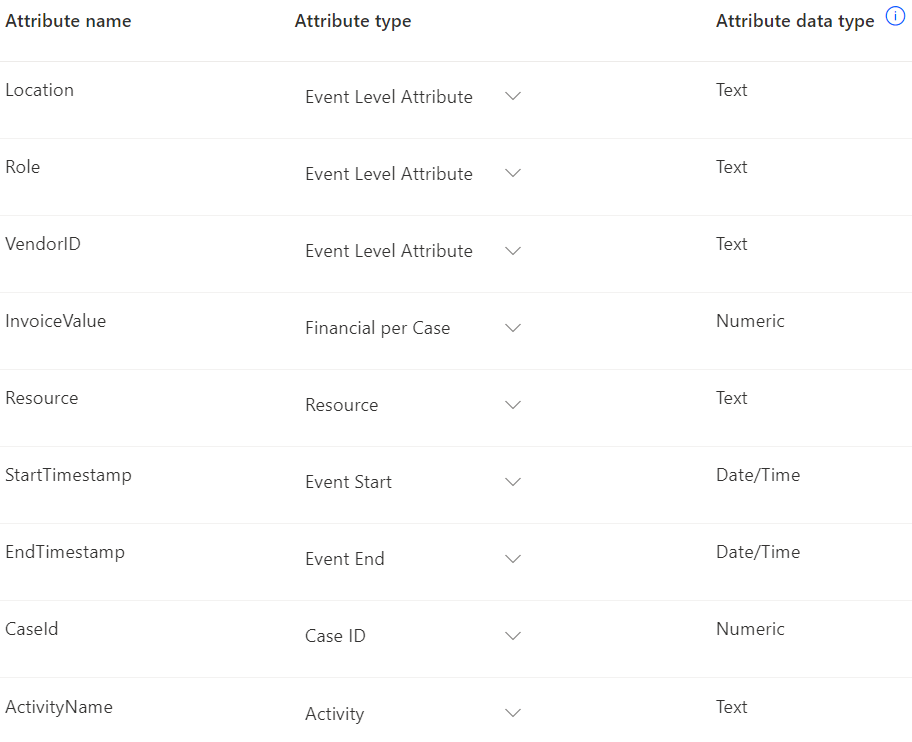
Match the Attribute Name from sample data to the Attribute Type as appropriate. In this sample, the data attributes you change are InvoiceValue, Resource, StartTimestamp, EndTimestamp, CaseId, and ActivityName.
When you finish, the attribute mapping should look like the following screenshot.
Select Save and analyze. The analysis might take a few minutes to run.
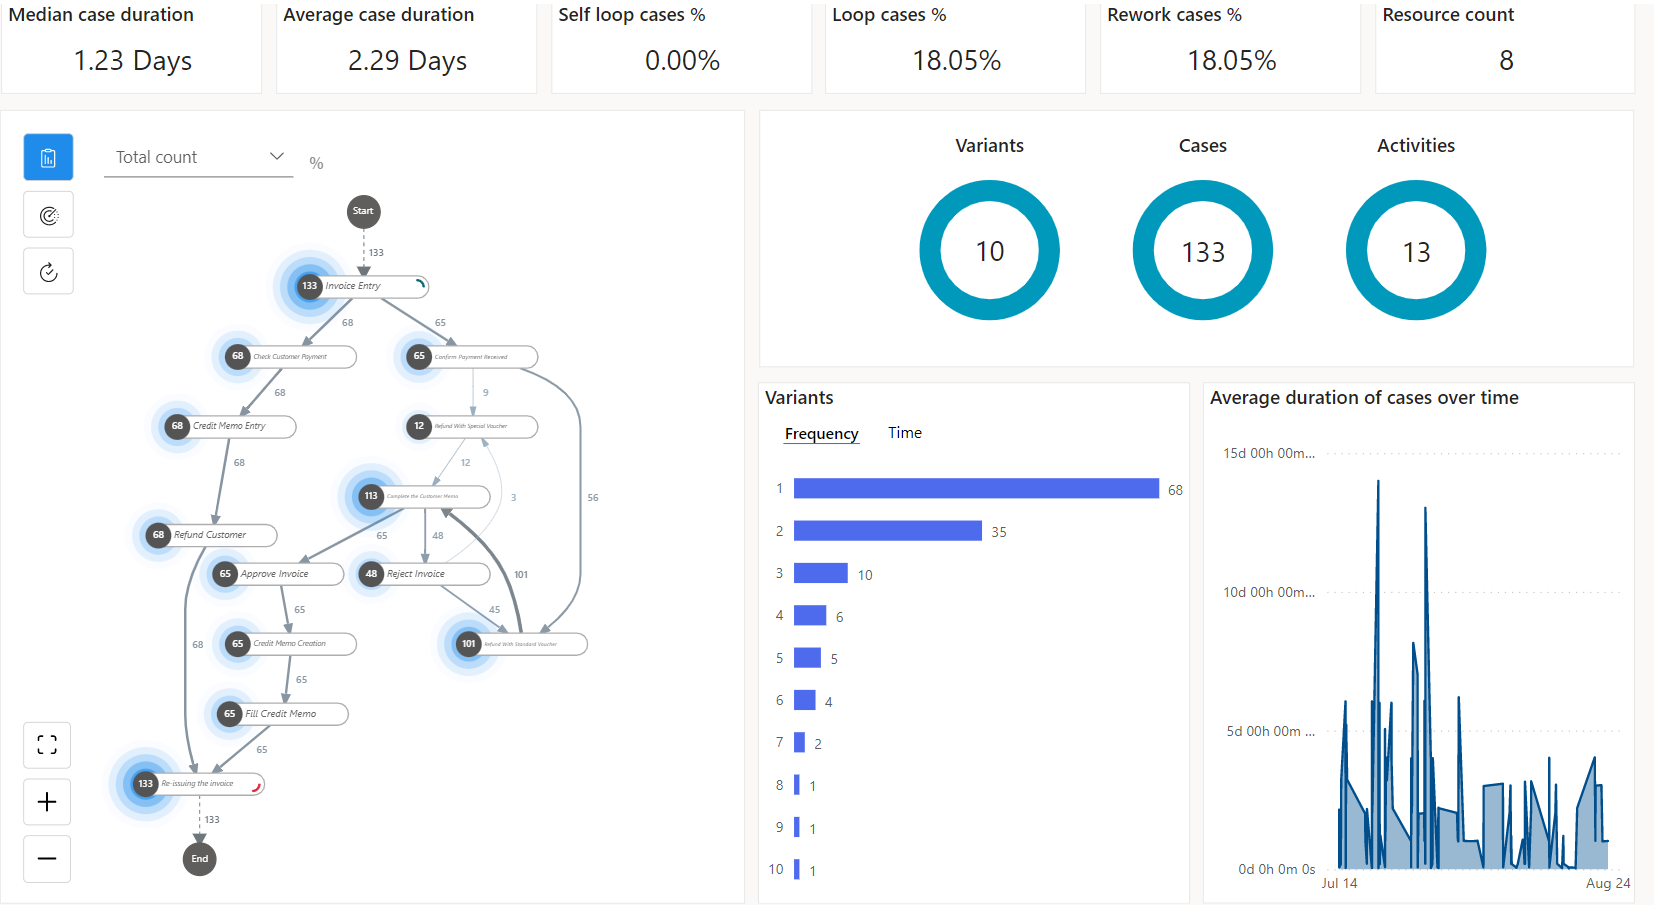
When the analysis process is complete, you see a process map and a dashboard with other insights about your process. On the dashboard, you can view many metrics that can help you analyze your process. To learn how to analyze the process map and metrics, go to Visualize and gain insights from processes in the process mining capability.
Analyze a process
Let's take the analysis of our process beyond KPIs. We use the Power Automate Process Mining desktop app, where you can edit and analyze your processes created in the process mining capability.
From the command bar of the analytics report page, select Download Process Mining app to download it.
On the toolbar, select the environment from the top right.
Search for the process you created with the process mining capability in Power Automate (AP Refunds Process).
To display the default view, select Default.
Based on your settings, the process model is:
- Downloaded to your local computer and analyzed locally
- Kept and analyzed in the cloud (preview). You're notified about the availability of this option with message on top of your application.

Learn more about setting the new option in Application settings.
You’re ready to use the advanced capabilities of the Process Mining desktop app.
On the Customize panel toolbar, select Frequency (the first icon), and then select Case count in the Metric dropdown menu.
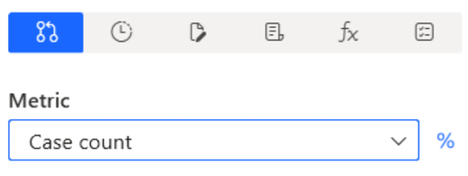
The process map displays the number of cases of the process that include the activity specified at each node.
On the Customize panel, select the clock icon, and then select Mean duration from the dropdown menu.
Notice that the Refund with special voucher step has a long mean duration compared to other steps.
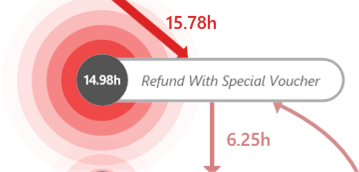
On the Customize panel, select Finance (the piece of paper icon), and then select Mean from the Metric dropdown menu.
Notice that the same Refund With Special Voucher step involves only $631.11 in invoice value, which is less than half of most of the other steps.

This step might be a good candidate for extra investigation, so select this step's node.
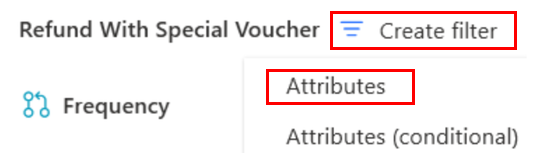
On the Customization panel, select Create filter > Attributes.
Compare paths with different views
We want to compare the paths that have this Refund With Special Voucher step with the paths that don't have this step, but instead have another step called Refund With Standard Voucher. Let's filter for paths that have Refund With Special Voucher and not Refund With Standard Voucher. Let's also filter for paths with Refund With Standard Voucher and without Refund With Special Voucher.
Create the 'Refund With Special Voucher' view
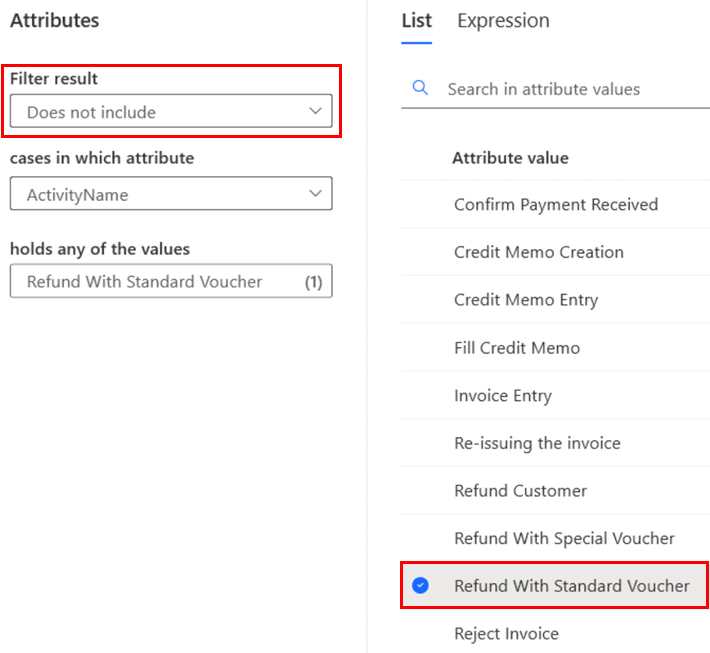
On the Filtering page, ensure Refund With Special Voucher is selected in the holds any of the values field.
On the command bar, select Add filter > Attributes.
This time, select Does not include from the Filter result dropdown menu.
On the List tab, select Refund With Standard Voucher to place it in the holds any of the values field.
Your Filtering screen should look like this:
On the bottom right corner, select Apply.
On the command bar at the top, select Save > Save as, and then enter Refund w/ Special Voucher > Save.
Create the 'Refund With Standard Voucher' view
Go back to the filter screen by selecting the Filter button in the bottom left of the screen.
Clear the Filter criteria set and repeat steps 1 through 4 of the previous section, but choose Refund With Standard Voucher in step 1 and Refund With Special Voucher in step 4.
In the command bar at the top, select Save > Save as, and then enter Refund w/ Standard Voucher > Save.
Compare views
You created two different views. One view shows the paths that have the Refund With Special Voucher step but not the Refund With Standard Voucher step (Refund w/ Special Voucher). The other view is its inverse (Refund w/ Standard Voucher). Let's compare these two views.
On the left panel, select Process compare.
Below the Compare tile, select Add layer.
From the Views dropdown menu, select Refund w/ Special Voucher > Add layer.
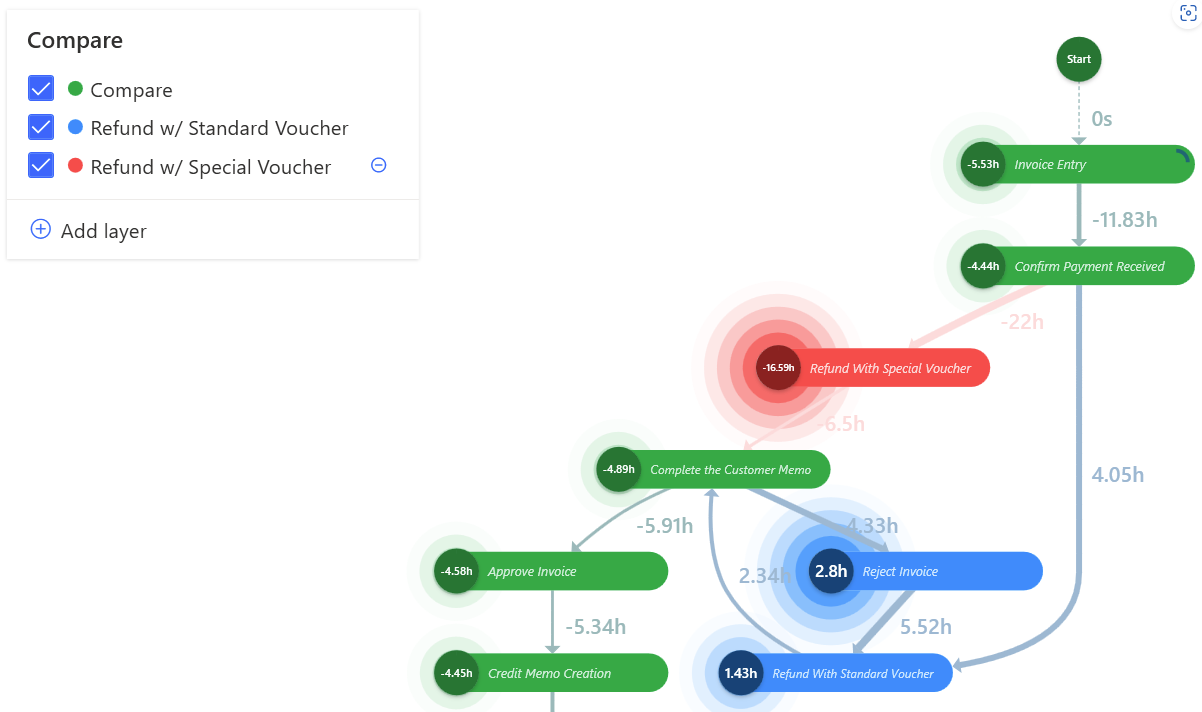
The process map that is created is a comparison of the two views.
In the Customize panel, ensure that Mean duration is selected as the metric.
Save this view as Standard vs. Special.
Understand the process map with different views
The green nodes represent steps common to both views. A red node represents the step that takes place only in the process with a special voucher (as indicated by the Compare legend). Blue nodes represent steps that take place only in the paths with standard voucher.
Expand the Customize panel by selecting Customize on the right navigation bar.
Select the Performance (the clock icon).
From the Metric dropdown menu, select Mean duration.
From the procedure in Analyze a process (previously in this article), there were only nine cases with Refund With Special Voucher. On average, the process is lengthened by almost 17 hours according to the process compare map in this section.

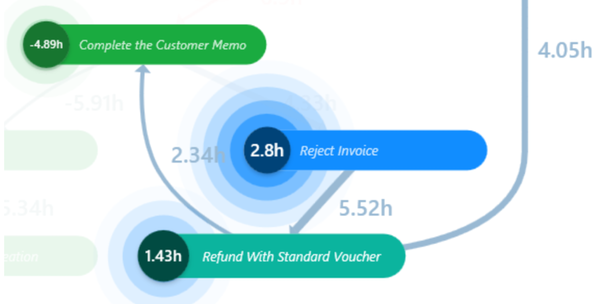
Notice that cases that have the Refund With Standard Voucher step also have the possibility of invoices being rejected as the blue node, which represents the Reject Invoice step suggests. This Reject Invoice step contributes only 2.8 hours on average to the process.
Based on insights we derived from this analysis, let's summarize our findings, derive a conclusion, and offer some recommendations for this process.
Insights summary
Refund With Special Voucher:
Takes place only a few times in the process compared to other steps.
Has a relatively low amount of money flowing through it.
Significantly increases the mean duration of the entire process.
Refund With Standard Voucher:
- The cases with this step also have the invoices being subsequently rejected. This causes rework and adds some time to the mean duration of the process.
Considerations for choosing a special or standard voucher
This organization has two ways to make refunds using vouchers: Refund With Special Voucher or Refund With Standard Voucher. The latter might sometimes cause some rework because some of those invoices are subsequently rejected. Alternatively, using the special voucher never causes invoice rejection. This might make it seem like using a special voucher should be the consistent course of action.
However, having the possibility of the invoice being rejected through a standard voucher saves the organization more time than using a special voucher. This never causes the invoice to be rejected—the difference in mean duration is approximately 13.79 hours.
Recommendation
An organization should focus on using standard vouchers versus special vouchers because just a few special vouchers can add much time to the process.
An organization should do further analysis to determine why using the standard invoice often causes invoice rejection. If they're able to uncover a remedy for this, the organization can implement this to further improve the process.
To learn more about how to take advantage of the advanced capabilities of Power Automate Process Mining, go to Overview of Power Automate Process Mining.