Note
Access to this page requires authorization. You can try signing in or changing directories.
Access to this page requires authorization. You can try changing directories.
Power Pages uses the Power Platform admin center to provide administrators with various site configuration capabilities.
Note
You will need to be assigned certain roles to perform administrative tasks. For more information, see Roles required for website administration.
Access the admin center
To access the admin center, from the design studio, select the Set up workspace.
In the Site Details section, select Open admin center.
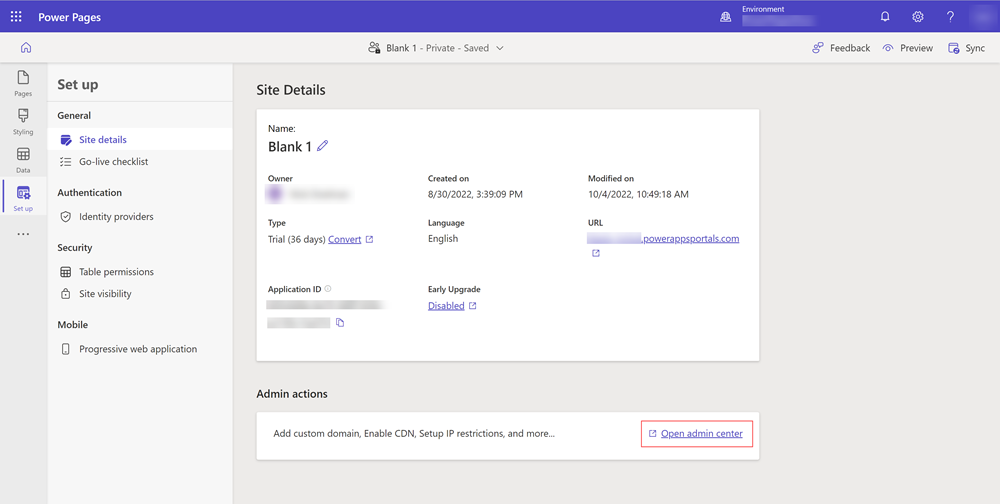
The Power Platform admin center opens allows you to configure your site.
Alternatively, you can also access your site details directly from the Power Platform admin center.
Go to the Power Platform admin center.
Under Resources, select Power Pages sites.
Select site to which you view details or perform admin actions.
The following capabilities are accessible from the admin center. More information on these features might be linked to the Power Apps documentation.
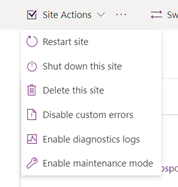
Site Actions
Select Site Actions to perform the following actions on your site.
| Action | More Information |
|---|---|
| Restart site | Restart the site. |
| Shut down this site | Turn off the site. |
| Delete this site | See Delete a portal |
| Disable custom errors | See Disable custom errors |
| Enable diagnostic logs | See Enable diagnostic logging |
| Enable maintenance mode | See Maintenance mode for a portal |
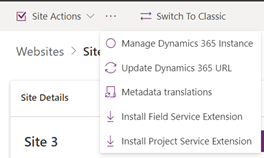
Site Actions (...)
Select ... to the left of Site Actions for more site actions.
| Action | More Information |
|---|---|
| Manage Dynamics 365 Instance | See Update the Dynamics 365 instance for your portal |
| Update Dynamics 365 URL | If you updated your environment URL, the Update Dynamics 365 URL action updates your site to point to the updated environment URL. |
| Metadata translations | See Import metadata translation |
| Install Field Service Extension | See Integrate Field Service |
| Install Project Service Extension | See Integrate Project Service Automation |
Switch to Classic
| Action | More Information |
|---|---|
| Switch to classic | Switch to the classic admin center portals admin center. The Power Apps portals admin center is now deprecated and no longer available as of August 2023. |
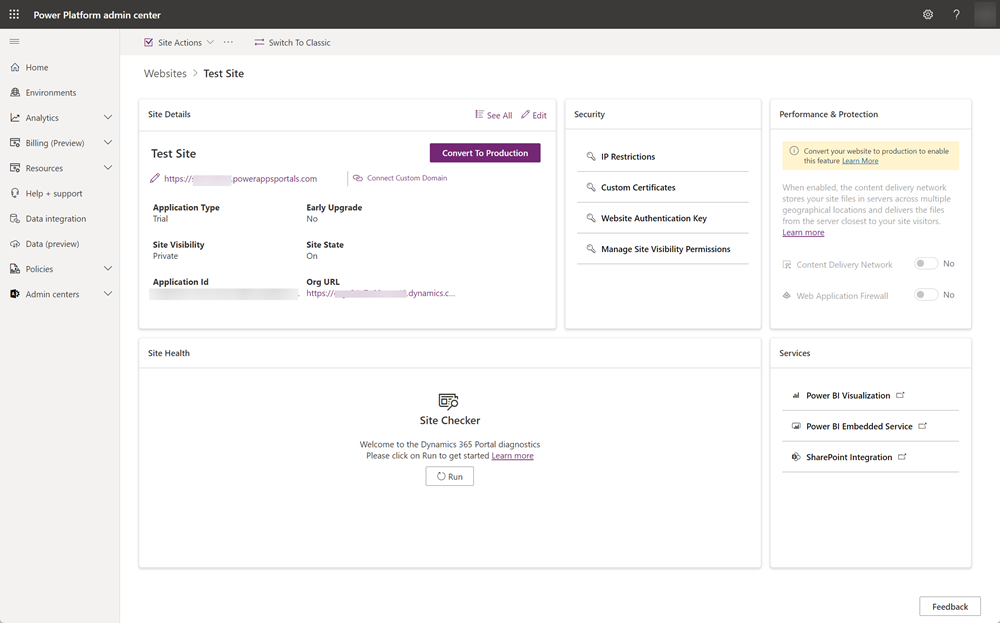
Site Details
| Action | More Information |
|---|---|
| See All | Opens a side panel displaying all the attributes of the current site. |
| Edit | Edit site details. A side panel opens allowing you to make the following updates to a site:
|
| Convert to Production | See Convert a site |
| Connect Custom Domain | See Add a custom domain name |
| Application Type | Indicates the application status of the site (Trial or Production) |
| Early Upgrade | Indicates if site is enabled for an early upgrade. |
| Site Visibility | Indicates the visibility of the site. See Site Visibility. |
| Site State | Indicates the site's running state. |
| Application Id | The site's application ID. |
| Org URL | The organization URL of the Microsoft Dataverse instance the site is associated with. |
Note
For certain attributes, you can view the date of the last modification and the person responsible for the change. These attributes are accompanied by an information icon. Click this icon to see the relevant details. For example, click the info icon next to Site Visibility to display when it was last modified and by whom.
Security
| Action | More Information |
|---|---|
| IP Restrictions | See Restrict website access by IP address |
| Custom Certificates | See Manage custom certificates |
| Website Authentication Key | See Manage website authentication key |
| Manage Site Visibility Permissions | See Site visibility in Power Pages |
Site Health
| Action | More Information |
|---|---|
| Site Checker | See Run Site Checker |
Performance & Protection
| Action | More Information |
|---|---|
| Content Delivery Network | See Content Delivery Network |
| Web Application Firewall |
Services
| Action | More Information |
|---|---|
| Power BI Visualization | See Enable Power BI visualization |
| Power BI Embedded Service | See Enable Power BI Embedded service |
| SharePoint Integration | See Manage SharePoint documents |
Add yourself as an owner of the Microsoft Entra application
To manage a website that is already provisioned or resubmit provisioning if it failed, you must be an owner of the Microsoft Entra application connected to your website.
To add yourself as an owner of the Microsoft Entra application:
Go to the Power Platform admin center following the steps above.
From the Site Details section, copy the value of the Application Id field.
Go to Microsoft Entra associated with your tenant. More information: Take over an unmanaged directory as administrator in Microsoft Entra ID.
In Microsoft Entra ID, search for the app registration by using the application ID you copied. You might need to switch from My apps to All apps.
Add users or groups as owners of this app registration. More information: Managing access to apps
Note
The user currently assigned as the owner of the application is authorized to perform this task. In situations where the application owner isn't identified or left the organization, a global administrator from your organization is authorized to update the application's ownership.
After you add yourself as an owner, reopen the site details page from the Power Platform admin center.
See also
Use Power Pages admin APIs
Roles required for website administration
Set up Power BI integration
Manage custom certificates
Power Pages licensing FAQ