Unit testing (preview)
[This article is pre-release documentation and is subject to change.]
This how-to article shows you how to create and run reliable test cases.
Prerequisites
You need to have a Power Platform unified developer experience installed and configured on your local machine and a Power Platform developer-focused sandbox environment linked to it. It's important to keep the cloud and local representation of the code the same (synchronized).
More information: Install and configure development tools (preview)
Key concepts
- Use SysTest Framework to author unit/component test code
- Test isolation
Use SysTest Framework to author unit/component test code
You can create new test cases to test the functionality in an application.
- Open Visual Studio.
- On the File menu, select Open > Project/Solution, and then select FleetManagement solution from the desktop folder. If the solution file isn't on your computer, the steps to create it are listed in End-to-end scenario for the Fleet Management sample application.
- In Solution Explorer, right-click the Fleet Management solution, select Add, and then select New Project.
- Choose finance and operations as the project type to create.
- Name this new project FleetManagementUnitTestSample, specify the FleetManagement folder on the desktop (C:\Users\Public\Desktop\FleetManagement) as the location, and then select OK.
- In Solution Explorer, right-click the new project, and then select Properties.
- Set the Model property to FleetManagementUnitTests, and then select OK.
- Now add a test class containing the tests against the fleet management code. Right-click the FleetManagementUnitTestSample project, select Add, and then select New Item.
- In the Add New Item window, select Test Class as the type of element to add. Name the new class FMUnitTestSample, and then select Add.
The template class contains information that should get you started with writing your test. In this example, the test class only consist of two tests, each marked with the SysTestMethod attribute. Since the methods aren't subject to extensibility, they have been adorned with a Hookable(false) attribute. In addition, the test class contains a method called setup() that is called prior to any tests being run. This method is often useful for setting up state shared across all tests.
class FMUnitTestSample extends SysTestCase
{
    public void setup()
    {
        // Reset the test data to be sure things are clean
        FMDataHelper::main(null);
    }

    [SysTestMethod, Hookable(false)]
    public void testFMTotalsEngine()
    {
        FMRental rental;
        FMTotalsEngine fmTotals;
        FMRentalTotal fmRentalTotal;
        FMRentalCharge rentalCharge;
        FMRentalTotal expectedtotal;
        str rentalID = '000022';

        // Find a known rental
        rental = FMRental::find(rentalID);

        // Get the rental charges associated with the rental
        // Data is seeded randomly, so this will change for each run
        select sum(ExtendedAmount) from rentalCharge
                where rentalCharge.RentalId == rental.RentalId;

        fmTotals = FMTotalsEngine::construct();
        fmTotals.calculateRentalVehicleRate(rental);

        // Get the totals from the engine
        fmRentalTotal = fmTotals.totals(rental);

        // Set the expected amount
        expectedTotal = rental.VehicleRateTotal + rentalCharge.ExtendedAmount;

        this.assertEquals(expectedTotal,fmRentalTotal);
    }

    [SysTestMethod, Hookable(false)]
    public void testFMCarValidateField()
    {
        FMCarClass fmCar;

        fmCar.NumberOfDoors = -1;
        this.assertFalse(fmCar.validateField(Fieldnum("FMCarClass", "NumberOfDoors")));

        fmCar.NumberOfDoors = 4;
        this.assertTrue(fmCar.validateField(Fieldnum("FMCarClass", "NumberOfDoors")));
    }
}
Continue by following these remaining instructions.
- Save the test class.
- Build the project by right-clicking on the FleetManagementUnitTestSample project in Solution Explorer, and then select Build.
After you have fixed any problems diagnosed by the X++ compiler, you're ready to run your unit tests using the Visual Studio test explorer. In the unified developer experience, the execution takes place in the cloud against the data that resides in the running SQL Server. So you need to deploy the results of your compilation to the cloud by following these steps.
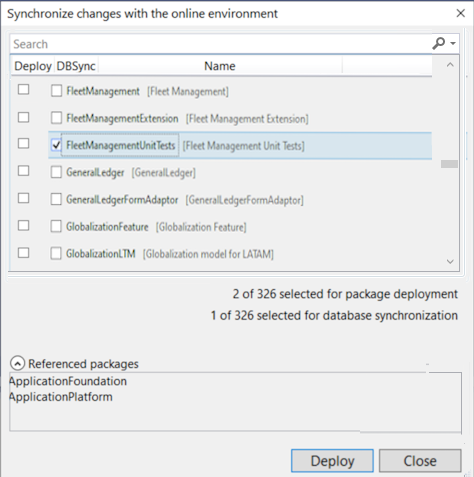
Select the Deploy model for project FleetManagementUnitTests menu item from the context menu on the project in Solution Explorer. You're prompted to connect to Power Platform if you aren't already connected.
The deployment dialog is displayed. Since we haven't added any new tables that need to be synced to the database, we now perform the deployment step. Fill out the dialog and choose Deploy.
On the Test menu of Visual Studio, open Test Explorer.
Select Run selected test to execute in the cloud the two test methods of the test case. Note that we do not currently support the debug menu in Test Explorer.
Test Explorer shows the results of each test after it completes. Hopefully, all your tests succeed. If not, you can use Test Explorer to navigate to the offending test code.
Test isolation
For a test to be of high value it must be reliable. A test must pass or fail consistently independent of other factors such as other tests. One typical cause of unreliable tests is leaking state, such as data left behind in the database that influences downstream tests. Another cause of unreliable tests is relying on tests to be called in a particular order. To prevent this type of issue, you can use the SysTestTransaction attribute.
| TestTransactionMode | Description |
|---|---|
| AutoRollback | Default. Provides the best isolation. All transactions are rolled back using SQL save points, and all database statements are routed to the main connection including user connections. No data is persisted. |
| LegacyRollback | All insert statements are tracked and deleted during clean-up. All insert statements are downgraded to row-by-row. One typical use case is when testing user connections or concurrency scenarios. This isolation level cleans up setup data, and the recommendation is to wrap each test method in a ttsBegin and ttsAbort. |
| LegacyRollbackWithUpdateTracking | All update, delete, and insert statements are tracked and reverted during cleanup. All insert, update, and delete statements are tracked and downgraded to row-by-row. This mode is the slowest isolation level. |
| None | Only use this mode for debugging. Provides no isolation. This setting can be useful to temporarily debug a test as it allows you to use the regular user interface to navigate the data that the test created. |
Example:
    [SysTestTransaction(TestTransactionMode::LegacyRollback)]
    class MyTestSample extends SysTestCase
Test module creation to manage test code and FormAdaptors
Creating a test specific module helps to keep test code together and manageable.
Open Visual Studio and go to Dynamics 365 > Model Management > Create model.
Enter the model name, select the layer, and then enter any more details. It's a good idea to include the word Test in the name of the test module. The default build definition is configured to discover all test modules that contain the word Test.
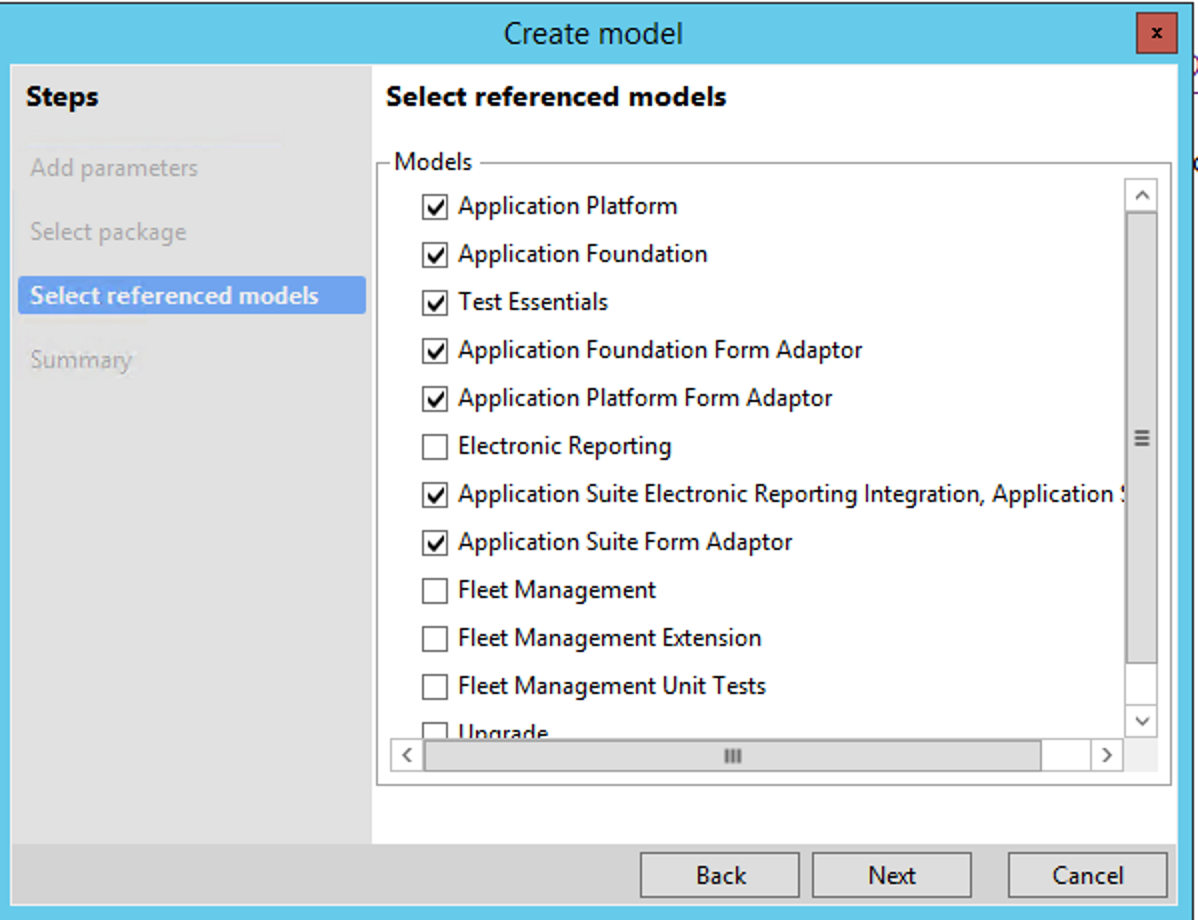
Because this model holds forms from the Application Platform/Foundation, add references to models selected (checked) in the following figure.
See also
Feedback
Coming soon: Throughout 2024 we will be phasing out GitHub Issues as the feedback mechanism for content and replacing it with a new feedback system. For more information see: https://aka.ms/ContentUserFeedback.
Submit and view feedback for