Extend and customize CoE Starter Kit components
There's no "one size fits all" solution for a Center of Excellence (CoE). Some companies will want a more restrictive set of rules for their organization, while others will want to let users personally explore with less limitation.
That's why the CoE Starter Kit intends to provide a starting point for administration, governance, and nurture tooling approaches. However, you may find that you'll need to extend the kit to fit your needs in addition to using the tools from the CoE Starter Kit as they are.
There are many reasons for why you may want to extend the CoE Starter Kit:
- Capturing additional metadata for apps and flows—for example, as part of the Compliance process.
- Modifying the apps and flows to fit existing processes you may have in place—for example, asking makers to provide additional information in the Developer Compliance Center.
- Customizing the apps to fit with your organization's brand and theme, especially for broadly used apps like the App Catalog.
- Building additional apps and flows on top of the inventory gathered by the CoE Starter Kit.
This article prepares you to extend the CoE Starter Kit. It provides guidance on:
- How to customize CoE Starter Kit components.
- How to add your own CoE Starter Kit components.
- How to deploy and publish your customizations.
Not following best practices when extending the CoE Starter Kit can lead to unintended consequences, like no longer receiving updates from Microsoft during an upgrade.
What components can I customize?
Before we explain how to extend the CoE Starter Kit, here's some guidance on what components we do and don't recommend extending:
- Tables and model-driven apps support merging. These resources can easily be extended by creating your own unmanaged solution and making changes there (for example, adding new fields). During an upgrade, you'll receive our changes and also keep your changes.
- Canvas apps, custom pages, and cloud flows do not support merging. These resources can only be extended and customized by creating a copy in your own unmanaged solution. During an upgrade, you no longer receive our changes, which should be a deliberate choice in order to customize a process and make it fit to your organization.
- Cloud flows that are responsible for gathering inventory should not be customized. These flows are frequently updated to fix bugs, gather additional data, or improve performance. If you have additional requirements for what inventory to gather, raise a feature ask or create separate flows for your requirements.
- Power BI dashboards do not support merging. We recommend creating a copy of the dashboard, creating your own custom reports and publishing them to same workspace as the main CoE dashboard for your admins to have a seamless experience between out of the box CoE kit reports and your custom reports.
What's the mechanism to extend the CoE Starter Kit?
The CoE Starter Kit is composed of components made by using the capabilities of Microsoft Power Platform. It can be extended by using Power Platform itself. The following article gives guidelines on how to properly customize and deploy your customizations.
The CoE Starter Kit is made available as managed solutions. Any new components or customizations must be included in an unmanaged solution so you can keep track of your changes and deploy them to other environments.
Learn more about solutions:
- Introduction to solutions
- Solution concepts
- How managed solutions are merged
- Use a solution to customize
- Manage solutions in Power Apps and Power Automate
If you plan to make customizations to a large number of CoE Starter Kit components, use multiple unmanaged solutions to organize your extensions better and reduce the size of each solution. Lighter solutions reduce deployment time. Learn more: Organize solutions
Important
Any extensions or customizations to the CoE Starter Kit components should be made in a nonproduction environment before being deployed to your production environment as managed.
What are some limitations?
- The Power Automate "Save As" capability to copy a flow is not supported for flows that call child flows. The only way to customize flows with child flows is by editing the flow in the managed solution and creating an unmanaged layer.
- Canvas apps, custom pages, and cloud flows do not support merging. These resources can only be extended and customized by creating a copy in your own, unmanaged solution.
- Power BI dashboards do not support merging.
Creating a new solution
To create a new unmanaged solution:
Go to make.powerapps.com.
Go to your CoE development environment. The managed solutions of the CoE Starter Kit components you are using should already be installed in this environment—for example, Center of Excellence - Core components and Center of Excellence - Innovation Backlog.
Select Solutions.
Select + New solution.

Enter the Display name (for example, Contoso CoE Extension), Name (for example, ContosoCoEExtension),Publisher (author of your solution), and Version (leave 1.0.0.0 if it's your first solution).

Select Create to create your solution.
Creating components in a solution
To add a new component to your new solution:
Go to make.powerapps.com.
Go to your CoE development environment.
Select Solutions.
Select your new solution.
Select + New in the top menu.

Choose the component type to add this component to your solution.
Important
Create additional components within your own solution rather than the existing CoE Starter Kit solutions so that the prefix of your publisher (author) is applied to the name of the component. Your publisher's prefix enables you to differentiate your components from the components belonging to the CoE Starter Kit.
Customizing CoE Starter Kit components
Caution
The CoE Starter Kit is distributed as a managed solution and shouldn't be customized directly.
Most components can be customized by duplicating the component and customizing the copy. The only exception is adding new fields in an existing table.
Below are common examples of how to customize and extend some of the main components of the CoE Starter Kit.
Creating a copy of a canvas application
Add a canvas app to your unmanaged solution:
Go to make.powerapps.com.
Go to your CoE development environment.
Go to Solutions.
Select your solution.
Select + Add existing.
Select App > Canvas app.

Search for the canvas app you want to customize and select Add to add it to your solution.

Next, create a copy of the canvas app:
Select the canvas app in your solution and select Edit.

The app is opened in Power Apps Studio.
Open the save menu on top of the right corner by clicking the down-arrow and select Save as

Change the name of the app (for instance, add a prefix), and select Save.

Go back to your solution—your copy of the app is displayed in the list (with your publisher prefix).
Remove the original app from your solution by selecting the app and, in the menu, selecting Remove and then Remove from solution.

Verify that app in the CoE solution from where you copied does not have unmanaged layer created. If it does, then remove unmanaged layers to continue receiving updates to the original app. You may want to compare them to your changes.
You can now safely edit your own copy.
Note
Creating a copy of a canvas app to extend and customize it means you'll no longer receive updates for this app during an upgrade.
Working with cloud flows
Caution
- Due to a product limitation, you can't create a copy of a parent cloud flows triggering child flows. Most CoE Starter Kit flows use child flows.
- Customizations to cloud flows can be made on the existing flows as unmanaged.
- Unmanaged changes will take precedence over the managed ones; therefore, customized flows won't be updated as part of a CoE upgrade.
- Learn more: Solution Layers
Customize an existing flow:
Go to make.powerapps.com.
Go to your CoE development environment.
Go to Solutions.
Select CoE StaterKit solution like Center of Excellence - Core Components.
Select Cloud Flows
Select or search for the flow you want to customize.

Click Save as

Change the name of the flow (for instance, add a prefix), and select Save.

Open your own solution to which you want to copy the flow
Select Add existing > Automation > Cloud flow.

Select Outside Dataverse and select the copy of the flow you just created

Select the flow in your unmanaged solution
Click Save as
Click Edit button to start customizing the flow.

Verify that the flow in the CoE solution from where you copied does not have unmanaged layer created. if it does, then remove unmanaged layers to continue receiving updates to the original flow.
Note
Creating a copy of a cloud flow to extend and customize means you'll no longer receive updates for this cloud flow during an upgrade.
Working with model-driven apps and extending Dataverse tables
Create your own model-driven app instead of extending the existing one to avoid your changes being impacted by an upgrade. Learn more: Overview of building a model-driven app with Power Apps
Configure a new model-driven application
First, create a new model-driven application:
- Go to make.powerapps.com
- Go to your CoE development environment.
- Go to Solutions.
- Select your solution.
- Select + New.
- Select App > Model-driven app.
- Enter a Name and click Create.

Then, configure the new model-driven application:
- In the App Designer, use the menu to select the components for your app.
- Configure the app navigation (site map) to show the elements in your app's menu by defining groups and subareas.
 to show the elements in your app's menu by defining groups and subareas.")
- Configure what type of content you want to add to the app like tables, dashboards and links.

- Select Save and Publish.
- Select Play to test the app.
You can also add existing custom pages to your own, model-driven app. Custom pages are the building blocks behind most apps in the CoE Starter Kit, and you can bring them into your own, model-driven app to build very tailored and targeted experiences for your admins and makers.
There are a few reasons why you may want to do this:
- Some of the apps in the CoE Starter Kit bring together a few different features by including different custom pages in the navigation of the main application, such as the Nurture apps - Makers. If you don't want to use all the features, you may want to create your own app and only include custom pages of the features you want to use in the navigation.
- Some of the apps in the CoE Starter Kit target the same persona, but functionality is split across different apps. For example the Power Platform Admin View and CoE Admin Command Center are both apps that admins will use. You may want to combine both apps into one app. You can do that by creating your own, model-driven app and bringing in all the custom pages and tables into one app.
- If you've created your own features and extensions to the CoE Starter Kit as custom pages and want to combine them with CoE Starter Kit features for a seamless user experience, the best option may be to create your own, model-driven app. You can bring in your custom pages and CoE Starter Kit custom pages into the navigation.
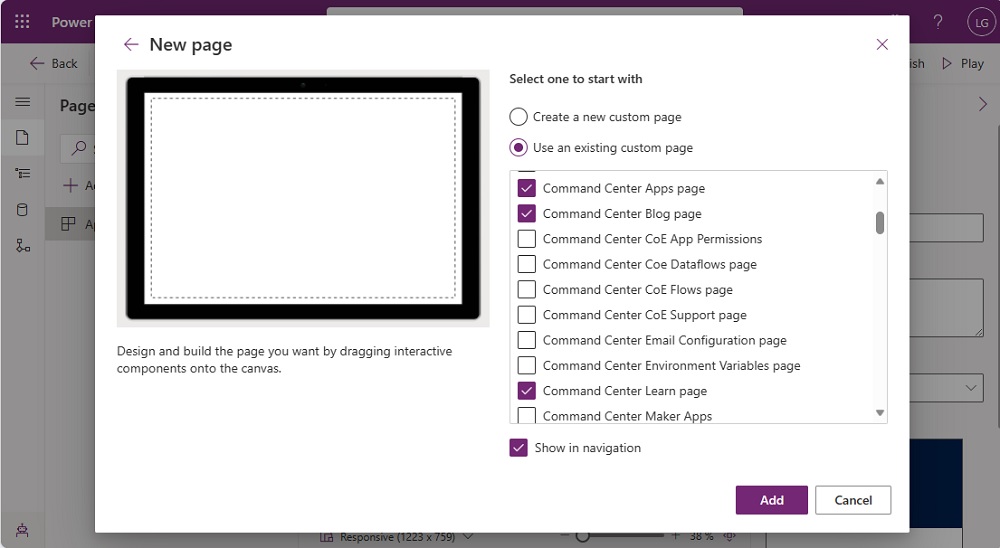
- If you've created your own model-driven app, select + Add page.
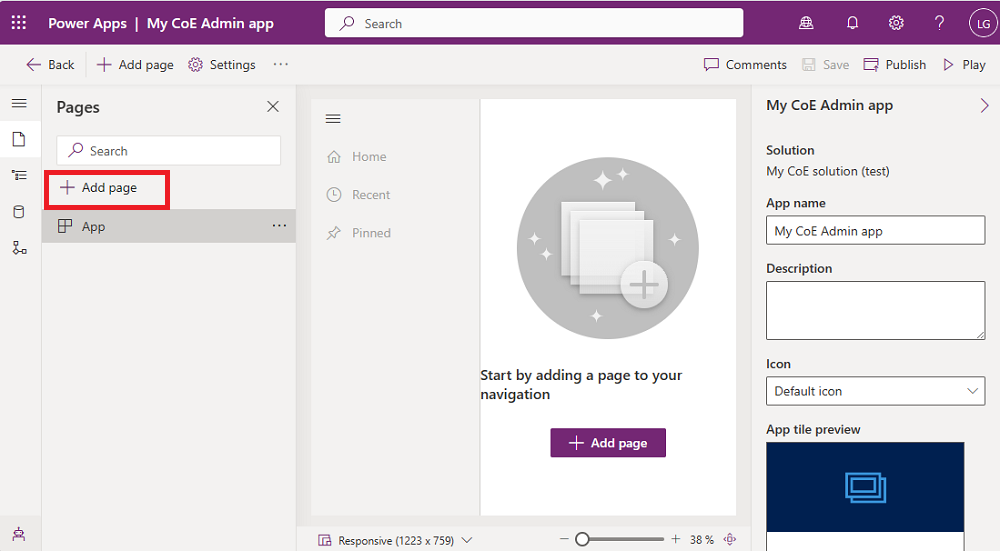
- Select Custom page.
- Select Use an existing custom page and select the pages you want to add.
- You can also add additional content, such as tables, dashboards and links.
- Select Save and Publish.
- Select Play to test the app.
Add a new column to an existing table
Start by adding the table you want to add the field to, if it's not already in your solution:
Go to make.powerapps.com.
Go to your CoE development environment.
Go to Solutions.
Select your solution.
Select Add existing > Table.

Search for the table(s) you want to add and select Next.

Important
If you only want to add new fields and not modify the views and forms of the table, don't check the options to include metadata or objects.

Select Add.
Then, add a new field:
Select the table you just added to the solution.
In the Columns tab, select Add Column.
Fill in the form with the details of your new field, such as name and data type, and select Done.
Select Save Table at the lower right of the screen.
Customize an existing form
Forms are used within model-driven application and portals to render table data. Forms support merge behavior.
Form merge occurs on a section-by-section basis. When you add new elements to an existing tab or section, your changes can affect or conceal the elements from the managed layers, including when the managed element is updated. This behavior occurs because the managed layers are underneath the unmanaged layer you're introducing with your customization. If you don't want to affect or conceal managed elements on the form, we recommend that you include your new elements within new container elements, such as a section or tab.
Learn more: Merge form customizations
Add the table linked to the form to your solution:
Go to make.powerapps.com.
Go to your CoE development environment.
Go to Solutions.
Select your solution.
Select Add existing.
Choose Table.
Search for the table you want to add and select Next.
Select Add.
Add the form you want to customize:
These steps are needed only when you added existing table to your solution without adding all table objects
In solution explorer, select the table you want to add form and then select Forms

Select Add existing form

Select the form(s) you want to customize and select Add

Customize the form:
Select the table and then select Forms.
Select ... and then select Edit form to edit the form.

Note
Depending on the goal of your customization, you can also create a new form or duplicate the existing form.
Add the new form to your model-driven application:
If you have created a new form or duplicated the existing form, start by disabling the old one so that it's not shown.
On the original form, select ... and then select Remove form from this solution.
Select Form settings.
Make sure the new form's settings are configured correctly, including Ordering and Security roles.

Add your new form to your model-driven app in the App Designer.
Customize a view
Views are used in model-driven apps to display table data as lists.
Learn more: Create and edit views
Add the table linked to the form to your solution:
Go to make.powerapps.com.
Go to your CoE development environment.
Go to Solutions.
Select your solution.
Select Add existing.
Choose Table.
Search for the table you want to add and select Next.
Select Add.
Add the view you want to customize:
These steps are needed only when you added existing table to your solution without adding all table objects
In solution explorer, select the table you want to add view and then select Views

Select Add existing view

Select the view(s) you want to customize and select Add

Customize the view:
Select the table and then select Views.
Select ... and then select Edit view to edit the view.

Note
Depending on the goal of your customization, you can also create a new view or duplicate the existing view.
Add the new view to your model-driven application:
- If you have created a new view or duplicated the existing view, start by disabling the old one so that it's not shown.
- On the original view, select ... and then select Remove view from this solution.
- Add your new view to your model-driven application in the App Designer.
Customize a model-driven app system dashboard
Dashboards are used in model-driven apps to display table data as graphical components.
Learn more: Create or edit model-driven app dashboards
System dashboards can't be duplicated as system dashboards.
Two options are available to customize these dashboards:
(Recommended option) In your development environment, create a new system dashboard and reuse the components from the CoE Starter Kit dashboards.
Directly in your production environment, you can create a personal dashboard from the system dashboard and then share it with the team.

Deploy and publish your customizations
Deploy the solution with your customizations as a managed solution to test and production environments.
Learn more: Implementing healthy project and solution ALM
Consider using the ALM Accelerator for Power Platform to manage your deployments.
Feedback
Coming soon: Throughout 2024 we will be phasing out GitHub Issues as the feedback mechanism for content and replacing it with a new feedback system. For more information see: https://aka.ms/ContentUserFeedback.
Submit and view feedback for