Observação
O acesso a essa página exige autorização. Você pode tentar entrar ou alterar diretórios.
O acesso a essa página exige autorização. Você pode tentar alterar os diretórios.
O recurso de personalizações do Microsoft Dev Box ajuda você a simplificar a configuração de ambientes de desenvolvimento baseados em nuvem. Começar os desenvolvedores em um novo projeto ou com uma nova equipe geralmente é complexo e demorado. Com personalizações, você pode configurar estações de trabalho prontas para código com aplicativos, ferramentas, repositórios, bibliotecas de código, pacotes e scripts de build. Este artigo orienta você pelo processo de criação, teste e edição de um arquivo de definição de imagem para sua caixa de desenvolvimento usando o Visual Studio Code.
Há duas maneiras de usar personalizações no Dev Box. As personalizações de equipe criam uma configuração compartilhada para uma equipe de desenvolvedores. As personalizações de usuário criam uma configuração pessoal para um desenvolvedor individual. A tabela a seguir resume as diferenças entre os dois tipos de personalizações.
| Característica | Personalizações de equipe | Personalizações de usuário |
|---|---|---|
| Configurar em | Pool de computadores de desenvolvimento | Computador de desenvolvimento |
| As personalizações se aplicam a | Todos os computadores de desenvolvimento no pool | Computador de desenvolvimento individual |
| Compartilhável facilmente | Sim | Não |
| Nome do arquivo de personalizações | Imagedefinition.yaml |
myfilename.yaml ou Workload.yaml |
| Originado de | Catálogo | Carregado ou do repositório pessoal |
| Dá suporte a segredos do cofre de chaves | Sim | Sim |
Pré-requisitos
- Configure um centro de desenvolvimento com um pool de computadores de desenvolvimento e um projeto de computador de desenvolvimento para que você possa criar um computador de desenvolvimento.
- Seja membro do grupo de segurança de Usuários do Computador de Desenvolvimento por pelo menos um projeto.
- Tenha um catálogo anexado ao centro de desenvolvimento com tarefas que você pode usar no arquivo de definição de imagem. Se você não tiver um catálogo, consulte Adicionar e configurar um catálogo do GitHub ou do Azure Repos.
Permissões necessárias para configurar personalizações
| Ação | Permissão/Função |
|---|---|
| Habilite catálogos em nível de projeto para um centro de desenvolvimento. | Engenheiro de plataforma com acesso para gravação na assinatura. |
| Habilitar configurações de sincronização de catálogo para um projeto. | Engenheiro de plataforma com acesso para gravação na assinatura. |
| Anexar um catálogo a um projeto. | Permissões de Administrador ou Colaborador do Projeto no Centro de Desenvolvimento. |
| Crie um arquivo de definição de imagem. | Nenhum especificado. Qualquer pessoa pode criar um arquivo de definição de imagem. |
| Adicionar tarefas a um catálogo. | Permissão para adicionar ao repositório que hospeda o catálogo. |
Escolher uma origem para tarefas de personalização
Você pode obter tarefas do Dev Box de tarefas internas na plataforma ou usar tarefas personalizadas armazenadas em um catálogo. Escolha a origem que melhor se alinha às suas necessidades de personalização e aos requisitos de projeto.
Use tarefas internas do WinGet e do PowerShell. Os centros de desenvolvimento do Dev Box dão suporte a tarefas do PowerShell e do WinGet prontas para uso. Você pode começar com essas tarefas integradas. Se suas personalizações exigirem apenas o PowerShell e o WinGet, prossiga com a criação do arquivo de personalizações. Para obter mais informações, consulte Criar um arquivo de definição de imagem.
A tarefa interna do WinGet não é executável do WinGet. A tarefa interna do WinGet é baseada no cmdlet WinGet do PowerShell.
Use um catálogo para definir tarefas personalizadas. Você pode criar suas próprias tarefas personalizadas. Para disponibilizar tarefas personalizadas para toda a sua organização, anexe um catálogo que contém definições de tarefa personalizadas ao centro de desenvolvimento. O Dev Box dá suporte a catálogos do Azure Repos e do GitHub. Como as tarefas são definidas apenas no centro de desenvolvimento, armazene tarefas e definições de imagem em repositórios separados.
Para saber mais sobre como definir tarefas personalizadas, consulte Criar tarefas para personalizações de equipe do Dev Box.
Criar definições de imagem no nível do projeto
Os projetos podem ajudá-lo a gerenciar recursos do Dev Box com eficiência. Ao atribuir a cada equipe de desenvolvedor seu próprio projeto, você pode organizar os recursos com eficiência. Você pode criar várias definições de imagem em seu repositório de catálogo, cada uma em sua própria pasta para direcionar equipes de desenvolvedor diferentes em seu projeto.
Atribuir permissões para administradores de projeto
Para anexar um catálogo a um projeto, você deve ter permissão de Administrador do Projeto ou Colaborador para o projeto. Para saber como atribuir a permissão de Administrador do Projeto, confira Conceder acesso administrativo a projetos do Dev Box.
Habilitar catálogos no nível do projeto
Você precisa habilitar catálogos no nível do projeto no nível do centro de desenvolvimento antes de adicionar um catálogo a um projeto. Para habilitar o uso de catálogos no nível do projeto no nível do centro de desenvolvimento:
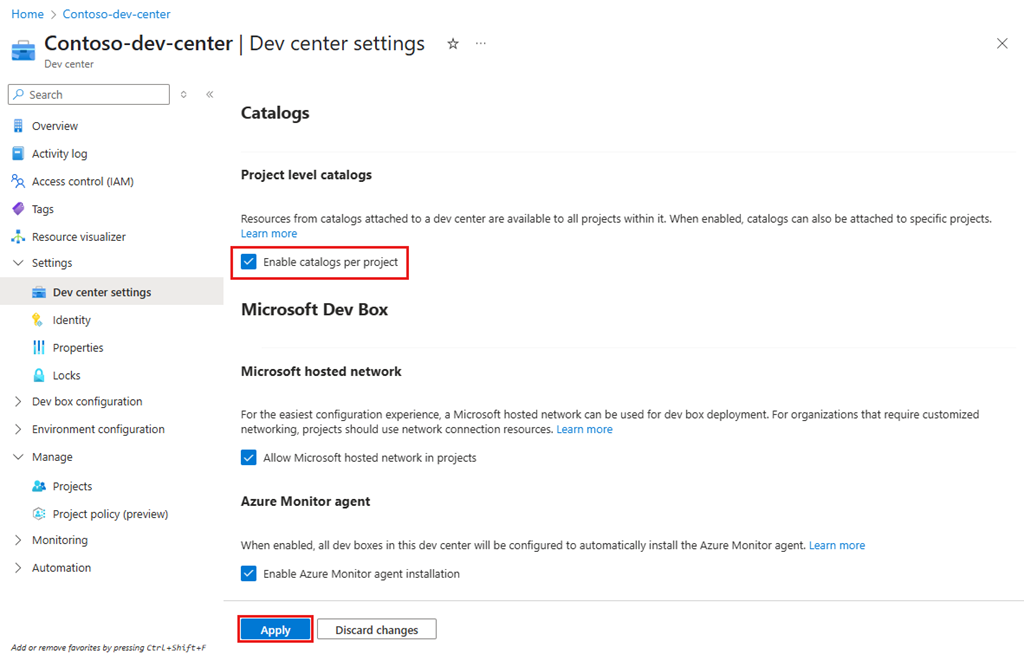
No portal do Azure, acesse o centro de desenvolvimento.
No menu à esquerda, em Configurações, selecione Configurações do Centro de Desenvolvimento.
Em catálogos de nível de projeto, selecione Habilitar catálogos por projeto e selecione Aplicar.
Para obter mais informações sobre como adicionar catálogos a projetos, consulte Adicionar e configurar um catálogo do GitHub ou do Azure Repos.
Criar um arquivo de definição de imagem
Você pode criar e testar arquivos de definição de imagem usando o Visual Studio Code. Além de usar as tarefas internas, você pode usar a extensão Dev Box no Visual Studio Code para descobrir as tarefas personalizadas que estão disponíveis por meio do centro de desenvolvimento.
Crie uma caixa de desenvolvimento (ou use uma caixa de desenvolvimento existente) para teste.
Na caixa de desenvolvimento de teste, instale o Visual Studio Code e instale a extensão Dev Box.
Baixe um arquivo de definição de imagem YAML de exemplo do repositório de exemplos. Abra-o no Visual Studio Code.
Descubra as tarefas disponíveis no catálogo usando a paleta de comandos. Caixa de desenvolvimento Selecionar Exibição>Paleta de Comandos>: Listar Tarefas Disponíveis para Esse Computador de Desenvolvimento.

Teste a personalização no Visual Studio Code usando a paleta de comandos. Selecionar Exibição>Paleta de Comandos>: Caixa de desenvolvimento: aplicar tarefas de personalizações.

O arquivo de definição de imagem é executado e aplica as tarefas especificadas à caixa de desenvolvimento de teste. Inspecione as alterações e verifique se há erros ou avisos gerados no terminal do Visual Studio Code durante a execução da tarefa.
Quando o arquivo de definição de imagem for executado com êxito, carregue-o no catálogo.
Tarefas do sistema e tarefas do usuário
Você pode usar tarefas do sistema e do usuário no arquivo de definição de imagem. A seção tarefas do arquivo de definição de imagem é dividida nas seções a seguir. Ambas as seções compartilham os mesmos parâmetros com base nas definições de tarefa em seu catálogo.
-
Tarefas do sistema: essas tarefas são executadas como
LocalSystemdurante o estágio de provisionamento da caixa de desenvolvimento. Normalmente, elas são usadas para configurações no nível do sistema, como instalar software ou definir configurações do sistema que exigem privilégios administrativos. -
Tarefas do usuário: essas tarefas são executadas como o usuário após a primeira entrada do usuário na caixa de desenvolvimento. Normalmente, elas são usadas para configurações de nível de usuário, como instalar aplicativos específicos do usuário ou definir configurações de usuário no contexto do usuário. Por exemplo, os usuários geralmente preferem instalar o Python e o Visual Studio Code no contexto do usuário em vez de em todo o sistema. Coloque as tarefas do WinGet na seção
userTaskspara obter melhores resultados quando não operam de forma adequada em tarefas.
Os usuários padrão que configuram personalizações de usuário podem usar apenas tarefas do usuário. Eles não podem usar tarefas do sistema.
Opcional: personalizar sua caixa de desenvolvimento usando arquivos de Configuração de Estado Desejado existentes
A DSC (Configuração de Estado Desejado) é uma plataforma de gerenciamento no PowerShell que permite que você gerencie seu ambiente de desenvolvimento com a configuração como código. Você pode usar o DSC para definir o estado desejado do seu ambiente de desenvolvimento, incluindo instalações de software, configurações e ajustes.
Você também pode usar arquivos de configuração de DSC para configurar uma caixa de desenvolvimento usando uma tarefa interna do WinGet.
O exemplo a seguir mostra um arquivo de definição de imagem do computador de desenvolvimento que chama um arquivo DSC do WinGet existente:
tasks:
    - name: winget
      parameters:
          configure: "projectConfiguration.dsc.yaml"
Para saber mais, confira a configuração do WinGet.
Definir configurações de sincronização de catálogo para o projeto
Configure seu projeto para sincronizar definições de imagem do catálogo. Com essa configuração, você pode usar as definições de imagem no catálogo para criar pools de computadores de desenvolvimento.
Entre no portal do Azure.
Na caixa de pesquisa, insira projetos. Na lista de resultados, selecione Projetos.
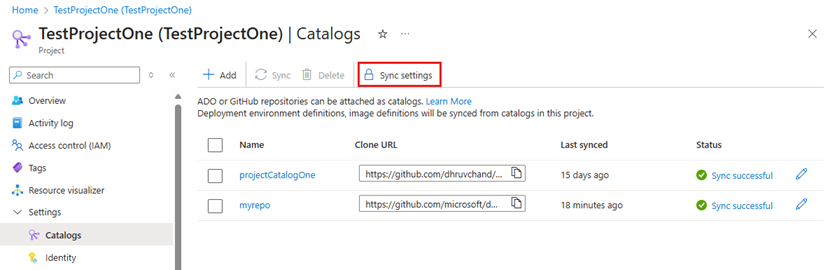
Abra o projeto do Computador de Desenvolvimento para o qual você deseja definir as configurações de sincronização de catálogo.
Selecione Catálogos.
Selecione Configurações de sincronização.
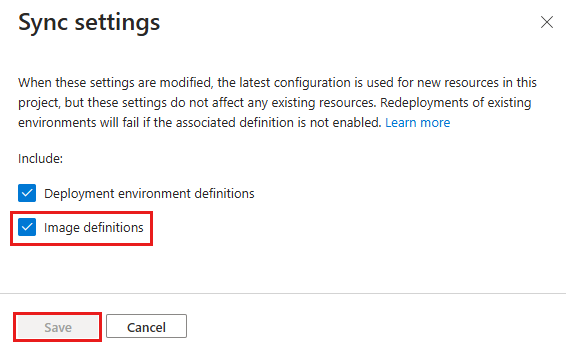
No painel Configurações de sincronização, selecione Definições de imagem e selecione Salvar.


Anexar catálogo que contém o arquivo de definição
Antes de usar um arquivo de personalização como uma definição de imagem, você deve anexar um catálogo que contenha o arquivo de definição ao centro de desenvolvimento ou ao projeto. O catálogo pode ser do GitHub ou do Azure Repos.
O painel Definições de imagem lista as definições de imagem que seu projeto pode acessar.

Para obter mais informações sobre como anexar catálogos, consulte Adicionar e configurar um catálogo do GitHub ou do Azure Repos.
Configurar um pool de computadores de desenvolvimento para usar uma definição de imagem
Disponibilize personalizações para suas equipes de desenvolvimento configurando um pool de caixas de desenvolvimento para usar um arquivo de personalização (imagedefinition.yaml). Armazene o arquivo de personalização em um repositório vinculado a um catálogo em seu centro de desenvolvimento ou projeto. Especifique esse arquivo como a definição de imagem para o pool e as personalizações são aplicadas a novos computadores de desenvolvimento.
As etapas a seguir mostram como criar um pool de computadores de desenvolvimento e especificar uma definição de imagem:
Entre no portal do Azure.
Na caixa de pesquisa, insira projetos. Na lista de resultados, selecione Projetos.
Abra o projeto de Computador de Desenvolvimento ao qual você deseja associar o novo pool de computador de desenvolvimento.
Selecione Pools de computadores de desenvolvimento e Criar.
No painel Criar um pool de computadores de desenvolvimento, insira os seguintes valores:
Configurações Valor Nome Insira um nome para o pool. O nome do pool fica visível para os desenvolvedores selecionarem quando criarem caixas de desenvolvimento. Ele precisa ser exclusivo em um projeto. Definição Esse computador lista definições de imagem de catálogos acessíveis e definições de computador de desenvolvimento. Selecione um arquivo de definição de imagem. Conexão de rede Selecione Implantar em uma rede hospedada da Microsoft ou use uma conexão de rede existente. Habilitar logon único Selecione Sim para habilitar o logon único para os computadores de desenvolvimento neste pool. O logon único deve ser configurado para a organização. Para obter mais informações, consulte Habilitar logon único para computadores de desenvolvimento. Privilégios de Criador do Computador de Desenvolvimento Selecione Administrador Local ou Usuário Padrão. Habilitar Parada automática Sim é o padrão. Selecione Não para desabilitar um agendamento de parada automática. Você pode configurar um agendamento de parada automática depois de criar o pool. Hora de término Selecione um horário para desligar todos os computadores de desenvolvimento no pool. Fuso horário Selecione o fuso horário no qual a hora de parada está. Licenciamento Marque esta caixa de seleção para confirmar que a organização tem licenças do Benefício Híbrido do Azure que você deseja aplicar aos computadores de desenvolvimento neste pool. 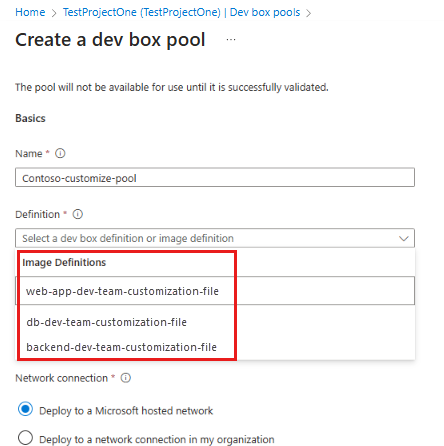
Selecione Criar.
Verifique se o novo pool de computadores de desenvolvimento é exibido na lista. Talvez você precise atualizar a tela.

Criar um computador de desenvolvimento usando o portal do desenvolvedor
Para verificar se as personalizações do arquivo de definição de imagem são aplicadas, crie uma caixa de desenvolvimento no portal do desenvolvedor do Dev Box. Siga as etapas no Início Rápido: Criar e conectar-se a uma caixa de desenvolvimento usando o portal do desenvolvedor do Dev Box. Em seguida, conecte-se ao computador de desenvolvimento recém criado e verifique se as personalizações funcionam conforme o esperado.
Você pode fazer ajustes no arquivo de personalização e criar um novo computador de desenvolvimento para testar as alterações. Quando tiver certeza de que as personalizações estão corretas, você pode criar uma imagem reutilizável.
Próxima etapa
Agora que você tem um arquivo de definição de imagem, carregue-o em um catálogo e anexe o catálogo a um projeto. O arquivo de definição de imagem é usado para configurar e criar caixas de desenvolvimento para suas equipes de desenvolvimento.