Observação
O acesso a essa página exige autorização. Você pode tentar entrar ou alterar diretórios.
O acesso a essa página exige autorização. Você pode tentar alterar os diretórios.
Simule e automatize a entrada do usuário de dispositivos como teclado, mouse, toque, caneta e gamepad em seus aplicativos do Windows.
APIs importantes: Windows.UI.Input.Preview.Injection
Visão geral
A injeção de entrada permite que seu aplicativo do Windows simule a entrada de uma variedade de dispositivos de entrada e direcione essa entrada em qualquer lugar, incluindo fora da área de cliente do aplicativo (até mesmo para aplicativos em execução com privilégios de Administrador, como o Editor do Registro).
A injeção de entrada é útil para aplicativos e ferramentas do Windows que precisam fornecer funcionalidades que incluem acessibilidade, teste (ad hoc, automatizado) e acesso remoto e recursos de suporte.
Configuração
Para usar as APIs de injeção de entrada em seu aplicativo do Windows, você precisará adicionar o seguinte ao manifesto do aplicativo:
- Clique com o botão direito do mouse no arquivo
Package.appxmanifest e selecione Exibir código . - Insira o seguinte no nó
Package:xmlns:rescap="http://schemas.microsoft.com/appx/manifest/foundation/windows10/restrictedcapabilities"IgnorableNamespaces="rescap"
- Insira o seguinte no nó
Capabilities:<rescap:Capability Name="inputInjectionBrokered" />
Entrada de usuário duplicada
|
|---|
| de exemplo de injeção de entrada por toque |
Neste exemplo, demonstramos como usar as APIs de injeção de entrada (Windows.UI.Input.Preview.Injection) para escutar eventos de entrada do mouse em uma região de um aplicativo e simular eventos de entrada por toque correspondentes em outra região.
Baixe este exemplo de exemplo de injeção de entrada (mouse para toque)
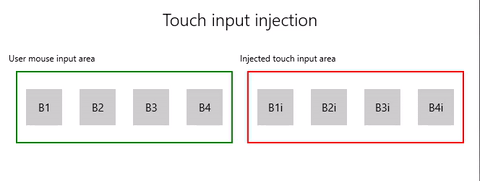
Primeiro, configuramos a interface do usuário (MainPage.xaml).
Temos duas áreas de grade (uma para entrada do mouse e outra para entrada por toque injetada), cada uma com quatro botões.
Observação
O fundo da Grade deve receber uma cor (
Transparent, nesse caso), caso contrário, os eventos de ponteiro não serão detectados.Quando qualquer clique do mouse é detectado na área de entrada, um evento de toque correspondente é injetado na área de injeção de entrada. Cliques em botões da entrada de injeção são relatados na área do título.
<Grid Background="{ThemeResource ApplicationPageBackgroundThemeBrush}">
    <Grid.RowDefinitions>
        <RowDefinition Height="Auto"/>
        <RowDefinition Height="Auto"/>
        <RowDefinition Height="*"/>
    </Grid.RowDefinitions>
    <StackPanel Grid.Row="0"
                Margin="10">
        <TextBlock Style="{ThemeResource TitleTextBlockStyle}"
                   Name="titleText"
                   Text="Touch input injection"
                   HorizontalTextAlignment="Center" />
        <TextBlock Style="{ThemeResource BodyTextBlockStyle}"
                   Name="statusText"
                   HorizontalTextAlignment="Center" />
    </StackPanel>
    <Grid HorizontalAlignment="Center"
                    Grid.Row="1">
        <Grid.RowDefinitions>
            <RowDefinition Height="Auto"/>
            <RowDefinition Height="*"/>
        </Grid.RowDefinitions>
        <Grid.ColumnDefinitions>
            <ColumnDefinition/>
            <ColumnDefinition/>
        </Grid.ColumnDefinitions>
        <TextBlock Grid.Column="0"
                   Grid.Row="0"
                   Style="{ThemeResource CaptionTextBlockStyle}"
                   Text="User mouse input area"/>
        <!-- Background must be set to something, otherwise pointer events are not detected. -->
        <Grid Name="ContainerInput"
              Grid.Column="0"
              Grid.Row="1"
              HorizontalAlignment="Stretch"
              Background="Transparent"
              BorderBrush="Green"
              BorderThickness="2"
              MinHeight="100" MinWidth="300"
              Margin="10">
            <Grid.ColumnDefinitions>
                <ColumnDefinition/>
                <ColumnDefinition/>
                <ColumnDefinition/>
                <ColumnDefinition/>
            </Grid.ColumnDefinitions>
            <Button Name="B1"
                    Grid.Column="0"
                    HorizontalAlignment="Center"
                    Width="50" Height="50"
                    Content="B1" />
            <Button Name="B2"
                    Grid.Column="1"
                    HorizontalAlignment="Center"
                    Width="50" Height="50"
                    Content="B2" />
            <Button Name="B3"
                    Grid.Column="2"
                    HorizontalAlignment="Center"
                    Width="50" Height="50"
                    Content="B3" />
            <Button Name="B4"
                    Grid.Column="3"
                    HorizontalAlignment="Center"
                    Width="50" Height="50"
                    Content="B4" />
        </Grid>
        <TextBlock Grid.Column="1"
                   Grid.Row="0"
                   Style="{ThemeResource CaptionTextBlockStyle}"
                   Text="Injected touch input area"/>
        <Grid Name="ContainerInject"
              Grid.Column="1"
              Grid.Row="1"
              HorizontalAlignment="Stretch"
              BorderBrush="Red"
              BorderThickness="2"
              MinHeight="100" MinWidth="300"
              Margin="10">
            <Grid.ColumnDefinitions>
                <ColumnDefinition/>
                <ColumnDefinition/>
                <ColumnDefinition/>
                <ColumnDefinition/>
            </Grid.ColumnDefinitions>
            <Button Name="B1i" Click="Button_Click_Injected"
                    Content="B1i"
                    Grid.Column="0"
                    HorizontalAlignment="Center"
                    Width="50" Height="50" />
            <Button Name="B2i" Click="Button_Click_Injected"
                    Content="B2i"
                    Grid.Column="1"
                    HorizontalAlignment="Center"
                    Width="50" Height="50" />
            <Button Name="B3i" Click="Button_Click_Injected"
                    Content="B3i"
                    Grid.Column="2"
                    HorizontalAlignment="Center"
                    Width="50" Height="50" />
            <Button Name="B4i" Click="Button_Click_Injected"
                    Content="B4i"
                    Grid.Column="3"
                    HorizontalAlignment="Center"
                    Width="50" Height="50" />
        </Grid>
    </Grid>
</Grid>
Em seguida, inicializamos nosso aplicativo.
Neste snippet, declaramos nossos objetos globais e declaramos ouvintes para eventos de ponteiro (AddHandler) dentro da área de entrada do mouse que pode ser marcada como manipulada nos eventos de clique do botão.
O objeto InputInjector representa o dispositivo de entrada virtual para enviar os dados de entrada.
No manipulador de
ContainerInput_PointerPressed, chamamos a função de injeção de toque.No manipulador de
ContainerInput_PointerReleased, chamamos UninitializeTouchInjection para desativar o objeto InputInjector.public sealed partial class MainPage : Page { /// <summary> /// The virtual input device. /// </summary> InputInjector _inputInjector; /// <summary> /// Initialize the app, set the window size, /// and add pointer input handlers for the container. /// </summary> public MainPage() { this.InitializeComponent(); ApplicationView.PreferredLaunchViewSize = new Size(600, 200); ApplicationView.PreferredLaunchWindowingMode = ApplicationViewWindowingMode.PreferredLaunchViewSize; // Button handles PointerPressed/PointerReleased in // the Tapped routed event, but we need the container Grid // to handle them also. Add a handler for both // PointerPressedEvent and PointerReleasedEvent on the input Grid // and set handledEventsToo to true. ContainerInput.AddHandler(PointerPressedEvent, new PointerEventHandler(ContainerInput_PointerPressed), true); ContainerInput.AddHandler(PointerReleasedEvent, new PointerEventHandler(ContainerInput_PointerReleased), true); } /// <summary> /// PointerReleased handler for all pointer conclusion events. /// PointerPressed and PointerReleased events do not always occur /// in pairs, so your app should listen for and handle any event that /// might conclude a pointer down (such as PointerExited, PointerCanceled, /// and PointerCaptureLost). /// </summary> /// <param name="sender">Source of the click event</param> /// <param name="e">Event args for the button click routed event</param> private void ContainerInput_PointerReleased( object sender, PointerRoutedEventArgs e) { // Prevent most handlers along the event route from handling event again. e.Handled = true; // Shut down the virtual input device. _inputInjector.UninitializeTouchInjection(); } /// <summary> /// PointerPressed handler. /// PointerPressed and PointerReleased events do not always occur /// in pairs. Your app should listen for and handle any event that /// might conclude a pointer down (such as PointerExited, /// PointerCanceled, and PointerCaptureLost). /// </summary> /// <param name="sender">Source of the click event</param> /// <param name="e">Event args for the button click routed event</param> private void ContainerInput_PointerPressed( object sender, PointerRoutedEventArgs e) { // Prevent most handlers along the event route from // handling the same event again. e.Handled = true; InjectTouchForMouse(e.GetCurrentPoint(ContainerInput)); } ... }Aqui está a função de injeção de entrada por toque.
Primeiro, chamamos TryCreate para instanciar o objeto InputInjector.
Em seguida, chamamos
InitializeTouchInjection com um InjectedInputVisualizationMode de . Depois de calcular o ponto de injeção, chamamos InjectedInputTouchInfo para inicializar a lista de pontos de toque a serem injetados (para este exemplo, criamos um ponto de toque correspondente ao ponteiro de entrada do mouse).
Por fim, chamamos InjectTouchInput duas vezes, a primeira para um ponteiro para baixo e a segunda para um ponteiro para cima.
/// <summary>
/// Inject touch input on injection target corresponding
/// to mouse click on input target.
/// </summary>
/// <param name="pointerPoint">The mouse click pointer.</param>
private void InjectTouchForMouse(PointerPoint pointerPoint)
{
    // Create the touch injection object.
    _inputInjector = InputInjector.TryCreate();

    if (_inputInjector != null)
    {
        _inputInjector.InitializeTouchInjection(
            InjectedInputVisualizationMode.Default);

        // Create a unique pointer ID for the injected touch pointer.
        // Multiple input pointers would require more robust handling.
        uint pointerId = pointerPoint.PointerId + 1;

        // Get the bounding rectangle of the app window.
        Rect appBounds =
            Windows.UI.ViewManagement.ApplicationView.GetForCurrentView().VisibleBounds;

        // Get the top left screen coordinates of the app window rect.
        Point appBoundsTopLeft = new Point(appBounds.Left, appBounds.Top);

        // Get a reference to the input injection area.
        GeneralTransform injectArea =
            ContainerInject.TransformToVisual(Window.Current.Content);

        // Get the top left screen coordinates of the input injection area.
        Point injectAreaTopLeft = injectArea.TransformPoint(new Point(0, 0));

        // Get the screen coordinates (relative to the input area)
        // of the input pointer.
        int pointerPointX = (int)pointerPoint.Position.X;
        int pointerPointY = (int)pointerPoint.Position.Y;

        // Create the point for input injection and calculate its screen location.
        Point injectionPoint =
            new Point(
                appBoundsTopLeft.X + injectAreaTopLeft.X + pointerPointX,
                appBoundsTopLeft.Y + injectAreaTopLeft.Y + pointerPointY);

        // Create a touch data point for pointer down.
        // Each element in the touch data list represents a single touch contact.
        // For this example, we're mirroring a single mouse pointer.
        List<InjectedInputTouchInfo> touchData =
            new List<InjectedInputTouchInfo>
            {
                new InjectedInputTouchInfo
                {
                    Contact = new InjectedInputRectangle
                    {
                        Left = 30, Top = 30, Bottom = 30, Right = 30
                    },
                    PointerInfo = new InjectedInputPointerInfo
                    {
                        PointerId = pointerId,
                        PointerOptions =
                        InjectedInputPointerOptions.PointerDown |
                        InjectedInputPointerOptions.InContact |
                        InjectedInputPointerOptions.New,
                        TimeOffsetInMilliseconds = 0,
                        PixelLocation = new InjectedInputPoint
                        {
                            PositionX = (int)injectionPoint.X ,
                            PositionY = (int)injectionPoint.Y
                        }
                },
                Pressure = 1.0,
                TouchParameters =
                    InjectedInputTouchParameters.Pressure |
                    InjectedInputTouchParameters.Contact
            }
        };

        // Inject the touch input.
        _inputInjector.InjectTouchInput(touchData);

        // Create a touch data point for pointer up.
        touchData = new List<InjectedInputTouchInfo>
        {
            new InjectedInputTouchInfo
            {
                PointerInfo = new InjectedInputPointerInfo
                {
                    PointerId = pointerId,
                    PointerOptions = InjectedInputPointerOptions.PointerUp
                }
            }
        };

        // Inject the touch input.
        _inputInjector.InjectTouchInput(touchData);
    }
}
Por fim, lidamos com qualquer botão Clique eventos roteados na área de injeção de entrada e atualizamos a interface do usuário com o nome do botão clicado.
Consulte também
Exemplos de tópico
Colaborar conosco no GitHub
A fonte deste conteúdo pode ser encontrada no GitHub, onde você também pode criar e revisar problemas e solicitações de pull. Para obter mais informações, confira o nosso guia para colaboradores.

Windows developer