Use the custom categories (standard) API (preview)
The custom categories (standard) API lets you create your own content categories for your use case and train Azure AI Content Safety to detect them in new content.
Important
This feature is only available in certain Azure regions. See Region availability.
Caution
The sample data in this guide might contain offensive content. User discretion is advised.
Prerequisites
- An Azure subscription - Create one for free
- Once you have your Azure subscription, create a Content Safety resource in the Azure portal to get your key and endpoint. Enter a unique name for your resource, select your subscription, and select a resource group, supported region, and supported pricing tier. Then select Create.
- The resource takes a few minutes to deploy. After it finishes, Select go to resource. In the left pane, under Resource Management, select Subscription Key and Endpoint. Copy the endpoint and either of the key values to a temporary location for later use.
- Also create an Azure blob storage container where you'll keep your training annotation file.
- One of the following installed:
- cURL for REST API calls.
- Python 3.x installed
Prepare your training data
To train a custom category, you need example text data that represents the category you want to detect. Follow these steps to prepare your sample data:
Collect or write your sample data:
- The quality of your sample data is important for training an effective model. Aim to collect at least 50 positive samples that accurately represent the content you want to identify. These samples should be clear, varied, and directly related to the category definition.
- Negative samples aren't required, but they can improve the model's ability to distinguish relevant content from irrelevant content. To improve performance, aim for 50 samples that aren't related to the positive case definition. These should be varied but still within the context of the content your model will encounter. Choose negative samples carefully to ensure they don't inadvertently overlap with the positive category.
- Strive for a balance between the number of positive and negative samples. An uneven dataset can bias the model, causing it to favor one type of classification over another, which may lead to a higher rate of false positives or negatives.
Use a text editor to format your data in a .jsonl file. Below is an example of the appropriate format. Category examples should set
isPositivetotrue. Negative examples are optional but can improve performance:{"text": "This is the 1st sample.", "isPositive": true} {"text": "This is the 2nd sample.", "isPositive": true} {"text": "This is the 3rd sample (negative).", "isPositive": false}Upload the .jsonl file to an Azure Storage account blob container. Copy the blob URL to a temporary location for later use.
Grant storage access
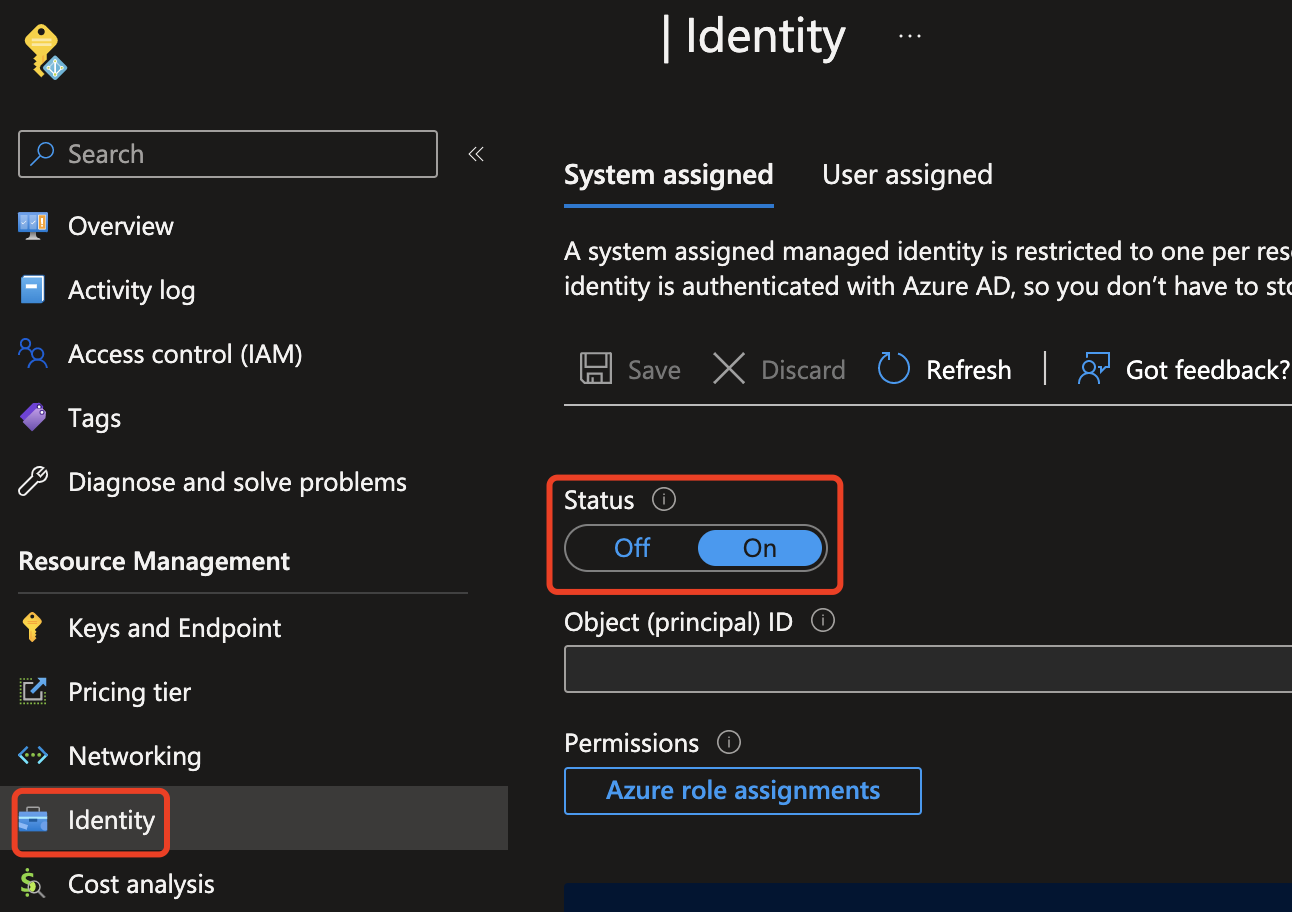
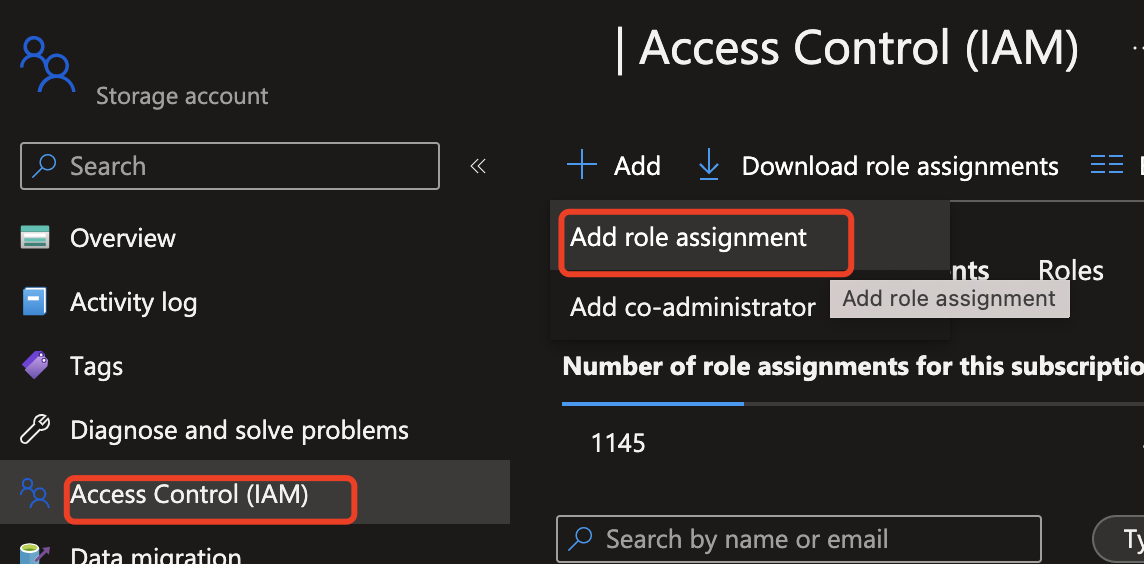
Next, you need to give your Content Safety resource access to read from the Azure Storage resource. Enable system-assigned Managed identity for the Azure AI Content Safety instance and assign the role of Storage Blob Data Contributor/Owner to the identity:
Important
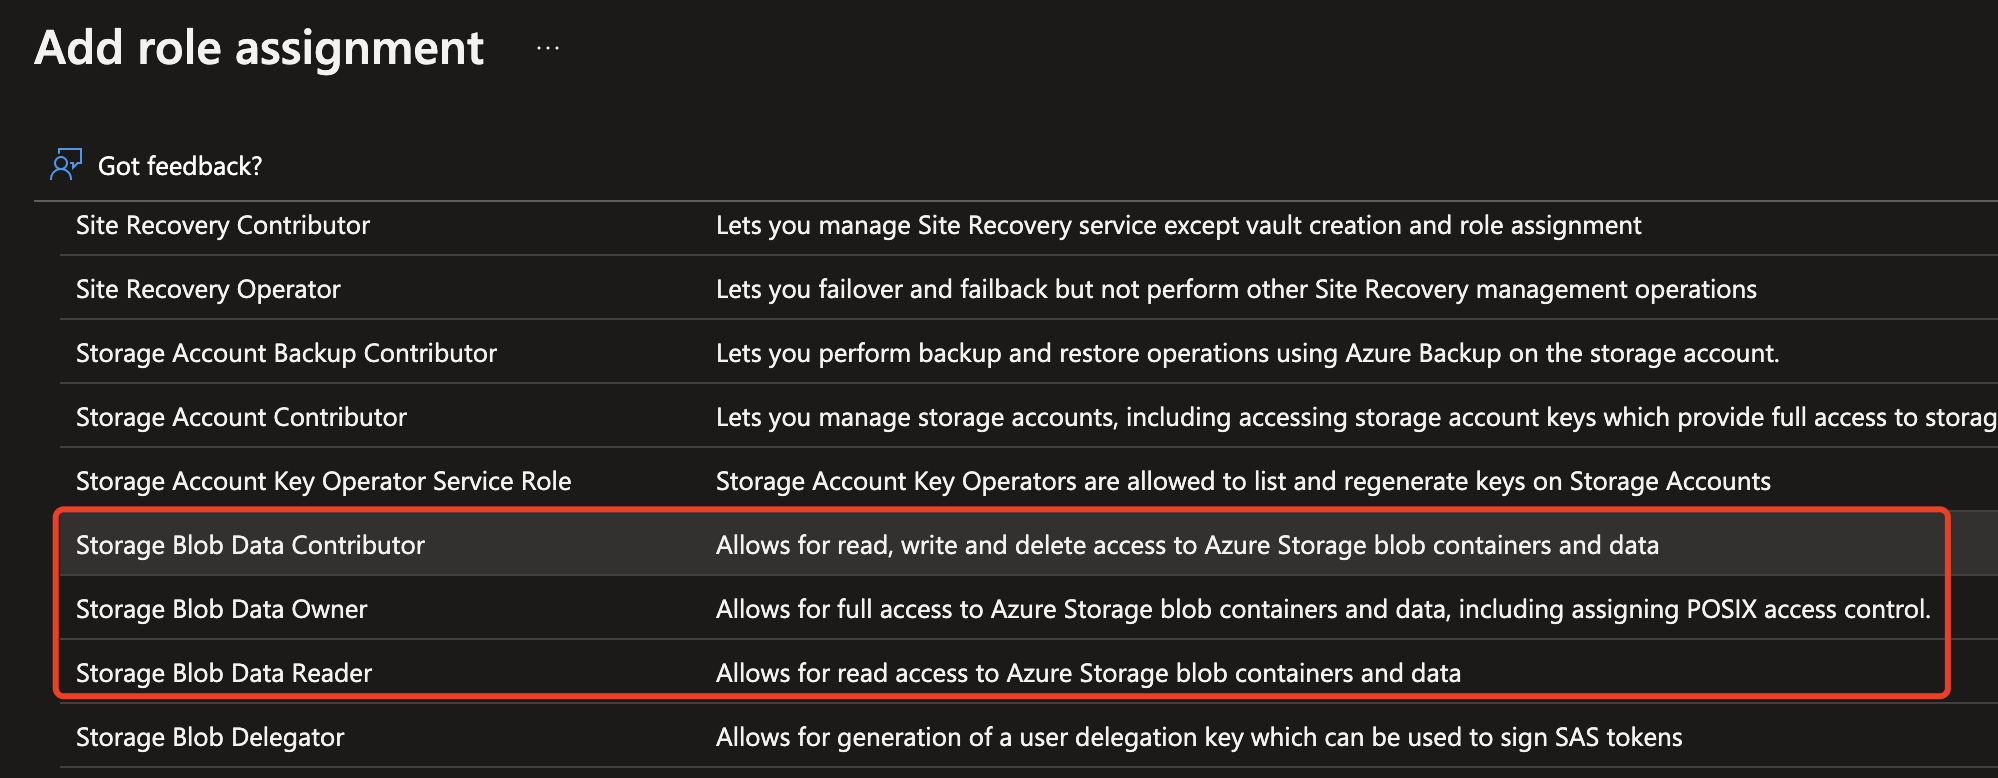
Only Storage Blob Data Contributor or Storage Blob Data Owner are valid roles to proceed.
Enable managed identity for the Azure AI Content Safety instance.

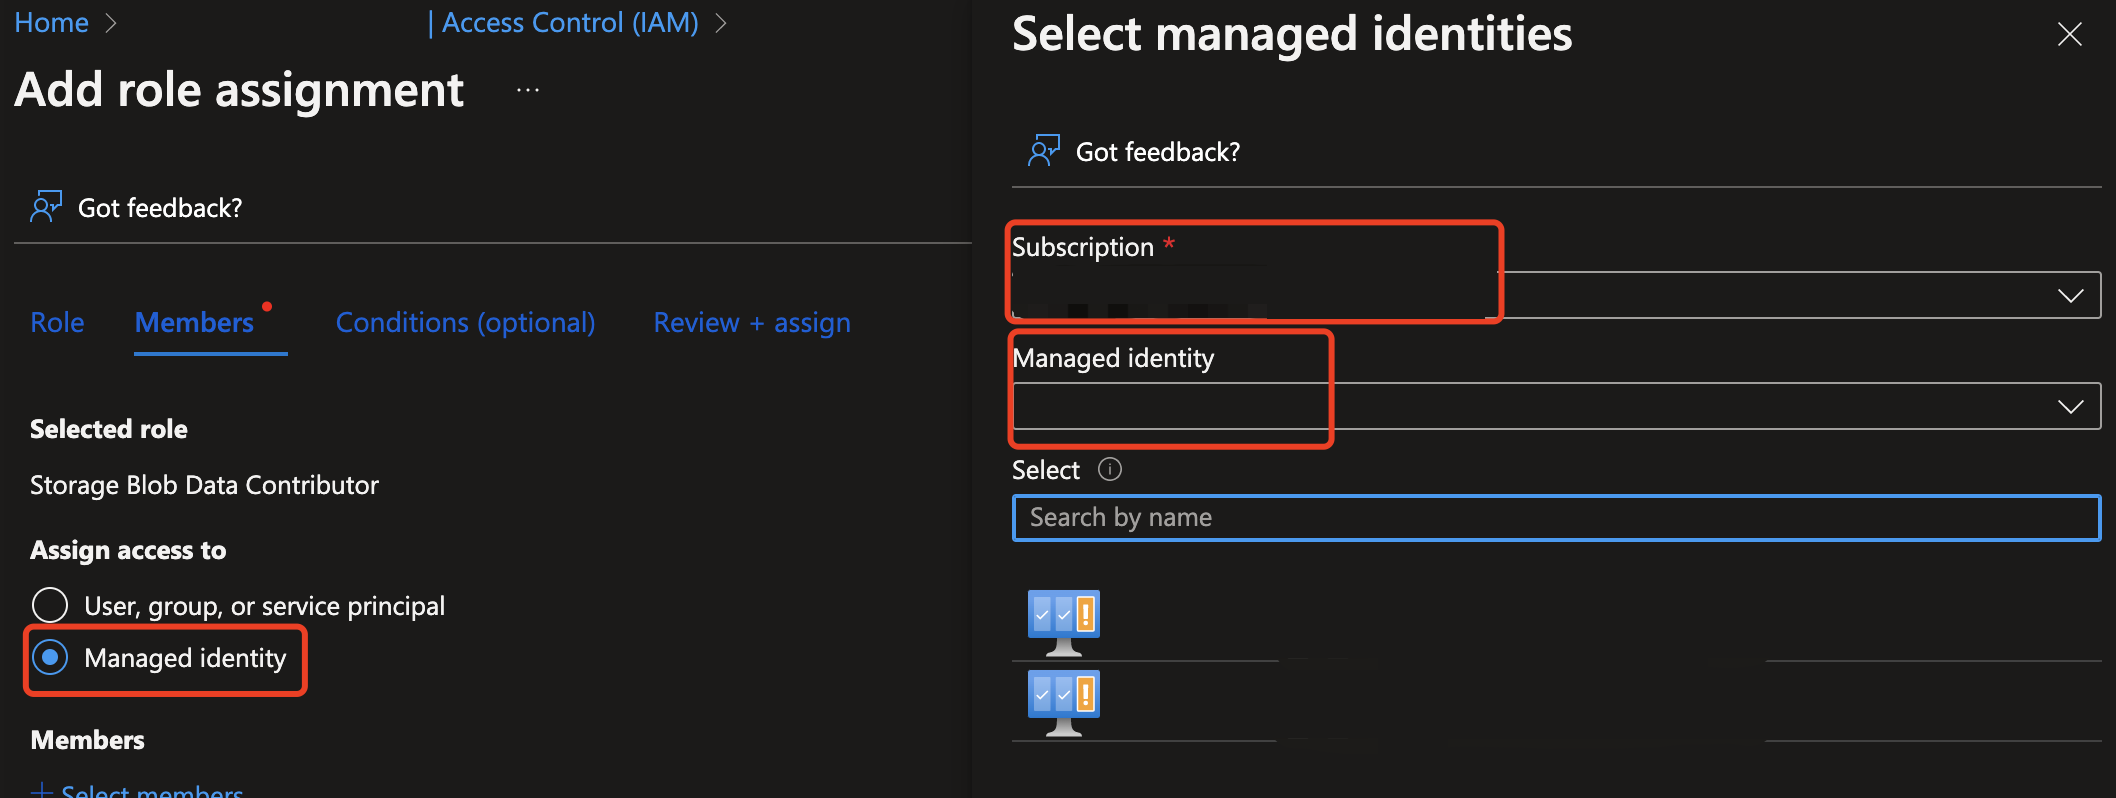
Assign the role of Storage Blob Data Contributor/Owner to the Managed identity. Any roles highlighted below should work.


Create and train a custom category
Important
Allow enough time for model training
The end-to-end execution of custom category training can take from around five hours to ten hours. Plan your moderation pipeline accordingly and allocate time for:
- Collecting and preparing your sample data
- The training process
- Model evaluation and adjustments
In the commands below, replace <your_api_key>, <your_endpoint>, and other necessary parameters with your own values. Then enter each command in a terminal window and run it.
Create new category version
curl -X PUT "<your_endpoint>/contentsafety/text/categories/<your_category_name>?api-version=2024-02-15-preview" \
     -H "Ocp-Apim-Subscription-Key: <your_api_key>" \
     -H "Content-Type: application/json" \
     -d "{
        \"categoryName\": \"<your_category_name>\",
        \"definition\": \"<your_category_definition>\",
        \"sampleBlobUrl\": \"https://example.blob.core.windows.net/example-container/sample.jsonl\"
     }"
Start the category build process:
After you receive the response, store the operation ID (referred to as id) in a temporary. You need this ID to retrieve the build status using the Get status API.
curl -X POST "<your_endpoint>/contentsafety/text/categories/<your_category_name>:build?api-version=2024-02-15-preview&version={version}" \
     -H "Ocp-Apim-Subscription-Key: <your_api_key>" \
     -H "Content-Type: application/json"
Get the category build status:
To retrieve the status, utilize the id obtained from the previous API response and place it in the path of the API below.
curl -X GET "<your_endpoint>/contentsafety/text/categories/operations/<id>?api-version=2024-02-15-preview" \
     -H "Ocp-Apim-Subscription-Key: <your_api_key>" \
     -H "Content-Type: application/json"
Analyze text with a customized category
Run the following command to analyze text with your customized category. Replace <your_category_name> with your own value:
curl -X POST "<your_endpoint>/contentsafety/text:analyzeCustomCategory?api-version=2024-02-15-preview" \
     -H "Ocp-Apim-Subscription-Key: <your_api_key>" \
     -H "Content-Type: application/json" \
     -d "{
        \"text\": \"Example text to analyze\",
        \"categoryName\": \"<your_category_name>\",
        \"version\": 1
        }"
Other custom categories operations
Remember to replace the placeholders below with your actual values for the API key, endpoint, and specific content (category name, definition, and so on). These examples help you to manage the customized categories in your account.
Get a customized category or a specific version of it
Replace the placeholders with your own values and run the following command in a terminal window:
curl -X GET "<endpoint>/contentsafety/text/categories/<your_category_name>?api-version=2024-02-15-preview&version=1" \
     -H "Ocp-Apim-Subscription-Key: <your_api_key>" \
     -H "Content-Type: application/json"
List categories of their latest versions
Replace the placeholders with your own values and run the following command in a terminal window:
curl -X GET "<endpoint>/contentsafety/text/categories?api-version=2024-02-15-preview" \
     -H "Ocp-Apim-Subscription-Key: <your_api_key>" \
     -H "Content-Type: application/json"
Delete a customized category or a specific version of it
Replace the placeholders with your own values and run the following command in a terminal window:
curl -X DELETE "<endpoint>/contentsafety/text/categories/<your_category_name>?api-version=2024-02-15-preview&version=1" \
     -H "Ocp-Apim-Subscription-Key: <your_api_key>" \
     -H "Content-Type: application/json"