Quickstart: Use SSMS to connect to and query Azure SQL Database or Azure SQL Managed Instance
Applies to: ![]() Azure SQL Database
Azure SQL Database ![]() Azure SQL Managed Instance
Azure SQL Managed Instance
In this quickstart, you'll learn how to use SQL Server Management Studio (SSMS) to connect to Azure SQL Database or Azure SQL Managed Instance and run queries.
Prerequisites
Completing this quickstart requires the following items:
A database in Azure SQL Database, Azure SQL Managed Instance or SQL Server on Azure VM. You can use one of these quickstarts to create and then configure your resource:
Action SQL Database SQL Managed Instance SQL Server on Azure VM Create Portal Portal Portal CLI CLI PowerShell PowerShell PowerShell Configure Server-level IP firewall rule
Microsoft Entra authentication1Connectivity from a VM
Connectivity from on-site
Microsoft Entra authentication1Connectivity to SQL Server
Microsoft Entra authentication1Sample database AdventureWorksLT sample Restore or import Adventure Works from BACPAC file from GitHub Restore or import Adventure Works from BACPAC file from GitHub or Restore Wide World Importers or Restore Wide World Importers
1 This tutorial uses Microsoft Entra multifactor authentication (MFA), which requires configuring a Microsoft Entra admin for your resource. If you haven't configured Microsoft Entra authentication for your resource, you can use SQL Server Authentication instead, though it is less secure.
Important
The scripts in this article are written to use the Adventure Works database. With a managed instance, you must either import the Adventure Works database into an instance database or modify the scripts in this article to use the Wide World Importers database.
If you simply want to run some ad hoc queries in Azure SQL Database without installing SSMS, use the Azure portal's query editor to query a database.
Get server connection information
Get the connection information you need to connect to your resource. You'll need the fully qualified server name (for Azure SQL Database) or host name (for Azure SQL Managed Instance), database name, and login information to complete this quickstart.
Sign in to the Azure portal.
Navigate to the database or managed instance you want to query.
On the Overview page, review the fully qualified server name next to Server name for your database in SQL Database or the fully qualified server name (or IP address) next to Host for your managed instance in SQL Managed Instance or your SQL Server instance on your VM. To copy the server name or host name, hover over it and select the Copy icon.
Important
- For connection information for SQL Server on Azure VM, see Connect to SQL Server
- A server listens on port 1433. To connect to a server from behind a corporate firewall, the firewall must have this port open.
Connect to your database
In SQL Server Management Studio (SSMS), connect to your database.
Open SSMS.
The Connect to Server dialog box appears. Enter the following information on the Login tab:
Setting Suggested value Details Server type Database Engine Select Database Engine (usually the default option). Server name The fully qualified server name Enter the name of your Azure SQL Database server or Azure SQL Managed Instance host name. Authentication Microsoft Entra MFA / SQL Server Authentication This quickstart uses the recommended Microsoft Entra multifactor authentication but other authentication options are available. Login Server account user ID The user ID from the server account used to create the server. A login is not required if you selected Microsoft Entra MFA. Password Server account password The password from the server account used to create the server. A password is not required if you selected Microsoft Entra MFA. Encryption Strict (SQL Server 2022 and Azure SQL) Starting with SQL Server Management Studio 20, Strict is required to connect to an Azure SQL resource. Trust server certificate Trust Server Certificate Check this option to bypass server certificate validation. The default value is False (unchecked), which promotes better security using trusted certificates. This option is selected by default when you choose Strict encryption. Host Name in Certificate Host name of the server The value provided in this option is used to specify a different, but expected, CN or SAN in the server certificate. 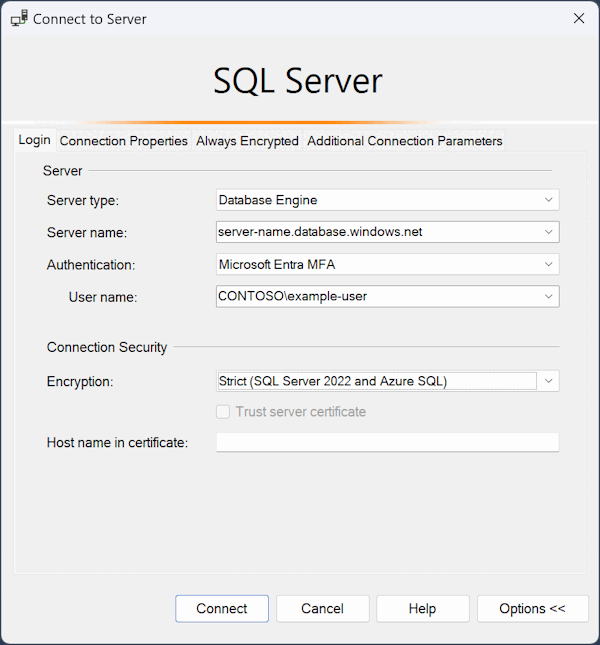
Select the Connection Properties tab in the Connect to Server dialog box.
In the Connect to database dropdown list menu, select mySampleDatabase. Completing the quickstart in the Prerequisites section creates an AdventureWorksLT database named mySampleDatabase. If your working copy of the AdventureWorks database has a different name than mySampleDatabase, then select it instead.
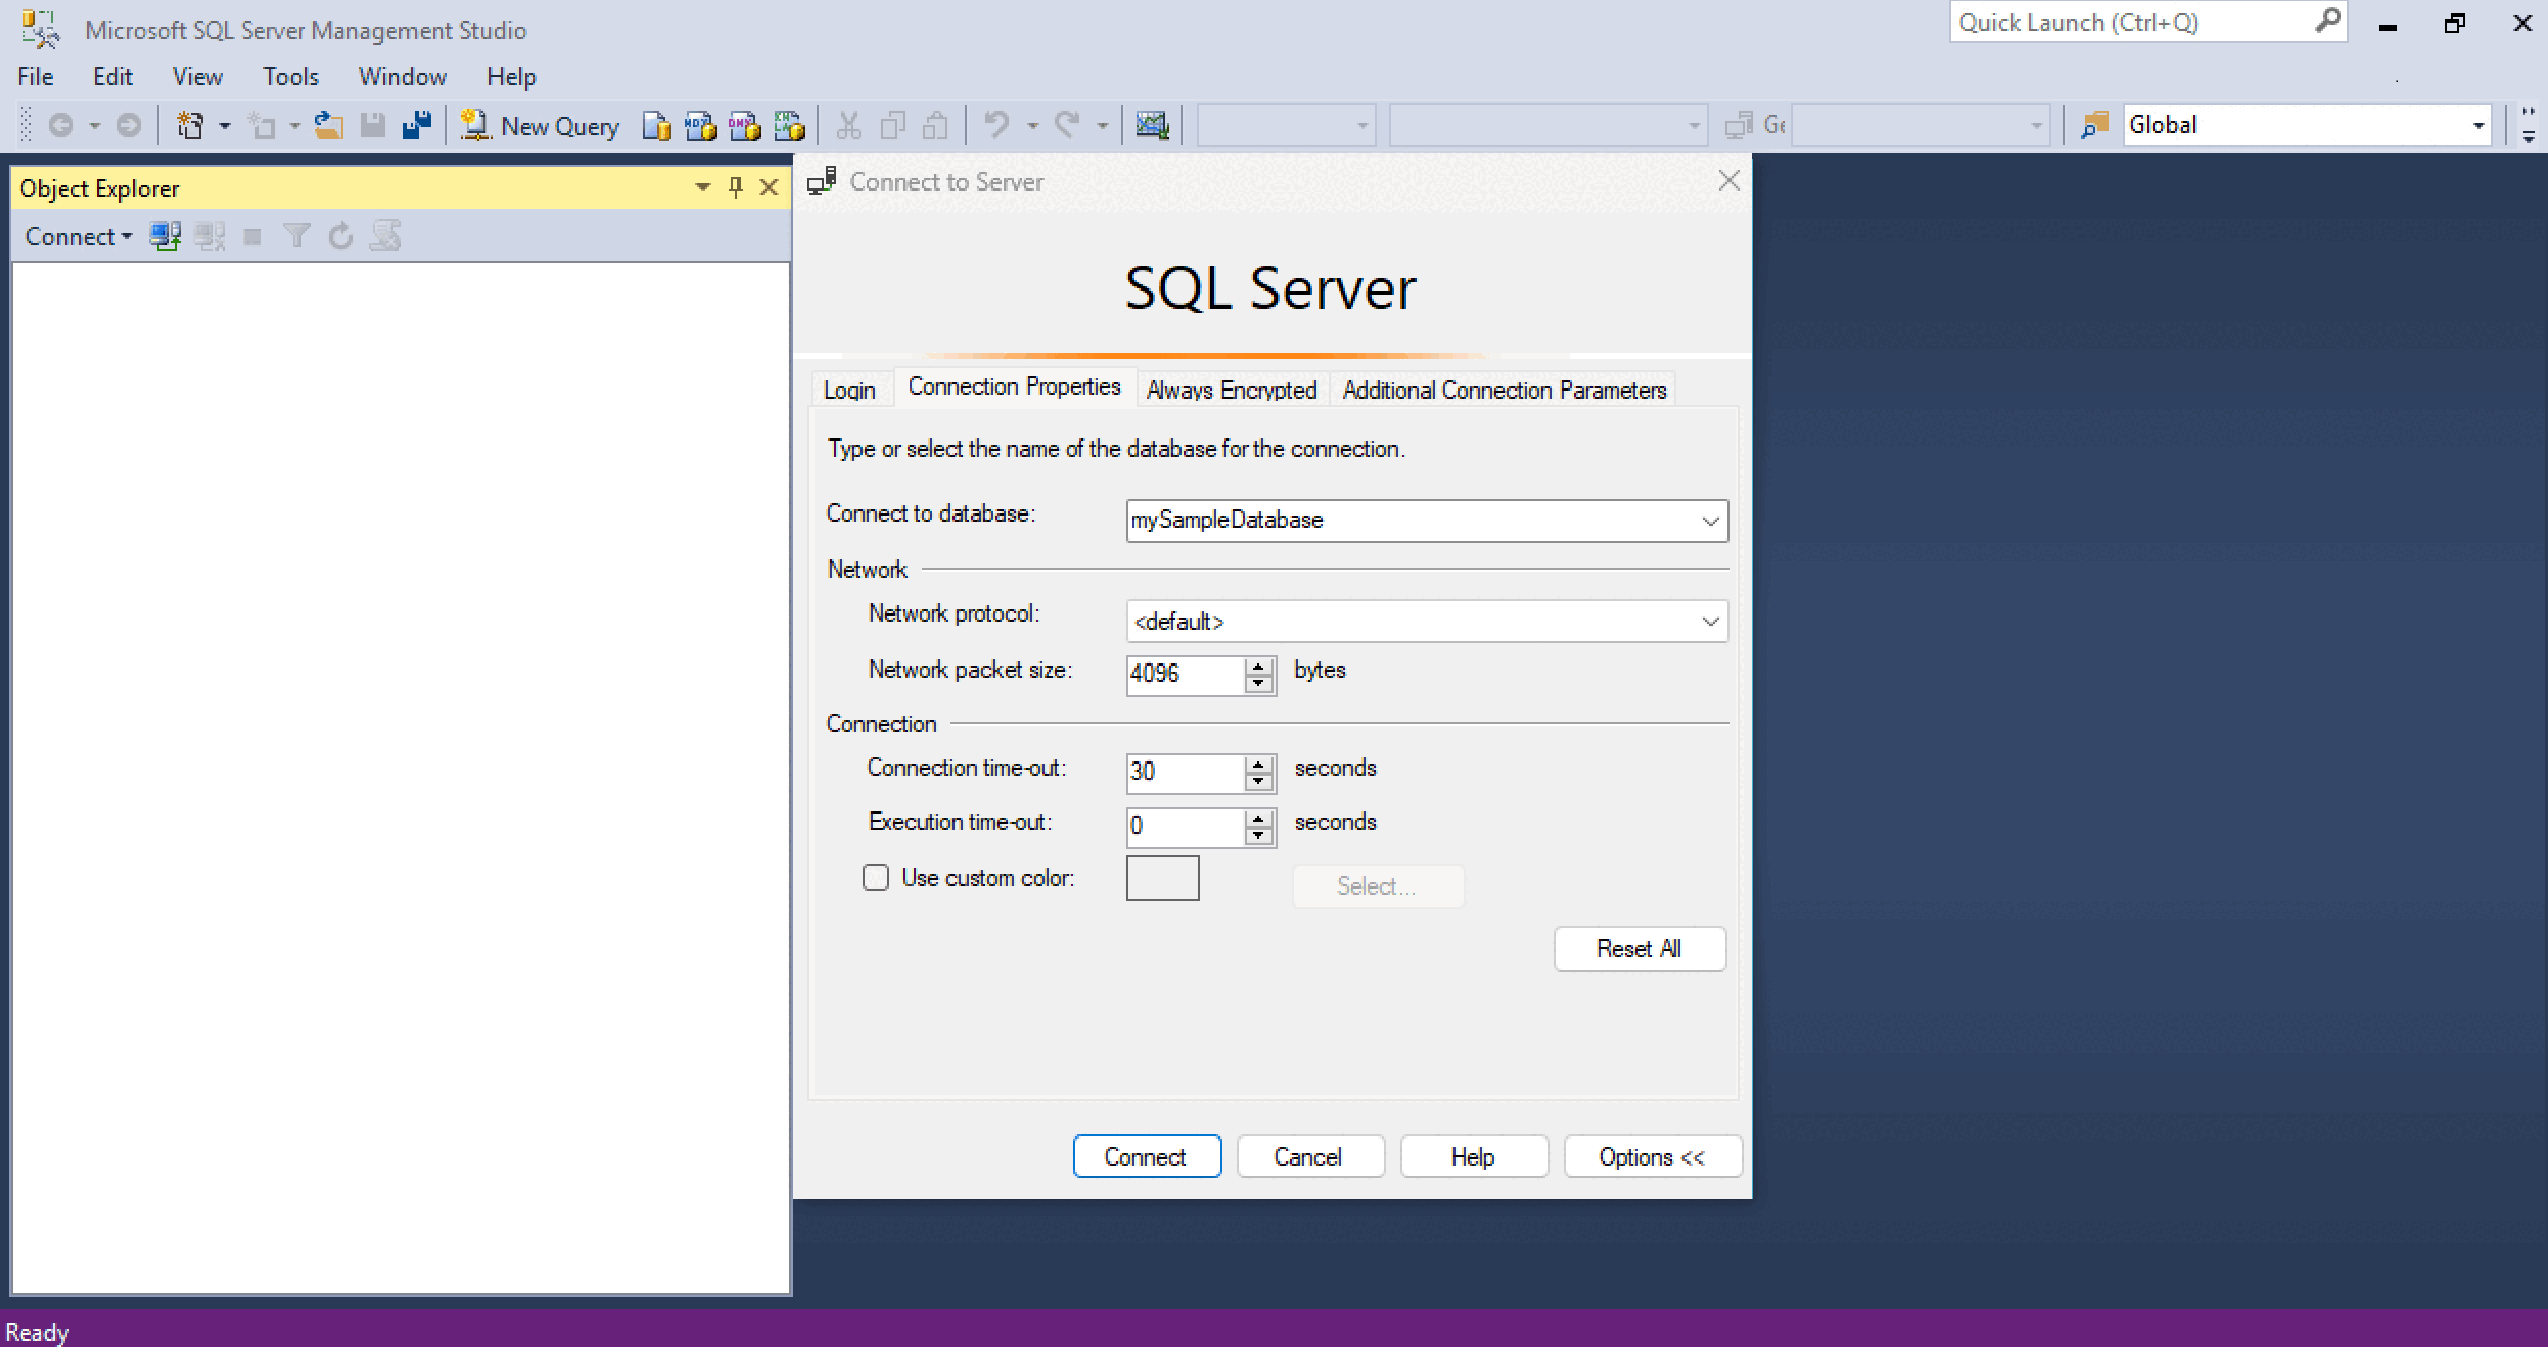
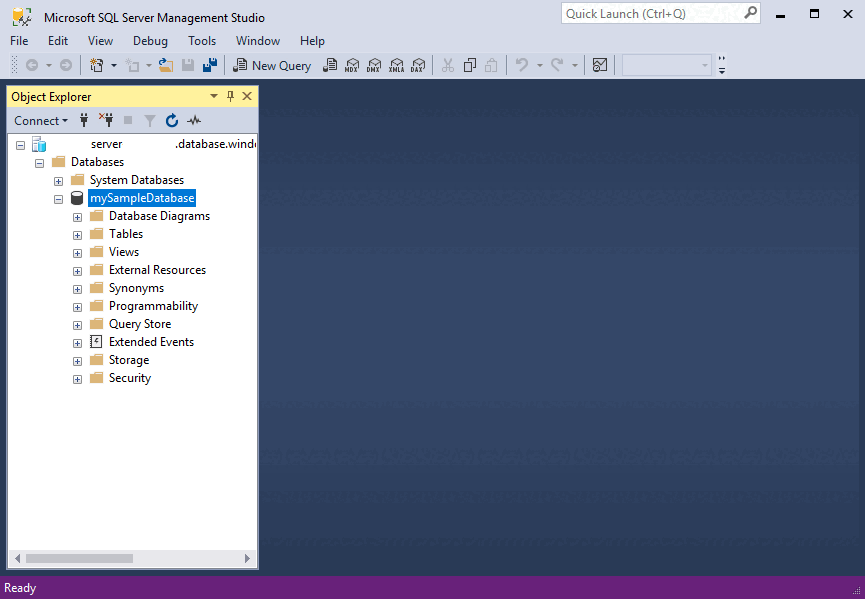
Select Connect. The Object Explorer window opens.
To view the database's objects, expand Databases and then expand your database node.


Query data
Run this SELECT Transact-SQL code to query for the top 20 products by category.
In Object Explorer, right-click mySampleDatabase and select New Query. A new query window connected to your database opens.
In the query window, paste the following SQL query:
SELECT pc.Name AS CategoryName,
       p.name AS ProductName
FROM [SalesLT].[ProductCategory] AS pc
     INNER JOIN
     [SalesLT].[Product] AS p
     ON pc.productcategoryid = p.productcategoryid;
On the toolbar, select Execute to run the query and retrieve data from the
ProductandProductCategorytables.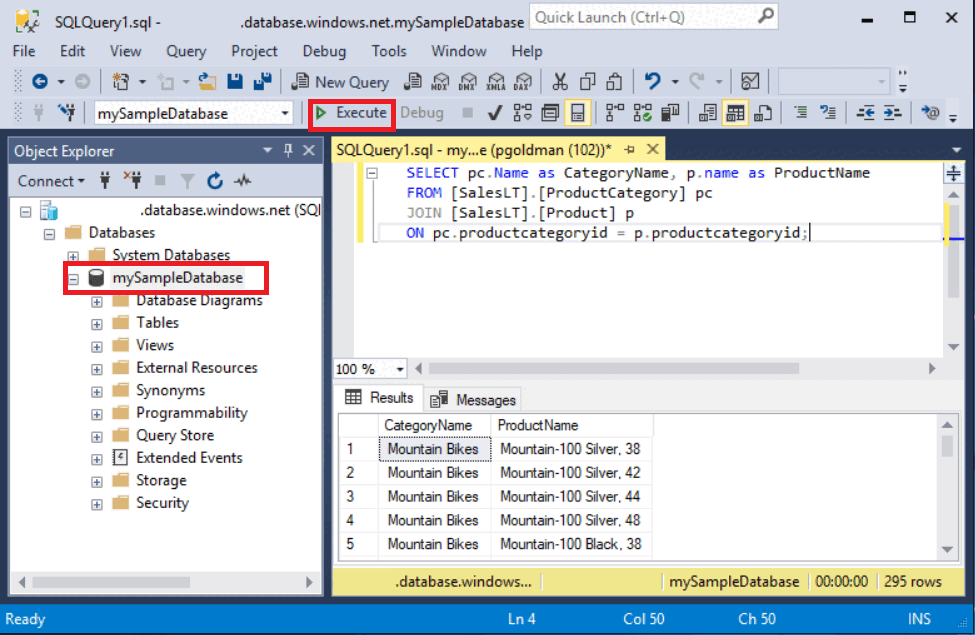

Insert data
Run this INSERT Transact-SQL code to create a new product in the SalesLT.Product table.
Replace the previous query with this one.
INSERT INTO [SalesLT].[Product] ([Name], [ProductNumber], [Color], [ProductCategoryID], [StandardCost], [ListPrice], [SellStartDate])
VALUES                         ('myNewProduct', 123456789, 'NewColor', 1, 100, 100, GETDATE());
Select Execute to insert a new row in the
Producttable. The Messages pane displays (1 row affected).
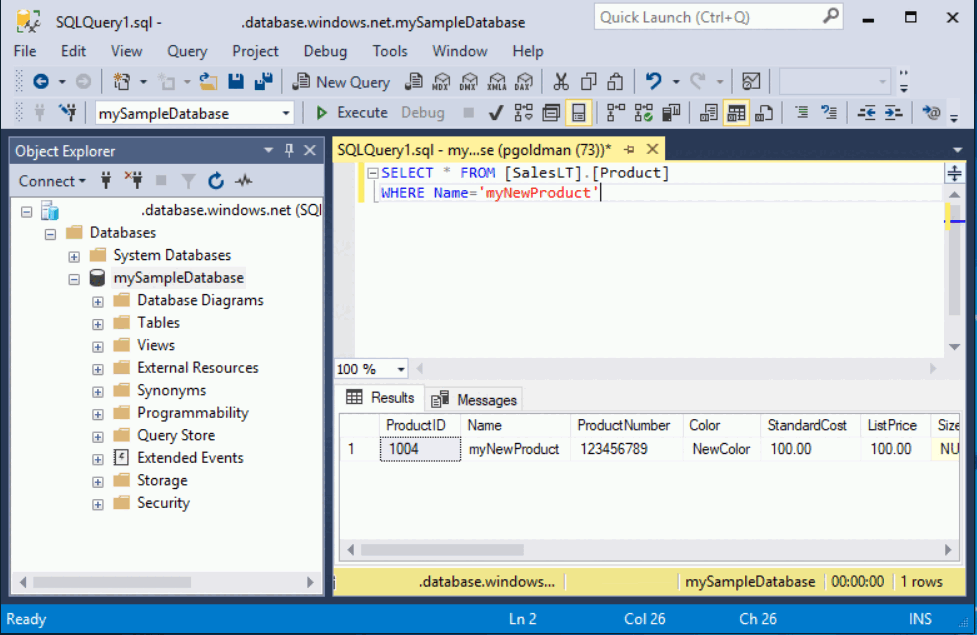
View the result
Replace the previous query with this one.
SELECT *
FROM [SalesLT].[Product]
WHERE Name = 'myNewProduct';
Select Execute. The following result appears.

Update data
Run this UPDATE Transact-SQL code to modify your new product.
Replace the previous query with this one that returns the new record created previously:
UPDATE [SalesLT].[Product]
    SET [ListPrice] = 125
WHERE Name = 'myNewProduct';
Select Execute to update the specified row in the
Producttable. The Messages pane displays (1 row affected).
Delete data
Run this DELETE Transact-SQL code to remove your new product.
Replace the previous query with this one.
DELETE [SalesLT].[Product]
WHERE Name = 'myNewProduct';
Select Execute to delete the specified row in the
Producttable. The Messages pane displays (1 row affected).
Authentication options
Although this quickstart uses Microsoft Entra MFA, other authentication options are available, such as:
- Default: The default option can be used when connecting using any Microsoft Entra authentication mode that's passwordless and noninteractive.
- Microsoft Entra multifactor authentication: Uses an interactive prompt for authentication.
- Managed identities in Microsoft Entra for Azure SQL: Supports two types of managed identities: system-assigned managed identity (SMI) and user-assigned managed identity (UMI). If you want to use a managed identity to connect to any SQL product from SSMS, install SSMS to an Azure VM. SSMS needs to be within an Azure context where it has access to request a token for that managed identity. The SQL product must have a principal for that managed identity. See Use a Windows VM system-assigned managed identity to access Azure SQL.
- Microsoft Entra service principals: Use a service principal to authenticate to a SQL product from SSMS by using its application client ID and secret.
- Microsoft Entra password: Uses a Microsoft Entra user name and password to connect to the SQL product.
- Microsoft Entra integrated: Uses the current Windows user's credentials to connect to the SQL product.
- SQL Server Authentication: Uses a SQL Server login and password to connect to the SQL product. This option is less secure than Microsoft Entra authentication.
Related content
- SQL Server Management Studio
- Azure portal query editor for Azure SQL Database
- Quickstart: Use Visual Studio Code to connect and query Azure SQL Database or Azure SQL Managed Instance
- Quickstart: Use .NET and C# in Visual Studio to connect to and query a database
- Quickstart: Use PHP to query a database in Azure SQL Database or Azure SQL Managed Instance
- Quickstart: Use Node.js to query a database in Azure SQL Database or Azure SQL Managed Instance
- Use Java and JDBC with Azure SQL Database
- Quickstart: Use Python to query a database in Azure SQL Database or Azure SQL Managed Instance
- Quickstart: Use Ruby to query a database in Azure SQL Database or Azure SQL Managed Instance