Configure a container image to execute deployments with Terraform
In this article, you learn how to build custom Terraform container images to deploy your environment definitions in Azure Deployment Environments (ADE). You learn how to configure a custom image to provision infrastructure using the Terraform Infrastructure-as-Code (IaC) framework.
An environment definition comprises at least two files: a template file, like main.tf, and a manifest file named environment.yaml. You use a container to deploy environment definition that uses Terraform.
The ADE extensibility model enables you to create custom container images to use with your environment definitions. By using the extensibility model, you can create your own custom container images, and store them in a container registry like DockerHub. You can then reference these images in your environment definitions to deploy your environments.
Prerequisites
- An Azure account with an active subscription. Create an account for free.
- Azure Deployment Environments set up in your Azure subscription.
- To set up ADE, follow the Quickstart: Configure Azure Deployment Environments.
Create a custom Terraform container image
Creating a custom container image allows you to customize your deployments to fit your requirements.
After you complete the image customization, you must build the image and push it to your container registry.
Create and customize a container image with Docker
In this example, you learn how to build a Docker image to utilize ADE deployments and access the ADE CLI, basing your image on one of the ADE authored images.
The ADE CLI is a tool that allows you to build custom images by using ADE base images. You can use the ADE CLI to customize your deployments and deletions to fit your workflow. The ADE CLI is preinstalled on the sample images. To learn more about the ADE CLI, see the CLI Custom Runner Image reference.
To create an image configured for ADE, follow these steps:
- Base your image on an ADE-authored sample image or the image of your choice by using the FROM statement.
- Install any necessary packages for your image by using the RUN statement.
- Create a scripts folder at the same level as your Dockerfile, store your deploy.sh and delete.sh files within it, and ensure those scripts are discoverable and executable inside your created container. This step is necessary for your deployment to work using the ADE core image.
Select a sample container image by using the FROM statement
Include a FROM statement within a created DockerFile for your new image pointing to a sample image hosted on Microsoft Artifact Registry.
Here's an example FROM statement, referencing the sample core image:
FROM mcr.microsoft.com/deployment-environments/runners/core:latest
This statement pulls the most recently published core image, and makes it a basis for your custom image.
Install Terraform in a Dockerfile
You can install the Terraform CLI to an executable location so that it can be used in your deployment and deletion scripts.
Here's an example of that process, installing version 1.7.5 of the Terraform CLI:
RUN wget -O terraform.zip https://releases.hashicorp.com/terraform/1.7.5/terraform_1.7.5_linux_amd64.zip
RUN unzip terraform.zip && rm terraform.zip
RUN mv terraform /usr/bin/terraform
Tip
You can get the download URL for your preferred version of the Terraform CLI from Hashicorp releases.
The ADE sample images are based on the Azure CLI image, and have the ADE CLI and JQ packages preinstalled. You can learn more about the Azure CLI, and the JQ package.
To install any more packages you need within your image, use the RUN statement.
Execute operation shell scripts
Within the sample images, operations are determined and executed based on the operation name. Currently, the two operation names supported are deploy and delete.
To set up your custom image to utilize this structure, specify a folder at the level of your Dockerfile named scripts, and specify two files, deploy.sh, and delete.sh. The deploy shell script runs when your environment is created or redeployed, and the delete shell script runs when your environment is deleted. You can see examples of shell scripts in the repository under the Runner-Images folder for the ARM-Bicep image.
To ensure these shell scripts are executable, add the following lines to your Dockerfile:
COPY scripts/* /scripts/
RUN find /scripts/ -type f -iname "*.sh" -exec dos2unix '{}' '+'
RUN find /scripts/ -type f -iname "*.sh" -exec chmod +x {} \;
Author operation shell scripts to use the Terraform CLI
There are three steps to deploy infrastructure via Terraform:
terraform init- initializes the Terraform CLI to perform actions within the working directoryterraform plan- develops a plan based on the incoming Terraform infrastructure files and variables, and any existing state files, and develops steps needed to create or update infrastructure specified in the .tf filesterraform apply- applies the plan to create new or update existing infrastructure in Azure
During the core image's entrypoint, any existing state files are pulled into the container and the directory saved under the environment variable $ADE_STORAGE. Additionally, any parameters set for the current environment stored under the variable $ADE_OPERATION_PARAMETERS. In order to access the existing state file, and set your variables within a .tfvars.json file, run the following commands:
EnvironmentState="$ADE_STORAGE/environment.tfstate"
EnvironmentPlan="/environment.tfplan"
EnvironmentVars="/environment.tfvars.json"

echo "$ADE_OPERATION_PARAMETERS" > $EnvironmentVars
Additionally, to utilize ADE privileges to deploy infrastructure inside your subscription, your script needs to use the Managed Service Identity (MSI) when provisioning infrastructure by using the Terraform AzureRM provider. If your deployment needs special permissions to complete your deployment, such as particular roles, assign those permissions to the project environment type's identity that is being used for your environment deployment. ADE sets the relevant environment variables, such as the client, tenant, and subscription IDs within the core image's entrypoint, so run the following commands to ensure the provider uses the ADE MSI:
export ARM_USE_MSI=true
export ARM_CLIENT_ID=$ADE_CLIENT_ID
export ARM_TENANT_ID=$ADE_TENANT_ID
export ARM_SUBSCRIPTION_ID=$ADE_SUBSCRIPTION_ID
If you have other variables to reference within your template that aren't specified in your environment's parameters, set environment variables using the prefix TF_VAR. A list of provided ADE environment variables is provided Azure Deployment Environment CLI variables reference. An example of those commands could be;
export TF_VAR_resource_group_name=$ADE_RESOURCE_GROUP_NAME
export TF_VAR_ade_env_name=$ADE_ENVIRONMENT_NAME
export TF_VAR_env_name=$ADE_ENVIRONMENT_NAME
export TF_VAR_ade_subscription=$ADE_SUBSCRIPTION_ID
export TF_VAR_ade_location=$ADE_ENVIRONMENT_LOCATION
export TF_VAR_ade_environment_type=$ADE_ENVIRONMENT_TYPE
Now, you can run the steps listed previously to initialize the Terraform CLI, generate a plan for provisioning infrastructure, and apply a plan during your deployment script:
terraform init
terraform plan -no-color -compact-warnings -refresh=true -lock=true -state=$EnvironmentState -out=$EnvironmentPlan -var-file="$EnvironmentVars"
terraform apply -no-color -compact-warnings -auto-approve -lock=true -state=$EnvironmentState $EnvironmentPlan
During your deletion script, you can add the destroy flag to your plan generation to delete the existing resources, as shown in the following example:
terraform init
terraform plan -no-color -compact-warnings -destroy -refresh=true -lock=true -state=$EnvironmentState -out=$EnvironmentPlan -var-file="$EnvironmentVars"
terraform apply -no-color -compact-warnings -auto-approve -lock=true -state=$EnvironmentState $EnvironmentPlan
Finally, to make the outputs of your deployment uploaded and accessible when accessing your environment via the Azure CLI, transform the output object from Terraform to the ADE-specified format through the JQ package. Set the value to the $ADE_OUTPUTS environment variable, as shown in the following example:
tfOutputs=$(terraform output -state=$EnvironmentState -json)
# Convert Terraform output format to ADE format.
tfOutputs=$(jq 'walk(if type == "object" then
            if .type == "bool" then .type = "boolean"
            elif .type == "list" then .type = "array"
            elif .type == "map" then .type = "object"
            elif .type == "set" then .type = "array"
            elif (.type | type) == "array" then
                if .type[0] == "tuple" then .type = "array"
                elif .type[0] == "object" then .type = "object"
                elif .type[0] == "set" then .type = "array"
                else .
                end
            else .
            end
        else .
        end)' <<< "$tfOutputs")

echo "{\"outputs\": $tfOutputs}" > $ADE_OUTPUTS
Make the custom image accessible to ADE
You must build your Docker image and push it to your container registry to make it available for use in ADE. You can build your image using the Docker CLI, or by using a script provided by ADE.
Select the appropriate tab to learn more about each approach.
Before you build the image to be pushed to your registry, ensure the Docker Engine is installed on your computer. Then, navigate to the directory of your Dockerfile, and run the following command:
docker build . -t {YOUR_REGISTRY}.azurecr.io/{YOUR_REPOSITORY}:{YOUR_TAG}
For example, if you want to save your image under a repository within your registry named customImage, and upload with the tag version of 1.0.0, you would run:
docker build . -t {YOUR_REGISTRY}.azurecr.io/customImage:1.0.0
Push the Docker image to a registry
In order to use custom images, you need to set up a publicly accessible image registry with anonymous image pull enabled. This way, Azure Deployment Environments can access your custom image to execute in our container.
Azure Container Registry is an Azure offering that stores container images and similar artifacts.
To create a registry, which can be done through the Azure CLI, the Azure portal, PowerShell commands, and more, follow one of the quickstarts.
To set up your registry to have anonymous image pull enabled, run the following commands in the Azure CLI:
az login
az acr login -n {YOUR_REGISTRY}
az acr update -n {YOUR_REGISTRY} --public-network-enabled true
az acr update -n {YOUR_REGISTRY} --anonymous-pull-enabled true
When you're ready to push your image to your registry, run the following command:
docker push {YOUR_REGISTRY}.azurecr.io/{YOUR_IMAGE_LOCATION}:{YOUR_TAG}
Connect the image to your environment definition
When authoring environment definitions to use your custom image in their deployment, edit the runner property on the manifest file (environment.yaml or manifest.yaml).
runner: "{YOUR_REGISTRY}.azurecr.io/{YOUR_REPOSITORY}:{YOUR_TAG}"
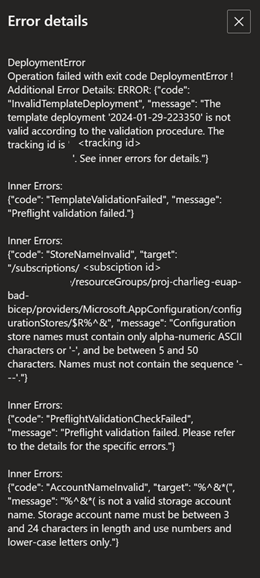
Access operation logs and error details
ADE stores error details for a failed deployment in the $ADE_ERROR_LOG file within the container.
To troubleshoot a failed deployment:
Sign in to the Developer Portal.
Identify the environment that failed to deploy, and select See details.
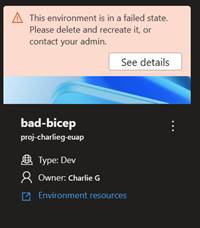
Review the error details in the Error Details section.


Additionally, you can use the Azure CLI to view an environment's error details using the following command:
az devcenter dev environment show --environment-name {YOUR_ENVIRONMENT_NAME} --project {YOUR_PROJECT_NAME}
To view the operation logs for an environment deployment or deletion, use the Azure CLI to retrieve the latest operation for your environment, and then view the logs for that operation ID.
# Get list of operations on the environment, choose the latest operation
az devcenter dev environment list-operation --environment-name {YOUR_ENVIRONMENT_NAME} --project {YOUR_PROJECT_NAME}
# Using the latest operation ID, view the operation logs
az devcenter dev environment show-logs-by-operation --environment-name {YOUR_ENVIRONMENT_NAME} --project {YOUR_PROJECT_NAME} --operation-id {LATEST_OPERATION_ID}
Related content
Feedback
În curând: Pe parcursul anului 2024, vom elimina treptat Probleme legate de GitHub ca mecanism de feedback pentru conținut și îl vom înlocui cu un nou sistem de feedback. Pentru mai multe informații, consultați: https://aka.ms/ContentUserFeedback.
Trimiteți și vizualizați feedback pentru