Notă
Accesul la această pagină necesită autorizare. Puteți încerca să vă conectați sau să modificați directoarele.
Accesul la această pagină necesită autorizare. Puteți încerca să modificați directoarele.
Applies to: Azure Logic Apps (Standard)
When your integration workflow needs logic beyond the built-in operations and prebuilt connectors, create a local function where the code remains specific to your logic app solution. This local function is custom .NET code that you author, run, debug, and deploy in the same Azure Logic Apps Standard project as the caller workflows. By keeping the function local, you can develop, secure, deploy, scale, and operate the workflow and its custom code as a single app.
Local functions help your workflows perform tasks such as:
- Implement custom business logic and calculations.
- Parse proprietary or complex inbound messages.
- Validate, enrich, or perform simple transformations on data.
- Shape outbound messages for an API, connector, or partner system.
- Reuse suitable .NET helper logic from existing integration solutions, including BizTalk Server migration scenarios.
With local functions, you can achieve the following goals:
| Goal | Capability |
|---|---|
| Develop and debug one solution | Create the workflow and local function in the same Visual Studio Code workspace, and step through both in one debugging session. |
| Deploy together | Build and deploy the local function alongside the caller workflows without provisioning a separate service plan. |
| Reduce service boundaries | Avoid a separate Function app, HTTP endpoint, authentication flow, and network hop for workflow-specific code. |
| Combine low-code and pro-code tools | Use connectors and workflow orchestration for the integration flow. Use local functions for specialized .NET logic. |
A local function differs from a function hosted in a separate function app in Azure Functions. Azure Functions works best when your code must expose an independent endpoint, be shared across apps, follow its own deployment and versioning lifecycle, or scale independently. When your code needs to work inside a specific Azure Logic Apps Standard solution and share the application lifecycle with the caller workflows, use a local function.
This guide shows how to create, build, call, debug, and deploy local .NET functions for Standard workflows by using Visual Studio Code.
Note
Local functions aren't suitable for the following scenarios:
- Running processes that might exceed 10 minutes.
- Using BizTalk Server pipeline components that implement streaming.
For more information, see Limitations.
Prerequisites
An Azure account and subscription. Get a free Azure account.
The most recent Visual Studio Code with the Azure Logic Apps (Standard) extension.
For prerequisites, see Create Standard workflows in single-tenant Azure Logic Apps with Visual Studio Code.
The extension provides the following capabilities and benefits:
- Write your own code by creating functions that have the flexibility and control to solve your most challenging integration problems.
- Debug code locally in Visual Studio Code. Step through your code and workflows in the same debugging session.
- Deploy code alongside your workflows. No other service plans are necessary.
- Support BizTalk Server migration scenarios so you can lift and shift custom .NET investments from on premises to the cloud.
A local folder to use for your code project.
Limitations
You can author local functions only in Visual Studio Code running on Windows. This capability supports .NET Framework and .NET 8 for Standard workflows hosted on Workflow Service Plan, App Service Environment v3 (ASE v3), or Hybrid.
You can't use custom functions authoring in the Azure portal. However, to work with outputs from custom functions in your workflow, follow these steps:
After you deploy your functions to Azure, follow the steps in Call your code from a workflow for the Azure portal.
Add the built-in action named Call a local function in this logic app to your workflow. Select the deployed custom functions you want and run your code.
Use subsequent workflow actions to reference the custom function outputs, like you can in any other workflow. You can view the built-in action's run history, inputs, and outputs.
For general limitations, see Limits and configuration reference for Azure Logic Apps.
1: Create a code project
The Azure Logic Apps (Standard) extension for Visual Studio Code includes a code project template that provides a streamlined experience for writing, debugging, and deploying your own code with your workflows. This project template creates a workspace file and two sample projects: one project to write your code and another project to create your workflows.
Note
You can't use the same project folder for both your code and workflows.
To create a code project, follow these steps:
In Visual Studio Code, sign in to your Azure account.
If sign in takes longer than usual, Visual Studio Code prompts you to sign in through a Microsoft authentication website by providing you with a device code. To sign in by using the code instead, follow these steps:
Select Use Device Code, and then select Copy & Open.
Select Open Link to open a new browser window and continue to the authentication website.
On the Sign in to your account page, enter your authentication code, and select Next.
On the Activity Bar, select the Azure icon.
In the Azure window, go to the Workspace section. Move your pointer over the title area so that the toolbar appears.
From the Azure Logic Apps menu, select Create new logic app workspace.
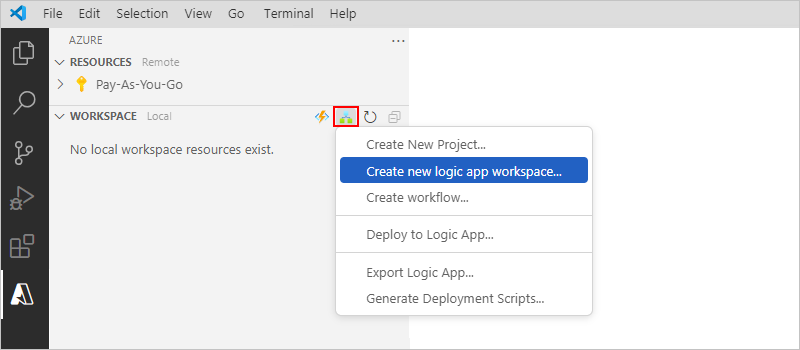
In the Select Folder window, browse to the local project folder, select the folder, and then Select.
In the Create new logic app workspace window, for the Workspace name prompt, enter a name for your workspace, and then press Enter.
This example uses
weather-appas the workspace name:
For the Select a template for your new project prompt, select Logic app with custom code project.
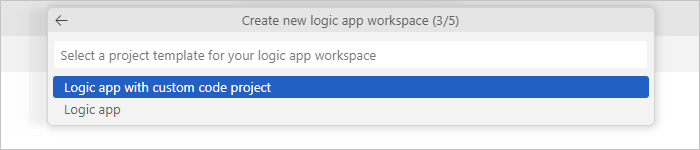
For the Select a target framework prompt, select either .NET Framework or .NET 8.
Follow the subsequent prompts to provide the following information:
Prompt Example value Logic App name weather-logic-appFunction name for your .NET functions project WeatherForecastNamespace for your .NET functions project Contoso.EnterpriseSelect a template for your project's first workflow:
- Stateful workflow
- Stateless workflow
- Autonomous agent
- Conversational agent
- Skip for nowStateful workflow Workflow name weather-workflowFor the Select how you would like to open your project prompt, select Open in current window.
After you finish this step, Visual Studio Code creates your workspace, which includes a .NET functions project and a logic app project, by default, for example:
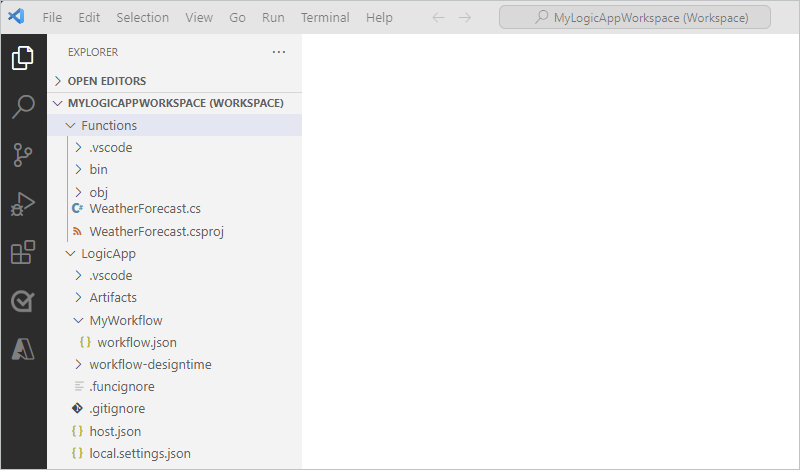
In the Explorer window, note the following folders in your workspace:
Folder Description <workspace-name> Contains both your .NET functions project and logic app workflow project. <logic-app-name> Contains the files and other artifacts for your logic app project. For example, the workflow.json file is the workflow definition file where you can build your workflow. <function-name> Contains the files and other artifacts for your .NET functions project. For example, the <function-name>.cs file is the code file where you can author your code. For the Enable connectors for Azure for Logic Apps <logic-app-name> prompt, select Use connectors from Azure.
For the Select subscription prompt, select the Azure subscription you want.
For the Select a resource group for new resources prompt, select the resource group you want or Create new resource group.
For the Select a location for new resources prompt, select the Azure region for deployment.
For the Select authentication method for Azure connectors, select the authentication type to use for connections that need authentication.
Authentication type Description Managed identity Select Managed Service Identity to use the system-assigned or user-assigned identity on your logic app resource.
By default, Standard logic app resources already have the system-assigned identity enabled. However, you need to set up the identity with role access on the target resource plus any other requirements.
For more information, see Assign role-based access to a managed identity.Connection keys Set up access to the target resource by using connections strings and access keys.
After you complete these steps, continue to the next section so you can author your code.
2: Write your code
In the Explorer window, expand the function project folder, and open the <function-name>.cs file.
This file contains sample code and specific code elements with values you previously provided.
In this example, the WeatherForecast.cs function file contains these code elements with example values:
Code element Value Namespace name Contoso.EnterpriseClass name WeatherForecastFunction name WeatherForecastFunction parameters zipCode,temperatureScaleReturn type Task<Weather>Complex type WeatherThe following example shows the complete sample code:
//------------------------------------------------------------
// Copyright (c) Microsoft Corporation. All rights reserved.
//------------------------------------------------------------

namespace Contoso.Enterprise
{
    using System;
    using System.Collections.Generic;
    using System.Threading.Tasks;
    using Microsoft.Azure.Functions.Extensions.Workflows;
    using Microsoft.Azure.WebJobs;
    using Microsoft.Extensions.Logging;

    /// <summary>
    /// Represents the WeatherForecast flow invoked function.
    /// </summary>
    public class WeatherForecast
    {

        private readonly ILogger<WeatherForecast> logger;

        public WeatherForecast(ILoggerFactory loggerFactory)
        {
            logger = loggerFactory.CreateLogger<WeatherForecast>();
        }

        /// <summary>
        /// Executes the logic app workflow.
        /// </summary>
        /// <param name="zipCode">The zip code.</param>
        /// <param name="temperatureScale">The temperature scale (e.g., Celsius or Fahrenheit).</param>
        [FunctionName("WeatherForecast")]
        public Task<Weather> Run([WorkflowActionTrigger] int zipCode, string temperatureScale)
        {

            this.logger.LogInformation("Starting WeatherForecast with Zip Code: " + zipCode + " and Scale: " + temperatureScale);

            // Generate random temperature within a range based on the temperature scale
            Random rnd = new Random();
            var currentTemp = temperatureScale == "Celsius" ? rnd.Next(1, 30) : rnd.Next(40, 90);
            var lowTemp = currentTemp - 10;
            var highTemp = currentTemp + 10;

            // Create a Weather object with the temperature information
            var weather = new Weather()
            {
                ZipCode = zipCode,
                CurrentWeather = $"The current weather is {currentTemp} {temperatureScale}",
                DayLow = $"The low for the day is {lowTemp} {temperatureScale}",
                DayHigh = $"The high for the day is {highTemp} {temperatureScale}"
            };

            return Task.FromResult(weather);
        }

        /// <summary>
        /// Represents the weather information for WeatherForecast.
        /// </summary>
        public class Weather
        {
            /// <summary>
            /// Gets or sets the zip code.
            /// </summary>
            public int ZipCode { get; set; }

            /// <summary>
            /// Gets or sets the current weather.
            /// </summary>
            public string CurrentWeather { get; set; }

            /// <summary>
            /// Gets or sets the low temperature for the day.
            /// </summary>
            public string DayLow { get; set; }

            /// <summary>
            /// Gets or sets the high temperature for the day.
            /// </summary>
            public string DayHigh { get; set; }
        }
    }
}
The function definition includes a default
Runmethod that you can use to get started. This sampleRunmethod demonstrates some capabilities available with the custom functions feature, such as passing different inputs and outputs, including complex .NET types.The <function-name>.cs file also includes the
ILoggerinterface that provides support for logging events to an Application Insights resource. You can send tracing information to Application Insights and store that information with the trace information from your workflows, for example:private readonly ILogger<WeatherForecast> logger; public WeatherForecast(ILoggerFactory loggerFactory) { logger = loggerFactory.CreateLogger<WeatherForecast>(); } [FunctionName("WeatherForecast")] public Task<Weather> Run([WorkflowActionTrigger] int zipCode, string temperatureScale) { this.logger.LogInformation("Starting WeatherForecast with Zip Code: " + zipCode + " and Scale: " + temperatureScale); <...> }Replace the sample function code with your own, and edit the default
Runmethod for your specific scenarios. Or, you can copy the function, including the[FunctionName("<function-name>")]declaration, and then rename the function with a unique name. You can then edit the renamed function to meet your needs.
This example continues with the original sample code, assuming no changes.
3: Compile and build your code
After you finish writing your code, compile it to make sure no build errors exist. Your .NET functions project automatically includes build tasks that compile and add your code to the lib\custom folder in your logic app project. Workflows look for custom functions in this folder. Depending on your .NET version, these tasks put the assemblies in the lib\custom\net472 or lib\custom\net8 folder.
Follow these steps:
In Visual Studio Code, on the Activity Bar, select Explorer.
In the Explorer window, open the shortcut menu for the functions project folder, and select Build functions project.
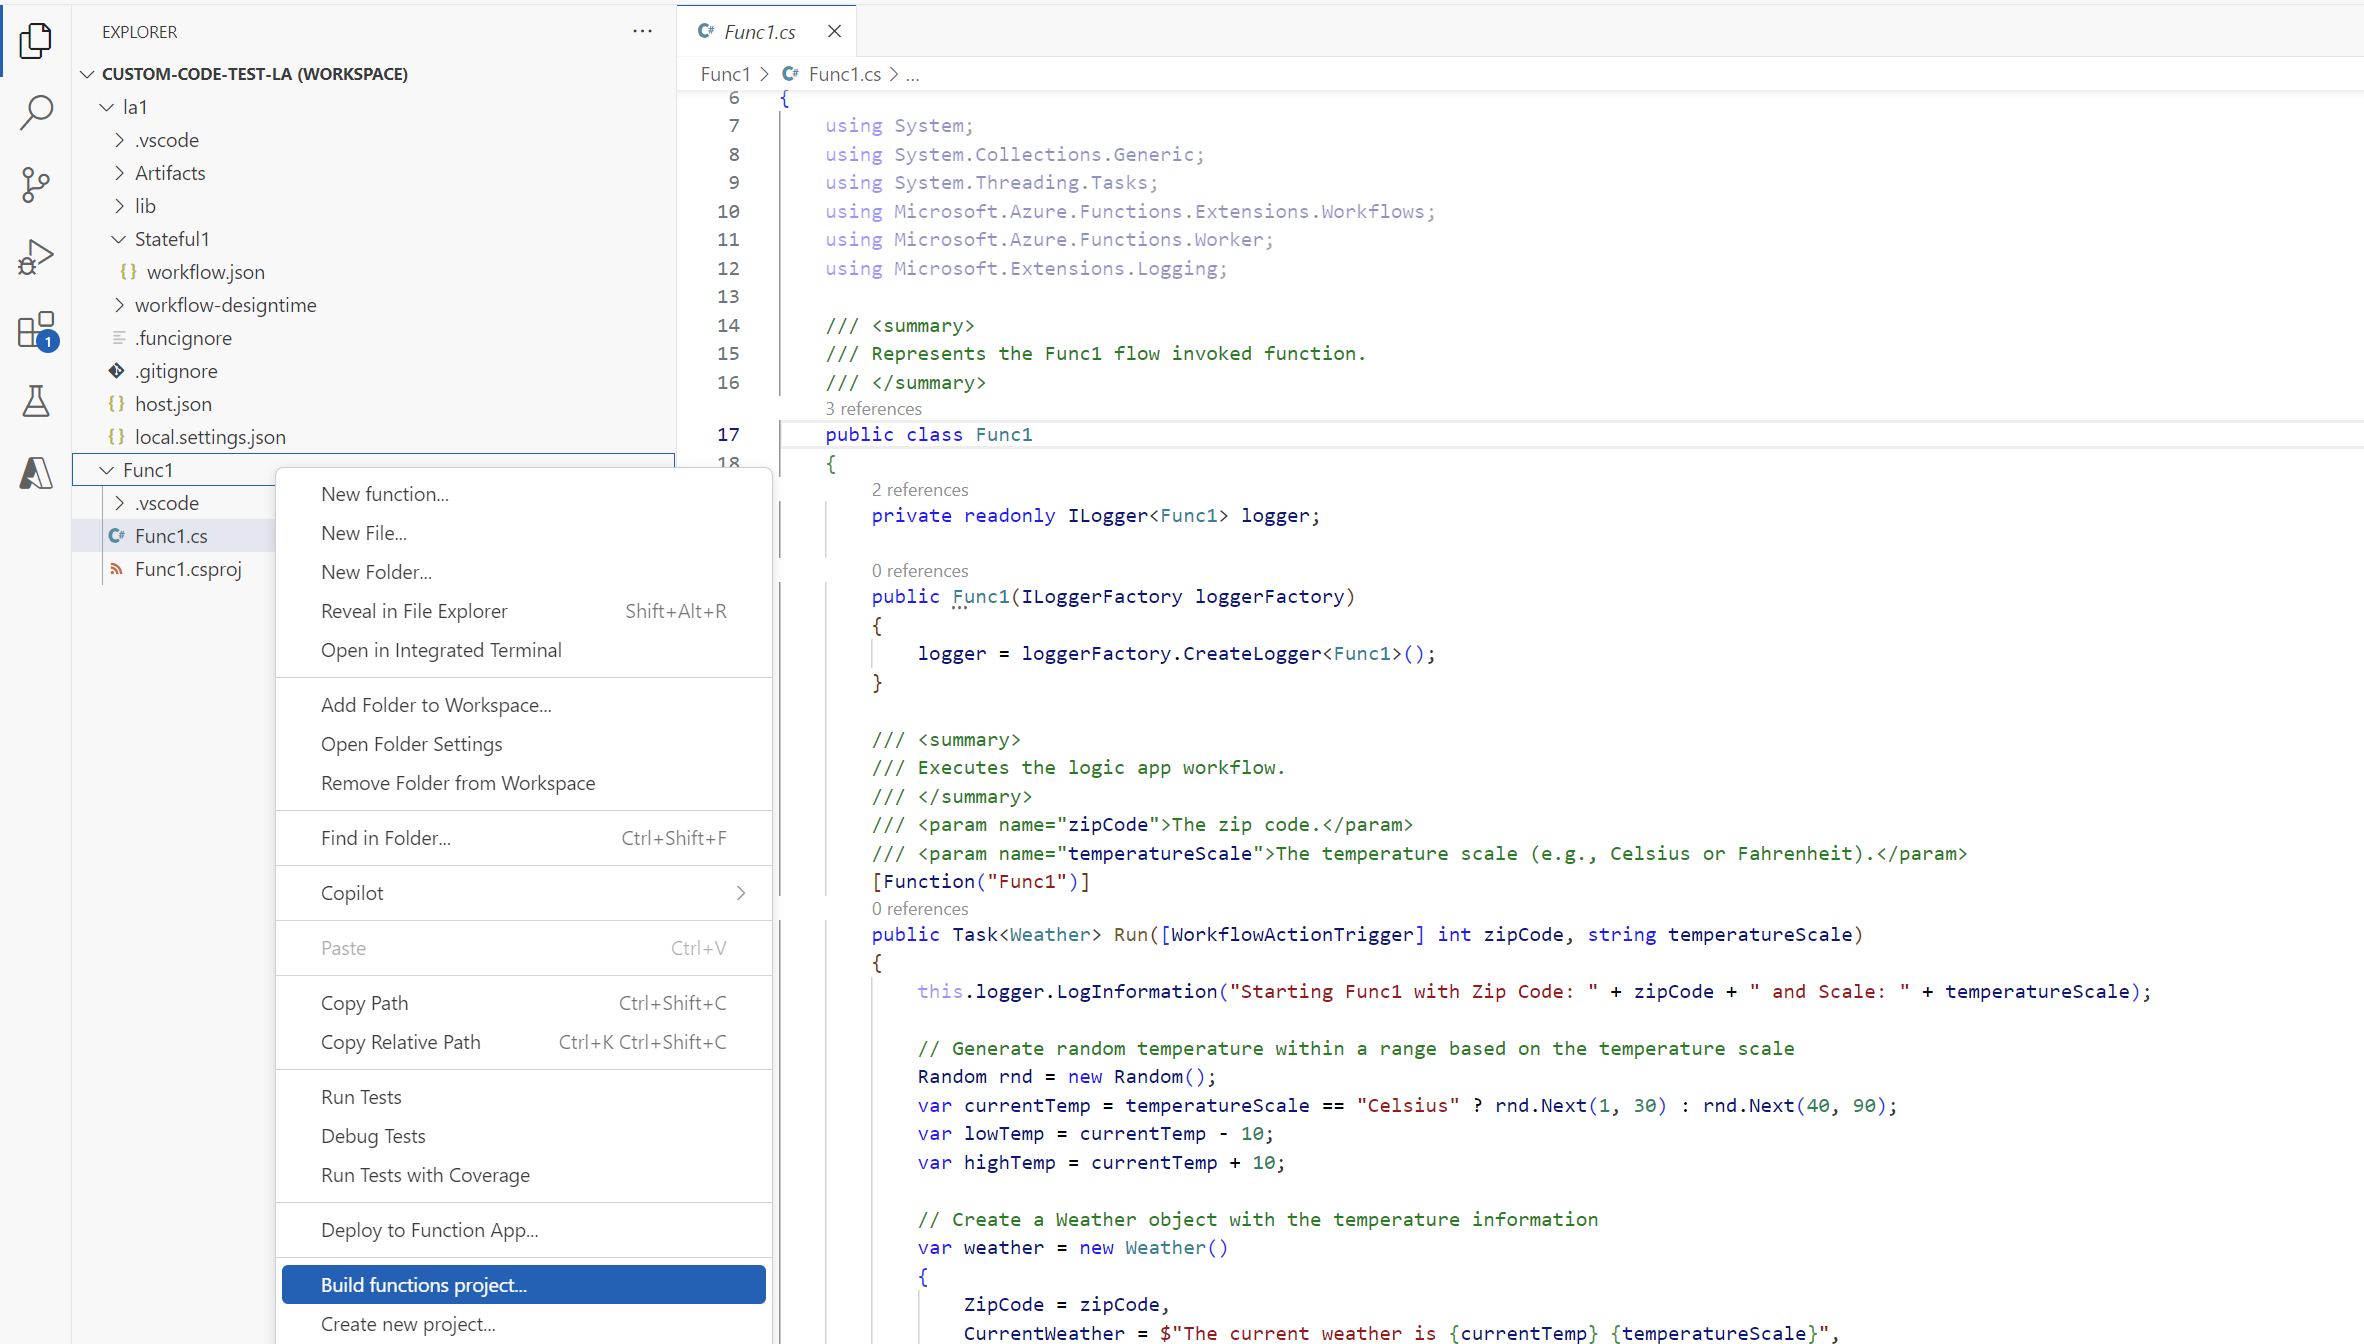
The build task runs for the functions project. If your build succeeds, the Terminal window shows a Build succeeded message.
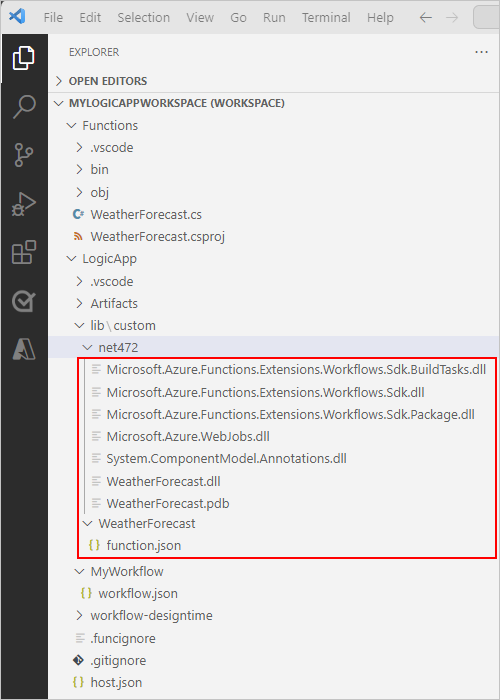
Confirm that the following items exist in your logic app project:
In your workspace, expand the following folders: <your-logic-app> > lib\custom > net472 or net8, based on your .NET version. Confirm that the net472 or net8 subfolder contains the assembly (DLL) files required to run your code, including a file named <function-name>.dll.
In your workspace, expand the following folders: <your logic app> > lib\custom > <function-name>. Confirm that the <function-name> subfolder contains a function.json file, which includes the metadata about the function code that you wrote. The workflow designer uses this file to determine the necessary inputs and outputs when calling your code.
The following example shows sample generated assemblies and other files in the logic app project:
4: Call your code from a workflow
After you confirm that your code compiles and your logic app project contains the necessary files for your code to run, set up your workflow to call your code.
In the Explorer window, expand <workspace-name>, <logic-app-name>, and then <workflow-name>.
Open the shortcut menu for workflow.json, and select Open designer.
The workflow designer opens and shows the default workflow with the following trigger and actions:
Operation Description Trigger The built-in Request trigger named When an HTTP request is received. Action The built-in action named Call a local function in this logic app. Action The built-in Response action named Response that you use to reply to the caller only when you use the Request trigger. On the designer, select the action named Call a local function in this logic app.
The action's information pane opens so you can set up the custom function call, for example:
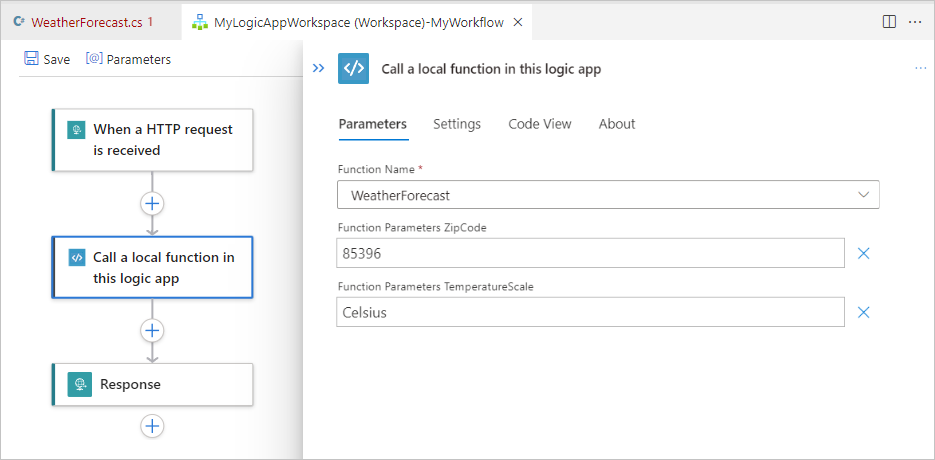
Review and confirm that the Function name parameter value is set to the function that you want to run. Review or change any other parameter values that your function uses.
5: Debug your code and workflow
For each of the following Azure Storage services, start the Azurite storage emulator:
- Azure Blob Service
- Azure Queue Service
- Azure Table Service
From the Visual Studio Code View menu, select Command Palette.
At the prompt that appears, select Azurite: Start Blob Service from the list.
From the working directory list that appears, select your logic app.
Repeat these steps for Azurite: Start Queue Service and Azurite: Start Table Service.
If you're successful, the Visual Studio Code taskbar at the bottom of the screen shows the three storage services running.
Attach the debugger to both your logic app project and .NET functions project by following these steps:
In Visual Studio Code, on the Activity Bar, select Run and Debug (keyboard: Ctrl+Shift+D).
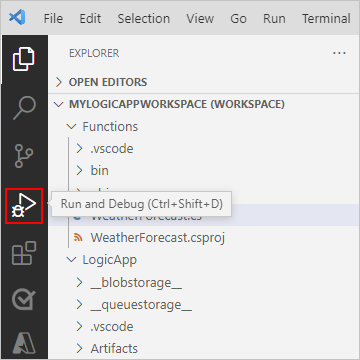
From the Run and Debug list, select Run/Debug logic app with local function (<your logic app>), and then select Play (green arrow).

The following events occur:
- The Terminal window opens and shows the started debugging process.
- The Debug Console window opens and shows the debugging status.
- At the bottom of Visual Studio Code, the task bar turns orange, indicating that the .NET debugger is loaded.
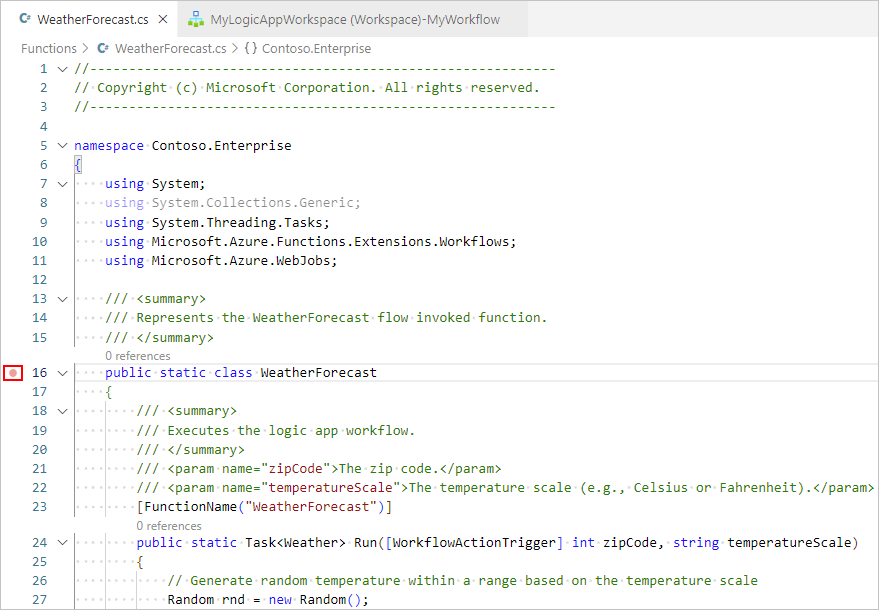
To set any breakpoints, in your function definition (<function-name>.cs) or workflow definition (workflow.json), find the line number where you want the breakpoint, and select the adjacent column, for example:
To manually run the Request trigger in your workflow, open the workflow's Overview page:
From your logic app project, open the workflow.json file's shortcut menu, and then select Overview.
On the workflow's Overview page, the Run trigger button is available for when you want to manually start the workflow. Under Workflow Properties, the Callback URL value is the URL for a callable endpoint that's created by the Request trigger in your workflow. You can send requests to this URL to trigger your workflow from other apps, including other logic app workflows.
On the Overview page toolbar, select Run trigger.
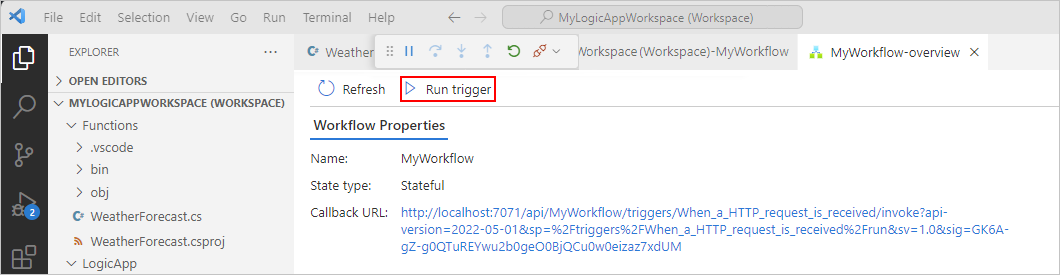
After your workflow starts to run, the debugger activates your first breakpoint.
On the Run menu or debugger toolbar, select a debug action.
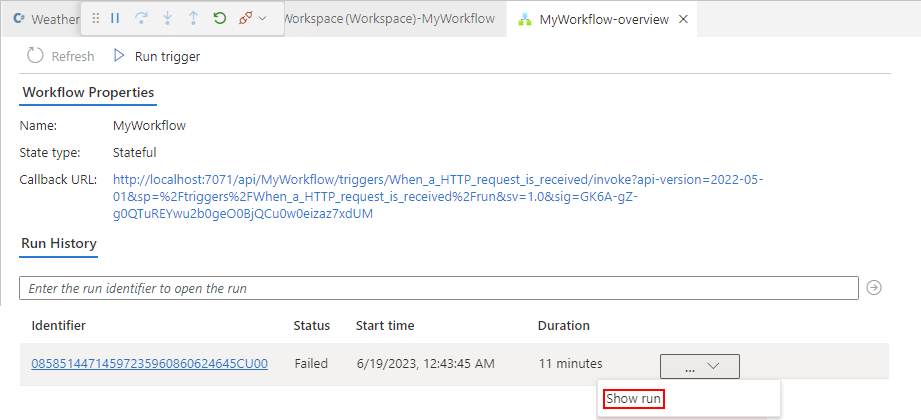
After the workflow run completes, the Overview page shows the finished run and basic details about that run.
To review more information about the workflow run, select the finished run. Or, from the list next to the Duration column, select Show run.
6: Deploy your code
Deploy your custom functions the same way you deploy your logic app project. Whether you deploy from Visual Studio Code or use a CI/CD DevOps process, make sure that you build your code before you deploy. Also, make sure that all dependent assemblies exist in the following logic app project folders before you deploy:
.NET 4.7.2: lib/custom/net472 folder
.NET 8: lib/custom/net8 folder
For more information, see Deploy Standard workflows from Visual Studio Code to Azure.
Dependency injection
When you choose .NET 8, custom .NET code in Standard workflows supports dependency injection (DI). This capability lets you register services once, which makes them automatically available to your custom code functions at runtime, rather than create dependencies inside each function.
Note
Only .NET 8 custom code projects in Visual Studio Code support dependency injection.
Without dependency injection, custom code functions often:
- Create service instances directly in the function.
- Duplicate logic across multiple functions or workflows.
- Mix business logic with setup and configuration code.
As workflows grow, custom code becomes harder to test, reuse, and maintain. By using dependency injection, you can:
- Separate business logic from workflow execution.
- Reuse shared services across multiple custom code functions.
- Align custom code with standard .NET development patterns.
Custom code becomes more manageable in production workflows, especially when multiple workflows rely on the same logic.
When to use dependency injection
If you have simple or one-off custom code functions, you probably don't need dependency injection. However, if your custom code has the following requirements, consider using dependency injection:
- Multiple workflows use or share the same custom code functions.
- Your custom code functions contain business or routing logic that changes over time.
- You require better testability or long‑term maintainability.
How does dependency injection affect custom .NET functions
Dependency injection doesn't change how you call custom .NET functions or your workflow behavior. This capability only changes the underlying custom code structure but produces the same outcome. The following steps describe this process:
- Azure Logic Apps loads your custom code project.
- Azure Logic Apps instantiates, registers, and injects the required services into the function.
- The function runs using the injected dependencies.
Enable dependency injection
To use dependency injection with your custom .NET code, complete the following requirements:
When you create your custom code project, select .NET 8.
Only .NET 8 custom code projects support dependency injection.
In your project, add a
StartupConfigurationclass to define the list of dependencies. Implement theIConfigureStartupinterface and register your dependencies by usingIServiceCollection, for example:using Microsoft.Azure.Functions.Extensions.Workflows; using Microsoft.Extensions.DependencyInjection; public class StartupConfiguration : IConfigureStartup { /// <summary> /// Configures services for the custom code function to use. /// </summary> /// <param name="services">The service collection to configure.</param> public void Configure(IServiceCollection services) { // Register the routing service with dependency injection services.AddSingleton<IRoutingService, OrderRoutingService>(); services.AddSingleton<IDiscountService, DiscountService>(); } }The
IConfigureStartupinterface is defined inMicrosoft.Azure.Functions.Extensions.Workflows, whileIServiceCollectionis defined inMicrosoft.Extensions.DependencyInjection. For more information, see StartupConfiguration.cs.In your custom code function class constructor, initialize the registered services by defining them as constructor parameters, rather than creating them inside the function, for example:
public class MySampleFunction
{
    private readonly ILogger<MySampleFunction> logger;
    private readonly IRoutingService routingService;
    private readonly IDiscountService discountService;

    public MySampleFunction(ILoggerFactory loggerFactory, IRoutingService routingService, IDiscountService discountService)
    {
        this.logger = loggerFactory.CreateLogger<MySampleFunction>();
        this.routingService = routingService;
        this.discountService = discountService;
    }

    // Add your function logic here

}
Beyond building and deploying your custom code project, you don't need to take any other steps, edit your workflow, or make any other setup changes in Azure Logic Apps to enable dependency injection.
For more information, see the Custom Code Dependency Injection sample.
Bring your own NuGet packages to custom code projects
For NuGet-based custom code projects that use .NET 8, you can include and manage your own NuGet packages without having to resolve conflicts with dependencies used by the language worker host. Just directly add the assembly dependencies to the separate assembly location in your project. With the following exceptions, you can bring any .NET 8-compatible dependent assembly versions that your project needs:
- Microsoft.Extensions.Logging.Abstractions
- Microsoft.Extensions.DependencyInjection.Abstractions
- Microsoft.Azure.Functions.Extensions.Workflows.Abstractions
Troubleshoot problems
Action information pane error
On the workflow designer, when you select the built-in action named Call a local function in this logic app, the action's information pane shows the following message:
Failed to retrieve dynamic inputs. Error details:
In this scenario, check your logic app project to see if the LogicApp\lib\custom folder is empty. If it's empty, from the Terminal menu, select Run Task > build Functions.
No process with the specified name is currently running
If you get this error message when you run your workflow, you likely attached the debugger process to .NET Functions, rather than to your logic app.
To fix this problem, from the Run and Debug list, select Attach to logic app (LogicApp), and then select Play (green triangle).
Package not imported correctly
If the Output window shows an error similar to the following message, make sure that you have at least .NET 6.0 installed. If you have this version installed, try uninstalling and then reinstalling.
C:\Users\yourUserName\.nuget\packages\microsoft.net.sdk.functions\4.2.0\build\Microsoft.NET.Sdk.Functions.targets(83,5): warning : The ExtensionsMetadataGenerator package was not imported correctly. Are you missing 'C:\Users\yourUserName\.nuget\packages\microsoft.azure.webjobs.script.extensionsmetadatagenerator\4.0.1\build\Microsoft.Azure.WebJobs.Script.ExtensionsMetadataGenerator.targets' or 'C:\Users\yourUserName\.nuget\packages\microsoft.azure.webjobs.script.extensionsmetadatagenerator\4.0.1\build\Microsoft.Azure.WebJobs.Script.ExtensionsMetadataGenerator.props'? [C:\Desktop\...\custom-code-project\MyLogicAppWorkspace\Function\WeatherForecast.csproj] WeatherForecast -> C:\Desktop\...\custom-code-project\MyLogicAppWorkspace\Function\\bin\Debug\net472\WeatherForecast.dll C:\Users\yourUserName\.nuget\packages\microsoft.net.sdk.functions\4.2.0\build\Microsoft.NET.Sdk.Functions.Build.targets(32,5): error : It was not possible to find any compatible framework version [C:\Desktop\...\custom-code-project\MyLogicAppWorkspace\Function\WeatherForecast.csproj] C:\Users\yourUserName\.nuget\packages\microsoft.net.sdk.functions\4.2.0\build\Microsoft.NET.Sdk.Functions.Build.targets(32,5): error : The specified framework 'Microsoft.NETCore.App', version '6.0.0' was not found. [C:\Desktop\...\custom-code-project\MyLogicAppWorkspace\Function\WeatherForecast.csproj] C:\Users\yourUserName\.nuget\packages\microsoft.net.sdk.functions\4.2.0\build\Microsoft.NET.Sdk.Functions.Build.targets(32,5): error : - Check application dependencies and target a framework version installed at: [C:\Desktop\...\custom-code-project\MyLogicAppWorkspace\Function\WeatherForecast.csproj]
Build failures with errors CS1031 and CS1001
If your function doesn't include variables and you build your code, the Output window might show the following error messages:
C:\Users\yourUserName\...\custom-code-project\Function\func.cs (24,64): error CS1031: Type expected [C:\Users\yourUserName\...\custom-code-project\Function\func.csproj]
C:\Users\yourUserName\...\custom-code-project\Function\func.cs (24,64): error CS1001: Identifier expected [C:\Users\yourUserName\...\custom-code-project\Function\func.csproj]
Build FAILED.
C:\Users\yourUserName\...\custom-code-project\Function\func.cs (24,64): error CS1031: Type expected [C:\Users\yourUserName\...\custom-code-project\Function\func.csproj]
C:\Users\yourUserName\...\custom-code-project\Function\func.cs (24,64): error CS1001: Identifier expected [C:\Users\yourUserName\...\custom-code-project\Function\func.csproj]
0 Warning(s)
2 Error(s)
To fix this problem, in your code's Run method, add the following parameter:
string parameter1 = null
The following example shows how the Run method signature appears:
public static Task<Weather> Run([WorkflowActionTrigger] int zipCode, string temperatureScale, string parameter1 = null)