Monitoring virtual machines (for virtualized network function)
This section discusses the optional tooling available for telecom operators to monitor the Virtualized Network Functions (VNF) workloads. With Azure Monitoring Agent (AMA), logs and performance metrics can be collected from the Virtual Machines (VM) running VNFs. One of the pre-requisites for AMA is Arc connectivity back to Azure (using Azure Arc for Servers).
Extension onboarding with CLI using managed identity auth
When enabling Monitoring agents on VMs using CLI, ensure appropriate versions of CLI are installed:
- azure-cli: 2.39.0+
- azure-cli-core: 2.39.0+
- Resource-graph: 2.1.0+
Documentation for starting with Azure CLI, how to install it across multiple operating systems, and how to install CLI extensions.
Arc connectivity
Azure Arc-enabled servers let you manage Linux physical servers and Virtual Machines hosted outside of Azure, such as on-premises cloud environment like Operator Nexus. A hybrid machine is any machine not running in Azure. When a hybrid machine is connected to Azure, it becomes a connected machine, treated as a resource in Azure. Each connected machine has a Resource ID enabling the machine to be included in a resource group.
Prerequisites
Before you start, be sure to review the prerequisites and verify that your subscription, and resources meet the requirements. Some of the prerequisites are:
- Your VNF VM is connected to CloudServicesNetwork (the network that the VM uses to communicate with Operator Nexus services).
- You have SSH access to your VNF VM.
- Proxies & wget install:
- Ensure wget is installed.
- To set the proxy as an environment variable run:
echo "http\_proxy=http://169.254.0.11:3128" \>\> /etc/environment
echo "https\_proxy=http://169.254.0.11:3128" \>\> /etc/environment
- You have appropriate permissions on VNF VM to be able to run scripts, install package dependencies etc. For more information visit link for more details.
- To use Azure Arc-enabled servers, the following Azure resource providers must be registered in your subscription:
- Microsoft.HybridCompute
- Microsoft.GuestConfiguration
- Microsoft.HybridConnectivity
If these resource providers aren't already registered, you can register them using the following commands:
az account set --subscription "{Your Subscription Name}"

az provider register --namespace 'Microsoft.HybridCompute'

az provider register --namespace 'Microsoft.GuestConfiguration'

az provider register --namespace 'Microsoft.HybridConnectivity'
Deployment
You can Arc connect servers in your environment by performing a set of steps manually. The VNF VM can be connected to Azure using a deployment script. Or you can use an automated method by running a template script. The script can be used to automate the download and installation of the agent.
This method requires that you have administrator permissions on the machine to install and configure the agent. On Linux machine, you can deploy the required agentry by using the root account.
The script to automate the download and installation, and to establish the connection with Azure Arc, is available from the Azure portal. To complete the process, take the following steps:
From your browser, go to the Azure portal.
On the Select a method page, select the Add a single server tile, and then select Generate script.
On the Prerequisites page, select Next .
On the Resource details page, provide the following information:
In the Subscription drop-down list, select the subscription the machine will be managed in.
In the Resource group drop-down list, select the resource group the machine will be managed from.
In the Region drop-down list, select the Azure region to store the server's metadata.
In the Operating system drop-down list, select the operating system of your VNF VM.
If the machine is communicating through a proxy server to connect to the internet, specify the proxy server IP address. If a name and port number is used, specify that information.
Select Next: Tags.
On the Tags page, review the default Physical location tags suggested and enter a value, or specify one or more Custom tags to support your standards.
Select Next: Download and run script.
On the Download and run script page, review the summary information, and then select Download. If you still need to make changes, select Previous.
Note:
- Set the exit on error flag up at the top of the script to make sure it fails fast and doesn't give you false success in the end. For example, in Shell script use "set -e" at the top of the script.
- Add export http_proxy=<PROXY_URL> and export https_proxy=<PROXY_URL> to the script along with export statements in the Arc connectivity script. (Proxy IP - 169.254.0.11:3128).
To deploy the azcmagent on the server, sign-in to the server with an account that has root access. Change to the folder that you copied the script to and execute it on the server by running the ./OnboardingScript.sh script.
If the agent fails to start after setup is finished, check the logs for detailed error information. The log directory is /var/opt/azcmagent/log.
After you install the agent and configure it to connect to Azure Arc-enabled servers, verify that the server is successfully connected at Azure portal.
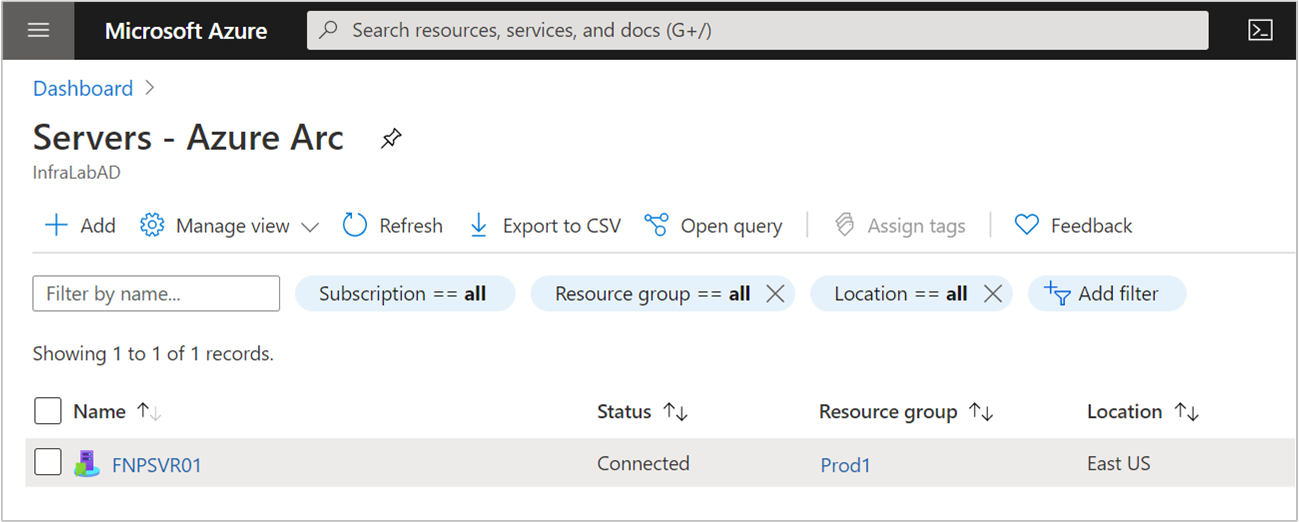
Figure: Sample Arc-Enrolled VM
Troubleshooting
Note: If you see errors while running script, then fix the errors and rerun the script before moving to the next steps.
Some common reasons for errors:
- You don't have the required permissions on the VM.
- wget package isn't installed on the VM.
- If it fails to install package dependencies, it's because proxy doesn't have the required domains added to the allowed URLs. For example, on Ubuntu, apt fails to install dependencies because it can't reach ".ubuntu.com". Add the required egress endpoints to the proxy.
Azure monitor agent
The Azure Monitor Agent is implemented as an Azure VM extension ver Arc connected Machines. It also lists the options to create associations with Data Collection Rules that define which data the agent should collect. Installing, upgrading, or uninstalling the Azure Monitor Agent won't require you to restart your server.
Ensure that you configure collection of logs and metrics using the Data Collection Rule.
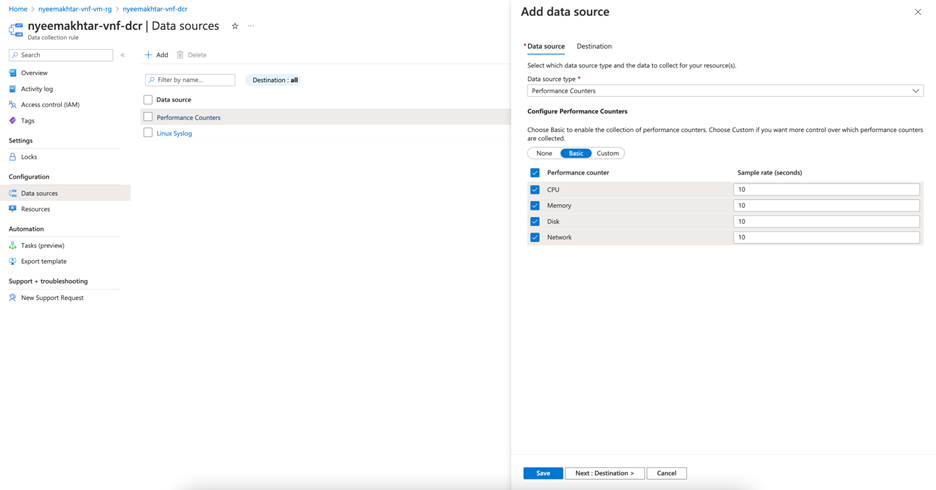
Figure: DCR adding source
Note: The metrics configured with DCR should have destination set to Log Analytics Workspace as it's not supported on Azure Monitor Metrics yet.
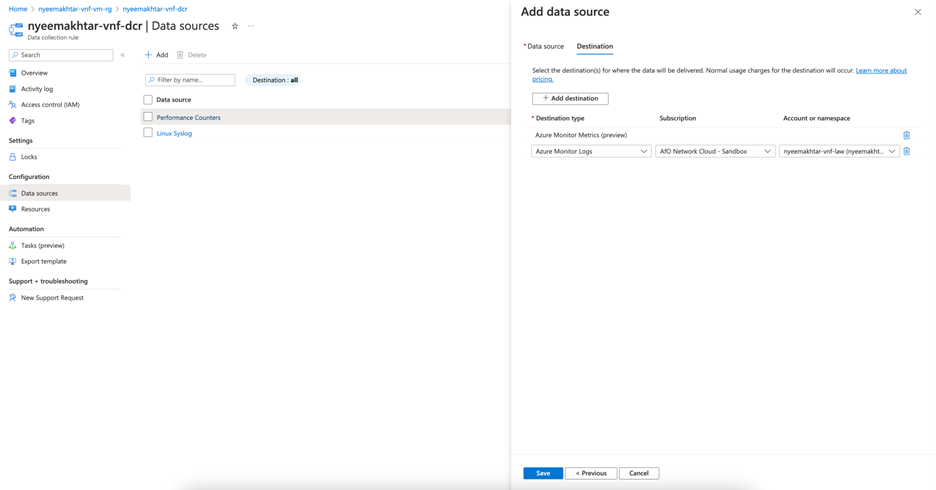
Figure: DCR adding destination
Pre-requisites
The following prerequisites must be met prior to installing the Azure Monitor Agent:
- Permissions : For methods other than using the Azure portal, you must have the following role assignments to install the agent:
| Built-in role | Scopes | Reason |
|---|---|---|
| Virtual Machine Contributor Azure Connected Machine Resource Administrator | Azure Arc-enabled servers | To deploy the agent |
| Any role that includes the action Microsoft.Resources/deployments/* | Subscription and/orResource group and/or | To deploy Azure Resource Manager templates |
Installing Azure Monitoring Agent
Once, the Virtual Machines are Arc connected, ensure that you create a local file from your Azure Cloud Shell with name "settings.json" to provide the proxy information:
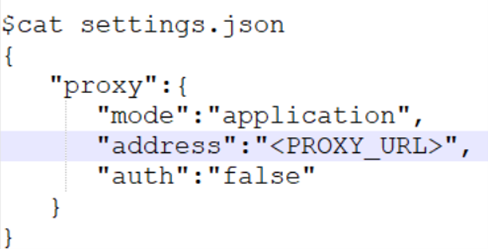
Figure: settings.json file
Then use the following command to install the Azure Monitoring agent on these Azure Arc-enabled servers:
az connectedmachine extension create --name AzureMonitorLinuxAgent --publisher Microsoft.Azure.Monitor --type AzureMonitorLinuxAgent --machine-name \<arc-server-name\> --resource-group \<resource-group-name\> --location \<arc-server-location\> --type-handler-version "1.21.1" --settings settings.json
To collect data from virtual machines by using Azure Monitor Agent, you'll need to:
Create Data Collection Rules (DCRs)that define which data Azure Monitor Agent sends to which destinations.
Associate the Data Collection Rule to specific Virtual Machines.
Data Collection Rule via Portal
The steps to create a DCR and associate it to a Log Analytics Workspace can be found here.
Lastly verify if you're getting the logs in the Log Analytics Workspace specified.
Data collection rule via CLI
Following are the commands to create and associate DCR to enable collection of logs and metrics from these Virtual Machines.
Create DCR:
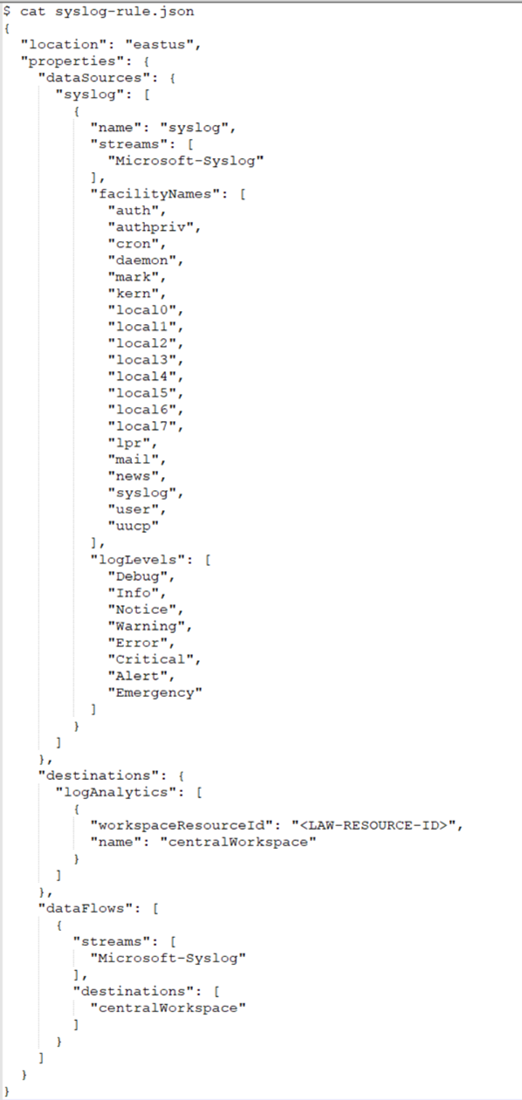
az monitor data-collection rule create --name \<name-for-dcr\> --resource-group \<resource-group-name\> --location \<location-for-dcr\> --rule-file \<rules-file\> [--description] [--tags]
An example rules-file:
Associate DCR:
az monitor data-collection rule association create --name \<name-for-dcr-association\> --resource \<connected-machine-resource-id\> --rule-id \<dcr-resource-id\> [--description]
Additional resources
- Review workbooks documentation and then you may use Operator Nexus telemetry sample Operator Nexus workbooks.
- Review Azure Monitor Alerts, how to create Azure Monitor Alert rules, and use sample Operator Nexus Alert templates.
Feedback
În curând: Pe parcursul anului 2024, vom elimina treptat Probleme legate de GitHub ca mecanism de feedback pentru conținut și îl vom înlocui cu un nou sistem de feedback. Pentru mai multe informații, consultați: https://aka.ms/ContentUserFeedback.
Trimiteți și vizualizați feedback pentru