Create a contact using the Office 365 Outlook Contact adapter - BizTalk Server
Use the Office 365 Outlook Contact adapter in BizTalk Server to create contacts in your Office 365 Outlook.
Create a contact using a send port
In the BizTalk Server Administration console, right-click Send Ports, select New, and select Static One-way send port.
Create a Send Port provides some guidance.
Enter a Name. In Transport, set the Type to Office 365 Outlook Contact, and select Configure.
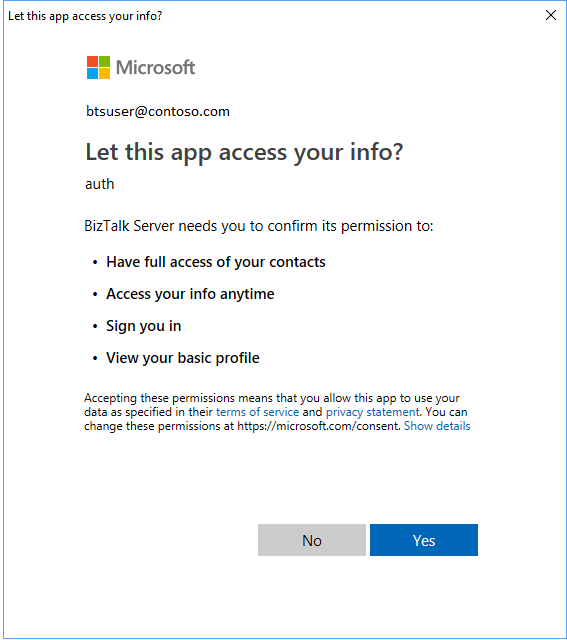
Select Sign in …, and sign in to your Office 365 Account. The account is auto-populated with your email address.
Allow BizTalk Server approval for permission to access:
Select Ok to save your changes.
Test the send port
You can use a simple File receive port and location to create an event on your Office 365 Outlook Contact adapter.
Create a receive port using the File adapter. Within your receive location, set the Receive folder to C:\Temp\In\, and set the file mask to *.xml.
In your Office 365 Outlook Contact adapter send port properties, set the Filters to
BTS.ReceivePortName == <Receive Port Name>.Paste the following into a text editor, and save the file as Office365Contact.xml. This is your sample message.
    <ns0:Contact xmlns:ns0="http://schemas.microsoft.com/BizTalk/Office365OutlookContacts/Send">
        <categories>categories_0</categories>
        <categories>categories_1</categories>
        <categories>categories_2</categories>
        <birthday>1999-05-31T13:20:00.000-05:00</birthday>
        <fileAs>fileAs_0</fileAs>
        <displayName>displayName_0</displayName>
        <givenName>givenName_0</givenName>
        <initials>initials_0</initials>
        <middleName>middleName_0</middleName>
        <nickName>nickName_0</nickName>
        <surname>surname_0</surname>
        <title>title_0</title>
        <yomiGivenName>yomiGivenName_0</yomiGivenName>
        <yomiSurname>yomiSurname_0</yomiSurname>
        <yomiCompanyName>yomiCompanyName_0</yomiCompanyName>
        <generation>generation_0</generation>
        <jobTitle>jobTitle_0</jobTitle>
        <companyName>companyName_0</companyName>
        <department>department_0</department>
        <officeLocation>officeLocation_0</officeLocation>
        <profession>profession_0</profession>
        <businessHomePage>businessHomePage_0</businessHomePage>
        <assistantName>assistantName_0</assistantName>
        <manager>manager_0</manager>
        <homePhones>homePhones_0</homePhones>
        <homePhones>homePhones_1</homePhones>
        <mobilePhone>mobilePhone_0</mobilePhone>
        <businessPhones>businessPhones_0</businessPhones>
        <businessPhones>businessPhones_1</businessPhones>
        <spouseName>spouseName_0</spouseName>
        <personalNotes>personalNotes_0</personalNotes>
        <children>children_0</children>
        <children>children_1</children>
        <children>children_2</children>
        <emailAddresses>
            <name>name_0</name>
            <address>address_0</address>
        </emailAddresses>
        <emailAddresses>
            <name>name_0</name>
            <address>address_0</address>
        </emailAddresses>
        <homeAddress>
            <city>city_0</city>
            <countryOrRegion>countryOrRegion_0</countryOrRegion>
            <postalCode>10000</postalCode>
            <state>state_0</state>
            <street>street_0</street>
        </homeAddress>
        <businessAddress>
            <city>city_0</city>
            <countryOrRegion>countryOrRegion_0</countryOrRegion>
            <postalCode>11111</postalCode>
            <state>state_0</state>
            <street>street_0</street>
        </businessAddress>
        <otherAddress>
            <city>city_0</city>
            <countryOrRegion>countryOrRegion_0</countryOrRegion>
            <postalCode>21222</postalCode>
            <state>state_0</state>
            <street>street_0</street>
        </otherAddress>
    </ns0:Contact>
The XML schema is provided as part of the SDK inside < BizTalk Installation Folder\SDK\Schemas >
Start the File receive location and the Office 365 Outlook Contact adapter send port.
Copy Office365Contact.xml sample message into the receive folder (C:\Temp\In\). The send port creates a contact in your Office 365 Outlook account based on the xml.
Next steps
See all the Office 365 adapters.
Feedback
În curând: Pe parcursul anului 2024, vom elimina treptat Probleme legate de GitHub ca mecanism de feedback pentru conținut și îl vom înlocui cu un nou sistem de feedback. Pentru mai multe informații, consultați: https://aka.ms/ContentUserFeedback.
Trimiteți și vizualizați feedback pentru