Notă
Accesul la această pagină necesită autorizare. Puteți încerca să vă conectați sau să modificați directoarele.
Accesul la această pagină necesită autorizare. Puteți încerca să modificați directoarele.
The Monitor hub provides a centralized place to set up and manage alerts for the jobs that run across Fabric. Instead of checking each item individually to find out whether it ran, you can get automatic notifications when a job fails or reaches another state you want to monitor.
This article shows you how to set up and manage both types of job alerts from one place:
- Notifications for failed scheduled jobs are free email notifications that tell you when a scheduled job fails.
- Activator-based alert rules support advanced job alerting, including more job events (such as Started and Succeeded), richer notifications, and automated actions.
Important
Job alerting in the Monitor hub is currently in preview. See the Supplemental Terms of Use for Microsoft Azure Previews for legal terms that apply to Azure features that are in beta, preview, or otherwise not yet released into general availability.
Prerequisites
Before you begin, ensure that you have the following prerequisites:
- Access to at least one item capable of running jobs, such as a notebook, a pipeline, or a dataflow.
- To configure, edit, or remove notifications for failed scheduled jobs, at least the Contributor role in the workspace or Write permission on the item. For more information, see Roles in workspaces in Microsoft Fabric.
- To create Activator-based alert rules, workspace Owner or Contributor permission, which you need to create the underlying Workspace Monitoring and Activator items.
Choose between notifications for failed scheduled jobs and Activator-based alerts
The Monitor hub manages notifications for failed scheduled jobs and Activator-based alerts together, but they remain separate alert types. You can use one or both, depending on the level of alerting each job needs. Use the following table to decide which alert type fits your needs.
| Alert type | Best for | Cost |
|---|---|---|
| Notifications for failed scheduled jobs | Getting a free email when a scheduled job fails. | Free |
| Activator-based alert rules | Advanced alerting on more job events (Started, Succeeded, and others), richer notifications, and automated actions. | Activator capacity usage and billing |
Set up notifications for failed scheduled jobs
The Schedule failure emails experience in the Monitor hub Alerts section provides a centralized place to view and manage failure notifications across items. You can also manage these notifications for individual items in the job scheduler. Both experiences use the same notification settings, so changes made in one appear in the other. For details about per-item configuration and notification content, see Job Scheduler in Microsoft Fabric.
Configure notifications for failed scheduled jobs in the Monitor hub
To set up notifications for failed scheduled jobs for a scheduled item:
Sign in to Microsoft Fabric.
Open Monitor from the navigation pane. Switch to the new the Monitor experience if you're still in the classic view.
Under Manage, select Alerts.
Select the Schedule failure emails tab, and then select + Configure notifications.
Only those items that support schedules are available for you to select. Choose an item, and then choose Select a scheduled item.
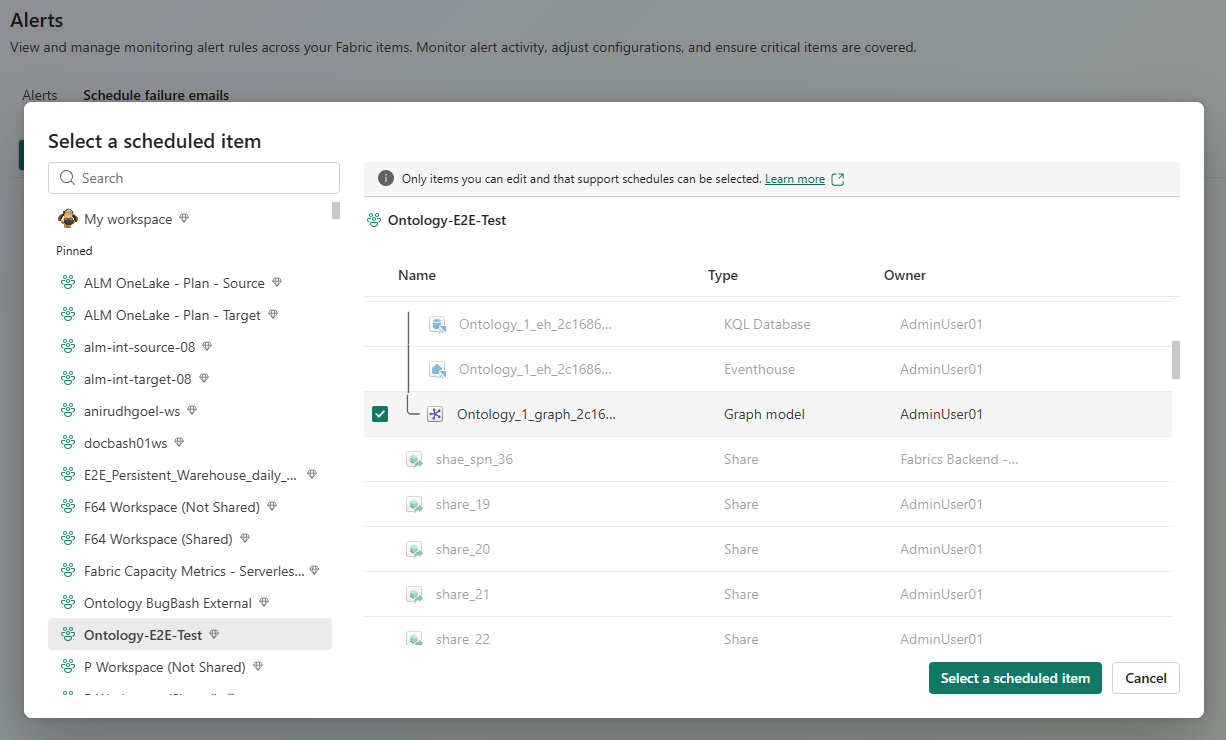
In Select recipients, enter the names or email addresses of the recipients. Recipients can be users or groups in your Microsoft Entra tenant, including B2B guest users. Direct external email addresses aren't supported.
Select Save.
Tip
You can also configure notifications for failed scheduled jobs from the Job runs page. Select the ellipses (...) next to the item, and then select Create and manage alerts > Schedule failure emails (free).
Edit or remove notifications for failed scheduled jobs
To change or stop notifications for failed scheduled jobs for an item:
- Sign in to Microsoft Fabric.
- Open Monitor from the navigation pane. Switch to the new the Monitor experience if you're still in the classic view.
- Under Manage, select Alerts.
- On Schedule failure emails, select the item. The Notification details pane opens and shows the current recipients.
- To change recipients, select Edit recipients, update the list, and save your changes.
- To stop notifications, select Remove notifications.
Permissions and limitations
You can see failure notifications for any scheduled item that you have permission to view. To configure, edit, or remove notifications, you need at least the Contributor role in the workspace or Write permission on the item.
Keep the following limitations in mind:
- Semantic models aren't yet supported on the Schedule failures page.
- Failure notifications apply only to scheduled runs, not to manual runs.
- Notifications are sent in the recipient's Fabric display language, with English as the fallback.
Create Activator-based alert rules
Activator-based alert rules extend job alerting beyond notifications for failed scheduled jobs. Use them when you need to alert on more job events (such as Started and Succeeded), send richer notifications, or trigger automated actions.
Note
To use Activator-based alerts, you must enable workspace monitoring so that Fabric can provision a monitoring item for storing Activator-based alerts. However, you're not required to provision an eventhouse or enable any additional capabilities such as diagnostic data collection or AI powered investigation. Collecting and storing this data might incur additional costs.
Requirements for Activator-based alerts
Before you create Activator-based alerts, review the following requirements:
- Enable workspace monitoring.
- You must have workspace Owner or Contributor permission to create the Workspace Monitoring and Activator items in the workspace.
- Activator-based alerts support the following job types: pipeline, Spark job, notebook, user data function, warehouse, lakehouse, mirrored database, SQL database, and KQL database.
Enable workspace monitoring
Sign in to Microsoft Fabric.
Open the workspace where you want to change monitoring settings.
Select the Workspace settings (gear) icon. Make sure you're using the new workspace experience.
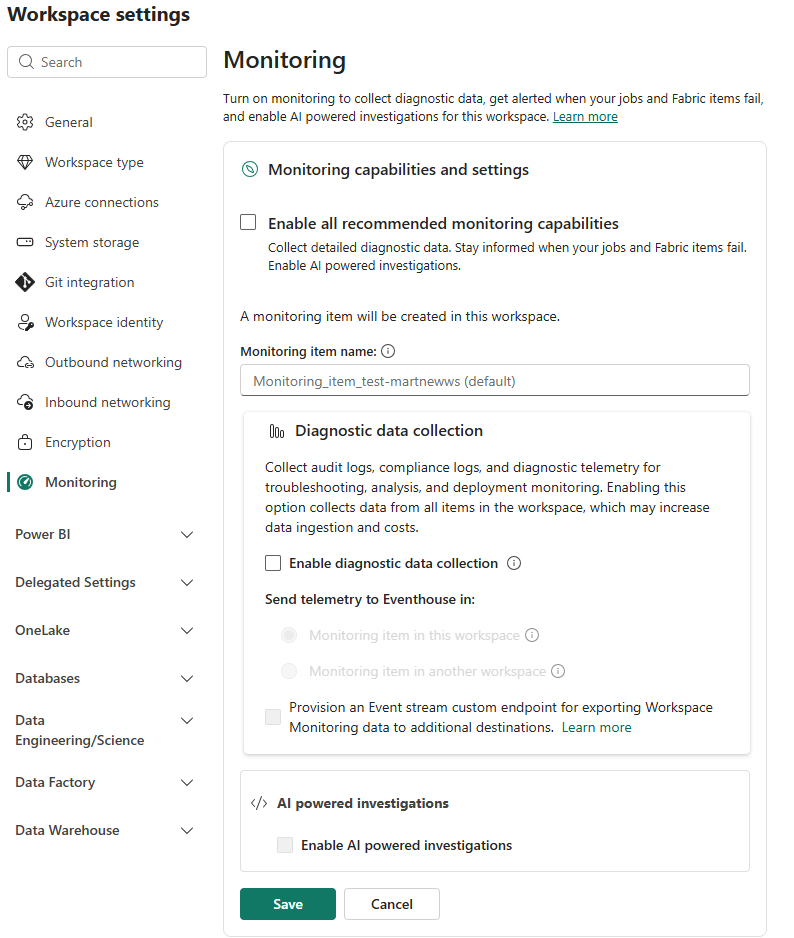
In the Workspace settings page, select Monitoring.
Select Enable.
Note
By default, all additional monitoring capabilities are enabled, including diagnostic data, telemetry data, and AI powered investigations. These capabilities aren't required for Activator-based alerts, and you can deselect them if you prefer, as shown in the following image.
Select Save.
Create an alert rule
To set up failure notifications for an item, on the Job runs page, select the ellipses (...) next to the item, and then select Create and manage alerts > Alerts (paid). The rule specifies the job events that trigger the alert, the recipients of the alert, and any automated actions to take when the alert is triggered.
Manage job alerts
You can manage both notifications for failed scheduled jobs and Activator-based alerts from the at-scale alert management experience in the Monitor hub. This experience gives you a single place to review and adjust alerts across your jobs. You can also manage Activator-based alerts from Real-Time hub and Activator.