Extend Microsoft Copilot with connector actions (preview)
Connector actions let you define connectors that can be invoked from AI surfaces in Power Platform. For connector actions, you need to identify the actions enabled for use in the Copilot. You can also capture the information that large language models require to effectively identify and utilize the plugin, such as summary and description fields.
Prerequisites
A few prerequisites are needed in order to extend Microsoft-branded copilot experiences with connector actions.
General prerequisites
For all Copilot types, you must have maker-level credentials, a copilot license, and a Microsoft Teams license.
Dynamics 365 Customer Service and Copilot for Sales prerequisites
For Copilot in Dynamics 365 Customer Service and Copilot for Sales, you must be signed in to an environment that contains the Copilot that you wish to extend.
Copilot for Sales prerequisites
- Salesforce customers must be signed in to their Dataverse environment. This environment is usually named msdyn_viva.
- You must sign in to Copilot for Sales through Outlook in the environment you wish to extend at least once before extending.
Add a connector action
Adding a connector action to a Microsoft-branded copilot involves a few steps. The following sections provide guidance on how to add a connector action to Copilot for Microsoft 365, Copilot for Sales, and Copilot in Dynamics 365 Customer Service.
Select the Copilot experience and choose connector action
On the home page, select Copilots.

On the Copilots list in the left hand navigation, select the Microsoft-branded copilot experience you wish to extend.

The overview page for the Copilot is displayed.
Select the Actions tab. You can see a list of the actions already present within the Copilot.
Next, select + Add Action.
You're provided a list of all supported action types for the Copilot.

Select Connector to extend with a connector action.
The Select your connector page is displayed. You're provided a list of available connector types to select from.
Connectors connect copilots to different services. The list includes all certified connectors offered by Microsoft.
Depending on the Copilot, the list might also include custom connectors that are present in the current environment. A search bar is available to help find the connector that you wish to use.
Note
At this time, custom connectors cannot be used to extend Copilot in Dynamics 365 Customer Service.
Select connector type and select a solution
Find your connector type using the search bar and select it.

The Build a custom AI action using your connector page is displayed.
Write a name and description for your connector.
The connector name must be unique. By default, it takes on the name of the connector type that was chosen. You should add more defining information to ensure it's both a unique name and that it's easy to discern what it does for users who want to enable it later. Consider including in the description the types of actions it allows like "Mail service allows you to retrieve and create messages."

The description might be provided if present in the connector you selected. The description is used by the Copilot to identify when the action can be used to get responses back for the user request. Make the description as detailed and descriptive as you can. Provide specific details using terms you expect users to use when calling on the action. To continue with the mail service example, you might include something like:
"Mail service provides the ability to get lists of existing messages, retrieve folders where messages are stored, list titles of messages and folders, get messages, update message titles and bodies, and set priority for messages."
The description lets the Copilot know to use the action without being explicitly instructed, allowing for a more natural language experience.
Under Solution, a dropdown lists all solutions available within the current environment. Select the solution you want to use. For more information on what solutions are, and why they benefit you, see Solution concepts.

If you have a preferred solution, or your selected connector is already in the solution, that solution is automatically selected. You can either select a solution, or leave it blank. If you leave the solution blank, a solution is created for you with action name and default publisher. Storing your action in a solution lets you move it easily across environments.
Note
You do not see default solution or CDS default solution as an option in this case as we recommend having a custom solution for easy management. For more information, see: Default solution vs. custom solution.
Choose a solution and select Next.
The Select and configure your plugin action page is displayed. This page shows all the actions that are available to add for your connector. You can select and configure any actions you want your copilot to support, one at a time. A search bar is included to help you find the action you wish to select. There's no limit to the number of actions you can select for the connector.

Add actions to the connector
Next, you need to select from the available actions to add to the connector.
Note
Connectors can only execute the actions you specifically select and configure here. If an action isn't listed, then it's not available. It's not possible to add or remove actions from a connector from within the Copilot Studio actions wizard.
Select an action to proceed. The Configure your plugin action page is displayed for that chosen action.

Provide a name and description for your action. The name doesn't have to be unique in this case. These values are most likely going to be populated for you from the connector. However, as with the connector description, you should provide a detailed description so that the copilot knows when to invoke the specific action. The description helps allow a more natural language approach to selecting the action to execute. For example, if an action is "List message folders," you might use:
"List message folders allows you to get a list of all message folders available from the mail service. This action retrieves all folders, places them into a list view, and returns them to you."
The action description provides the context clues "list message folders," "get," "all," "retrieve," "list," "mail service," "return," "folders," and "view." Your copilot can use these context clues to identify when the action is the right one for a user request.
After you complete the page, select Next. The Review your action's parameters page appears.
Select Next to proceed.
This action takes you back to the Select and configure your plugin action page. You can see the new action you selected.

Select another action and repeat the previous action configuration steps if desired.
Alternatively, select Next. The Review, test, and publish your action screen is displayed.

The Review, test and publish your action page displays the details of all of the configuration steps up to this point. You can review them, and then test your action before publishing.
Test
With your connector action configured, you can now test it.
Note
At this time Copilot in Dynamics 365 for Customer Service does not allow for testing from inside of the connector action creation wizard. When this feature becomes available you will be able to test the plugin from this screen. For now users must publish the plugin and then they can validate it is functional within the Copilot in Dynamics 365 for Customer Service directly after it is enabled by an administrator.
Select your existing connection from the dropdown or select + New connection if you don't have a connection.
If you select + New connection, a wizard opens where you can add details to build the connection. When you're done, you can select the new connection from the dropdown.
When you're done selecting a connection, select Test action.
When you see a message that the action is ready to test, select Open to test to open the Copilot chat in a new window. Open the flyout to see the action, and toggle it on.
The action appears with a beaker icon under the connector chosen with format Test-Action name.
You can now test the plugin by trying the prompts you expect a user to use. You can also use the
–developer oncommand to get more information on prompt execution. Once you're satisfied with the results, return to the Copilot Studio window.
Publish
Once you're done testing, select Publish.
A page is displayed showing your connector in the process of being published. Once completed, you see a page indicating that your connector is published.
Select Go To Details Page to see the details of the published connector.
Note
Now that your connector is published an administrator must enable it before it can be used in the copilot. If you don't see the connector in the copilot make sure that the connector is enabled through Microsoft Admin Center or the copilot agents page. Once properly enabled, the connector will show up in the flyout. This step can have a delay of up to 24 hours the first time you do it.
You can also easily move a connector from one environment to another using a solution. To do so select Export solution on the details page. Exporting the solution lets you export the connector.

Change the version number if needed and select if the solution must be Managed or Unmanaged.
- Managed means you don't expect to have to make further changes to the solution.
- Unmanaged means you want to make changes to the solution in the target environment.
On completion, you see a green message with option to Download the solution, which saves a .zip file in your system.
Note
You aren't required to select Publish in the solutions panel.
Return to the Copilot Actions page in Copilot Studio and select Import Solution in the target environment.

Browse to select the .zip file for your exported solution and select Next to proceed. You can see the connector appearing in the Actions list.
Delete a connector action
If you need to delete a connector action, perform the following procedure.
Locate solution used by connector action
The procedure to delete a connector action is carried out in the Power Apps Maker portal. However, you need the solution used for the connector action in Copilot Studio.
Open Copilot Studio.
Select the environment used to create the connector action.
Under Copilots, select the Copilot where the connector action was created.
Select the Actions tab to view the list of actions associated with the Copilot.
Select the action you want to delete, and take note of the solution name.

Delete connector in Power Apps Maker portal
Go to the Maker portal (https://make.powerapps.com) and select the environment you used in Copilot Studio to create actions.
In the navigation panel, select Solutions to view the list of solutions in the environment.
Locate the solution you used to create the action and select it.
A list of objects associated with the solution appears.
Find the connector action you want to delete. The action is of type AIPlugin.
Tip
If you don’t see your action in the solution, move the action from draft state to ready state by publishing it.
Before deleting the action, you need to delete the dependency on the AICopilot_AIPlugin table. First, select Advanced > Show dependencies.

The dependencies for the connector action are displayed.
For the AICopilot_AIPlugin entry in the dependency list, select Delete.

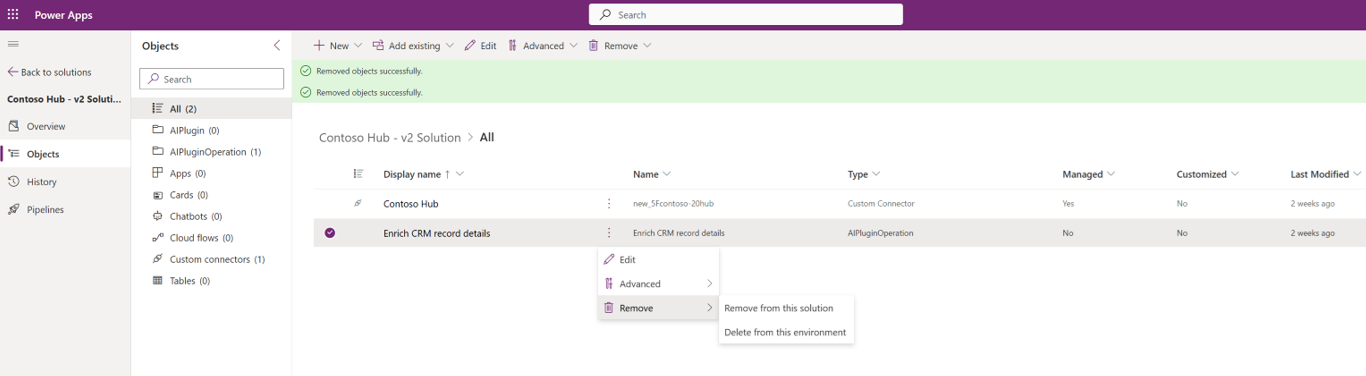
Return to the list of objects and delete the action by selecting Remove > Delete from this environment.

Delete any operations of type AIPluginOperation in the table by selecting Remove > Delete from this environment.
Return to Copilot Studio to verify that the action is removed from the Actions view for the Copilot.
Note
This procedure removes the plugin from the Copilot list. However, this will not remove any connection created to the data source.