Кластеризация данных точек с помощью пакета SDK для Android
При визуализации большого количества точек данных на карте они могут перекрывать друг друга. Перекрытие может привести к тому, что карта станет перегруженной и очень сложной для восприятия. Кластеризация данных точек — это процесс объединения данных точек, находящихся рядом друг с другом, и представления их на карте в виде единой кластеризованной точки данных. По мере того как пользователь масштабирует карту, кластеры разбиваются на отдельные точки данных. При работе с большим количеством точек данных используйте процессы кластеризации, чтобы улучшить взаимодействие с пользователем.
Примечание.
Прекращение использования пакета SDK для Android для Azure Карты
Пакет SDK для машинного кода Azure для Android Карты теперь устарел и будет прекращен 3.31.25. Чтобы избежать сбоев в работе служб, перейдите в веб-пакет SDK для Azure Карты на 3.31.25. Дополнительные сведения см. в руководстве по миграции пакета SDK для Android Карты Azure.
Необходимые компоненты
Обязательно выполните действия, описанные в кратком руководстве по созданию приложения Android. Блоки кода, приведенные в этой статье, можно поместить в обработчик событий onReady для карт.
Включение кластеризации в источнике данных
Чтобы включить кластеризацию в классе DataSource, задайте для параметра cluster значение true. Задайте clusterRadius, чтобы выбрать соседние точки и объединить их в кластер. Значение clusterRadius указывается в пикселях. С помощью clusterMaxZoom укажите уровень масштабирования для отключения логики кластеризации. Ниже приведен пример включения кластеризация в источнике данных.
//Create a data source and enable clustering.
DataSource source = new DataSource(
    //Tell the data source to cluster point data.
    cluster(true),

    //The radius in pixels to cluster points together.
    clusterRadius(45),

    //The maximum zoom level in which clustering occurs.
    //If you zoom in more than this, all points are rendered as symbols.
    clusterMaxZoom(15)
);
 //Create a data source and enable clustering.
val source = DataSource(
    //Tell the data source to cluster point data.
    cluster(true),

    //The radius in pixels to cluster points together.
    clusterRadius(45),

    //The maximum zoom level in which clustering occurs.
    //If you zoom in more than this, all points are rendered as symbols.
    clusterMaxZoom(15)
)
Внимание
Кластеризация работает только с функциями Point. Если источник данных содержит функции других типов геометрического объекта, таких как LineString или Polygon, возникнет ошибка.
Совет
Если две точки данных находятся близко друг к другу, возможно, что кластер никогда не будет разбит, независимо от того, насколько близко пользователь увеличит масштаб. Для решения этой задачи можно задать параметр clusterMaxZoom, чтобы отключить логику кластеризации и просто отобразить все данные.
Класс DataSource предлагает следующие методики для кластеризации.
| Метод | Возвращаемый тип | Description |
|---|---|---|
getClusterChildren(Feature clusterFeature) |
FeatureCollection |
Извлекает дочерние элементы заданного кластера на следующем уровне масштабирования. Эти дочерние элементы могут быть сочетанием фигур и подкластеров. Подкластеры становятся функциями со свойствами, соответствующими ClusteredProperties. |
getClusterExpansionZoom(Feature clusterFeature) |
int |
Вычисляет уровень масштабирования, с которого кластер начинает расширяться или разрывать друг от друга. |
getClusterLeaves(Feature clusterFeature, long limit, long offset) |
FeatureCollection |
Извлекает все точки в кластере. Задайте limit, чтобы вернуть подмножество точек, и используйте offset, чтобы пролистать страницы с точками. |
Отображение кластеров с помощью слоя пузырьков
Слой пузырьков — это отличный способ визуализации кластеризованных точек. Используйте выражения для масштабирования радиуса и изменения цвета в зависимости от количества точек в кластере. При отображении кластеров с помощью слоя пузырьков следует использовать отдельный слой для отображения некластеризованных точек данных.
Чтобы отобразить размер кластера поверх пузырька, используйте слой символов с текстом и не используйте значок.
Следующий код отображает кластеризованные точки, используя слой пузырьков и количество точек в каждом кластере с использованием слоя символов. Второй слой символов используется для отображения отдельных точек, не находящихся в кластере.
//Create a data source and add it to the map.
DataSource source = new DataSource(
    //Tell the data source to cluster point data.
    cluster(true),

    //The radius in pixels to cluster points together.
    clusterRadius(45),

    //The maximum zoom level in which clustering occurs.
    //If you zoom in more than this, all points are rendered as symbols.
    clusterMaxZoom(15)
);

//Import the geojson data and add it to the data source.
map.importDataFromUrl("https://earthquake.usgs.gov/earthquakes/feed/v1.0/summary/all_week.geojson");

//Add data source to the map.
map.sources.add(source);

//Create a bubble layer for rendering clustered data points.
map.layers.add(new BubbleLayer(source,
    //Scale the size of the clustered bubble based on the number of points in the cluster.
    bubbleRadius(
        step(
            get("point_count"),
            20,             //Default of 20 pixel radius.
            stop(100, 30),  //If point_count >= 100, radius is 30 pixels.
            stop(750, 40)   //If point_count >= 750, radius is 40 pixels.
        )
    ),

    //Change the color of the cluster based on the value on the point_cluster property of the cluster.
    bubbleColor(
        step(
            toNumber(get("point_count")),
            color(Color.GREEN),              //Default to lime green.
            stop(100, color(Color.YELLOW)),  //If the point_count >= 100, color is yellow.
            stop(750, color(Color.RED))      //If the point_count >= 100, color is red.
        )
    ),

    bubbleStrokeWidth(0f),

    //Only rendered data points which have a point_count property, which clusters do.
    BubbleLayerOptions.filter(has("point_count"))
));

//Create a symbol layer to render the count of locations in a cluster.
map.layers.add(new SymbolLayer(source,
    iconImage("none"),                //Hide the icon image.
    textField(get("point_count")),    //Display the point count as text.
    textOffset(new Float[]{ 0f, 0.4f }),

    //Allow clustered points in this layer.
    SymbolLayerOptions.filter(has("point_count"))
));

//Create a layer to render the individual locations.
map.layers.add(new SymbolLayer(source,
    //Filter out clustered points from this layer.
    SymbolLayerOptions.filter(not(has("point_count")))
));
//Create a data source and add it to the map.
val source = DataSource(
    //Tell the data source to cluster point data.
    cluster(true),

    //The radius in pixels to cluster points together.
    clusterRadius(45),

    //The maximum zoom level in which clustering occurs.
    //If you zoom in more than this, all points are rendered as symbols.
    clusterMaxZoom(15)
)

//Import the geojson data and add it to the data source.
map.importDataFromUrl("https://earthquake.usgs.gov/earthquakes/feed/v1.0/summary/all_week.geojson")

//Add data source to the map.
map.sources.add(source)

//Create a bubble layer for rendering clustered data points.
map.layers.add(
    BubbleLayer(
        source,

        //Scale the size of the clustered bubble based on the number of points in the cluster.
        bubbleRadius(
            step(
                get("point_count"),
                20,  //Default of 20 pixel radius.
                stop(100, 30),  //If point_count >= 100, radius is 30 pixels.
                stop(750, 40) //If point_count >= 750, radius is 40 pixels.
            )
        ),

        //Change the color of the cluster based on the value on the point_cluster property of the cluster.
        bubbleColor(
            step(
                toNumber(get("point_count")),
                color(Color.GREEN),  //Default to lime green.
                stop(100, color(Color.YELLOW)),  //If the point_count >= 100, color is yellow.
                stop(750, color(Color.RED)) //If the point_count >= 100, color is red.
            )
        ),
        bubbleStrokeWidth(0f),

        //Only rendered data points which have a point_count property, which clusters do.
        BubbleLayerOptions.filter(has("point_count"))
    )
)

//Create a symbol layer to render the count of locations in a cluster.
map.layers.add(
    SymbolLayer(
        source,
        iconImage("none"),  //Hide the icon image.
        textField(get("point_count")),  //Display the point count as text.
        textOffset(arrayOf(0f, 0.4f)),

        //Allow clustered points in this layer.
        SymbolLayerOptions.filter(has("point_count"))
    )
)

//Create a layer to render the individual locations.
map.layers.add(
    SymbolLayer(
        source,

        //Filter out clustered points from this layer.
        SymbolLayerOptions.filter(not(has("point_count")))
    )
)
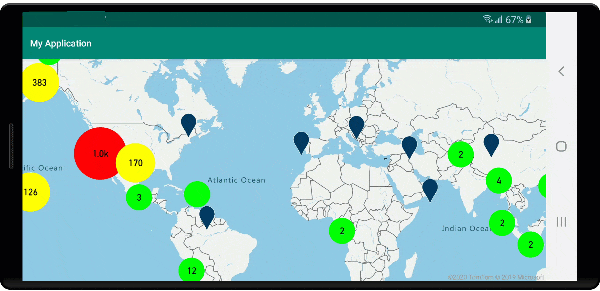
На следующем изображении показан приведенный выше код, который отображает возможности работы с кластерной точкой в слое пузырьков, масштабируется и окрашивается в зависимости от количества точек в кластере. Некластеризованные точки подготавливаются к просмотру с помощью слоя символов.

Отображение кластеров с помощью слоя символов
При визуализации точек данных слой символов автоматически скрывает символы, которые накладываются друг на друга, чтобы обеспечить удобство работы с картой для пользователя. Это поведение по умолчанию может оказаться нежелательным, если на карте необходимо отобразить плотность точек данных. Однако эти параметры можно изменить. Чтобы отобразить все символы, задайте для параметра iconAllowOverlap слоя символов значение true.
Используйте кластеризацию для отображения плотности точек данных для отображения пользовательского интерфейса, не перегруженного информацией. В следующем примере показано, как добавить пользовательские символы и представлять кластеры и отдельные точки данных с помощью слоя символов.
//Load all the custom image icons into the map resources.
map.images.add("earthquake_icon", R.drawable.earthquake_icon);
map.images.add("warning_triangle_icon", R.drawable.warning_triangle_icon);

//Create a data source and add it to the map.
DataSource source = new DataSource(
    //Tell the data source to cluster point data.
    cluster(true)
);

//Import the geojson data and add it to the data source.
map.importDataFromUrl("https://earthquake.usgs.gov/earthquakes/feed/v1.0/summary/all_week.geojson");

//Add data source to the map.
map.sources.add(source);

//Create a symbol layer to render the clusters.
map.layers.add(new SymbolLayer(source,
    iconImage("warning_triangle_icon"),
    textField(get("point_count")),
    textOffset(new Float[]{ 0f, -0.4f }),

    //Allow clustered points in this layer.
    filter(has("point_count"))
));

//Create a layer to render the individual locations.
map.layers.add(new SymbolLayer(source,
    iconImage("earthquake_icon"),

    //Filter out clustered points from this layer.
    filter(not(has("point_count")))
));
//Load all the custom image icons into the map resources.
map.images.add("earthquake_icon", R.drawable.earthquake_icon)
map.images.add("warning_triangle_icon", R.drawable.warning_triangle_icon)

//Create a data source and add it to the map.
val source = DataSource(
    //Tell the data source to cluster point data.
    cluster(true)
)

//Import the geojson data and add it to the data source.
map.importDataFromUrl("https://earthquake.usgs.gov/earthquakes/feed/v1.0/summary/all_week.geojson")

//Add data source to the map.
map.sources.add(source)

//Create a symbol layer to render the clusters.
map.layers.add(
    SymbolLayer(
        source,
        iconImage("warning_triangle_icon"),
        textField(get("point_count")),
        textOffset(arrayOf(0f, -0.4f)),

        //Allow clustered points in this layer.
        filter(has("point_count"))
    )
)

//Create a layer to render the individual locations.
map.layers.add(
    SymbolLayer(
        source,
        iconImage("earthquake_icon"),

        //Filter out clustered points from this layer.
        filter(not(has("point_count")))
    )
)
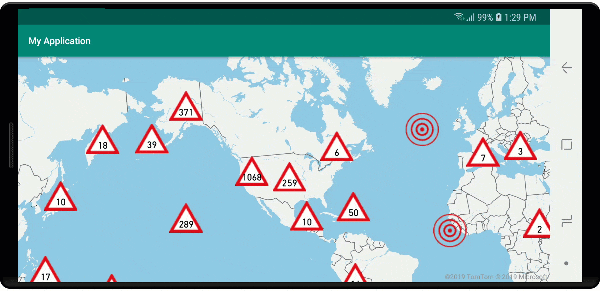
В этом примере приведенное ниже изображение загружается в прорисовываемую папку приложения.
| earthquake_icon.png | warning_triangle_icon.png |
На следующем изображении показан приведенный выше код для отрисовки функций кластеризованной и некластеризованной точки с помощью пользовательских значков.
Кластеризация и слой тепловых карт
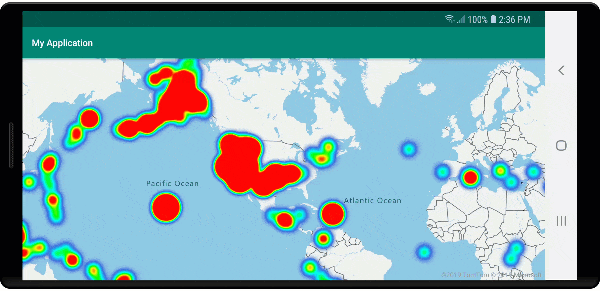
Тепловые карты — это отличный способ отображения плотности данных на карте. Этот метод визуализации может самостоятельно обрабатывать большое количество точек данных. Если точки данных кластеризованы, а размер кластера используется в качестве веса тепловой карты, то с помощью тепловой карты можно обработать еще больший объем данных. Чтобы получить этот параметр, задайте для параметра heatmapWeight слоя тепловой карты значение get("point_count"). Если радиус кластера мал, тепловая карта почти идентична тепловой карте с помощью некластеризованных точек данных, но она работает лучше. Однако меньший радиус кластера приводит к более точной тепловой карте, но с меньшими преимуществами производительности.
//Create a data source and add it to the map.
DataSource source = new DataSource(
    //Tell the data source to cluster point data.
    cluster(true),

    //The radius in pixels to cluster points together.
    clusterRadius(10)
);

//Import the geojson data and add it to the data source.
map.importDataFromUrl("https://earthquake.usgs.gov/earthquakes/feed/v1.0/summary/all_week.geojson");

//Add data source to the map.
map.sources.add(source);

//Create a heat map and add it to the map.
map.layers.add(new HeatMapLayer(source,
    //Set the weight to the point_count property of the data points.
    heatmapWeight(get("point_count")),

    //Optionally adjust the radius of each heat point.
    heatmapRadius(20f)
), "labels");
//Create a data source and add it to the map.
val source = DataSource(
    //Tell the data source to cluster point data.
    cluster(true),

    //The radius in pixels to cluster points together.
    clusterRadius(10)
)

//Import the geojson data and add it to the data source.
map.importDataFromUrl("https://earthquake.usgs.gov/earthquakes/feed/v1.0/summary/all_week.geojson")

//Add data source to the map.
map.sources.add(source)

//Create a heat map and add it to the map.
map.layers.add(
    HeatMapLayer(
        source,

        //Set the weight to the point_count property of the data points.
        heatmapWeight(get("point_count")),

        //Optionally adjust the radius of each heat point.
        heatmapRadius(20f)
    ), "labels"
)
На следующем рисунке показан приведенный выше код, отображающий тепловую карту, оптимизированную с помощью функций кластеризованной точки, а также число кластеров в качестве веса в тепловой карте.
События мыши в кластеризованных точках данных
Когда на слое, на котором содержатся кластеризованные точки данных, возникают события мыши, кластеризованная точка данных возвращается в событие в виде объекта признака точки GeoJSON. Эта функция точки имеет следующие свойства:
| Имя свойства | Type | Описание |
|---|---|---|
cluster |
boolean | Указывает, представляет ли компонент кластер. |
point_count |
number | Число точек, содержащихся в кластере. |
point_count |
number | Число точек, содержащихся в кластере. |
point_count_abbreviated |
строка | Строка, которая сокращает значение point_count, если оно длинное. (например, 4000 преобразуется в 4K). |
В этом примере используется слой пузырьков, который визуализирует точки кластера и добавляет событие щелчка. При срабатывании события щелчка код вычисляет и масштабирует карту до следующего уровня масштаба, при котором кластер разбивается. Эта функция реализуется с помощью метода getClusterExpansionZoom класса DataSource и свойства cluster_id кластеризованной точки данных, которую щелкнули.
//Create a data source and add it to the map.
DataSource source = new DataSource(
    //Tell the data source to cluster point data.
    cluster(true),

    //The radius in pixels to cluster points together.
    clusterRadius(45),

    //The maximum zoom level in which clustering occurs.
    //If you zoom in more than this, all points are rendered as symbols.
    clusterMaxZoom(15)
);

//Import the geojson data and add it to the data source.
source.importDataFromUrl("https://earthquake.usgs.gov/earthquakes/feed/v1.0/summary/all_week.geojson");

//Add data source to the map.
map.sources.add(source);

//Create a bubble layer for rendering clustered data points.
BubbleLayer clusterBubbleLayer = new BubbleLayer(source,
    //Scale the size of the clustered bubble based on the number of points in the cluster.
    bubbleRadius(
        step(
            get("point_count"),
            20f,    //Default of 20 pixel radius.
            stop(100, 30),   //If point_count >= 100, radius is 30 pixels.
            stop(750, 40)    //If point_count >= 750, radius is 40 pixels.
        )
    ),

    //Change the color of the cluster based on the value on the point_cluster property of the cluster.
    bubbleColor(
        step(
            get("point_count"),
            color(Color.GREEN),  //Default to green.
            stop(100, color(Color.YELLOW)), //If the point_count >= 100, color is yellow.
            stop(750, color(Color.RED))     //If the point_count >= 100, color is red.
        )
    ),

    bubbleStrokeWidth(0f),

    //Only rendered data points which have a point_count property, which clusters do.
    BubbleLayerOptions.filter(has("point_count"))
);

//Add the clusterBubbleLayer and two additional layers to the map.
map.layers.add(clusterBubbleLayer);

//Create a symbol layer to render the count of locations in a cluster.
map.layers.add(new SymbolLayer(source,
    //Hide the icon image.
    iconImage("none"),

    //Display the 'point_count_abbreviated' property value.
    textField(get("point_count_abbreviated")),

    //Offset the text position so that it's centered nicely.
    textOffset(new Float[] { 0f, 0.4f }),

    //Only rendered data points which have a point_count property, which clusters do.
    SymbolLayerOptions.filter(has("point_count"))
));

//Create a layer to render the individual locations.
map.layers.add(new SymbolLayer(source,
    //Filter out clustered points from this layer.
    SymbolLayerOptions.filter(not(has("point_count")))
));

//Add a click event to the cluster layer so we can zoom in when a user clicks a cluster.
map.events.add((OnFeatureClick) (features) -> {
    if(features.size() > 0) {
        //Get the clustered point from the event.
        Feature cluster = features.get(0);

        //Get the cluster expansion zoom level. This is the zoom level at which the cluster starts to break apart.
        int expansionZoom = source.getClusterExpansionZoom(cluster);

        //Update the map camera to be centered over the cluster.
        map.setCamera(
            //Center the map over the cluster points location.
            center((Point)cluster.geometry()),

            //Zoom to the clusters expansion zoom level.
            zoom(expansionZoom),

            //Animate the movement of the camera to the new position.
            animationType(AnimationType.EASE),
            animationDuration(200)
        );
    }

    //Return true indicating if event should be consumed and not passed further to other listeners registered afterwards, false otherwise.
    return true;
}, clusterBubbleLayer);
//Create a data source and add it to the map.
val source = DataSource( //Tell the data source to cluster point data.
    //The radius in pixels to cluster points together.
    cluster(true),

    //The maximum zoom level in which clustering occurs.
    clusterRadius(45),

    //If you zoom in more than this, all points are rendered as symbols.
    clusterMaxZoom(15)
)

//Import the geojson data and add it to the data source.
source.importDataFromUrl("https://earthquake.usgs.gov/earthquakes/feed/v1.0/summary/all_week.geojson")

//Add data source to the map.
map.sources.add(source)

//Create a bubble layer for rendering clustered data points.
val clusterBubbleLayer = BubbleLayer(
    source,

    //Scale the size of the clustered bubble based on the number of points in the cluster.
    bubbleRadius(
        step(
            get("point_count"),
            20f,  //Default of 20 pixel radius.
            stop(100, 30),  //If point_count >= 100, radius is 30 pixels.
            stop(750, 40) //If point_count >= 750, radius is 40 pixels.
        )
    ),

    //Change the color of the cluster based on the value on the point_cluster property of the cluster.
    bubbleColor(
        step(
            get("point_count"),
            color(Color.GREEN),  //Default to green.
            stop(
                100,
                color(Color.YELLOW)
            ),  //If the point_count >= 100, color is yellow.
            stop(750, color(Color.RED)) //If the point_count >= 100, color is red.
        )
    ),

    bubbleStrokeWidth(0f),

    //Only rendered data points which have a point_count property, which clusters do.
    BubbleLayerOptions.filter(has("point_count"))
)

//Add the clusterBubbleLayer and two additional layers to the map.
map.layers.add(clusterBubbleLayer)

//Create a symbol layer to render the count of locations in a cluster.
map.layers.add(
    SymbolLayer(
        source,

        //Hide the icon image.
        iconImage("none"),

        //Display the 'point_count_abbreviated' property value.
        textField(get("point_count_abbreviated")),

        //Offset the text position so that it's centered nicely.
        textOffset(
            arrayOf(
                0f,
                0.4f
            )
        ),

        //Only rendered data points which have a point_count property, which clusters do.
        SymbolLayerOptions.filter(has("point_count"))
    )
)

//Create a layer to render the individual locations.
map.layers.add(
    SymbolLayer(
        source,

        //Filter out clustered points from this layer.
        SymbolLayerOptions.filter(not(has("point_count")))
    )
)

//Add a click event to the cluster layer so we can zoom in when a user clicks a cluster.
map.events.add(OnFeatureClick { features: List<Feature?>? ->
    if (features.size() > 0) {
        //Get the clustered point from the event.
        val cluster: Feature = features.get(0)

        //Get the cluster expansion zoom level. This is the zoom level at which the cluster starts to break apart.
        val expansionZoom: Int = source.getClusterExpansionZoom(cluster)

        //Update the map camera to be centered over the cluster.
        map.setCamera(

            //Center the map over the cluster points location.
            center(cluster.geometry() as Point?),

            //Zoom to the clusters expansion zoom level.
            zoom(expansionZoom),

            //Animate the movement of the camera to the new position.
            animationType(AnimationType.EASE),
            animationDuration(200)
        )
    }
    true
}, clusterBubbleLayer)
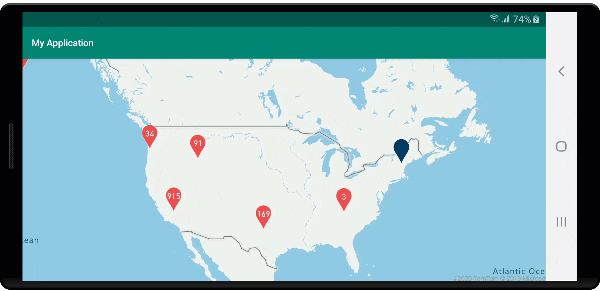
На следующем рисунке показан приведенный выше код, отображающий кластеризованные точки на карте, которая при выборе масштабируется на следующем уровне масштабирования, который кластер начинает разорвать и расширять.
Отображение области кластера
Данные точки, которые представляет кластер, распределяются по области. В этом примере при наведении указателя мыши на кластер происходит два основных действия. Во-первых, вычисляется выпуклая оболочка по отдельным точкам данных, содержащимся в кластере. Затем выпуклый корпус отображается на карте, чтобы показать область. Выпуклая оболочка — это многоугольник, который ограничивает набор точек, например эластичной полосой, и может быть вычислен с помощью метода atlas.math.getConvexHull. Все точки, содержащиеся в кластере, можно получить из источника данных с помощью метода getClusterLeaves.
//Create a data source and add it to the map.
DataSource source = new DataSource(
    //Tell the data source to cluster point data.
    cluster(true)
);

//Import the geojson data and add it to the data source.
source.importDataFromUrl("https://earthquake.usgs.gov/earthquakes/feed/v1.0/summary/all_week.geojson");

//Add data source to the map.
map.sources.add(source);

//Create a data source for the convex hull polygon. Since this will be updated frequently it is more efficient to separate this into its own data source.
DataSource polygonDataSource = new DataSource();

//Add data source to the map.
map.sources.add(polygonDataSource);

//Add a polygon layer and a line layer to display the convex hull.
map.layers.add(new PolygonLayer(polygonDataSource));
map.layers.add(new LineLayer(polygonDataSource));

//Create a symbol layer to render the clusters.
SymbolLayer clusterLayer = new SymbolLayer(source,
    iconImage("marker-red"),
    textField(get("point_count_abbreviated")),
    textOffset(new Float[] { 0f, -1.2f }),
    textColor(Color.WHITE),
    textSize(14f),

    //Only rendered data points which have a point_count property, which clusters do.
    SymbolLayerOptions.filter(has("point_count"))
);
map.layers.add(clusterLayer);

//Create a layer to render the individual locations.
map.layers.add(new SymbolLayer(source,
    //Filter out clustered points from this layer.
    SymbolLayerOptions.filter(not(has("point_count")))
));

//Add a click event to the layer so we can calculate the convex hull of all the points within a cluster.
map.events.add((OnFeatureClick) (features) -> {
    if(features.size() > 0) {
        //Get the clustered point from the event.
        Feature cluster = features.get(0);

        //Get all points in the cluster. Set the offset to 0 and the max long value to return all points.
        FeatureCollection leaves = source.getClusterLeaves(cluster, Long.MAX_VALUE, 0);

        //Get the point features from the feature collection.
        List<Feature> childFeatures = leaves.features();

        //When only two points in a cluster. Render a line.
        if(childFeatures.size() == 2){
            //Extract the geometry points from the child features.
            List<Point> points = new ArrayList();

            childFeatures.forEach(f -> {
                points.add((Point)f.geometry());
            });

            //Create a line from the points.
            polygonDataSource.setShapes(LineString.fromLngLats(points));
        } else {
            Polygon hullPolygon = MapMath.getConvexHull(leaves);

            //Overwrite all data in the polygon data source with the newly calculated convex hull polygon.
            polygonDataSource.setShapes(hullPolygon);
        }
    }

    //Return true indicating if event should be consumed and not passed further to other listeners registered afterwards, false otherwise.
    return true;
}, clusterLayer);
//Create a data source and add it to the map.
val source = DataSource(
    //Tell the data source to cluster point data.
    cluster(true)
)

//Import the geojson data and add it to the data source.
source.importDataFromUrl("https://earthquake.usgs.gov/earthquakes/feed/v1.0/summary/all_week.geojson")

//Add data source to the map.
map.sources.add(source)

//Create a data source for the convex hull polygon. Since this will be updated frequently it is more efficient to separate this into its own data source.
val polygonDataSource = DataSource()

//Add data source to the map.
map.sources.add(polygonDataSource)

//Add a polygon layer and a line layer to display the convex hull.
map.layers.add(PolygonLayer(polygonDataSource))
map.layers.add(LineLayer(polygonDataSource))

//Create a symbol layer to render the clusters.
val clusterLayer = SymbolLayer(
    source,
    iconImage("marker-red"),
    textField(get("point_count_abbreviated")),
    textOffset(arrayOf(0f, -1.2f)),
    textColor(Color.WHITE),
    textSize(14f),

    //Only rendered data points which have a point_count property, which clusters do.
    SymbolLayerOptions.filter(has("point_count"))
)
map.layers.add(clusterLayer)

//Create a layer to render the individual locations.
map.layers.add(
    SymbolLayer(
        source,

        //Filter out clustered points from this layer.
        SymbolLayerOptions.filter(not(has("point_count")))
    )
)

//Add a click event to the layer so we can calculate the convex hull of all the points within a cluster.
map.events.add(OnFeatureClick { features: List<Feature?>? ->
    if (features.size() > 0) {
        //Get the clustered point from the event.
        val cluster: Feature = features.get(0)

        //Get all points in the cluster. Set the offset to 0 and the max long value to return all points.
        val leaves: FeatureCollection = source.getClusterLeaves(cluster, Long.MAX_VALUE, 0)

        //Get the point features from the feature collection.
        val childFeatures = leaves.features()

        //When only two points in a cluster. Render a line.
        if (childFeatures!!.size == 2) {
            //Extract the geometry points from the child features.
            val points: MutableList<Point?> = ArrayList()
            childFeatures!!.forEach(Consumer { f: Feature ->
                points.add(
                    f.geometry() as Point?
                )
            })

            //Create a line from the points.
            polygonDataSource.setShapes(LineString.fromLngLats(points))
        } else {
            val hullPolygon: Polygon = MapMath.getConvexHull(leaves)

            //Overwrite all data in the polygon data source with the newly calculated convex hull polygon.
            polygonDataSource.setShapes(hullPolygon)
        }
    }
    true
}, clusterLayer)
На следующем рисунке показан приведенный выше код, в котором отображается область всех точек в кластеризованном элементе.
Статистическая обработка данных в кластерах
Зачастую кластеры обозначаются символом с количеством точек в кластере. Но иногда желательно настроить стиль кластеров с дополнительными метриками. С помощью свойств кластера можно создать пользовательские свойства и уравнять их вычисление на основе свойств в каждой точке с кластером. Свойства кластера можно определить в параметре clusterProperties элемента DataSource.
Следующий код вычисляет значение счетчика на основе свойства типа сущности каждой точки данных в кластере. Когда пользователь выбирает кластер, появится всплывающее окно с дополнительными сведениями о кластере.
//An array of all entity type property names in features of the data set.
String[] entityTypes = new String[] { "Gas Station", "Grocery Store", "Restaurant", "School" };
//Create a popup and add it to the map.
Popup popup = new Popup();
map.popups.add(popup);
//Close the popup initially.
popup.close();
//Create a data source and add it to the map.
source = new DataSource(
//Tell the data source to cluster point data.
cluster(true),
//The radius in pixels to cluster points together.
clusterRadius(50),
//Calculate counts for each entity type in a cluster as custom aggregate properties.
clusterProperties(new ClusterProperty[]{
new ClusterProperty("Gas Station", sum(accumulated(), get("Gas Station")), switchCase(eq(get("EntityType"), literal("Gas Station")), literal(1), literal(0))),
new ClusterProperty("Grocery Store", sum(accumulated(), get("Grocery Store")), switchCase(eq(get("EntityType"), literal("Grocery Store")), literal(1), literal(0))),
new ClusterProperty("Restaurant", sum(accumulated(), get("Restaurant")), switchCase(eq(get("EntityType"), literal("Restaurant")), literal(1), literal(0))),
new ClusterProperty("School", sum(accumulated(), get("School")), switchCase(eq(get("EntityType"), literal("School")), literal(1), literal(0)))
})
);
//Import the geojson data and add it to the data source.
source.importDataFromUrl("https://samples.azuremaps.com/data/geojson/SamplePoiDataSet.json");
//Add data source to the map.
map.sources.add(source);
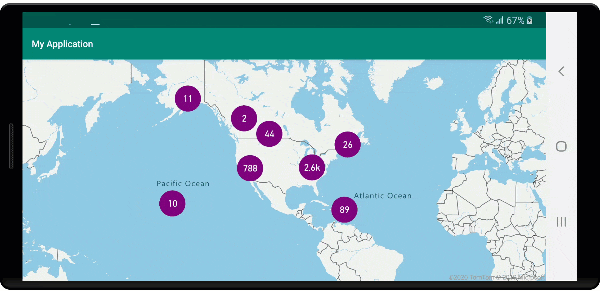
//Create a bubble layer for rendering clustered data points.
BubbleLayer clusterBubbleLayer = new BubbleLayer(source,
bubbleRadius(20f),
bubbleColor("purple"),
bubbleStrokeWidth(0f),
//Only rendered data points which have a point_count property, which clusters do.
BubbleLayerOptions.filter(has("point_count"))
);
//Add the clusterBubbleLayer and two additional layers to the map.
map.layers.add(clusterBubbleLayer);
//Create a symbol layer to render the count of locations in a cluster.
map.layers.add(new SymbolLayer(source,
//Hide the icon image.
iconImage("none"),
//Display the 'point_count_abbreviated' property value.
textField(get("point_count_abbreviated")),
textColor(Color.WHITE),
textOffset(new Float[] { 0f, 0.4f }),
//Only rendered data points which have a point_count property, which clusters do.
SymbolLayerOptions.filter(has("point_count"))
));
//Create a layer to render the individual locations.
map.layers.add(new SymbolLayer(source,
//Filter out clustered points from this layer.
SymbolLayerOptions.filter(not(has("point_count")))
));
//Add a click event to the cluster layer and display the aggregate details of the cluster.
map.events.add((OnFeatureClick) (features) -> {
if(features.size() > 0) {
//Get the clustered point from the event.
Feature cluster = features.get(0);
//Create a number formatter that removes decimal places.
NumberFormat nf = DecimalFormat.getInstance();
nf.setMaximumFractionDigits(0);
//Create the popup's content.
StringBuilder sb = new StringBuilder();
sb.append("Cluster size: ");
sb.append(nf.format(cluster.getNumberProperty("point_count")));
sb.append(" entities\n");
for(int i = 0; i < entityTypes.length; i++) {
sb.append("\n");
//Get the entity type name.
sb.append(entityTypes[i]);
sb.append(": ");
//Get the aggregated entity type count from the properties of the cluster by name.
sb.append(nf.format(cluster.getNumberProperty(entityTypes[i])));
}
//Retrieve the custom layout for the popup.
View customView = LayoutInflater.from(this).inflate(R.layout.popup_text, null);
//Access the text view within the custom view and set the text to the title property of the feature.
TextView tv = customView.findViewById(R.id.message);
tv.setText(sb.toString());
//Get the position of the cluster.
Position pos = MapMath.getPosition((Point)cluster.geometry());
//Set the options on the popup.
popup.setOptions(
//Set the popups position.
position(pos),
//Set the anchor point of the popup content.
anchor(AnchorType.BOTTOM),
//Set the content of the popup.
content(customView)
);
//Open the popup.
popup.open();
}
//Return a boolean indicating if event should be consumed or continue bubble up.
return true;
}, clusterBubbleLayer);
//An array of all entity type property names in features of the data set.
val entityTypes = arrayOf("Gas Station", "Grocery Store", "Restaurant", "School")

//Create a popup and add it to the map.
val popup = Popup()
map.popups.add(popup)

//Close the popup initially.
popup.close()

//Create a data source and add it to the map.
val source = DataSource(
    //Tell the data source to cluster point data.
    cluster(true),

    //The radius in pixels to cluster points together.
    clusterRadius(50),

    //Calculate counts for each entity type in a cluster as custom aggregate properties.
    clusterProperties(
        arrayOf<ClusterProperty>(
            ClusterProperty("Gas Station", sum(accumulated(), get("Gas Station")), switchCase(eq(get("EntityType"), literal("Gas Station")), literal(1), literal(0))),
            ClusterProperty("Grocery Store", sum(accumulated(), get("Grocery Store")), switchCase(eq(get("EntityType"), literal("Grocery Store")), literal(1), literal(0))),
            ClusterProperty("Restaurant", sum(accumulated(), get("Restaurant")), switchCase(eq(get("EntityType"), literal("Restaurant")), literal(1), literal(0))),
            ClusterProperty("School", sum(accumulated(), get("School")), switchCase(eq(get("EntityType"), literal("School")), literal(1), literal(0)))
        )
    )
)

//Import the geojson data and add it to the data source.
source.importDataFromUrl("https://samples.azuremaps.com/data/geojson/SamplePoiDataSet.json")

//Add data source to the map.
map.sources.add(source)

//Create a bubble layer for rendering clustered data points.
val clusterBubbleLayer = BubbleLayer(
    source,
    bubbleRadius(20f),
    bubbleColor("purple"),
    bubbleStrokeWidth(0f),

    //Only rendered data points which have a point_count property, which clusters do.
    BubbleLayerOptions.filter(has("point_count"))
)

//Add the clusterBubbleLayer and two additional layers to the map.
map.layers.add(clusterBubbleLayer)

//Create a symbol layer to render the count of locations in a cluster.
map.layers.add(
    SymbolLayer(
        source,

        //Hide the icon image.
        iconImage("none"),

        //Display the 'point_count_abbreviated' property value.
        textField(get("point_count_abbreviated")),

        textColor(Color.WHITE),
        textOffset(arrayOf(0f, 0.4f)),

        //Only rendered data points which have a point_count property, which clusters do.
        SymbolLayerOptions.filter(has("point_count"))
    )
)

//Create a layer to render the individual locations.
map.layers.add(
    SymbolLayer(
        source,

        //Filter out clustered points from this layer.
        SymbolLayerOptions.filter(not(has("point_count")))
    )
)

//Add a click event to the cluster layer and display the aggregate details of the cluster.
map.events.add(OnFeatureClick { features: List<Feature> ->
    if (features.size > 0) {
        //Get the clustered point from the event.
        val cluster = features[0]

        //Create a number formatter that removes decimal places.
        val nf: NumberFormat = DecimalFormat.getInstance()
        nf.setMaximumFractionDigits(0)

        //Create the popup's content.
        val sb = StringBuilder()

        sb.append("Cluster size: ")
        sb.append(nf.format(cluster.getNumberProperty("point_count")))
        sb.append(" entities\n")

        for (i in entityTypes.indices) {
            sb.append("\n")

            //Get the entity type name.
            sb.append(entityTypes[i])
            sb.append(": ")

            //Get the aggregated entity type count from the properties of the cluster by name.
            sb.append(nf.format(cluster.getNumberProperty(entityTypes[i])))
        }

        //Retrieve the custom layout for the popup.
        val customView: View = LayoutInflater.from(this).inflate(R.layout.popup_text, null)

        //Access the text view within the custom view and set the text to the title property of the feature.
        val tv: TextView = customView.findViewById(R.id.message)
        tv.text = sb.toString()

        //Get the position of the cluster.
        val pos: Position = MapMath.getPosition(cluster.geometry() as Point?)

        //Set the options on the popup.
        popup.setOptions(
            //Set the popups position.
            position(pos),

            //Set the anchor point of the popup content.
            anchor(AnchorType.BOTTOM),

            //Set the content of the popup.
            content(customView)
        )

        //Open the popup.
        popup.open()
    }

    //Return a boolean indicating if event should be consumed or continue bubble up.
    true
} as OnFeatureClick, clusterBubbleLayer)
Всплывающее окно выводится согласно шагам, описанным в разделе Отображение всплывающего окна.
На следующем рисунке показан приведенный выше код отображается всплывающее окно с агрегированным количеством значений каждого типа сущности для всех точек в кластеризованной точке.
Следующие шаги
Чтобы добавить дополнительные данные на карту, выполните следующие действия.