В настоящее время просмотр: Версия портала Foundry (классическая версия) - Переключиться на версию для нового портала Foundry
В этом кратком руководстве вы используете Microsoft Foundry для:
- Создание проекта
- Развертывание модели
- Запуск завершения процесса в чате
- Создание и запуск агента
- Отправка файлов в агент
Пакет SDK для Microsoft Foundry доступен на нескольких языках, включая Python, Java, TypeScript и C#. В этом кратком руководстве приведены инструкции по каждому из этих языков.
Необходимые условия
- Учетная запись Azure с активной подпиской. Если у вас нет, создайте учетную запись free Azure, которая включает бесплатную пробную подписку.
- Доступ к роли, которая позволяет создать ресурс Foundry, например владелец учетной записи Foundry или владелец Foundry в подписке или группе ресурсов. Дополнительные сведения о разрешениях см. в разделе Role-based access control for Microsoft Foundry.
Важно
Недавно были переименованы роли RBAC в Foundry.
Foundry User, Foundry Owner, Foundry Account Owner и Foundry Project Manager ранее назывались пользователь Azure AI, владелец Azure AI, владелец учетной записи Azure AI и руководитель проекта Azure AI. Пока новое название внедряется, в некоторых местах вы всё ещё можете видеть прежние названия. Идентификаторы ролей и основные разрешения не меняются из-за переименования.
- Установите необходимые языковые среды выполнения, глобальные средства и расширения VS Code, как описано в разделе "Подготовка среды разработки".
Важно
Перед началом работы убедитесь, что среда разработки готова.
В этом кратком руководстве основное внимание уделяется таким шагам, специфичным для сценариев, как установка пакета SDK, проверка подлинности и выполнение примера кода.
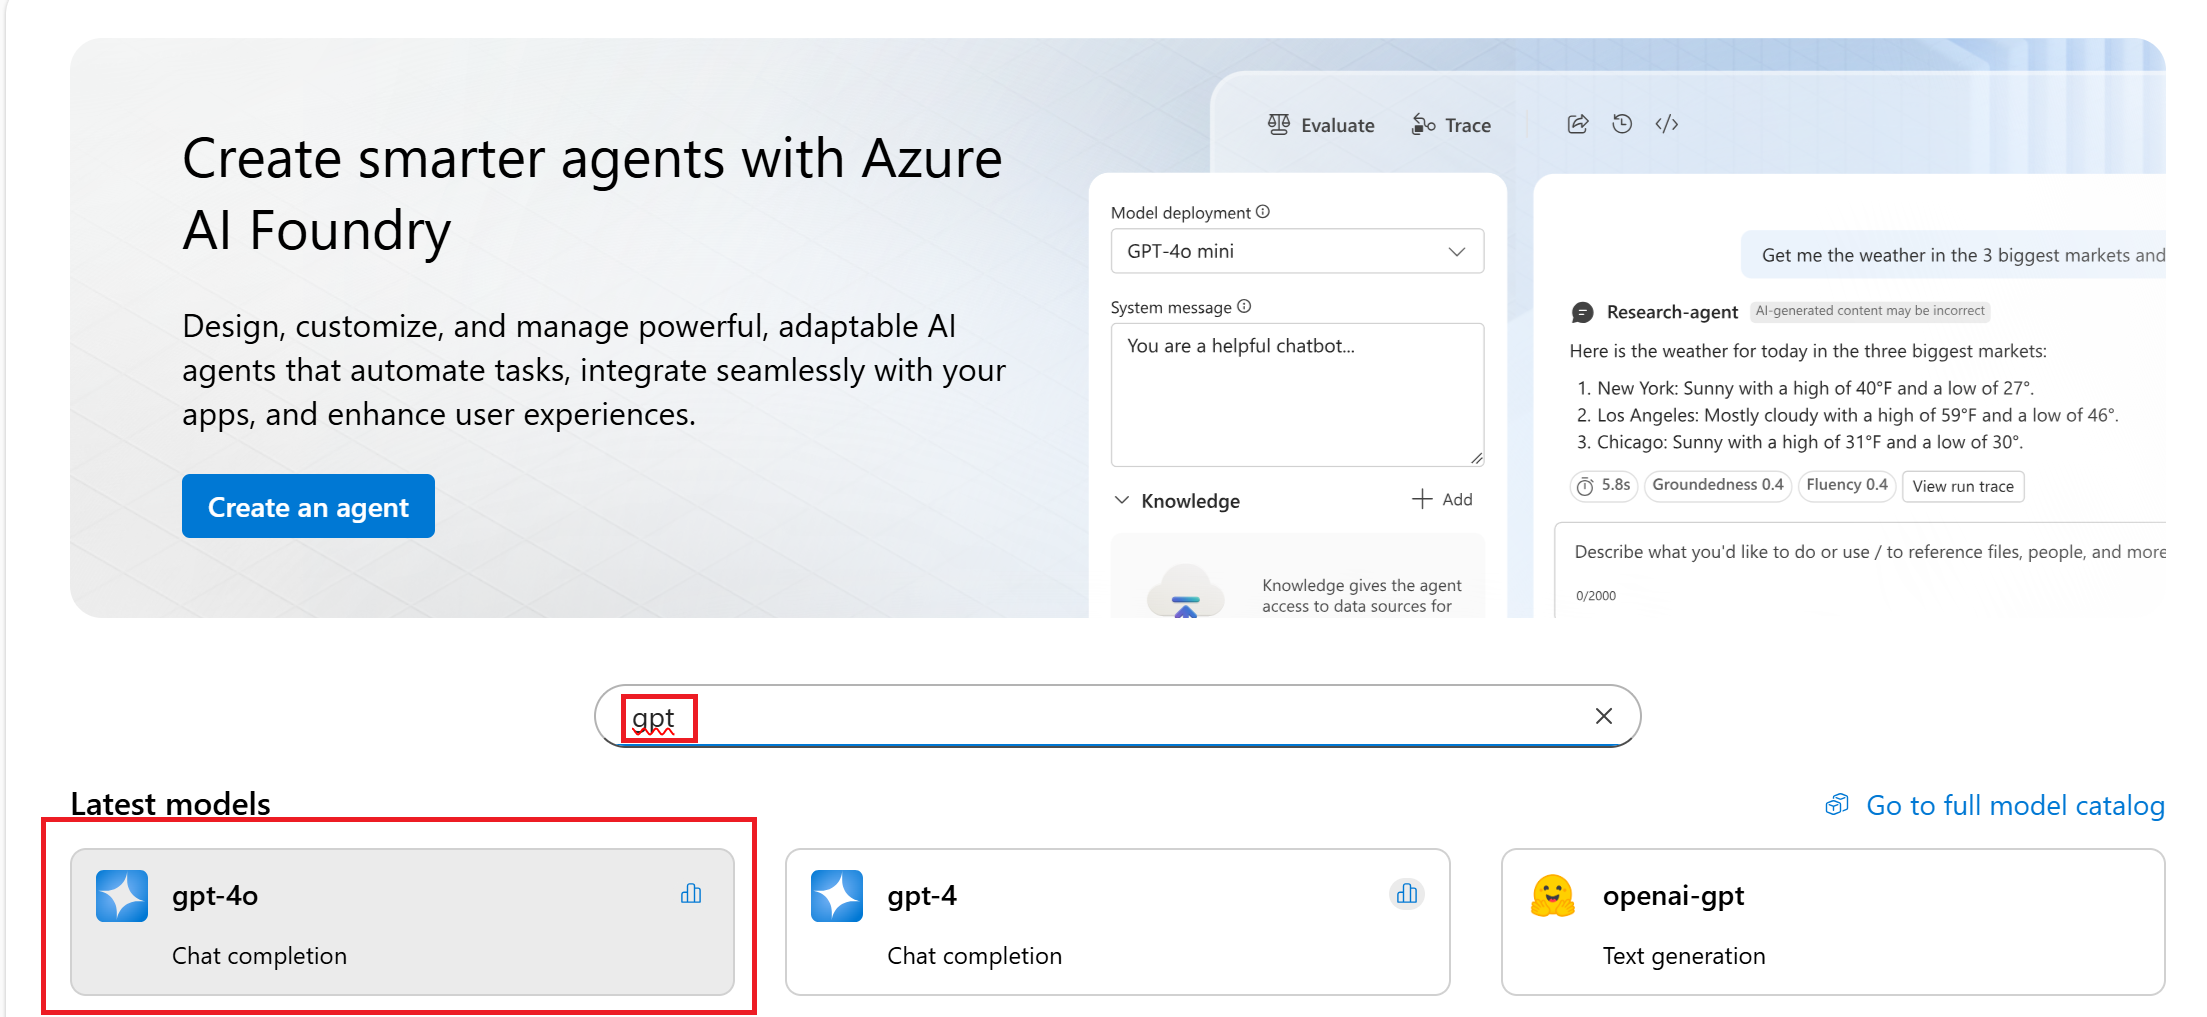
На портале можно изучить широкий каталог передовых моделей из многих различных поставщиков. В этом руководстве выполните поиск и выберите модель gpt-4o .
-
Войдите в Microsoft Foundry. Убедитесь, что переключатель New Foundry отключен. Эти шаги относятся к Foundry (classic).

Если вы находитесь в проекте, выберите Microsoft Foundry в верхнем левом углу навигационной цепочки, чтобы выйти из проекта. Вы вскоре создадите новую.
На целевой странице или каталоге моделей выберите gpt-4o (или gpt-4o-mini).
Выберите "Использовать эту модель". При появлении запроса введите имя нового проекта и нажмите кнопку "Создать".
Просмотрите имя развертывания и нажмите кнопку "Создать".
Затем выберите Подключиться и развернуть после выбора типа развертывания.
Выберите «Открыть в песочнице» на странице развертывания после завершения развертывания.
Вы попадаете в чат с заранее развернутой и готовой к использованию моделью.
Если вы создаете агента, начните с Создания агента. Шаги похожи, но в другом порядке. После создания проекта вы попадаете на игровую среду агента вместо игровой среды чата.
Подготовка к коду
Установите следующие пакеты:
pip install openai azure-identity azure-ai-projects==1.0.0
-
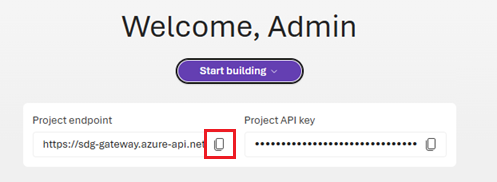
Найдите конечную точку проекта на экране приветствия проекта.
Перед выполнением скриптов Python выполните вход с помощью команды CLI az login (или az login --use-device-code).
Следуйте инструкциям ниже или получите код:
Установка пакетов:
Чтобы работать с средствами Foundry в проекте .NET, необходимо установить несколько пакетов NuGet. Добавьте пакеты NuGet с помощью интерфейса командной строки .NET в интегрированном терминале:
# Add Azure AI SDK packages
dotnet add package Azure.Identity
dotnet add package Azure.AI.Projects
dotnet add package Azure.AI.Agents.Persistent
dotnet add package Azure.AI.Inference
-
Найдите конечную точку проекта на экране приветствия проекта.
Задайте эти переменные среды для использования в скриптах. Это конечная точка проекта AZURE_AI_ENDPOINT, которую вы скопировали ранее. Удалите все после .com/ в этой конечной точке, чтобы сформировать AZURE_AI_INFERENCE.
AZURE_AI_ENDPOINT=https://your.services.ai.azure.com/api/projects/project
AZURE_AI_INFERENCE=https://your.services.ai.azure.com/
AZURE_AI_MODEL=your_model_name
Совет
Для работы примеров агента требуется установить переменную среды AZURE_AI_MODEL на модель, которая совместима с OpenAI, например, gpt-4.1, так как не все модели поддерживаются для использования в агентных сценариях, включая инструменты.
Перед выполнением скриптов C# обязательно выполните вход с помощью команды CLI az login (или az login --use-device-code) для проверки подлинности.
Следуйте инструкциям ниже или получите код:
Перед выполнением скриптов TypeScript выполните вход с помощью команды CLI az login (или az login --use-device-code) для проверки подлинности.
Скачайте package.json.
Установка пакетов с помощью npm install
-
Найдите конечную точку проекта на экране приветствия проекта.
Задайте эти переменные среды для использования в скриптах:
MODEL_DEPLOYMENT_NAME=gpt-4o
PROJECT_ENDPOINT=https://<your-foundry-resource-name>.services.ai.azure.com/api/projects/<your-foundry-project-name>
Запустите код с помощью следующих импортов:
import fs from 'fs';
import path from 'path';
import { fileURLToPath } from 'url';
import { DefaultAzureCredential } from '@azure/identity';
import { ToolUtility, DoneEvent, ErrorEvent, ThreadMessage } from '@azure/ai-agents';
import { AIProjectClient } from '@azure/ai-projects';
import { config } from 'dotenv';
config();
Следуйте инструкциям ниже или получите код:
-
Найдите конечную точку проекта на экране приветствия проекта.
Задайте эти переменные среды для использования в скриптах:
MODEL_DEPLOYMENT_NAME=gpt-4o
PROJECT_ENDPOINT=https://<your-foundry-resource-name>.services.ai.azure.com/api/projects/<your-foundry-project-name>
Обязательно войдите с помощью команды CLI az login (или az login --use-device-code) для проверки подлинности перед выполнением скриптов Java.
Скачайте POM.XML в среду разработки Java.
Следуйте инструкциям ниже или получите код:
Перед выполнением следующей команды обязательно выполните вход с помощью команды CLI az login (или az login --use-device-code) для проверки подлинности.
Получите временный токен доступа. Срок действия истекает через 60–90 минут, после этого потребуется обновить его.
az account get-access-token --scope https://ai.azure.com/.default
Сохраните результаты в качестве переменной AZURE_AI_AUTH_TOKENсреды.
Следуйте инструкциям ниже или получите код:
Установка не требуется для использования портала Foundry.
Чат с моделью
Завершение чата — это базовый стандартный блок приложений ИИ. С помощью завершения чата можно отправить список сообщений и получить ответ от модели.
Замените endpoint на ваш конечный адрес в этом коде:
from azure.ai.projects import AIProjectClient
from azure.identity import DefaultAzureCredential

project = AIProjectClient(
    endpoint="https://your-foundry-resource-name.ai.azure.com/api/projects/project-name",
    credential=DefaultAzureCredential(),
)

models = project.get_openai_client(api_version="2024-10-21")
response = models.chat.completions.create(
    model="gpt-4o",
    messages=[
        {"role": "system", "content": "You are a helpful writing assistant"},
        {"role": "user", "content": "Write me a poem about flowers"},
    ],
)

print(response.choices[0].message.content)
using System.ClientModel.Primitives;
using Azure.Identity;
using OpenAI;
using OpenAI.Chat;

#pragma warning disable OPENAI001

string projectEndpoint = System.Environment.GetEnvironmentVariable("AZURE_AI_INFERENCE")!;
string modelDeploymentName = System.Environment.GetEnvironmentVariable("AZURE_AI_MODEL")!;

BearerTokenPolicy tokenPolicy = new(
    new DefaultAzureCredential(),
    "https://ai.azure.com/.default");
OpenAIClient openAIClient = new(
    authenticationPolicy: tokenPolicy,
    options: new OpenAIClientOptions()
    {
        Endpoint = new($"{projectEndpoint}/openai/v1"),
    });
ChatClient chatClient = openAIClient.GetChatClient(modelDeploymentName);

ChatCompletion completion = await chatClient.CompleteChatAsync(
    [
        new SystemChatMessage("You are a helpful assistant."),
                    new UserChatMessage("How many feet are in a mile?")
    ]);

Console.WriteLine(completion.Content[0].Text);
// Get the Azure AI endpoint and deployment name from environment variables
const endpoint = process.env.PROJECT_ENDPOINT as string;
const deployment = process.env.MODEL_DEPLOYMENT_NAME || 'gpt-4o';

// Create an Azure OpenAI Client
const project = new AIProjectClient(endpoint, new DefaultAzureCredential());
const client = await project.getAzureOpenAIClient({
    // The API version should match the version of the Azure OpenAI resource
    apiVersion: "2024-12-01-preview"
});

// Create a chat completion
const chatCompletion = await client.chat.completions.create({
    model: deployment,
    messages: [
        { role: "system", content: "You are a helpful writing assistant" },
        { role: "user", content: "Write me a poem about flowers" },
    ],
});
console.log(`\n==================== 🌷 COMPLETIONS POEM ====================\n`);
console.log(chatCompletion.choices[0].message.content);
package com.azure.ai.foundry.samples;

import com.azure.ai.inference.ChatCompletionsClient;
import com.azure.ai.inference.ChatCompletionsClientBuilder;
import com.azure.ai.inference.models.ChatCompletions;
import com.azure.core.credential.AzureKeyCredential;
import com.azure.core.credential.TokenCredential;
import com.azure.core.exception.HttpResponseException;
import com.azure.core.util.logging.ClientLogger;
import com.azure.identity.DefaultAzureCredentialBuilder;

/**
 * Sample demonstrating non-streaming chat completion functionality
 * using the Azure AI Inference SDK, wired to your AOAI project endpoint.
 *
 * Environment variables:
 * - PROJECT_ENDPOINT:          Required. Your Azure AI project endpoint.
 * - AZURE_AI_API_KEY:          Optional. Your API key (falls back to DefaultAzureCredential).
 * - AZURE_MODEL_DEPLOYMENT_NAME: Optional. Model deployment name (default: "phi-4").
 * - AZURE_MODEL_API_PATH:      Optional. API path segment (default: "deployments").
 * - CHAT_PROMPT:               Optional. The prompt to send (uses a default if not provided).
 *
 * SDK Features Demonstrated:
 * - Using the Azure AI Inference SDK (com.azure:azure-ai-inference:1.0.0-beta.5)
 * - Creating a ChatCompletionsClient with Azure or API key authentication
 * - Configuring endpoint paths for different model deployments
 * - Using the simplified complete() method for quick completions
 * - Accessing response content through strongly-typed objects
 * - Implementing proper error handling for service requests
 * - Choosing between DefaultAzureCredential and AzureKeyCredential
 *
 */

public class ChatCompletionSample {
    private static final ClientLogger logger = new ClientLogger(ChatCompletionSample.class);

    public static void main(String[] args) {
        // 1) Read and validate the project endpoint
        String projectEndpoint = System.getenv("PROJECT_ENDPOINT");
        if (projectEndpoint == null || projectEndpoint.isBlank()) {
            logger.error("PROJECT_ENDPOINT is required but not set");
            return;
        }

        // 2) Optional auth + model settings
        String apiKey          = System.getenv("AZURE_AI_API_KEY");
        String deploymentName  = System.getenv("AZURE_MODEL_DEPLOYMENT_NAME");
        String apiPath         = System.getenv("AZURE_MODEL_API_PATH");
        String prompt          = System.getenv("CHAT_PROMPT");

        if (deploymentName == null || deploymentName.isBlank()) {
            deploymentName = "phi-4";
            logger.info("No AZURE_MODEL_DEPLOYMENT_NAME provided, using default: {}", deploymentName);
        }
        if (apiPath == null || apiPath.isBlank()) {
            apiPath = "deployments";
            logger.info("No AZURE_MODEL_API_PATH provided, using default: {}", apiPath);
        }
        if (prompt == null || prompt.isBlank()) {
            prompt = "What best practices should I follow when asking an AI model to review Java code?";
            logger.info("No CHAT_PROMPT provided, using default prompt: {}", prompt);
        }

        try {
            // 3) Build the full inference endpoint URL
            String fullEndpoint = projectEndpoint.endsWith("/")
                ? projectEndpoint
                : projectEndpoint + "/";
            fullEndpoint += apiPath + "/" + deploymentName;
            logger.info("Using inference endpoint: {}", fullEndpoint);

            // 4) Create the client with key or token credential :contentReference[oaicite:0]{index=0}
            ChatCompletionsClient client;
            if (apiKey != null && !apiKey.isBlank()) {
                logger.info("Authenticating using API key");
                client = new ChatCompletionsClientBuilder()
                    .credential(new AzureKeyCredential(apiKey))
                    .endpoint(fullEndpoint)
                    .buildClient();
            } else {
                logger.info("Authenticating using DefaultAzureCredential");
                TokenCredential credential = new DefaultAzureCredentialBuilder().build();
                client = new ChatCompletionsClientBuilder()
                    .credential(credential)
                    .endpoint(fullEndpoint)
                    .buildClient();
            }

            // 5) Send a simple chat completion request
            logger.info("Sending chat completion request with prompt: {}", prompt);
            ChatCompletions completions = client.complete(prompt);

            // 6) Process the response
            String content = completions.getChoice().getMessage().getContent();
            logger.info("Received response from model");
            System.out.println("\nResponse from AI assistant:\n" + content);
        } catch (HttpResponseException e) {
            // Handle API errors
            int status = e.getResponse().getStatusCode();
            logger.error("Service error {}: {}", status, e.getMessage());
            if (status == 401 || status == 403) {
                logger.error("Authentication failed. Check API key or Azure credentials.");
            } else if (status == 404) {
                logger.error("Deployment not found. Verify deployment name and endpoint.");
            } else if (status == 429) {
                logger.error("Rate limit exceeded. Please retry later.");
            }
        } catch (Exception e) {
            // Handle all other exceptions
            logger.error("Error in chat completion: {}", e.getMessage(), e);
        }
    }
}
Замените YOUR-FOUNDRY-RESOURCE-NAME значениями:
curl --request POST --url 'https://YOUR-FOUNDRY-RESOURCE-NAME.services.ai.azure.com/openai/deployments/gpt-4o/chat/completions?api-version=2024-10-21' \
-h 'authorization: Bearer $AZURE_AI_AUTH_TOKEN' \
-h 'content-type: application/json' \
-d '{
        "messages": [
            {"role": "system",
            "content": "You are a helpful writing assistant"},
            {"role": "user",
            "content": "Write me a poem about flowers"}
        ],
        "model": "gpt-4o"
    }'
- На игровой площадке чата введите запрос и нажмите кнопку "Отправить".
- Модель возвращает ответ в области Ответа.
Чат с агентом
Создайте агента и общайтесь с ним.
Замените endpoint на ваш конечный адрес в этом коде:
from azure.ai.projects import AIProjectClient
from azure.identity import DefaultAzureCredential
from azure.ai.agents.models import ListSortOrder, FilePurpose

project = AIProjectClient(
    endpoint="https://your-foundry-resource-name.ai.azure.com/api/projects/project-name",
    credential=DefaultAzureCredential(),
)

agent = project.agents.create_agent(
    model="gpt-4o",
    name="my-agent",
    instructions="You are a helpful writing assistant")

thread = project.agents.threads.create()
message = project.agents.messages.create(
    thread_id=thread.id,
    role="user",
    content="Write me a poem about flowers")

run = project.agents.runs.create_and_process(thread_id=thread.id, agent_id=agent.id)
if run.status == "failed":
    # Check if you got "Rate limit is exceeded.", then you want to get more quota
    print(f"Run failed: {run.last_error}")

# Get messages from the thread
messages = project.agents.messages.list(thread_id=thread.id)

# Get the last message from the sender
messages = project.agents.messages.list(thread_id=thread.id, order=ListSortOrder.ASCENDING)
for message in messages:
    if message.run_id == run.id and message.text_messages:
        print(f"{message.role}: {message.text_messages[-1].text.value}")

# Delete the agent once done
project.agents.delete_agent(agent.id)
print("Deleted agent")
using Azure;
using Azure.Identity;
using Azure.AI.Agents.Persistent;

// Creating the Client for agents
var projectEndpoint = System.Environment.GetEnvironmentVariable("AZURE_AI_ENDPOINT");
var modelDeploymentName = System.Environment.GetEnvironmentVariable("AZURE_AI_MODEL");
PersistentAgentsClient client = new(projectEndpoint, new DefaultAzureCredential());

// Create an Agent with toolResources and process Agent run
PersistentAgent agent = client.Administration.CreateAgent(
        model: modelDeploymentName,
        name: "SDK Test Agent - Tutor",
        instructions: "You are a personal electronics tutor. Write and run code to answer questions.",
        tools: new List<ToolDefinition> { new CodeInterpreterToolDefinition() });

// Create thread for communication
PersistentAgentThread thread = client.Threads.CreateThread();

// Create message to thread
PersistentThreadMessage messageResponse = client.Messages.CreateMessage(
    thread.Id,
    MessageRole.User,
    "I need to solve the equation `3x + 11 = 14`. Can you help me?");

// Run the Agent
ThreadRun run = client.Runs.CreateRun(thread, agent);

// Wait for the run to complete
do
{
    Thread.Sleep(TimeSpan.FromMilliseconds(500));
    run = client.Runs.GetRun(thread.Id, run.Id);
}
while (run.Status == RunStatus.Queued
    || run.Status == RunStatus.InProgress);
Pageable<PersistentThreadMessage> messages = client.Messages.GetMessages(
    threadId: thread.Id,
    order: ListSortOrder.Ascending
);
// Print the messages in the thread
WriteMessages(messages);

// Delete the thread and agent after use
client.Threads.DeleteThread(thread.Id);
client.Administration.DeleteAgent(agent.Id);

// Temporary function to use a list of messages in the thread and write them to the console.
static void WriteMessages(IEnumerable<PersistentThreadMessage> messages)
{
    foreach (PersistentThreadMessage threadMessage in messages)
    {
        Console.Write($"{threadMessage.CreatedAt:yyyy-MM-dd HH:mm:ss} - {threadMessage.Role,10}: ");
        foreach (MessageContent contentItem in threadMessage.ContentItems)
        {
            if (contentItem is MessageTextContent textItem)
            {
                Console.Write(textItem.Text);
            }
            else if (contentItem is MessageImageFileContent imageFileItem)
            {
                Console.Write($"<image from ID: {imageFileItem.FileId}");
            }
            Console.WriteLine();
        }
    }
}
const endpoint = process.env.PROJECT_ENDPOINT as string;
const deployment = process.env.MODEL_DEPLOYMENT_NAME || 'gpt-4o';
const client = new AIProjectClient(endpoint, new DefaultAzureCredential());

// Create an Agent
const agent = await client.agents.createAgent(deployment, {
    name: 'my-agent',
    instructions: 'You are a helpful agent'
});
console.log(`\n==================== 🕵️  POEM AGENT ====================`);

// Create a thread and message
const thread = await client.agents.threads.create();
const prompt = 'Write me a poem about flowers';
console.log(`\n---------------- 📝 User Prompt ---------------- \n${prompt}`);
await client.agents.messages.create(thread.id, 'user', prompt);

// Create run
let run = await client.agents.runs.create(thread.id, agent.id);

// Wait for run to complete
console.log(`\n---------------- 🚦 Run Status ----------------`);
while (['queued', 'in_progress', 'requires_action'].includes(run.status)) {
    // Avoid adding a lot of messages to the console
    await new Promise((resolve) => setTimeout(resolve, 1000));
    run = await client.agents.runs.get(thread.id, run.id);
    console.log(`Run status: ${run.status}`);
}

console.log('\n---------------- 📊 Token Usage ----------------');
console.table([run.usage]);

const messagesIterator = await client.agents.messages.list(thread.id);
const assistantMessage = await getAssistantMessage(messagesIterator);
console.log('\n---------------- 💬 Response ----------------');
printAssistantMessage(assistantMessage);

// Clean up
console.log(`\n---------------- 🧹 Clean Up Poem Agent ----------------`);
await client.agents.deleteAgent(agent.id);
console.log(`Deleted Agent, Agent ID: ${agent.id}`);
package com.azure.ai.foundry.samples;

import com.azure.ai.agents.persistent.PersistentAgentsClient;
import com.azure.ai.agents.persistent.PersistentAgentsClientBuilder;
import com.azure.ai.agents.persistent.PersistentAgentsAdministrationClient;
import com.azure.ai.agents.persistent.models.CreateAgentOptions;
import com.azure.ai.agents.persistent.models.CreateThreadAndRunOptions;
import com.azure.ai.agents.persistent.models.PersistentAgent;
import com.azure.ai.agents.persistent.models.ThreadRun;
import com.azure.core.credential.TokenCredential;
import com.azure.core.exception.HttpResponseException;
import com.azure.core.util.logging.ClientLogger;
import com.azure.identity.DefaultAzureCredentialBuilder;


/**
 * Sample demonstrating how to work with Azure AI Agents using the Azure AI Agents Persistent SDK.
 *
 * This sample shows how to:
 * - Set up authentication with Azure credentials
 * - Create a persistent agent with custom instructions
 * - Start a thread and run with the agent
 * - Access various properties of the agent and thread run
 * - Work with the PersistentAgentsClient and PersistentAgentsAdministrationClient
 *
 * Environment variables:
 * - AZURE_ENDPOINT: Optional fallback. The base endpoint for your Azure AI service if PROJECT_ENDPOINT is not provided.
 * - PROJECT_ENDPOINT: Required. The endpoint for your Azure AI Project.
 * - MODEL_DEPLOYMENT_NAME: Optional. The model deployment name (defaults to "gpt-4o").
 * - AGENT_NAME: Optional. The name to give to the created agent (defaults to "java-quickstart-agent").
 * - AGENT_INSTRUCTIONS: Optional. The instructions for the agent (defaults to a helpful assistant).
 *
 * Note: This sample requires proper Azure authentication. It uses DefaultAzureCredential which supports
 * multiple authentication methods including environment variables, managed identities, and interactive login.
 *
 * SDK Features Demonstrated:
 * - Using the Azure AI Agents Persistent SDK (com.azure:azure-ai-agents-persistent:1.0.0-beta.2)
 * - Creating an authenticated client with DefaultAzureCredential
 * - Using the PersistentAgentsClientBuilder pattern for client instantiation
 * - Working with the PersistentAgentsAdministrationClient for agent management
 * - Creating agents with specific configurations (name, model, instructions)
 * - Starting threads and runs for agent conversations
 * - Working with agent state and thread management
 * - Accessing agent and thread run properties
 * - Implementing proper error handling for Azure service interactions
 */
public class AgentSample {
    private static final ClientLogger logger = new ClientLogger(AgentSample.class);

    public static void main(String[] args) {
        // Load environment variables with better error handling, supporting both .env and system environment variables
        String endpoint = System.getenv("AZURE_ENDPOINT");
        String projectEndpoint = System.getenv("PROJECT_ENDPOINT");
        String modelName = System.getenv("MODEL_DEPLOYMENT_NAME");
        String agentName = System.getenv("AGENT_NAME");
        String instructions = System.getenv("AGENT_INSTRUCTIONS");


        // Check for required endpoint configuration
        if (projectEndpoint == null && endpoint == null) {
            String errorMessage = "Environment variables not configured. Required: either PROJECT_ENDPOINT or AZURE_ENDPOINT must be set.";
            logger.error("ERROR: {}", errorMessage);
            logger.error("Please set your environment variables or create a .env file. See README.md for details.");
            return;
        }

        // Use AZURE_ENDPOINT as fallback if PROJECT_ENDPOINT not set
        if (projectEndpoint == null) {
            projectEndpoint = endpoint;
            logger.info("Using AZURE_ENDPOINT as PROJECT_ENDPOINT: {}", projectEndpoint);
        }

        // Set defaults for optional parameters with informative logging
        if (modelName == null) {
            modelName = "gpt-4o";
            logger.info("No MODEL_DEPLOYMENT_NAME provided, using default: {}", modelName);
        }
        if (agentName == null) {
            agentName = "java-quickstart-agent";
            logger.info("No AGENT_NAME provided, using default: {}", agentName);
        }
        if (instructions == null) {
            instructions = "You are a helpful assistant that provides clear and concise information.";
            logger.info("No AGENT_INSTRUCTIONS provided, using default instructions");
        }

        // Create Azure credential with DefaultAzureCredentialBuilder
        // This supports multiple authentication methods including environment variables,
        // managed identities, and interactive browser login
        logger.info("Building DefaultAzureCredential");
        TokenCredential credential = new DefaultAzureCredentialBuilder().build();

        try {
            // Build the general agents client
            logger.info("Creating PersistentAgentsClient with endpoint: {}", projectEndpoint);
            PersistentAgentsClient agentsClient = new PersistentAgentsClientBuilder()
                .endpoint(projectEndpoint)
                .credential(credential)
                .buildClient();

            // Derive the administration client
            logger.info("Getting PersistentAgentsAdministrationClient");
            PersistentAgentsAdministrationClient adminClient =
                agentsClient.getPersistentAgentsAdministrationClient();

            // Create an agent
            logger.info("Creating agent with name: {}, model: {}", agentName, modelName);
            PersistentAgent agent = adminClient.createAgent(
                new CreateAgentOptions(modelName)
                    .setName(agentName)
                    .setInstructions(instructions)
            );
            logger.info("Agent created: ID={}, Name={}", agent.getId(), agent.getName());
            logger.info("Agent model: {}", agent.getModel());

            // Start a thread/run on the general client
            logger.info("Creating thread and run with agent ID: {}", agent.getId());
            ThreadRun runResult = agentsClient.createThreadAndRun(
                new CreateThreadAndRunOptions(agent.getId())
            );
            logger.info("ThreadRun created: ThreadId={}", runResult.getThreadId());

            // List available getters on ThreadRun for informational purposes
            logger.info("\nAvailable getters on ThreadRun:");
            for (var method : ThreadRun.class.getMethods()) {
                if (method.getName().startsWith("get")) {
                    logger.info(" - {}", method.getName());
                }
            }

            logger.info("\nDemo completed successfully!");

        } catch (HttpResponseException e) {
            // Handle service-specific errors with detailed information
            int statusCode = e.getResponse().getStatusCode();
            logger.error("Service error {}: {}", statusCode, e.getMessage());
            logger.error("Refer to the Azure AI Agents documentation for troubleshooting information.");
        } catch (Exception e) {
            // Handle general exceptions
            logger.error("Error in agent sample: {}", e.getMessage(), e);
        }
    }
}
Замените YOUR-FOUNDRY-RESOURCE-NAME и YOUR-PROJECT-NAME своими значениями:
# Create agent
curl --request POST --url "https://YOUR-FOUNDRY-RESOURCE-NAME.services.ai.azure.com/api/projects/YOUR-PROJECT-NAME/assistants?api-version=v1" \
    -h "authorization: Bearer $AZURE_AI_AUTH_TOKEN" \
    -h "content-type: application/json" \
    -d '{
            "model": "gpt-4o",
            "name": "my-agent",
            "instructions": "You are a helpful writing assistant"
        }'
#Lets say agent ID created is asst_123456789. Use this to run the agent

# Create thread
curl --request POST --url 'https://YOUR-FOUNDRY-RESOURCE-NAME.services.ai.azure.com/api/projects/YOUR-PROJECT-NAME/threads?api-version=v1' \
    -h 'authorization: Bearer $AZURE_AI_AUTH_TOKEN' \
    -h 'content-type: application/json'

#Lets say thread ID created is thread_123456789. Use this in the next step

# Create message using thread ID
curl --request POST --url 'https://YOUR-FOUNDRY-RESOURCE-NAME.services.ai.azure.com/api/projects/YOUR-PROJECT-NAME/threads/thread_123456789/messages?api-version=v1' \
    -h 'authorization: Bearer $AZURE_AI_AUTH_TOKEN' \
    -h 'content-type: application/json' \
    -d '{
            "role": "user",
            "content": "Write me a poem about flowers"
        }'

# Run thread with the agent - use both agent id and thread id
curl --request POST --url 'https://YOUR-FOUNDRY-RESOURCE-NAME.services.ai.azure.com/api/projects/YOUR-PROJECT-NAME/threads/thread_123456789/runs?api-version=v1' \
    -h 'authorization: Bearer $AZURE_AI_AUTH_TOKEN' \
    -h 'content-type: application/json' \
    --data '{
        "assistant_id": "asst_123456789"
    }'

# List the messages in the thread using thread ID
curl --request GET --url 'https://YOUR-FOUNDRY-RESOURCE-NAME.services.ai.azure.com/api/projects/YOUR-PROJECT-NAME/threads/thread_123456789/messages?api-version=v1' \
    -h 'authorization: Bearer $AZURE_AI_AUTH_TOKEN' \
    -h 'content-type: application/json'

# Delete agent once done using agent id
curl --request DELETE --url 'https://YOUR-FOUNDRY-RESOURCE-NAME.services.ai.azure.com/api/projects/YOUR-PROJECT-NAME/assistants/asst_123456789?api-version=v1' \
    -h 'authorization: Bearer $AZURE_AI_AUTH_TOKEN' \
    -h 'content-type: application/json'
Когда вы будете готовы использовать агента, для вас создается агент по умолчанию. Чтобы общаться с этим агентом, выполните указанные ниже действия.
- На левой панели выберите "Игровые площадки".
- На карточке игровой площадки агентов выберите "Давайте пойдем".
- Добавьте инструкции, такие как "Вы полезный помощник по написанию".
- Начните чаты с агентом, например: "Напишите мне стихотворение о цветах".
Добавление файлов в агент
Агенты обладают мощными возможностями с помощью средств. Давайте добавим средство поиска файлов, позволяющее нам выполнять извлечение знаний.
Замените endpoint на ваш конечный адрес в этом коде:
from azure.ai.projects import AIProjectClient
from azure.identity import DefaultAzureCredential
from azure.ai.agents.models import ListSortOrder, FileSearchTool

project = AIProjectClient(
    endpoint="https://your-foundry-resource-name.ai.azure.com/api/projects/project-name",
    credential=DefaultAzureCredential(),
)

# Upload file and create vector store
file = project.agents.files.upload(file_path="./product_info_1.md", purpose=FilePurpose.AGENTS)
vector_store = project.agents.vector_stores.create_and_poll(file_ids=[file.id], name="my_vectorstore")

# Create file search tool and agent
file_search = FileSearchTool(vector_store_ids=[vector_store.id])
agent = project.agents.create_agent(
    model="gpt-4o",
    name="my-assistant",
    instructions="You are a helpful assistant and can search information from uploaded files",
    tools=file_search.definitions,
    tool_resources=file_search.resources,
)

# Create thread and process user message
thread = project.agents.threads.create()
project.agents.messages.create(thread_id=thread.id, role="user", content="Hello, what Contoso products do you know?")
run = project.agents.runs.create_and_process(thread_id=thread.id, agent_id=agent.id)

# Handle run status
if run.status == "failed":
    print(f"Run failed: {run.last_error}")

# Print thread messages
messages = project.agents.messages.list(thread_id=thread.id, order=ListSortOrder.ASCENDING)
for message in messages:
    if message.run_id == run.id and message.text_messages:
        print(f"{message.role}: {message.text_messages[-1].text.value}")

# Cleanup resources
project.agents.vector_stores.delete(vector_store.id)
project.agents.files.delete(file_id=file.id)
project.agents.delete_agent(agent.id)
using Azure;
using Azure.Identity;
using Azure.AI.Agents.Persistent;

// Creating the Client for agents and vector stores
var projectEndpoint = System.Environment.GetEnvironmentVariable("AZURE_AI_ENDPOINT");
var modelDeploymentName = System.Environment.GetEnvironmentVariable("AZURE_AI_MODEL");
PersistentAgentsClient client = new(projectEndpoint, new DefaultAzureCredential());

PersistentAgentFileInfo uploadedAgentFile = client.Files.UploadFile(
    filePath: "product_info_1.md",
    purpose: PersistentAgentFilePurpose.Agents);

// Create a vector store with the file and wait for it to be processed.
// If you do not specify a vector store, create_message will create a vector store with a default expiration policy of seven days after they were last active

Dictionary<string, string> fileIds = new()
{
    { uploadedAgentFile.Id, uploadedAgentFile.Filename }
};

PersistentAgentsVectorStore vectorStore = client.VectorStores.CreateVectorStore(
    name: "my_vector_store");

// Add file ID to vector store.
VectorStoreFile vctFile = client.VectorStores.CreateVectorStoreFile(
    vectorStoreId: vectorStore.Id,
    fileId: uploadedAgentFile.Id
);

Console.WriteLine($"Added file to vector store. The id file in the vector store is {vctFile.Id}.");

FileSearchToolResource fileSearchToolResource = new FileSearchToolResource();
fileSearchToolResource.VectorStoreIds.Add(vectorStore.Id);

// Create an Agent with toolResources and process Agent run
PersistentAgent agent = client.Administration.CreateAgent(
        model: modelDeploymentName,
        name: "SDK Test Agent - Retrieval",
        instructions: "You are a helpful agent that can help fetch data from files you know about.",
        tools: new List<ToolDefinition> { new FileSearchToolDefinition() },
        toolResources: new ToolResources() { FileSearch = fileSearchToolResource });

// Create thread for communication
PersistentAgentThread thread = client.Threads.CreateThread();

// Create message to thread
PersistentThreadMessage messageResponse = client.Messages.CreateMessage(
    thread.Id,
    MessageRole.User,
    "Can you give me information on how to mount the product?");

// Run the Agent
ThreadRun run = client.Runs.CreateRun(thread, agent);

// Wait for the run to complete
// This is a blocking call, so it will wait until the run is completed
do
{
    Thread.Sleep(TimeSpan.FromMilliseconds(500));
    run = client.Runs.GetRun(thread.Id, run.Id);
}
while (run.Status == RunStatus.Queued
    || run.Status == RunStatus.InProgress);

// Create a list of messages in the thread and write them to the console.
Pageable<PersistentThreadMessage> messages = client.Messages.GetMessages(
    threadId: thread.Id,
    order: ListSortOrder.Ascending
);
WriteMessages(messages, fileIds);

// Delete the thread and agent after use
client.VectorStores.DeleteVectorStore(vectorStore.Id);
client.Files.DeleteFile(uploadedAgentFile.Id);
client.Threads.DeleteThread(thread.Id);
client.Administration.DeleteAgent(agent.Id);

// Helper method to write messages to the console
static void WriteMessages(IEnumerable<PersistentThreadMessage> messages, Dictionary<string, string> fileIds)
{
    foreach (PersistentThreadMessage threadMessage in messages)
    {
        Console.Write($"{threadMessage.CreatedAt:yyyy-MM-dd HH:mm:ss} - {threadMessage.Role,10}: ");
        foreach (MessageContent contentItem in threadMessage.ContentItems)
        {
            if (contentItem is MessageTextContent textItem)
            {
                if (threadMessage.Role == MessageRole.Agent && textItem.Annotations.Count > 0)
                {
                    string strMessage = textItem.Text;
                    foreach (MessageTextAnnotation annotation in textItem.Annotations)
                    {
                        if (annotation is MessageTextFilePathAnnotation pathAnnotation)
                        {
                            strMessage = replaceReferences(fileIds, pathAnnotation.FileId, pathAnnotation.Text, strMessage);
                        }
                        else if (annotation is MessageTextFileCitationAnnotation citationAnnotation)
                        {
                            strMessage = replaceReferences(fileIds, citationAnnotation.FileId, citationAnnotation.Text, strMessage);
                        }
                    }
                    Console.Write(strMessage);
                }
                else
                {
                    Console.Write(textItem.Text);
                }
            }
            else if (contentItem is MessageImageFileContent imageFileItem)
            {
                Console.Write($"<image from ID: {imageFileItem.FileId}");
            }
            Console.WriteLine();
        }
    }
}

// Helper method to replace file references in the text
static string replaceReferences(Dictionary<string, string> fileIds, string fileID, string placeholder, string text)
{
    if (fileIds.TryGetValue(fileID, out string replacement))
        return text.Replace(placeholder, $" [{replacement}]");
    else
        return text.Replace(placeholder, $" [{fileID}]");
}
// Upload a file named product_info_1.md
console.log(`\n==================== 🕵️  FILE AGENT ====================`);
const __dirname = path.dirname(fileURLToPath(import.meta.url));
const filePath = path.join(__dirname, '../data/product_info_1.md');
const fileStream = fs.createReadStream(filePath);
fileStream.on('data', (chunk: string | Buffer) => {
    console.log(`Read ${chunk.length} bytes of data.`);
});
const file = await client.agents.files.upload(fileStream, 'assistants', {
    fileName: 'product_info_1.md'
});
console.log(`Uploaded file, ID: ${file.id}`);
const vectorStore = await client.agents.vectorStores.create({
    fileIds: [file.id], // Associate the uploaded file with the vector store
    name: 'my_vectorstore'
});
console.log('\n---------------- 🗃️ Vector Store Info ----------------');
console.table([
    {
        'Vector Store ID': vectorStore.id,
        'Usage (bytes)': vectorStore.usageBytes,
        'File Count': vectorStore.fileCounts?.total ?? 'N/A'
    }
]);

// Create an Agent and a FileSearch tool
const fileSearchTool = ToolUtility.createFileSearchTool([vectorStore.id]);
const fileAgent = await client.agents.createAgent(deployment, {
    name: 'my-file-agent',
    instructions: 'You are a helpful assistant and can search information from uploaded files',
    tools: [fileSearchTool.definition],
    toolResources: fileSearchTool.resources
});

// Create a thread and message
const fileSearchThread = await client.agents.threads.create({ toolResources: fileSearchTool.resources });
const filePrompt = 'What are the steps to setup the TrailMaster X4 Tent?';
console.log(`\n---------------- 📝 User Prompt ---------------- \n${filePrompt}`);
await client.agents.messages.create(fileSearchThread.id, 'user', filePrompt);

// Create run
let fileSearchRun = await client.agents.runs.create(fileSearchThread.id, fileAgent.id).stream();

for await (const eventMessage of fileSearchRun) {
    if (eventMessage.event === DoneEvent.Done) {
        console.log(`Run completed: ${eventMessage.data}`);
    }
    if (eventMessage.event === ErrorEvent.Error) {
        console.log(`An error occurred. ${eventMessage.data}`);
    }
}

const fileSearchMessagesIterator = await client.agents.messages.list(fileSearchThread.id);
const fileAssistantMessage = await getAssistantMessage(fileSearchMessagesIterator);
console.log(`\n---------------- 💬 Response ---------------- \n`);
printAssistantMessage(fileAssistantMessage);

// Clean up
console.log(`\n---------------- 🧹 Clean Up File Agent ----------------`);
client.agents.vectorStores.delete(vectorStore.id);
client.agents.files.delete(file.id);
client.agents.deleteAgent(fileAgent.id);
console.log(`Deleted VectorStore, File, and FileAgent. FileAgent ID: ${fileAgent.id}`);
package com.azure.ai.foundry.samples;

import java.io.IOException;
import java.nio.file.Files;
import java.nio.file.Path;

import com.azure.ai.agents.persistent.PersistentAgentsClient;
import com.azure.ai.agents.persistent.PersistentAgentsClientBuilder;
import com.azure.ai.agents.persistent.PersistentAgentsAdministrationClient;
import com.azure.ai.agents.persistent.models.CreateAgentOptions;
import com.azure.ai.agents.persistent.models.CreateThreadAndRunOptions;
import com.azure.ai.agents.persistent.models.PersistentAgent;
import com.azure.ai.agents.persistent.models.ThreadRun;
import com.azure.core.exception.HttpResponseException;
import com.azure.core.util.logging.ClientLogger;
import com.azure.identity.DefaultAzureCredentialBuilder;

/**
 * Sample demonstrating agent creation with document capabilities using Azure AI Agents Persistent SDK.
 *
 * This sample shows how to:
 * - Set up authentication with Azure credentials
 * - Create a temporary document file for demonstration purposes
 * - Create a persistent agent with custom instructions for document search
 * - Start a thread and run with the agent that can access document content
 * - Work with file-based knowledge sources for agent interactions
 *
 * Environment variables:
 * - AZURE_ENDPOINT: Optional fallback. The base endpoint for your Azure AI service if PROJECT_ENDPOINT is not provided.
 * - PROJECT_ENDPOINT: Required. The endpoint for your Azure AI Project.
 * - MODEL_DEPLOYMENT_NAME: Optional. The model deployment name (defaults to "gpt-4o").
 * - AGENT_NAME: Optional. The name to give to the created agent (defaults to "java-file-search-agent").
 * - AGENT_INSTRUCTIONS: Optional. The instructions for the agent (defaults to document-focused instructions).
 *
 * Note: This sample demonstrates the creation of an agent that can process document content.
 * In a real-world scenario, you might want to integrate with Azure AI Search or similar services
 * for more advanced document processing capabilities.
 *
 * SDK Features Demonstrated:
 * - Using the Azure AI Agents Persistent SDK (com.azure:azure-ai-agents-persistent:1.0.0-beta.2)
 * - Creating an authenticated client with DefaultAzureCredential
 * - Using the PersistentAgentsClientBuilder for client instantiation
 * - Working with the PersistentAgentsAdministrationClient for agent management
 * - Creating temporary document files for agent access
 * - Adding document knowledge sources to agents
 * - Creating document-aware agents that can search and reference content
 * - Starting threads and runs for document-based Q&A
 * - Error handling for Azure service and file operations
 */
public class FileSearchAgentSample {
    private static final ClientLogger logger = new ClientLogger(FileSearchAgentSample.class);

    public static void main(String[] args) {
        // Load environment variables with proper error handling
        String endpoint = System.getenv("AZURE_ENDPOINT");
        String projectEndpoint = System.getenv("PROJECT_ENDPOINT");
        String modelName = System.getenv("MODEL_DEPLOYMENT_NAME");
        String agentName = System.getenv("AGENT_NAME");
        String instructions = System.getenv("AGENT_INSTRUCTIONS");

        // Check for required endpoint configuration
        if (projectEndpoint == null && endpoint == null) {
            String errorMessage = "Environment variables not configured. Required: either PROJECT_ENDPOINT or AZURE_ENDPOINT must be set.";
            logger.error("ERROR: {}", errorMessage);
            logger.error("Please set your environment variables or create a .env file. See README.md for details.");
            return;
        }

        // Set defaults for optional parameters
        if (modelName == null) {
            modelName = "gpt-4o";
            logger.info("No MODEL_DEPLOYMENT_NAME provided, using default: {}", modelName);
        }
        if (agentName == null) {
            agentName = "java-file-search-agent";
            logger.info("No AGENT_NAME provided, using default: {}", agentName);
        }
        if (instructions == null) {
            instructions = "You are a helpful assistant that can answer questions about documents.";
            logger.info("No AGENT_INSTRUCTIONS provided, using default instructions: {}", instructions);
        }

        logger.info("Building DefaultAzureCredential");
        var credential = new DefaultAzureCredentialBuilder().build();

        // Use AZURE_ENDPOINT as fallback if PROJECT_ENDPOINT not set
        String finalEndpoint = projectEndpoint != null ? projectEndpoint : endpoint;
        logger.info("Using endpoint: {}", finalEndpoint);

        try {
            // Build the general agents client with proper error handling
            logger.info("Creating PersistentAgentsClient with endpoint: {}", finalEndpoint);
            PersistentAgentsClient agentsClient = new PersistentAgentsClientBuilder()
                .endpoint(finalEndpoint)
                .credential(credential)
                .buildClient();

            // Derive the administration client
            logger.info("Getting PersistentAgentsAdministrationClient");
            PersistentAgentsAdministrationClient adminClient =
                agentsClient.getPersistentAgentsAdministrationClient();

            // Create sample document for demonstration
            Path tmpFile = createSampleDocument();
            logger.info("Created sample document at: {}", tmpFile);
            String filePreview = Files.readString(tmpFile).substring(0, 200) + "...";
            logger.info("{}", filePreview);

            // Create the agent with proper configuration
            logger.info("Creating agent with name: {}, model: {}", agentName, modelName);
            PersistentAgent agent = adminClient.createAgent(
                new CreateAgentOptions(modelName)
                    .setName(agentName)
                    .setInstructions(instructions)
            );
            logger.info("Agent ID: {}", agent.getId());
            logger.info("Agent model: {}", agent.getModel());

            // Start a thread and run on the general client
            logger.info("Creating thread and run with agent ID: {}", agent.getId());
            ThreadRun threadRun = agentsClient.createThreadAndRun(
                new CreateThreadAndRunOptions(agent.getId())
            );
            logger.info("ThreadRun ID: {}", threadRun.getThreadId());

            // Display success message
            logger.info("\nDemo completed successfully!");

        } catch (HttpResponseException e) {
            // Handle service-specific errors with detailed information
            int statusCode = e.getResponse().getStatusCode();
            logger.error("Service error {}: {}", statusCode, e.getMessage());
            logger.error("Refer to the Azure AI Agents documentation for troubleshooting information.");

        } catch (IOException e) {
            // Handle IO exceptions specifically for file operations
            logger.error("I/O error while creating sample document: {}", e.getMessage(), e);

        } catch (Exception e) {
            // Handle general exceptions
            logger.error("Error in file search agent sample: {}", e.getMessage(), e);
        }
    }

    /**
     * Creates a sample markdown document with cloud computing information.
     *
     * This method demonstrates:
     * - Creating a temporary file that will be automatically deleted when the JVM exits
     * - Writing structured markdown content to the file
     * - Logging file creation and preview of content
     *
     * In a real application, you might read existing files or create more complex documents.
     * You could also upload them to a document storage service for persistent access.
     *
     * @return Path to the created temporary file
     * @throws IOException if an I/O error occurs during file creation or writing
     */
    private static Path createSampleDocument() throws IOException {
        logger.info("Creating sample document");
        String content = """
            # Cloud Computing Overview

            Cloud computing is the delivery of computing services over the internet, including servers, storage,
            databases, networking, software, analytics, and intelligence. Cloud services offer faster innovation,
            flexible resources, and economies of scale.

            ## Key Cloud Service Models

            1. **Infrastructure as a Service (IaaS)** - Provides virtualized computing resources
            2. **Platform as a Service (PaaS)** - Provides hardware and software tools over the internet
            3. **Software as a Service (SaaS)** - Delivers software applications over the internet

            ## Major Cloud Providers

            - Microsoft Azure
            - Amazon Web Services (AWS)
            - Google Cloud Platform (GCP)
            - IBM Cloud

            ## Benefits of Cloud Computing

            - Cost efficiency
            - Scalability
            - Reliability
            - Performance
            - Security
            """;

        Path tempFile = Files.createTempFile("cloud-doc", ".md");
        Files.writeString(tempFile, content);
        logger.info("Sample document created at: {}", tempFile);
        return tempFile;
    }
}
Замените YOUR-FOUNDRY-RESOURCE-NAME и YOUR-PROJECT-NAME своими значениями:
#Upload the file
curl --request POST --url 'https://YOUR-FOUNDRY-RESOURCE-NAME.services.ai.azure.com/api/projects/YOUR-PROJECT-NAME/files?api-version=v1' \
    -h 'authorization: Bearer $AZURE_AI_AUTH_TOKEN' \
    -f purpose="assistant" \
    -f file="@product_info_1.md" #File object (not file name) to be uploaded.
#Lets say file ID created is assistant-123456789. Use this in the next step

# create vector store
curl --request POST --url 'https://YOUR-FOUNDRY-RESOURCE-NAME.services.ai.azure.com/api/projects/YOUR-PROJECT-NAME/vector_stores?api-version=v1' \
-h 'authorization: Bearer $AZURE_AI_AUTH_TOKEN' \
-h 'content-type: application/json' \
-d '{
        "name": "my_vectorstore",
        "file_ids": ["assistant-123456789"]
    }'
#Lets say Vector Store ID created is vs_123456789. Use this in the next step

# Create Agent for File Search
curl --request POST --url 'https://YOUR-FOUNDRY-RESOURCE-NAME.services.ai.azure.com/api/projects/YOUR-PROJECT-NAME/assistants?api-version=v1' \
    -h 'authorization: Bearer $AZURE_AI_AUTH_TOKEN' \
    -h 'content-type: application/json' \
    -d '{
        "model": "gpt-4o",
        "name": "my-assistant",
        "instructions": "You are a helpful assistant and can search information from uploaded files",
        "tools": [{"type": "file_search"}],
        "tool_resources": {"file_search": {"vector_store_ids": ["vs_123456789"]}}
    }'
#Lets say agent ID created is asst_123456789. Use this to run the agent

# Create thread
curl --request POST --url 'https://YOUR-FOUNDRY-RESOURCE-NAME.services.ai.azure.com/api/projects/YOUR-PROJECT-NAME/threads?api-version=v1' \
    -h 'authorization: Bearer $AZURE_AI_AUTH_TOKEN' \
    -h 'content-type: application/json'
#Lets say thread ID created is thread_123456789. Use this in the next step

# Create message using thread ID
curl --request POST --url 'https://YOUR-FOUNDRY-RESOURCE-NAME.services.ai.azure.com/api/projects/YOUR-PROJECT-NAME/threads/thread_123456789/messages?api-version=v1' \
    -h 'authorization: Bearer $AZURE_AI_AUTH_TOKEN' \
    -h 'content-type: application/json' \
    -d '{
            "role": "user",
            "content": "Hello, what Contoso products do you know?"
        }'

# Run thread with the agent - use both agent id and thread id
curl --request POST --url 'https://YOUR-FOUNDRY-RESOURCE-NAME.services.ai.azure.com/api/projects/YOUR-PROJECT-NAME/threads/thread_123456789/runs?api-version=v1' \
    -h 'authorization: Bearer $AZURE_AI_AUTH_TOKEN' \
    -h 'content-type: application/json' \
    --data '{
        "assistant_id": "asst_123456789"
    }'

# List the messages in the thread using thread ID
curl --request GET --url 'https://YOUR-FOUNDRY-RESOURCE-NAME.services.ai.azure.com/api/projects/YOUR-PROJECT-NAME/threads/thread_123456789/messages?api-version=v1' \
    -h 'authorization: Bearer $AZURE_AI_AUTH_TOKEN' \
    -h 'content-type: application/json'

# Delete agent once done using agent id
curl --request DELETE --url 'https://YOUR-FOUNDRY-RESOURCE-NAME.services.ai.azure.com/api/projects/YOUR-PROJECT-NAME/assistants/asst_123456789?api-version=v1' \
    -h 'authorization: Bearer $AZURE_AI_AUTH_TOKEN' \
    -h 'content-type: application/json'
- На панели установки агента, при необходимости, прокрутите вниз, чтобы найти База знаний.
- Нажмите кнопку "Добавить".
- Выберите файлы для отправки файла product_info_1.md.
- Выберите локальные файлы в разделе "Добавить файлы".
- Выберите " Отправить и сохранить".
- Измените инструкции агентов, например "Вы полезный помощник и можете искать информацию из отправленных файлов".
- Задайте вопрос, например "Привет, какие продукты Contoso вы знаете?"
- Чтобы добавить дополнительные файлы, выберите в AgentVectorStore ... и нажмите кнопку "Управление".
Очистка ресурсов
Если вам больше не нужен какой-либо из созданных ресурсов, удалите группу ресурсов, связанную с проектом.
- На портале Azure выберите группу ресурсов и выберите Delete. Убедитесь, что вы хотите удалить группу ресурсов.
Связанное содержимое