Реализация Oracle Data Guard на виртуальной машине Azure под управлением Linux
Область применения: ✔️ виртуальные машины Linux
Azure CLI можно использовать для создания ресурсов Azure и управления ими из командной строки или с помощью скриптов. В этой статье описывается, как с помощью Azure CLI развернуть базу данных Oracle Database 19c, выпуск 3 из Azure Marketplace образа. В этой статье представлено пошаговое руководство по установке и настройке Data Guard на виртуальной машине Azure. Для защиты среды порты не будут общедоступными, а экземпляр Бастиона Azure предоставит доступ к виртуальным машинам Oracle.
Перед началом работы убедитесь, что azure CLI установлен. Дополнительные сведения см. в руководстве по установке Azure CLI.
Подготовка среды
Предположения
Чтобы установить Oracle Data Guard, необходимо создать две виртуальные машины Azure в одной группе доступности:
- Основная виртуальная машина (
OracleVM1) имеет работающий экземпляр Oracle. - На резервной виртуальной машине (
OracleVM2) установлено только программное обеспечение Oracle.
Образ Azure Marketplace, используемый для создания виртуальных машин, — .Oracle:oracle-database-19-3:oracle-database-19-0904:latest
Примечание
Помните о версиях, которые достигли конца срока службы (EOL) и больше не поддерживаются Red Hat. Загруженные образы, которые находятся в или за пределами EOL, будут поддерживаться на основе разумных деловых усилий. Дополнительные сведения см. на веб-странице Red Hat, посвященной жизненным циклам продуктов.
Вход в Azure
Войдите в подписку Azure с помощью команды az login и следуйте инструкциям на экране.
az login
Настройка переменных среды
LOCATION Настройте переменную для среды:
LOCATION=eastus
RESOURCE_GROUP="Oracle-Lab"
VM_USERNAME="azureuser"
VM_PASSWORD="OracleLab123"
VNET_NAME="${RESOURCE_GROUP}VNet"
Включение расширения Бастиона Azure
Включите расширение Бастиона Azure в Azure CLI:
az extension add \
  --name bastion
Создание группы ресурсов
Создайте группу ресурсов с помощью команды az group create. Группа ресурсов Azure является логическим контейнером, в котором происходит развертывание ресурсов Azure и управление ими.
az group create \
  --name $RESOURCE_GROUP \
  --location $LOCATION
Создание виртуальной сети с двумя подсетями
Создайте виртуальную сеть, в которой будут подключаться все службы вычислений. В одной подсети будет размещен Бастион Azure, служба Azure, которая помогает защитить базы данных от общего доступа. Во второй подсети будут размещены две виртуальные машины базы данных Oracle.
Кроме того, создайте группу безопасности сети, на которую будут ссылаться все службы, чтобы определить, какие порты являются общедоступными. Будет предоставлен только порт 443. Служба Бастиона Azure откроет этот порт автоматически при создании экземпляра службы.
az network vnet create \
  --resource-group $RESOURCE_GROUP \
  --location $LOCATION \
  --name $VNET_NAME \
  --address-prefix "10.0.0.0/16"
az network vnet subnet create \
  --resource-group $RESOURCE_GROUP \
  --name AzureBastionSubnet \
  --vnet-name $VNET_NAME \
  --address-prefixes 10.0.0.0/24
az network vnet subnet create \
  --resource-group $RESOURCE_GROUP \
  --name OracleSubnet \
  --vnet-name $VNET_NAME \
  --address-prefixes 10.0.1.0/24
az network nsg create \
  --name OracleVM-NSG \
  --resource-group $RESOURCE_GROUP \
  --location $LOCATION
"Создать группу доступности"
Создавать группу доступности необязательно, но мы рекомендуем это сделать. Дополнительные сведения см. в рекомендациях по группам доступности Azure.
az vm availability-set create \
  --resource-group $RESOURCE_GROUP \
  --name OracleVMAvailabilitySet \
  --platform-fault-domain-count 2 \
  --platform-update-domain-count 2
Создание двух виртуальных машин
Создайте две виртуальные машины с помощью команды az vm create . В следующем примере создаются виртуальные машины с именами OracleVM1 и OracleVM2.
Создать OracleVM1 (основной):
az vm create \
  --resource-group $RESOURCE_GROUP \
  --name OracleVM1 \
  --availability-set OracleVMAvailabilitySet \
  --image Oracle:oracle-database-19-3:oracle-database-19-0904:latest \
  --size Standard_DS1_v2 \
  --authentication-type password \
  --admin-username $VM_USERNAME \
  --admin-password $VM_PASSWORD \
  --vnet-name $VNET_NAME \
  --subnet OracleSubnet \
  --nsg OracleVM-NSG \
  --os-disk-size-gb 32
Создать OracleVM2 (в режиме ожидания):
az vm create \
  --resource-group $RESOURCE_GROUP \
  --name OracleVM2 \
  --availability-set OracleVMAvailabilitySet \
  --image Oracle:oracle-database-19-3:oracle-database-19-0904:latest \
  --size Standard_DS1_v2 \
  --authentication-type password \
  --admin-username $VM_USERNAME \
  --admin-password $VM_PASSWORD \
  --vnet-name $VNET_NAME \
  --subnet OracleSubnet \
  --nsg OracleVM-NSG \
  --os-disk-size-gb 32
Создание экземпляра службы "Бастион Azure"
Бастион Azure предоставляет безопасный туннель для всех служб, размещенных в виртуальной сети. Он служит полем перехода для устранения прямого доступа к базам данных Oracle.
Создайте общедоступный IP-адрес для доступа к службе Бастиона Azure:
az network public-ip create \
  --resource-group $RESOURCE_GROUP \
  --name OracleLabBastionPublicIP \
  --sku Standard
Создайте экземпляр службы Бастиона Azure:
az network bastion create \
  --location $LOCATION \
  --name OracleLabBastion \
  --public-ip-address OracleLabBastionPublicIP \
  --resource-group $RESOURCE_GROUP \
  --vnet-name $VNET_NAME \
  --sku basic
Подключитесь к виртуальной машине
Теперь вы получите доступ OracleVM1 с помощью службы "Бастион Azure" из портал Azure.
В поле поиска в верхней части окна введите OracleVM1. В списке результатов выберите OracleVM1 , чтобы открыть виртуальную машину.

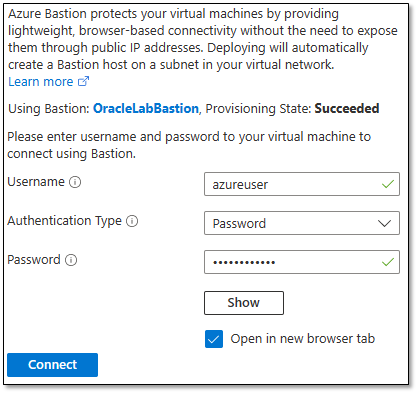
В верхней части панели выберите Подключить>Бастион.

Введите имя пользователя и пароль, а затем нажмите кнопку Подключиться .

Откроется новая вкладка с безопасным подключением к виртуальной машине, где программное обеспечение Oracle уже установлено из Azure Marketplace образа.

Настройка OracleVM1 (основной)
Отключите брандмауэр.
sudo systemctl stop firewalld
sudo systemctl disable firewalld
oracle Задайте пароль пользователя:
sudo passwd oracle
azureuser Введите пароль: OracleLab123.
Измените oracle пароль пользователя на OracleLab123. (Введите его еще раз, чтобы проверить.)
Создание базы данных на oracleVM1 (источник)
Программное обеспечение Oracle уже установлено в образе Azure Marketplace, поэтому следующим шагом является установка базы данных.
Переключитесь на суперпользователя Oracle:
sudo su - oracle
Создание базы данных
dbca -silent \
   -createDatabase \
   -datafileDestination /u01/app/oracle/cdb1 \
   -templateName General_Purpose.dbc \
   -gdbname cdb1 \
   -sid cdb1 \
   -responseFile NO_VALUE \
   -characterSet AL32UTF8 \
   -sysPassword OracleLab123 \
   -systemPassword OracleLab123 \
   -createAsContainerDatabase true \
   -numberOfPDBs 1 \
   -pdbName pdb1 \
   -pdbAdminPassword OracleLab123 \
   -databaseType MULTIPURPOSE \
   -automaticMemoryManagement false \
   -storageType FS
Результат должен выглядеть следующим образом:
Copying database files
1% complete
2% complete
8% complete
13% complete
19% complete
27% complete
Creating and starting Oracle instance
29% complete
32% complete
33% complete
34% complete
38% complete
42% complete
43% complete
45% complete
Completing Database Creation
48% complete
51% complete
53% complete
62% complete
70% complete
72% complete
Creating Pluggable Databases
78% complete
100% complete
Look at the log file "/u01/app/oracle/cfgtoollogs/dbca/cdb1/cdb1.log" for further details.
ORACLE_SID Задайте переменные и ORACLE_HOME :
$ ORACLE_HOME=/u01/app/oracle/product/19.0.0/dbhome_1; export ORACLE_HOME
$ ORACLE_SID=cdb1; export ORACLE_SID
При необходимости можно добавить ORACLE_HOME и ORACLE_SID в файл /home/oracle/.bashrc , чтобы сохранить эти параметры для будущих имен входа:
# add oracle home
export ORACLE_HOME= /u01/app/oracle/product/19.0.0/dbhome_1
# add oracle sid
export ORACLE_SID=cdb1
Настройка Data Guard
Включение режима журнала архивирования на myVM1 (основная)
Включить режим ведения журнала:
sqlplus / as sysdba
SQL> SELECT log_mode FROM v$database;
LOG_MODE
------------
NOARCHIVELOG
SQL> SHUTDOWN IMMEDIATE;
SQL> STARTUP MOUNT;
SQL> ALTER DATABASE ARCHIVELOG;
SQL> ALTER DATABASE OPEN;
Включите принудительное ведение журнала и убедитесь, что присутствует хотя бы один файл журнала:
SQL> ALTER DATABASE FORCE LOGGING;
SQL> ALTER SYSTEM SWITCH LOGFILE;
При создании резервных журналов повторяемых операций их размер и количество должны совпадать с размером и количеством журналов повторяемых операций базы данных источника:
SQL> ALTER DATABASE ADD STANDBY LOGFILE ('/u01/app/oracle/cdb1/standby_redo01.log') SIZE 200M;
SQL> ALTER DATABASE ADD STANDBY LOGFILE ('/u01/app/oracle/cdb1/standby_redo02.log') SIZE 200M;
SQL> ALTER DATABASE ADD STANDBY LOGFILE ('/u01/app/oracle/cdb1/standby_redo03.log') SIZE 200M;
SQL> ALTER DATABASE ADD STANDBY LOGFILE ('/u01/app/oracle/cdb1/standby_redo04.log') SIZE 200M;
Включите Flashback (что значительно упрощает восстановление) и задайте для значение STANDBY_FILE_MANAGEMENTAUTO. Затем выйдите из SQL*Plus.
SQL> ALTER SYSTEM SET db_recovery_file_dest_size=50G scope=both sid='*';
SQL> ALTER SYSTEM SET db_recovery_file_dest='/u01/app/oracle/cdb1' scope=both sid='*';
SQL> ALTER SYSTEM SET STANDBY_FILE_MANAGEMENT=AUTO SCOPE=BOTH;
SQL> ALTER SYSTEM SET STANDBY_FILE_MANAGEMENT=AUTO;
SQL> EXIT;
Настройка службы на OracleVM1 (основной)
Измените или создайте файл tnsnames.ora , который находится в папке $ORACLE_HOME/network/admin .
Добавьте следующие записи:
cdb1 =
  (DESCRIPTION =
    (ADDRESS_LIST =
      (ADDRESS = (PROTOCOL = TCP)(HOST = OracleVM1)(PORT = 1521))
    )
    (CONNECT_DATA =
      (SID = cdb1)
    )
  )
cdb1_stby =
  (DESCRIPTION =
    (ADDRESS_LIST =
      (ADDRESS = (PROTOCOL = TCP)(HOST = OracleVM2)(PORT = 1521))
    )
    (CONNECT_DATA =
      (SID = cdb1)
    )
  )
Измените или создайте файл listener.ora , который находится в папке $ORACLE_HOME/network/admin .
Добавьте следующие записи:
LISTENER =
  (DESCRIPTION_LIST =
    (DESCRIPTION =
      (ADDRESS = (PROTOCOL = TCP)(HOST = OracleVM1)(PORT = 1521))
      (ADDRESS = (PROTOCOL = IPC)(KEY = EXTPROC1521))
    )
  )
SID_LIST_LISTENER =
  (SID_LIST =
    (SID_DESC =
      (GLOBAL_DBNAME = cdb1_DGMGRL)
      (ORACLE_HOME = /u01/app/oracle/product/19.0.0/dbhome_1)
      (SID_NAME = cdb1)
    )
  )
ADR_BASE_LISTENER = /u01/app/oracle
Включите брокер Data Guard:
sqlplus / as sysdba
SQL> ALTER SYSTEM SET dg_broker_start=true;
SQL> CREATE pfile FROM spfile;
SQL> EXIT;
Скопируйте файл параметров на резервный сервер:
scp -p $ORACLE_HOME/dbs/initcdb1.ora oracle@OracleVM2:$ORACLE_HOME/dbs/
Запустите прослушиватель:
 lsnrctl stop
 lsnrctl start
Настройка службы на OracleVM2 (резервная версия)
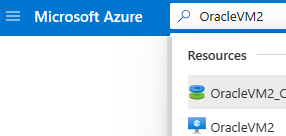
Вернитесь на портал Azure. Выполните поиск по запросу OracleVM2, а затем выберите ресурс в списке результатов.
В верхней части панели выберите Подключить>Бастион.
Введите имя пользователя и пароль, а затем нажмите кнопку Подключиться .
Отключение брандмауэра на OracleVM2 (режим ожидания)
sudo systemctl stop firewalld
sudo systemctl disable firewalld
Настройка среды для OracleVM1
oracle Задайте пароль пользователя:
sudo passwd oracle
azureuser Введите пароль: OracleLab123.
Измените oracle пароль пользователя на OracleLab123. (Введите его еще раз, чтобы проверить.)
Переключитесь на oracle суперпользователя:
$ sudo su – oracle
ORACLE_SID Задайте переменные и ORACLE_HOME :
ORACLE_HOME=/u01/app/oracle/product/19.0.0/dbhome_1; export ORACLE_HOME
ORACLE_SID=cdb1; export ORACLE_SID
При необходимости можно добавить ORACLE_HOME и ORACLE_SID в файл /home/oracle/.bashrc , чтобы сохранить эти параметры для будущих имен входа:
# add oracle home
export ORACLE_HOME=/u01/app/oracle/product/19.0.0/dbhome_1
# add oracle sid
export ORACLE_SID=cdb1
Измените или создайте файл tnsnames.ora , который находится в папке $ORACLE_HOME/network/admin .
Добавьте следующие записи:
cdb1 =
  (DESCRIPTION =
    (ADDRESS_LIST =
      (ADDRESS = (PROTOCOL = TCP)(HOST = OracleVM1)(PORT = 1521))
    )
    (CONNECT_DATA =
      (SID = cdb1)
    )
  )
cdb1_stby =
  (DESCRIPTION =
    (ADDRESS_LIST =
      (ADDRESS = (PROTOCOL = TCP)(HOST = OracleVM2)(PORT = 1521))
    )
    (CONNECT_DATA =
      (SID = cdb1)
    )
  )
Измените или создайте файл listener.ora , который находится в папке $ORACLE_HOME/network/admin .
Добавьте следующие записи:
LISTENER =
  (DESCRIPTION_LIST =
    (DESCRIPTION =
      (ADDRESS = (PROTOCOL = TCP)(HOST = OracleVM2)(PORT = 1521))
      (ADDRESS = (PROTOCOL = IPC)(KEY = EXTPROC1521))
    )
  )
SID_LIST_LISTENER =
  (SID_LIST =
    (SID_DESC =
      (GLOBAL_DBNAME = cdb1_DGMGRL)
      (ORACLE_HOME = /u01/app/oracle/product/19.0.0/dbhome_1)
      (SID_NAME = cdb1)
    )
  )
ADR_BASE_LISTENER = /u01/app/oracle
Запустите прослушиватель:
 lsnrctl stop
 lsnrctl start
Восстановление базы данных в OracleVM2 (резервная версия)
Создайте файл параметров /tmp/initcdb1_stby.ora со следующим содержимым:
*.db_name='cdb1'
Создайте папки:
$ mkdir -p /u01/app/oracle/cdb1
$ mkdir -p /u01/app/oracle/oradata/cdb1/pdbseed
$ mkdir -p /u01/app/oracle/oradata/cdb1/pdb1
$ mkdir -p /u01/app/oracle/fast_recovery_area/cdb1
$ mkdir -p /u01/app/oracle/admin/cdb1/adump
Создайте файл пароля:
$ orapwd file=/u01/app/oracle/product/19.0.0/dbhome_1/dbs/orapwcdb1 password=OracleLab123 entries=10 force=y
Запустите базу данных в OracleVM2:
 export ORACLE_SID=cdb1
 sqlplus / as sysdba
SQL> CREATE spfile from pfile;
SQL> STARTUP NOMOUNT PFILE='/tmp/initcdb1_stby.ora';
SQL> EXIT;
Восстановите базу данных с помощью средства Oracle диспетчер восстановления (RMAN):
$ rman TARGET sys/OracleLab123@cdb1 AUXILIARY sys/OracleLab123@cdb1_stby
Выполните следующие команды в RMAN:
DUPLICATE TARGET DATABASE
  FOR STANDBY
  FROM ACTIVE DATABASE
  DORECOVER
  SPFILE
    SET db_unique_name='CDB1_STBY' COMMENT 'Is standby'
  NOFILENAMECHECK;
После выполнения команд отображаются сообщения, аналогичные приведенным ниже:
media recovery complete, elapsed time: 00:00:00
Finished recover at 29-JUN-22
Finished Duplicate Db at 29-JUN-22
Выход из RMAN:
RMAN> EXIT;
Включите брокер Data Guard:
sqlplus / as sysdba
SQL> ALTER SYSTEM SET dg_broker_start=true;
SQL> EXIT;
Настройка брокера Data Guard на OracleVM1 (основной)
Запустите диспетчер Data Guard и войдите, используя SYS и пароль. (Не используйте проверку подлинности ОС.)
$ dgmgrl sys/OracleLab123@cdb1
DGMGRL for Linux: Version 19.0.0.0 - 64bit Production
Copyright (c) 2000, 2013, Oracle. All rights reserved.
Welcome to DGMGRL, type "help" for information.
Connected as SYSDBA.
DGMGRL> CREATE CONFIGURATION my_dg_config AS PRIMARY DATABASE IS cdb1 CONNECT IDENTIFIER IS cdb1;
Configuration "my_dg_config" created with primary database "cdb1"
DGMGRL> ADD DATABASE cdb1_stby AS CONNECT IDENTIFIER IS cdb1_stby MAINTAINED AS PHYSICAL;
Database "cdb1_stby" added
DGMGRL> ENABLE CONFIGURATION;
Enabled.
Проверьте конфигурацию:
DGMGRL> SHOW CONFIGURATION;
Configuration - my_dg_config
  Protection Mode: MaxPerformance
  Members:
  cdb1      - Primary database
  cdb1_stby - Physical standby database
Fast-Start Failover: DISABLED
Configuration Status:
SUCCESS   (status updated 26 seconds ago)
Настройка Oracle Data Guard завершена. В следующем разделе показано, как проверить подключение и переключение.
Подключение базы данных с клиентского компьютера
Обновите файл tnsnames.ora на клиентском компьютере. Этот файл обычно находится в $ORACLE_HOME/network/admin.
cdb1=
  (DESCRIPTION=
    (ADDRESS=
      (PROTOCOL=TCP)
      (HOST=OracleVM1)
      (PORT=1521)
    )
    (CONNECT_DATA=
      (SERVER=dedicated)
      (SERVICE_NAME=cdb1)
    )
  )
cdb1_stby=
  (DESCRIPTION=
    (ADDRESS=
      (PROTOCOL=TCP)
      (HOST=OracleVM2)
      (PORT=1521)
    )
    (CONNECT_DATA=
      (SERVER=dedicated)
      (SERVICE_NAME=cdb1_stby)
    )
  )
Запустите SQL*Plus:
$ sqlplus sys/OraPasswd1@cdb1
SQL*Plus: Release 19.0.0.0 Production on Wed May 10 14:18:31 2022
Copyright (c) 1982, 2016, Oracle.  All rights reserved.
Connected to:
Oracle Database 12c Enterprise Edition Release 19.0.0.0 - 64bit Production
With the Partitioning, OLAP, Advanced Analytics and Real Application Testing options
SQL>
Проверка конфигурации Data Guard
Переключение базы данных на OracleVM1 (источник)
Переключение с основного на резервный (cdb1 на cdb1_stby):
$ dgmgrl sys/OracleLab123@cdb1
DGMGRL for Linux: Version 19.0.0.0 - 64bit Production
Copyright (c) 2000, 2013, Oracle. All rights reserved.
Welcome to DGMGRL, type "help" for information.
Connected as SYSDBA.
DGMGRL> SWITCHOVER TO cdb1_stby;
Performing switchover NOW, please wait...
Operation requires a connection to instance "cdb1" on database "cdb1_stby"
Connecting to instance "cdb1"...
Connected as SYSDBA.
New primary database "cdb1_stby" is opening...
Operation requires start up of instance "cdb1" on database "cdb1"
Starting instance "cdb1"...
ORACLE instance started.
Database mounted.
Switchover succeeded, new primary is "cdb1_stby"
DGMGRL>
Теперь можно подключиться к резервной базе данных. Запустите SQL*Plus:
$ sqlplus sys/OracleLab123@cdb1_stby
SQL*Plus: Release 19.0.0.0 Production on Wed May 10 14:18:31 2022
Copyright (c) 1982, 2016, Oracle.  All rights reserved.
Connected to:
Oracle Database 19c Enterprise Edition Release 19.0.0.0 - 64bit Production
With the Partitioning, OLAP, Advanced Analytics and Real Application Testing options
SQL>
Переключение базы данных на OracleVM2 (режим ожидания)
Чтобы переключиться, выполните следующий код в OracleVM2:
$ dgmgrl sys/OracleLab123@cdb1_stby
DGMGRL for Linux: Version 190.0.0.0 - 64bit Production
Copyright (c) 2000, 2013, Oracle. All rights reserved.
Welcome to DGMGRL, type "help" for information.
Connected as SYSDBA.
DGMGRL> SWITCHOVER TO cdb1;
Performing switchover NOW, please wait...
Operation requires a connection to instance "cdb1" on database "cdb1"
Connecting to instance "cdb1"...
Connected as SYSDBA.
New primary database "cdb1" is opening...
Operation requires start up of instance "cdb1" on database "cdb1_stby"
Starting instance "cdb1"...
ORACLE instance started.
Database mounted.
Switchover succeeded, new primary is "cdb1"
Теперь вы снова имеете возможность подключиться к основной базе данных. Запустите SQL*Plus:
$ sqlplus sys/OracleLab123@cdb1
SQL*Plus: Release 19.0.0.0 Production on Wed May 10 14:18:31 2022
Copyright (c) 1982, 2016, Oracle.  All rights reserved.
Connected to:
Oracle Database 19c Enterprise Edition Release 19.0.0.0 - 64bit Production
With the Partitioning, OLAP, Advanced Analytics and Real Application Testing options
SQL>
Вы завершили установку и настройку Data Guard на Oracle Linux.
Удаление виртуальной машины
Если виртуальные машины больше не нужны, можно использовать следующую команду, чтобы удалить группу ресурсов, виртуальные машины и все связанные ресурсы:
az group delete --name $RESOURCE_GROUP
Дальнейшие действия
Обратная связь
Ожидается в ближайшее время: в течение 2024 года мы постепенно откажемся от GitHub Issues как механизма обратной связи для контента и заменим его новой системой обратной связи. Дополнительные сведения см. в разделе https://aka.ms/ContentUserFeedback.
Отправить и просмотреть отзыв по