Calculate the Net Promoter Score for Dynamics 365 Customer Voice data
Net Promoter Score (NPS) is a commonly recognized scale with which to measure the overall satisfaction of your customers. Typically, it is used at the end of surveys where the respondent is asked if they would recommend a product, service, or company on a scale of 0 to 10.
Based on the response that is given, a respondent is classed as one of the following types:
Promoter (score 9-10) - Respondent will continue to buy from an organization, refer them, and promote them.
Passive (score 7-8) - Respondent is satisfied but unenthusiastic and could be swayed by competitors.
Detractor (score 0-6) - Unhappy customer who can damage an organization's brand and impede growth through negative word-of-mouth.
The Net Promoter Score formula then gives you the NPS, a score that can range from a low of -100 (all Detractors) to a high of 100 (all Promoters). The formula is as follows:
% PROMOTERS – % DETRACTORS = NPS
When capturing feedback, you can view NPS within Dynamics 365 Customer Voice for a specific survey. When reviewing in Power BI, you can combine several surveys, and by using custom calculations, you can add the overall NPS to a report.
Create the formula
To create the overall NPS, you need to create a new column and a new measure on the msfp_surveyresponses table. The column will be for the NPS Type. As mentioned, based on the given response, a respondent can be considered as Promoter, Passive, or Detractor. When they respond to the NPS question, only the numerical value is given, so you need to figure out how many and the percentage of Promoters and Detractors so you can then use the formula to create your NPS score.
Create the column by using the following formula. This formula uses a switch statement and assigns the Detractor value for any survey response with an NPS Score of 6 or below, a Passive for any response with a 7 or an 8, and a Promoter for any response with a 9 or above.
NPS Type = SWITCH(TRUE(),msfp_surveyresponse[msfp_npsscore]<=6,"Detractors",msfp_surveyresponse[msfp_npsscore]=7 ||msfp_surveyresponse[msfp_npsscore]=8, "Passives",'msfp_surveyresponse'[msfp_npsscore]>=9,"Promoters")
Next, you will create the new measure. By using the NPS Type column that was previously created, the formula for the Total NPS will follow the NPS formula. You can divide the number of promoters by the total number of responses, do the same for the detractors, and then subtract the latter from the former. Then, multiply by 100, which will give you the whole number: the overall Net Promoter Score.
TOTAL NPS =
var NumOfRespon = CALCULATE(COUNTROWS(msfp_surveyresponse), ALL(msfp_surveyresponse))
return
(CALCULATE(COUNTA(msfp_surveyresponse[activityid]), FILTER(msfp_surveyresponse, msfp_surveyresponse[NPS Type]="Promoters")) / NumOfRespon
    - CALCULATE(COUNTA(msfp_surveyresponse[activityid]), FILTER(msfp_surveyresponse, msfp_surveyresponse[NPS Type]="Detractors")) / NumOfRespon)
    * 100
After the measure has been created, select it from the list of columns, which will provide access to the Measure tools tab at the top of Power BI. From the Measure tools tab, change the formatting of the column to a whole number so that it will display correctly.
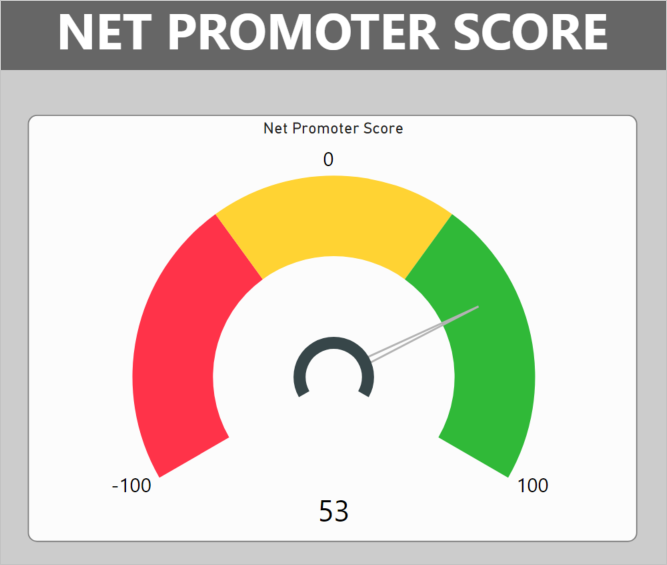
A visual can then be used in Power BI to show the Total NPS measure that was created. In the following example, a custom tachometer gauge visual can be used to provide clear and accurate analysis of the NPS score. To achieve this task, set the start value of the axis to -100 and set the end to 100 (the two far ends of the NPS scale). The first range can be set with a red color to indicate that it's a highly undesired number. The second range can be set to a yellow or amber, with a start value around -30. The third range can be set with a green color, with a start value of a positive desired range based on the organization's NPS goal. Making sure that the callout value is turned on will also display the NPS score in the middle of the gauge.
By creating a custom column and a custom measure on the msfp_surveyresponses table, the overall Net Promoter Score can be created for all responses within the selected data source. Consider also filtering the data to only include those responses that include an NPS score or filtering the surveys to only include specific ones by name. Using this process provides the knowledge that is needed to add the NPS score to other reports or dashboards or add more filtering to help find the NPS for a specific business unit, industry, or an individual account record.
