Локальные уведомления в Xamarin.Forms
 Скачайте пример
Локальные уведомления — это оповещения, отправляемые приложениями, установленными на мобильном устройстве. Локальные уведомления часто используются для таких функций, как:
- События календаря
- Напоминания
- Триггеры на основе расположения
Каждая платформа обрабатывает создание, отображение и использование локальных уведомлений по-разному. Из этой статье вы узнаете, как создать кроссплатформенную абстракцию для отправки, планирования и получения локальных уведомлений с помощью Xamarin.Forms.

Создание кросс-платформенного интерфейса
Приложение Xamarin.Forms должно создавать и использовать уведомления, не заботясь о реализации базовой платформы. Следующий интерфейс INotificationManager реализуется в общей библиотеке кода и определяет кросс-платформенный API, который приложение может использовать для взаимодействия с уведомлениями:
public interface INotificationManager
{
    event EventHandler NotificationReceived;
    void Initialize();
    void SendNotification(string title, string message, DateTime? notifyTime = null);
    void ReceiveNotification(string title, string message);
}
Этот интерфейс будет реализован в каждом проекте платформы. Событие NotificationReceived позволяет приложению обрабатывать входящие уведомления. Метод Initialize должен выполнять любую собственную логику платформы, необходимую для подготовки системы уведомлений. С помощью метода SendNotification в определенное время, заданное с помощью необязательного параметра DateTime, должно быть отправлено уведомление. Метод ReceiveNotification должен вызываться базовой платформой при получении сообщения.
Использование интерфейса в Xamarin.Forms
После создания интерфейса его можно использовать в общем проекте Xamarin.Forms, даже если реализация платформы еще не создана. Пример приложения содержит ContentPage с именем MainPage.xaml со следующим содержимым:
<StackLayout Margin="0,35,0,0"
             x:Name="stackLayout">
    <Label Text="Click the button below to create a local notification."
           TextColor="Red"
           HorizontalOptions="Center"
           VerticalOptions="Start" />
    <Button Text="Create Notification"
            HorizontalOptions="Center"
            VerticalOptions="Start"
            Clicked="OnSendClick" />
    <Label Text="Click the button below to schedule a local notification for in 10 seconds time."
           TextColor="Red"
           HorizontalOptions="Center"
           VerticalOptions="Start" />
    <Button Text="Create Notification"
            HorizontalOptions="Center"
            VerticalOptions="Start"
            Clicked="OnScheduleClick" />
</StackLayout>
Макет содержит элементы Label с пояснением инструкций и элементы Button, которые позволяют отправить или запланировать уведомление при касании.
Код программной части класса MainPage обрабатывает отправку и получение уведомлений:
public partial class MainPage : ContentPage
{
    INotificationManager notificationManager;
    int notificationNumber = 0;

    public MainPage()
    {
        InitializeComponent();

        notificationManager = DependencyService.Get<INotificationManager>();
        notificationManager.NotificationReceived += (sender, eventArgs) =>
        {
            var evtData = (NotificationEventArgs)eventArgs;
            ShowNotification(evtData.Title, evtData.Message);
        };
    }

    void OnSendClick(object sender, EventArgs e)
    {
        notificationNumber++;
        string title = $"Local Notification #{notificationNumber}";
        string message = $"You have now received {notificationNumber} notifications!";
        notificationManager.SendNotification(title, message);
    }

    void OnScheduleClick(object sender, EventArgs e)
    {
        notificationNumber++;
        string title = $"Local Notification #{notificationNumber}";
        string message = $"You have now received {notificationNumber} notifications!";
        notificationManager.SendNotification(title, message, DateTime.Now.AddSeconds(10));
    }

    void ShowNotification(string title, string message)
    {
        Device.BeginInvokeOnMainThread(() =>
        {
            var msg = new Label()
            {
                Text = $"Notification Received:\nTitle: {title}\nMessage: {message}"
            };
            stackLayout.Children.Add(msg);
        });
    }
}
Конструктор MainPage класса используется Xamarin.FormsDependencyService для получения экземпляра конкретной INotificationManagerплатформы объекта. Методы OnSendClick и OnScheduleClicked используют экземпляр INotificationManager для отправки и планирования новых уведомлений. Метод ShowNotification вызывается из обработчика событий, присоединенного к событию NotificationReceived, и вставляет новый Label в страницу при вызове события.
Обработчик событий NotificationReceived приводит свои аргументы событий к NotificationEventArgs. Этот тип определен в общем проекте Xamarin.Forms:
public class NotificationEventArgs : EventArgs
{
    public string Title { get; set; }
    public string Message { get; set; }
}
Дополнительные сведения о Xamarin.FormsDependencyServiceзависимостях см. в разделе Xamarin.Forms "Зависимости".
Создание реализации интерфейса Android
Чтобы приложение Xamarin.Forms отправляло и получало уведомления на Android, оно должно предоставить реализацию интерфейса INotificationManager.
Создание класса AndroidNotificationManager
Класс AndroidNotificationManager реализует интерфейс INotificationManager:
using System;
using Android.App;
using Android.Content;
using Android.Graphics;
using Android.OS;
using AndroidX.Core.App;
using Xamarin.Forms;
using AndroidApp = Android.App.Application;

[assembly: Dependency(typeof(LocalNotifications.Droid.AndroidNotificationManager))]
namespace LocalNotifications.Droid
{
    public class AndroidNotificationManager : INotificationManager
    {
        const string channelId = "default";
        const string channelName = "Default";
        const string channelDescription = "The default channel for notifications.";

        public const string TitleKey = "title";
        public const string MessageKey = "message";

        bool channelInitialized = false;
        int messageId = 0;
        int pendingIntentId = 0;

        NotificationManager manager;

        public event EventHandler NotificationReceived;

        public static AndroidNotificationManager Instance { get; private set; }

        public AndroidNotificationManager() => Initialize();

        public void Initialize()
        {
            if (Instance == null)
            {
                CreateNotificationChannel();
                Instance = this;
            }
        }

        public void SendNotification(string title, string message, DateTime? notifyTime = null)
        {
            if (!channelInitialized)
            {
                CreateNotificationChannel();
            }

            if (notifyTime != null)
            {
                Intent intent = new Intent(AndroidApp.Context, typeof(AlarmHandler));
                intent.PutExtra(TitleKey, title);
                intent.PutExtra(MessageKey, message);

                PendingIntent pendingIntent = PendingIntent.GetBroadcast(AndroidApp.Context, pendingIntentId++, intent, PendingIntentFlags.CancelCurrent);
                long triggerTime = GetNotifyTime(notifyTime.Value);
                AlarmManager alarmManager = AndroidApp.Context.GetSystemService(Context.AlarmService) as AlarmManager;
                alarmManager.Set(AlarmType.RtcWakeup, triggerTime, pendingIntent);
            }
            else
            {
                Show(title, message);
            }
        }

        public void ReceiveNotification(string title, string message)
        {
            var args = new NotificationEventArgs()
            {
                Title = title,
                Message = message,
            };
            NotificationReceived?.Invoke(null, args);
        }

        public void Show(string title, string message)
        {
            Intent intent = new Intent(AndroidApp.Context, typeof(MainActivity));
            intent.PutExtra(TitleKey, title);
            intent.PutExtra(MessageKey, message);

            PendingIntent pendingIntent = PendingIntent.GetActivity(AndroidApp.Context, pendingIntentId++, intent, PendingIntentFlags.UpdateCurrent);

            NotificationCompat.Builder builder = new NotificationCompat.Builder(AndroidApp.Context, channelId)
                .SetContentIntent(pendingIntent)
                .SetContentTitle(title)
                .SetContentText(message)
                .SetLargeIcon(BitmapFactory.DecodeResource(AndroidApp.Context.Resources, Resource.Drawable.xamagonBlue))
                .SetSmallIcon(Resource.Drawable.xamagonBlue)
                .SetDefaults((int)NotificationDefaults.Sound | (int)NotificationDefaults.Vibrate);

            Notification notification = builder.Build();
            manager.Notify(messageId++, notification);
        }

        void CreateNotificationChannel()
        {
            manager = (NotificationManager)AndroidApp.Context.GetSystemService(AndroidApp.NotificationService);

            if (Build.VERSION.SdkInt >= BuildVersionCodes.O)
            {
                var channelNameJava = new Java.Lang.String(channelName);
                var channel = new NotificationChannel(channelId, channelNameJava, NotificationImportance.Default)
                {
                    Description = channelDescription
                };
                manager.CreateNotificationChannel(channel);
            }

            channelInitialized = true;
        }

        long GetNotifyTime(DateTime notifyTime)
        {
            DateTime utcTime = TimeZoneInfo.ConvertTimeToUtc(notifyTime);
            double epochDiff = (new DateTime(1970, 1, 1) - DateTime.MinValue).TotalSeconds;
            long utcAlarmTime = utcTime.AddSeconds(-epochDiff).Ticks / 10000;
            return utcAlarmTime; // milliseconds
        }
    }
}
Атрибут assembly над пространством имен регистрирует реализацию INotificationManager интерфейса с DependencyService.
Android позволяет приложениям определять несколько каналов для уведомлений. Метод Initialize создает базовый канал, который образец приложения использует для отправки уведомлений. Метод SendNotification определяет логику конкретной платформы, необходимую для создания и отправки уведомления. При получении сообщения операционная система Android вызывает метод ReceiveNotification и обработчик событий.
Метод SendNotification позволяет создать локальное уведомление сразу или в определенное время (DateTime). Можно запланировать отправку уведомления на определенное время (DateTime) с помощью класса AlarmManager. Это уведомление получит объект, производный от класса BroadcastReceiver.
[BroadcastReceiver(Enabled = true, Label = "Local Notifications Broadcast Receiver")]
public class AlarmHandler : BroadcastReceiver
{
    public override void OnReceive(Context context, Intent intent)
    {
        if (intent?.Extras != null)
        {
            string title = intent.GetStringExtra(AndroidNotificationManager.TitleKey);
            string message = intent.GetStringExtra(AndroidNotificationManager.MessageKey);

            AndroidNotificationManager manager = AndroidNotificationManager.Instance ?? new AndroidNotificationManager();
            manager.Show(title, message);
        }
    }
}
Внимание
По умолчанию уведомления, запланированные с помощью класса AlarmManager, сбрасываются после перезагрузки устройства. Но можно реализовать в приложении возможность автоматически возобновить запланированные уведомления при перезапуске устройства. Дополнительные сведения см. в разделе Запуск службы сигнализации при перезагрузке устройства статьи Планирование повторяющихся сигналов на сайте developer.android.com и в примере. Сведения о фоновой обработке в Android см. в разделе Guide to Background processing (Руководство по фоновой обработке) на сайте developer.android.com.
Дополнительные сведения о широковещательных приемниках см. в статье Широковещательные приемники в Xamarin.Android.
Обработка входящих уведомлений в Android
Класс MainActivity должен обнаруживать входящие уведомления и уведомлять экземпляр AndroidNotificationManager. Атрибут Activity в классе MainActivity должен указывать значение LaunchMode для LaunchMode.SingleTop:
[Activity(
        //...
        LaunchMode = LaunchMode.SingleTop]
    public class MainActivity : global::Xamarin.Forms.Platform.Android.FormsAppCompatActivity
    {
        // ...
    }
Режим SingleTop предотвращает запуск нескольких экземпляров Activity, пока приложение находится на переднем плане. LaunchMode не подходит для приложений, которые запускают несколько действий в более сложных сценариях уведомления. Дополнительные сведения о значениях перечисления LaunchMode см. в разделе Режим запуска действий Android.
В MainActivity класс изменен для получения входящих уведомлений:
protected override void OnCreate(Bundle savedInstanceState)
{
    // ...

    global::Xamarin.Forms.Forms.Init(this, savedInstanceState);
    LoadApplication(new App());
    CreateNotificationFromIntent(Intent);
}

protected override void OnNewIntent(Intent intent)
{
    CreateNotificationFromIntent(intent);
}

void CreateNotificationFromIntent(Intent intent)
{
    if (intent?.Extras != null)
    {
        string title = intent.GetStringExtra(AndroidNotificationManager.TitleKey);
        string message = intent.GetStringExtra(AndroidNotificationManager.MessageKey);
        DependencyService.Get<INotificationManager>().ReceiveNotification(title, message);
    }
}
Метод CreateNotificationFromIntent извлекает данные уведомления из аргумента intent и предоставляет их AndroidNotificationManager с помощью метода ReceiveNotification. Метод CreateNotificationFromIntent вызывается как из метода OnCreate, так и с помощью метода OnNewIntent:
- При запуске приложения с помощью данных уведомления, данные
Intentпередаются в методOnCreate. - Если приложение уже находится на переднем плане, данные
Intentбудут переданы методуOnNewIntent.
Android предлагает множество дополнительных параметров для уведомлений. Дополнительные сведения см. в статье Уведомления в Xamarin.Android.
Создание реализации интерфейса iOS
Чтобы приложение Xamarin.Forms отправляло и получало уведомления на iOS, оно должно предоставить реализацию INotificationManager.
Создание класса iOSNotificationManager
Класс iOSNotificationManager реализует интерфейс INotificationManager:
using System;
using Foundation;
using UserNotifications;
using Xamarin.Forms;

[assembly: Dependency(typeof(LocalNotifications.iOS.iOSNotificationManager))]
namespace LocalNotifications.iOS
{
    public class iOSNotificationManager : INotificationManager
    {
        int messageId = 0;
        bool hasNotificationsPermission;
        public event EventHandler NotificationReceived;

        public void Initialize()
        {
            // request the permission to use local notifications
            UNUserNotificationCenter.Current.RequestAuthorization(UNAuthorizationOptions.Alert, (approved, err) =>
            {
                hasNotificationsPermission = approved;
            });
        }

        public void SendNotification(string title, string message, DateTime? notifyTime = null)
        {
            // EARLY OUT: app doesn't have permissions
            if (!hasNotificationsPermission)
            {
                return;
            }

            messageId++;

            var content = new UNMutableNotificationContent()
            {
                Title = title,
                Subtitle = "",
                Body = message,
                Badge = 1
            };

            UNNotificationTrigger trigger;
            if (notifyTime != null)
            {
                // Create a calendar-based trigger.
                trigger = UNCalendarNotificationTrigger.CreateTrigger(GetNSDateComponents(notifyTime.Value), false);
            }
            else
            {
                // Create a time-based trigger, interval is in seconds and must be greater than 0.
                trigger = UNTimeIntervalNotificationTrigger.CreateTrigger(0.25, false);
            }

            var request = UNNotificationRequest.FromIdentifier(messageId.ToString(), content, trigger);
            UNUserNotificationCenter.Current.AddNotificationRequest(request, (err) =>
            {
                if (err != null)
                {
                    throw new Exception($"Failed to schedule notification: {err}");
                }
            });
        }

        public void ReceiveNotification(string title, string message)
        {
            var args = new NotificationEventArgs()
            {
                Title = title,
                Message = message
            };
            NotificationReceived?.Invoke(null, args);
        }

        NSDateComponents GetNSDateComponents(DateTime dateTime)
        {
            return new NSDateComponents
            {
                Month = dateTime.Month,
                Day = dateTime.Day,
                Year = dateTime.Year,
                Hour = dateTime.Hour,
                Minute = dateTime.Minute,
                Second = dateTime.Second
            };
        }
    }
}
Атрибут assembly над пространством имен регистрирует реализацию INotificationManager интерфейса с DependencyService.
В iOS перед попыткой планирования уведомления необходимо запросить разрешение на использование уведомлений. Метод Initialize запрашивает авторизацию для использования локальных уведомлений. Метод SendNotification определяет логику, необходимую для создания и отправки уведомления. При получении сообщения операционная система iOS вызовет метод ReceiveNotification и обработчик событий.
Примечание.
Метод SendNotification отвечает за немедленное создание локального уведомления с помощью объекта UNTimeIntervalNotificationTrigger или в определенное время (DateTime) с помощью объекта UNCalendarNotificationTrigger.
Обработка входящих уведомлений в iOS
В iOS необходимо создать делегат, который делит UNUserNotificationCenterDelegate на подклассы для обработки входящих сообщений. Пример приложения определяет класс iOSNotificationReceiver:
public class iOSNotificationReceiver : UNUserNotificationCenterDelegate
{
    public override void WillPresentNotification(UNUserNotificationCenter center, UNNotification notification, Action<UNNotificationPresentationOptions> completionHandler)
    {
        ProcessNotification(notification);
        completionHandler(UNNotificationPresentationOptions.Alert);
    }

    void ProcessNotification(UNNotification notification)
    {
        string title = notification.Request.Content.Title;
        string message = notification.Request.Content.Body;

        DependencyService.Get<INotificationManager>().ReceiveNotification(title, message);
    }
}
Этот класс использует DependencyService для получения экземпляра класса iOSNotificationManager и предоставляет входные данные уведомления методу ReceiveNotification.
Во время запуска приложения класс AppDelegate должен указывать объект iOSNotificationReceiver в качестве делегата UNUserNotificationCenter. Это происходит в методе FinishedLaunching:
public override bool FinishedLaunching(UIApplication app, NSDictionary options)
{
    global::Xamarin.Forms.Forms.Init();

    UNUserNotificationCenter.Current.Delegate = new iOSNotificationReceiver();

    LoadApplication(new App());
    return base.FinishedLaunching(app, options);
}
iOS предлагает множество дополнительных параметров для уведомлений. Дополнительные сведения см. в статье Уведомления в Xamarin.iOS.
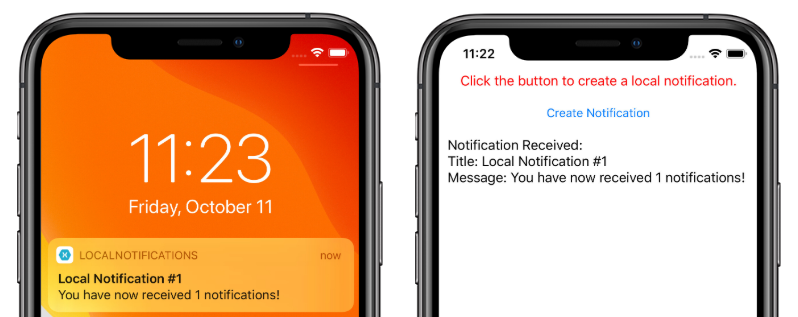
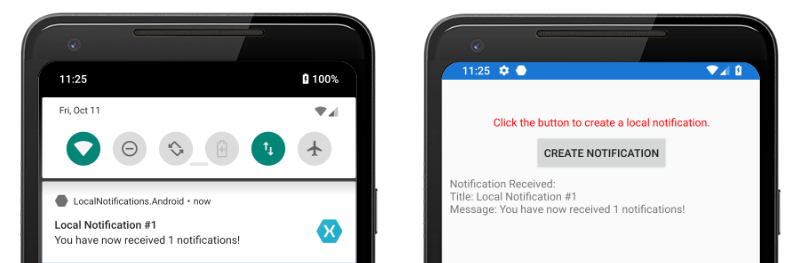
Тестирование приложения
Приложение можно тестировать на обеих платформах после того, как проекты платформы будут содержать зарегистрированную реализацию интерфейса INotificationManager. Запустите приложение и нажмите любую кнопку для создания уведомлений.
В Android уведомления появятся в области уведомлений. Когда пользователь касается уведомления, приложение получает уведомление и отображает сообщение.
В iOS приложение автоматически получает входящие уведомления без необходимости ввода данных пользователем. Приложение получает уведомление и отображает сообщение: