ChatGPT + Enterprise data (csharp)
Table of Contents
- Features
- Application Architecture
- Azure account requirements
- Getting Started
- Enabling optional features
- Productionizing
- Resources
- FAQ


This sample demonstrates a few approaches for creating ChatGPT-like experiences over your own data using the Retrieval Augmented Generation pattern. It uses Azure OpenAI Service to access the ChatGPT model (gpt-35-turbo), and Azure Cognitive Search for data indexing and retrieval.
The repo includes sample data so it's ready to try end-to-end. In this sample application, we use a fictitious company called Contoso Electronics, and the experience allows its employees to ask questions about the benefits, internal policies, as well as job descriptions and roles.
For more details on how this application was built, check out:
- Transform your business with smart .NET apps powered by Azure and ChatGPT blog post
- Build Intelligent Apps with .NET and Azure - Build Session
We want to hear from you! Are you interested in building or currently building intelligent apps? Take a few minutes to complete this survey.
Features
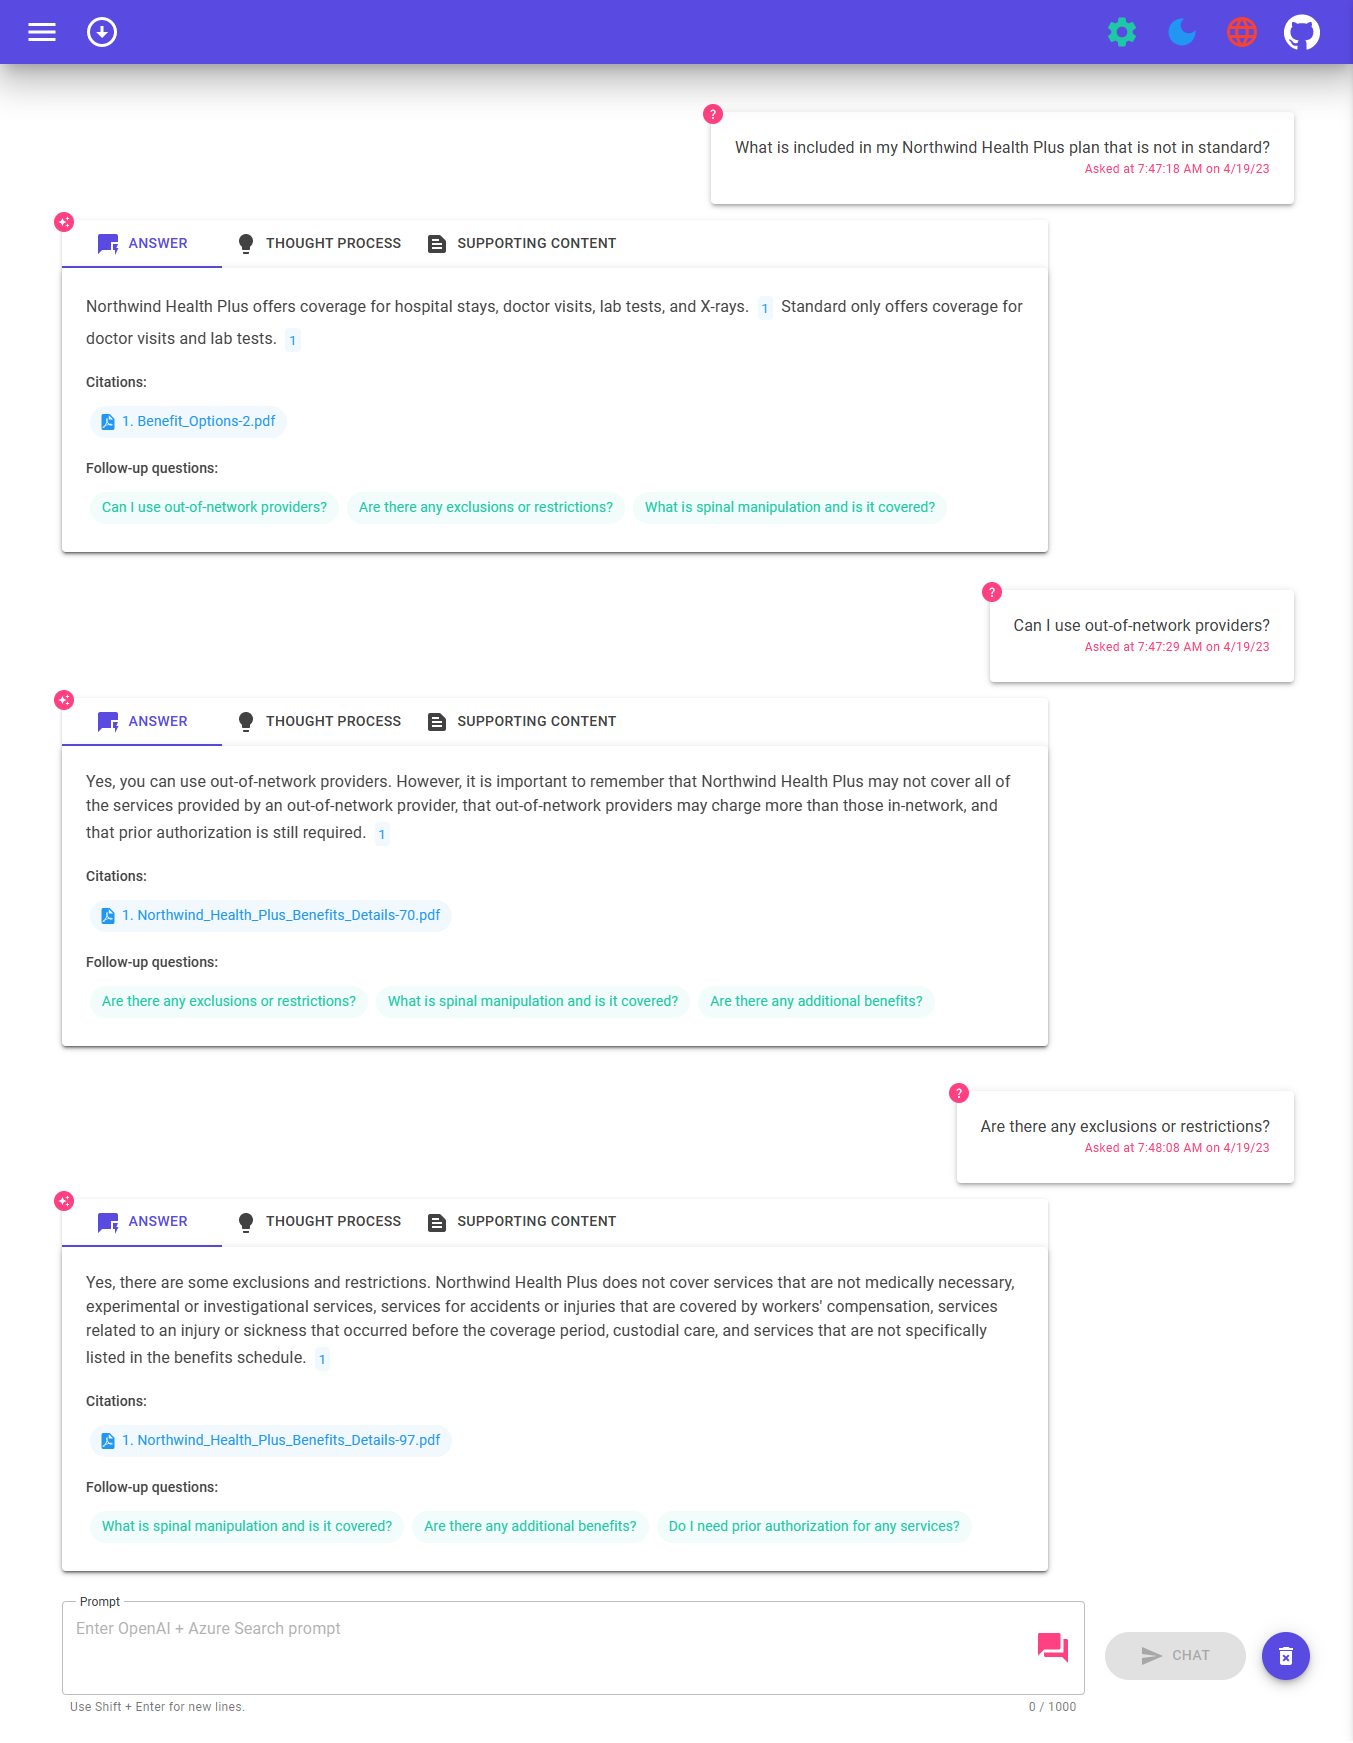
- Voice Chat, Chat and Q&A interfaces
- Explores various options to help users evaluate the trustworthiness of responses with citations, tracking of source content, etc.
- Shows possible approaches for data preparation, prompt construction, and orchestration of interaction between model (ChatGPT) and retriever (Cognitive Search)
- Settings directly in the UX to tweak the behavior and experiment with options
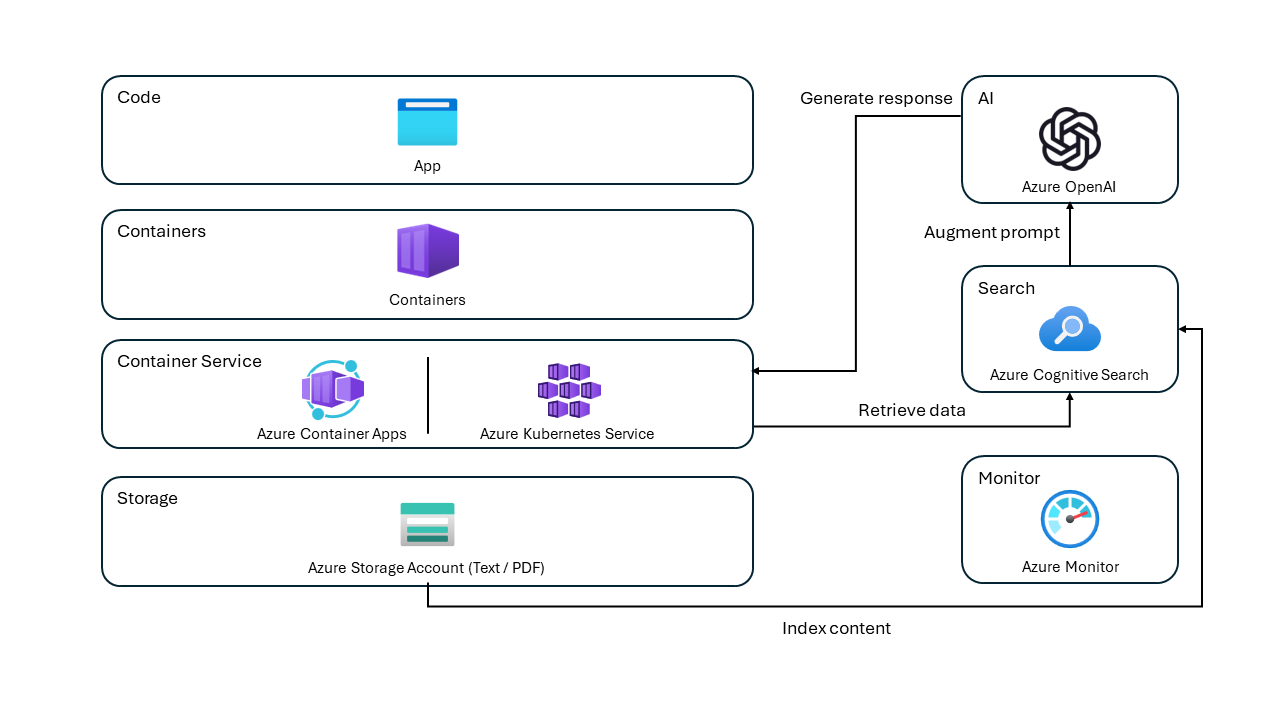
Application architecture
- User interface - The application’s chat interface is a Blazor WebAssembly application. This interface is what accepts user queries, routes request to the application backend, and displays generated responses.
- Backend - The application backend is an ASP.NET Core Minimal API. The backend hosts the Blazor static web application and what orchestrates the interactions among the different services. Services used in this application include:
- Azure Cognitive Search – indexes documents from the data stored in an Azure Storage Account. This makes the documents searchable using vector search capabilities.
- Azure OpenAI Service – provides the Large Language Models to generate responses. Semantic Kernel is used in conjunction with the Azure OpenAI Service to orchestrate the more complex AI workflows.
Getting Started
Account Requirements
In order to deploy and run this example, you'll need
- Azure Account - If you're new to Azure, get an Azure account for free and you'll get some free Azure credits to get started.
- Azure subscription with access enabled for the Azure OpenAI service - You can request access. You can also visit the Cognitive Search docs to get some free Azure credits to get you started.
- Azure account permissions - Your Azure Account must have
Microsoft.Authorization/roleAssignments/writepermissions, such as User Access Administrator or Owner.
[!WARNING]
By default this sample will create an Azure Container App, and Azure Cognitive Search resource that have a monthly cost, as well as Form Recognizer resource that has cost per document page. You can switch them to free versions of each of them if you want to avoid this cost by changing the parameters file under the infra folder (though there are some limits to consider; for example, you can have up to 1 free Cognitive Search resource per subscription, and the free Form Recognizer resource only analyzes the first 2 pages of each document.)
Cost estimation
Pricing varies per region and usage, so it isn't possible to predict exact costs for your usage. However, you can try the Azure pricing calculator for the resources below:
- Azure Container Apps
- Azure OpenAI Service
- Azure Form Recognizer
- Azure Cognitive Search
- Azure Blob Storage
- Azure Monitor
Project setup
You have a few options for setting up this project. The easiest way to get started is GitHub Codespaces, since it will setup all the tools for you, but you can also set it up locally if desired.
GitHub Codespaces
You can run this repo virtually by using GitHub Codespaces, which will open a web-based VS Code in your browser:
VS Code Remote Containers
A related option is VS Code Remote Containers, which will open the project in your local VS Code using the Dev Containers extension:
Local environment
Install the following prerequisites:
Powershell 7+ (pwsh) - For Windows users only.
Important
Ensure you can runpwsh.exefrom a PowerShell command. If this fails, you likely need to upgrade PowerShell.-
Important
Ensure Docker is running before running anyazdprovisioning / deployment commands.
Then, run the following commands to get the project on your local environment:
- Run
azd auth login - Clone the repository or run
azd init -t azure-search-openai-demo-csharp - Run
azd env new azure-search-openai-demo-csharp
Deployment
Deploying from scratch
Important
Ensure Docker is running before running anyazdprovisioning / deployment commands.
Execute the following command, if you don't have any pre-existing Azure services and want to start from a fresh deployment.
Run
azd up- This will provision Azure resources and deploy this sample to those resources, including building the search index based on the files found in the./datafolder.- For the target location, the regions that currently support the model used in this sample are East US 2 , East US or South Central US. For an up-to-date list of regions and models, check here
- If you have access to multiple Azure subscriptions, you will be prompted to select the subscription you want to use. If you only have access to one subscription, it will be selected automatically.
Note
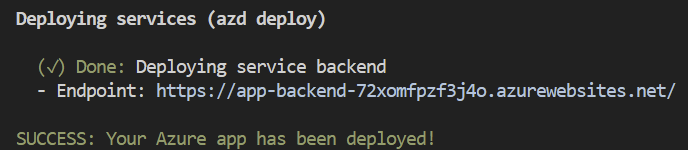
This application uses thegpt-35-turbomodel. When choosing which region to deploy to, make sure they're available in that region (i.e. EastUS). For more information, see the Azure OpenAI Service documentation.After the application has been successfully deployed you will see a URL printed to the console. Click that URL to interact with the application in your browser.
It will look like the following:
[!NOTE]
It may take a few minutes for the application to be fully deployed.
Use existing resources
If you have existing resources in Azure that you wish to use, you can configure azd to use those by setting the following azd environment variables:
- Run
azd env set AZURE_OPENAI_SERVICE {Name of existing OpenAI service} - Run
azd env set AZURE_OPENAI_RESOURCE_GROUP {Name of existing resource group that OpenAI service is provisioned to} - Run
azd env set AZURE_OPENAI_CHATGPT_DEPLOYMENT {Name of existing ChatGPT deployment}. Only needed if your ChatGPT deployment is not the default 'chat'. - Run
azd env set AZURE_OPENAI_EMBEDDING_DEPLOYMENT {Name of existing embedding model deployment}. Only needed if your embedding model deployment is not the defaultembedding. - Run
azd up
[!NOTE]
You can also use existing Search and Storage Accounts. See./infra/main.parameters.jsonfor list of environment variables to pass toazd env setto configure those existing resources.
Deploying or re-deploying a local clone of the repo
[!IMPORTANT]
Ensure Docker is running before running anyazdprovisioning / deployment commands.
- Run
azd up
Deploying your repo using App Spaces
[!NOTE]
Make sure you have AZD supported bicep files in your repository and add an initial GitHub Actions Workflow file which can either be triggered manually (for initial deployment) or on code change (automatically re-deploying with the latest changes) To make your repository compatible with App Spaces, you need to make changes to your main bicep and main parameters file to allow AZD to deploy to an existing resource group with the appropriate tags.
- Add AZURE_RESOURCE_GROUP to main parameters file to read the value from environment variable set in GitHub Actions workflow file by App Spaces.
"resourceGroupName": { "value": "${AZURE_RESOURCE_GROUP}" } - Add AZURE_TAGS to main parameters file to read the value from environment variable set in GitHub Actions workflow file by App Spaces.
"tags": { "value": "${AZURE_TAGS}" } - Add support for resource group and tags in your main bicep file to read the value being set by App Spaces.
param resourceGroupName string = '' param tags string = '' - Combine the default tags set by Azd with those being set by App Spaces. Replace tags initialization in your main bicep file with the following -
var baseTags = { 'azd-env-name': environmentName }
var updatedTags = union(empty(tags) ? {} : base64ToJson(tags), baseTags)
Make sure to use "updatedTags" when assigning "tags" to resource group created in your bicep file and update the other resources to use "baseTags" instead of "tags". For example -
```json
resource rg 'Microsoft.Resources/resourceGroups@2021-04-01' = {
  name: !empty(resourceGroupName) ? resourceGroupName : '${abbrs.resourcesResourceGroups}${environmentName}'
  location: location
  tags: updatedTags
}
Running locally
[!IMPORTANT]
Ensure Docker is running before running anyazdprovisioning / deployment commands.
Run
azd auth loginAfter the application deploys, set the environment variable
AZURE_KEY_VAULT_ENDPOINT. You can find the value in the .azure/YOUR-ENVIRONMENT-NAME/.env file or the Azure portal.Run the following .NET CLI command to start the ASP.NET Core Minimal API server (client host):
dotnet run --project ./app/backend/MinimalApi.csproj --urls=http://localhost:7181/
Navigate to http://localhost:7181, and test out the app.
Running locally with the .NET MAUI client
This sample includes a .NET MAUI client, packaging the experience as an app that can run on a Windows/macOS desktop or on Android and iOS devices. The MAUI client here is implemented using Blazor hybrid, letting it share most code with the website frontend.
Open app/app-maui.sln to open the solution that includes the MAUI client
Edit app/maui-blazor/MauiProgram.cs, updating
client.BaseAddresswith the URL for the backend.If it's running in Azure, use the URL for the service backend from the steps above. If running locally, use http://localhost:7181.
Set MauiBlazor as the startup project and run the app
Sharing Environments
Run the following if you want to give someone else access to the deployed and existing environment.
- Install the Azure CLI
- Run
azd init -t azure-search-openai-demo-csharp - Run
azd env refresh -e {environment name}- Note that they will need the azd environment name, subscription Id, and location to run this command - you can find those values in your./azure/{env name}/.envfile. This will populate their azd environment's .env file with all the settings needed to run the app locally. - Run
pwsh ./scripts/roles.ps1- This will assign all of the necessary roles to the user so they can run the app locally. If they do not have the necessary permission to create roles in the subscription, then you may need to run this script for them. Just be sure to set theAZURE_PRINCIPAL_IDenvironment variable in the azd .env file or in the active shell to their Azure Id, which they can get withaz account show.
Clean up resources
Run azd down
Using the app
- In Azure: navigate to the Azure Container App deployed by
azd. The URL is printed out whenazdcompletes (as "Endpoint"), or you can find it in the Azure portal. - When running locally, navigate to http://localhost:7181 for the client app and http://localhost:7181/swagger for the Open API server page.
Once in the web app:
- On the Voice Chat page, select the voice settings dialog and configure text-to-speech preferences.
- You can either type messages to interact with Blazor Clippy, or select the Speak toggle button to use speech-to-text as your input.
- Try different topics in Chat context. For chat, try follow up questions, clarifications, ask to simplify or elaborate on answer, etc.
- Explore citations and sources
- Click on the "settings" icon to try different options, tweak prompts, etc.
Enabling optional features
Enabling Application Insights
To enable Application Insights and the tracing of each request, along with the logging of errors, set the AZURE_USE_APPLICATION_INSIGHTS variable to true before running azd up
- Run
azd env set AZURE_USE_APPLICATION_INSIGHTS true - Run
azd up
To see the performance data, go to the Application Insights resource in your resource group, click on the "Investigate -> Performance" blade and navigate to any HTTP request to see the timing data. To inspect the performance of chat requests, use the "Drill into Samples" button to see end-to-end traces of all the API calls made for any chat request:
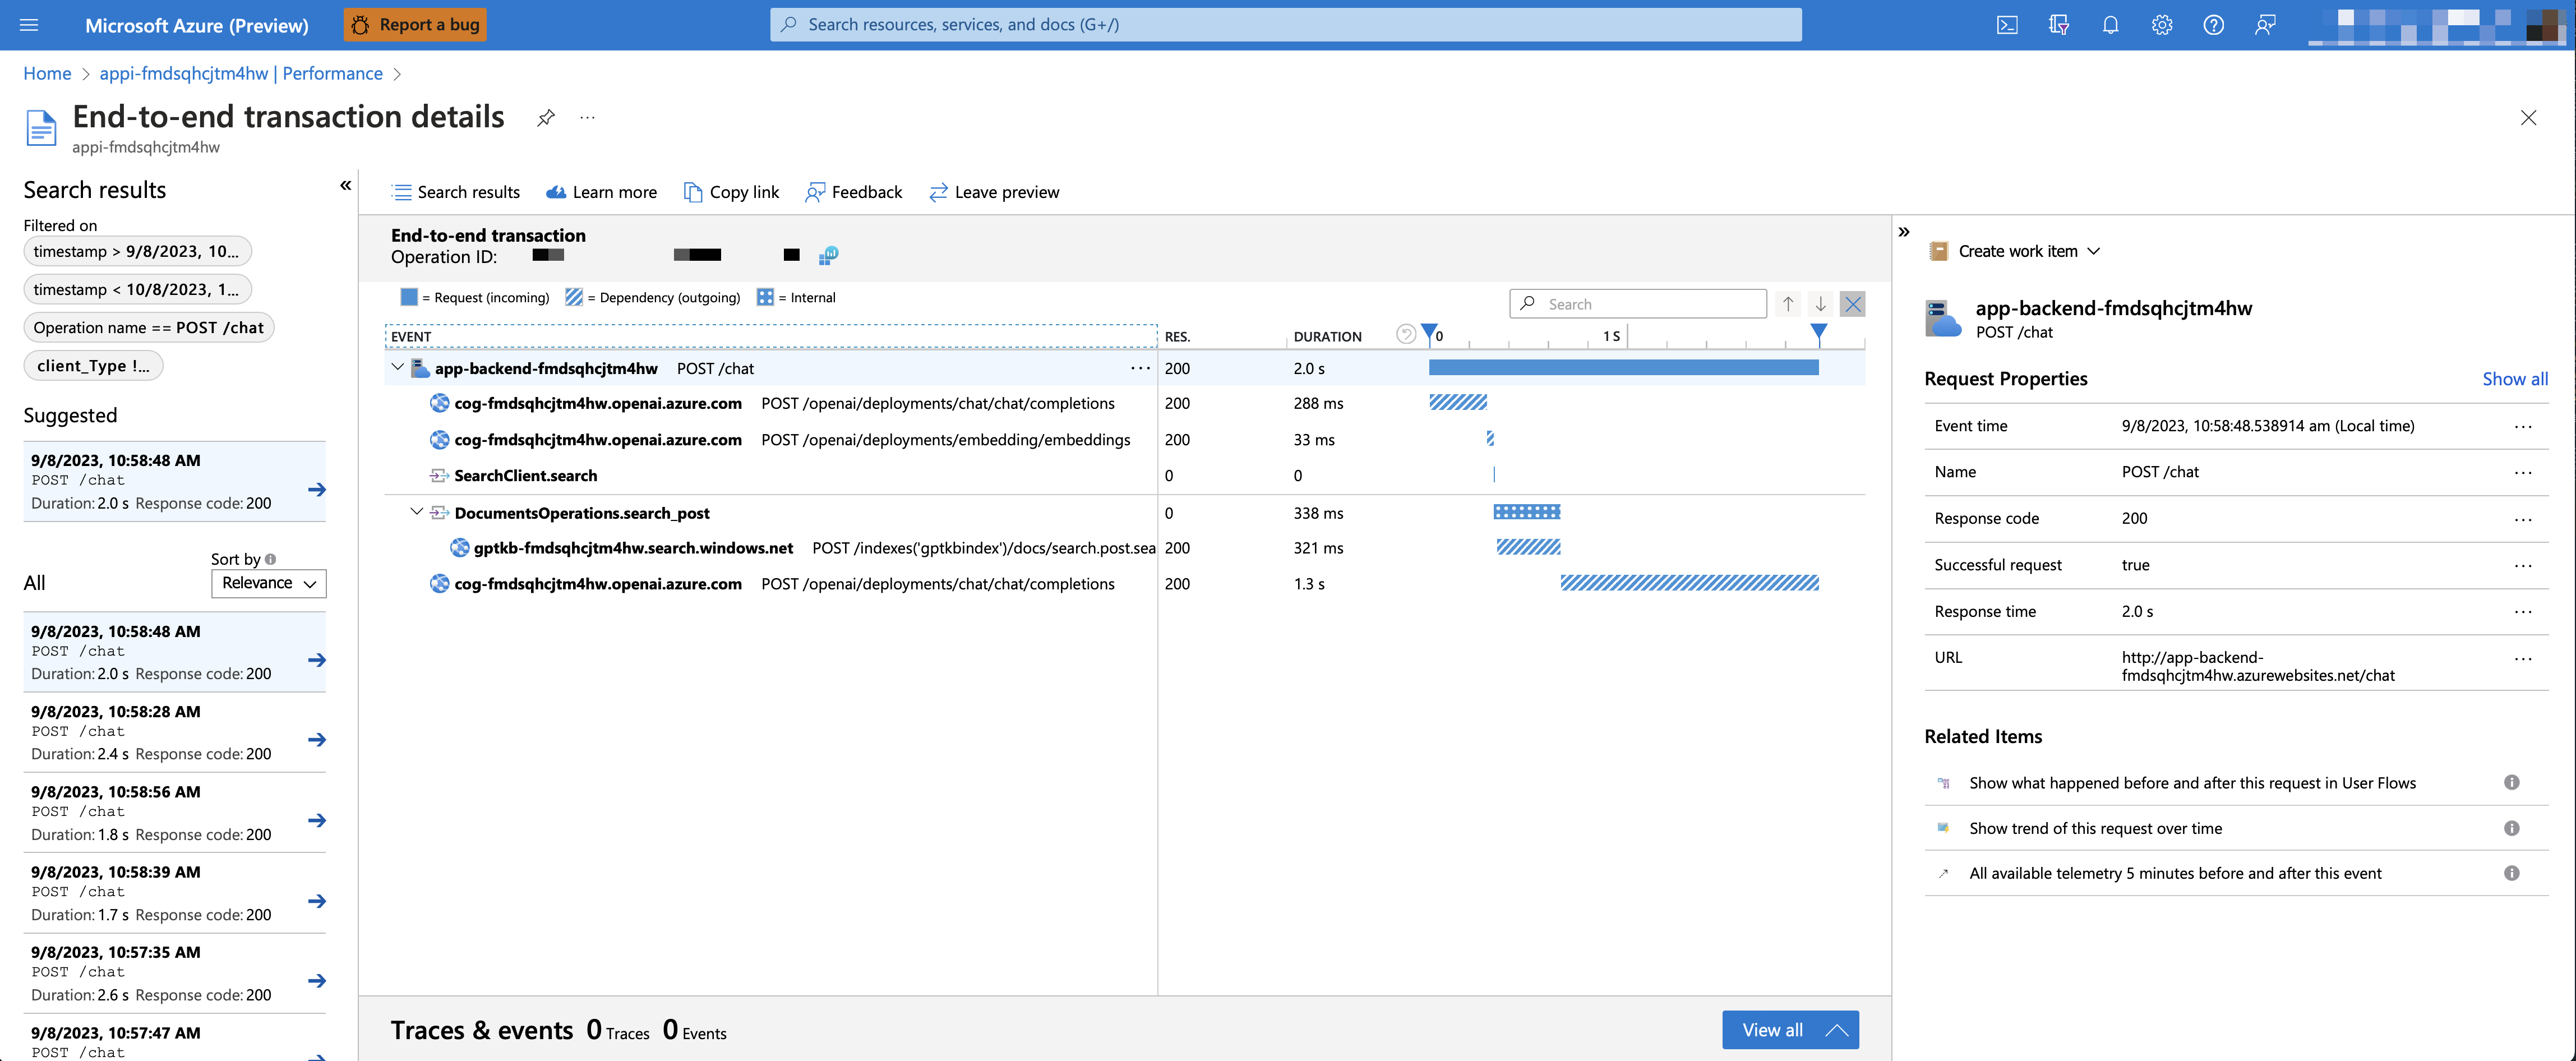
To see any exceptions and server errors, navigate to the "Investigate -> Failures" blade and use the filtering tools to locate a specific exception. You can see Python stack traces on the right-hand side.
Enabling authentication
By default, the deployed Azure container app will have no authentication or access restrictions enabled, meaning anyone with routable network access to the container app can chat with your indexed data. You can require authentication to your Azure Active Directory by following the Add container app authentication tutorial and set it up against the deployed container app.
To then limit access to a specific set of users or groups, you can follow the steps from Restrict your Azure AD app to a set of users by changing "Assignment Required?" option under the Enterprise Application, and then assigning users/groups access. Users not granted explicit access will receive the error message -AADSTS50105: Your administrator has configured the application <app_name> to block users unless they are specifically granted ('assigned') access to the application.-
Enable GPT-4V support
With GPT-4-vision-preview(GPT-4V), it's possible to support an enrichmented retrival augmented generation by providing both text and image as source content. To enable GPT-4V support, you need to enable USE_VISION and use GPT-4V model when provisioning.
Note
You would need to re-indexing supporting material and re-deploy the application after enabling GPT-4V support if you have already deployed the application before. This is because enabling GPT-4V support requires new fields to be added to the search index.
To enable GPT-4V support with Azure OpenAI Service, run the following commands:
azd env set USE_VISION true
azd env set USE_AOAI true
azd env set AZURE_OPENAI_CHATGPT_MODEL_NAME gpt-4
azd env set AZURE_OPENAI_RESOURCE_LOCATION westus # gpt-4-vision-preview is only available in a few regions. Please check the model availability for more details.
azd up
To enable GPT-4V support with OpenAI, run the following commands:
azd env set USE_VISION true
azd env set USE_AOAI false
azd env set OPENAI_CHATGPT_DEPLOYMENT gpt-4-vision-preview
azd up
To clean up previously deployed resources, run the following command:
azd down --purge
azd env set AZD_PREPDOCS_RAN false # This is to ensure that the documents are re-indexed with the new fields.
Productionizing
This sample is designed to be a starting point for your own production application, but you should do a thorough review of the security and performance before deploying to production. Here are some things to consider:
- OpenAI Capacity: The default TPM (tokens per minute) is set to 30K. That is equivalent to approximately 30 conversations per minute (assuming 1K per user message/response). You can increase the capacity by changing the
chatGptDeploymentCapacityandembeddingDeploymentCapacityparameters ininfra/main.bicepto your account's maximum capacity. You can also view the Quotas tab in Azure OpenAI studio to understand how much capacity you have. - Azure Storage: The default storage account uses the
Standard_LRSSKU. To improve your resiliency, we recommend usingStandard_ZRSfor production deployments, which you can specify using theskuproperty under thestoragemodule ininfra/main.bicep. - Azure Cognitive Search: If you see errors about search service capacity being exceeded, you may find it helpful to increase the number of replicas by changing
replicaCountininfra/core/search/search-services.bicepor manually scaling it from the Azure Portal. - Azure Container Apps: By default, this application deploys containers with 0.5 CPU Cores and 1GB of memory. The minimum replicas is 1 and maximum 10. For this app, you can set values such as
containerCpuCoreCount,containerMaxReplicas,containerMemory,containerMinReplicasin theinfra/core/host/container-app.bicepfile to fit your needs. You can use auto-scaling rules or scheduled scaling rules, and scale up the maximum/minimum based on load. - Authentication: By default, the deployed app is publicly accessible. We recommend restricting access to authenticated users. See Enabling authentication above for how to enable authentication.
- Networking: We recommend deploying inside a Virtual Network. If the app is only for internal enterprise use, use a private DNS zone. Also consider using Azure API Management (APIM) for firewalls and other forms of protection. For more details, read Azure OpenAI Landing Zone reference architecture.
- Loadtesting: We recommend running a loadtest for your expected number of users.
Resources
- Revolutionize your Enterprise Data with ChatGPT: Next-gen Apps w/ Azure OpenAI and Cognitive Search
- Azure Cognitive Search
- Azure OpenAI Service
Azure.AI.OpenAINuGet package- Original Blazor App
[!NOTE]
The PDF documents used in this demo contain information generated using a language model (Azure OpenAI Service). The information contained in these documents is only for demonstration purposes and does not reflect the opinions or beliefs of Microsoft. Microsoft makes no representations or warranties of any kind, express or implied, about the completeness, accuracy, reliability, suitability or availability with respect to the information contained in this document. All rights reserved to Microsoft.
FAQ
Question: Why do we need to break up the PDFs into chunks when Azure Cognitive Search supports searching large documents?
Answer: Chunking allows us to limit the amount of information we send to OpenAI due to token limits. By breaking up the content, it allows us to easily find potential chunks of text that we can inject into OpenAI. The method of chunking we use leverages a sliding window of text such that sentences that end one chunk will start the next. This allows us to reduce the chance of losing the context of the text.