A .NET MAUI app using MSAL.NET to authenticate users with Azure AD for Customers
- Overview
- Scenario
- Prerequisites
- Setup the sample
- Explore the sample
- About the code
- Troubleshooting
- Contributing
- Learn More
Overview
This sample demonstrates a cross platform MAUI app (iOS, Android, WinUI) that authenticates users with the Azure AD for Customers.
ℹ️ To learn how applications integrate with Microsoft Graph, consider going through the recorded session: An introduction to Microsoft Graph for developers
Scenario
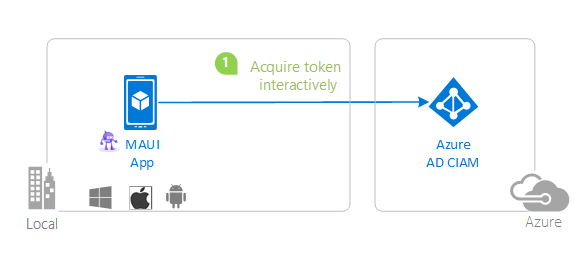
- The client MAUI App uses the to sign-in a user and obtain a JWT ID Token from Azure AD for Customers.
- The ID Token proves that the user has successfully authenticated against Azure AD for Customers.
Prerequisites
- Visual Studios with the MAUI workload installed:
- An Azure AD for Customers tenant. For more information, see: How to get an Azure AD for Customers tenant
- A user account in your Azure AD for Customers tenant.
This sample will not work with a personal Microsoft account. If you're signed in to the Azure portal with a personal Microsoft account and have not created a user account in your directory before, you will need to create one before proceeding.
Setup the sample
Step 1: Clone or download this repository
From your shell or command line:
git clone https://github.com/Azure-Samples/ms-identity-ciam-dotnet-tutorial.git
or download and extract the repository .zip file.
⚠️ To avoid path length limitations on Windows, we recommend cloning into a directory near the root of your drive.
Step 2: Navigate to project folder
cd 1-Authentication\2-sign-in-maui
Step 3: Register the sample application(s) in your tenant
ℹ️ While there are multiple projects in this sample, we'd register just one app with Azure AD and use the registered app's client id in both apps. This reuse of app ids (client ids) is used when the apps themselves are just components of one larger app topology.
There is one project in this sample. To register it, you can:
- follow the steps below for manually register your apps
- or use PowerShell scripts that:
- automatically creates the Azure AD applications and related objects (passwords, permissions, dependencies) for you.
- modify the projects' configuration files.
Expand this section if you want to use this automation:
⚠️ If you have never used Microsoft Graph PowerShell before, we recommend you go through the App Creation Scripts Guide once to ensure that your environment is prepared correctly for this step.
Ensure that you have PowerShell 7 or later installed at.
Run the script to create your Azure AD application and configure the code of the sample application accordingly.
For interactive process -in PowerShell, run:
cd .\AppCreationScripts\
.\Configure.ps1 -TenantId "[Optional] - your tenant id" -AzureEnvironmentName "[Optional] - Azure environment, defaults to 'Global'"
Other ways of running the scripts are described in App Creation Scripts guide. The scripts also provide a guide to automated application registration, configuration and removal which can help in your CI/CD scenarios.
Choose the Azure AD for Customers tenant where you want to create your applications
To manually register the apps, as a first step you'll need to:
- Sign in to the Azure portal.
- If your account is present in more than one Azure AD for Customers tenant, select your profile at the top right corner in the menu on top of the page, and then switch directory to change your portal session to the desired Azure AD for Customers tenant.
Create User Flows
Please refer to: Tutorial: Create user flow in Azure Active Directory CIAM
ℹ️ To enable password reset in Customer Identity Access Management (CIAM) in Azure Active Directory (Azure AD), please refer to: Tutorial: Enable self-service password reset
Add External Identity Providers
Please refer to:
Register the client app (active-directory-maui-v2)
- Navigate to the Azure portal and select the Azure AD for Customers service.
- Select the App Registrations blade on the left, then select New registration.
- In the Register an application page that appears, enter your application's registration information:
- In the Name section, enter a meaningful application name that will be displayed to users of the app, for example
ciam-dotnet-maui. - Under Supported account types, select Accounts in this organizational directory only
- Select Register to create the application.
- In the Name section, enter a meaningful application name that will be displayed to users of the app, for example
- In the Overview blade, find and note the Application (client) ID. You use this value in your app's configuration file(s) later in your code.
- In the app's registration screen, select the Authentication blade to the left.
- If you don't have a platform added, select Add a platform and select the Public client (mobile & desktop) option.
- In the Redirect URIs section, add msal{ClientId}://auth. The ClientId is the Id of the App Registration and can be found under Overview/Application (client) ID
- Click Save to save your changes.
- Since this app signs-in users, we will now proceed to select delegated permissions, which is is required by apps signing-in users.
- In the app's registration screen, select the API permissions blade in the left to open the page where we add access to the APIs that your application needs:
- Select the Add a permission button and then:
- Ensure that the Microsoft APIs tab is selected.
- In the Commonly used Microsoft APIs section, select Microsoft Graph
- In the Delegated permissions section, select openid, offline_access in the list. Use the search box if necessary.
- Select the Add permissions button at the bottom.
- At this stage, the permissions are assigned correctly, but since it's a CIAM tenant, the users themselves cannot consent to these permissions. To get around this problem, we'd let the tenant administrator consent on behalf of all users in the tenant. Select the Grant admin consent for {tenant} button, and then select Yes when you are asked if you want to grant consent for the requested permissions for all accounts in the tenant. You need to be a tenant admin to be able to carry out this operation.
Configure the client app (active-directory-maui-v2) to use your app registration
Open the project in your IDE (like Visual Studio or Visual Studio Code) to configure the code.
In the steps below, "ClientID" is the same as "Application ID" or "AppId".
Open the
appsettings.jsonfile.Find the placeholder
Enter_the_Tenant_Subdomain_Hereand replace it with the Directory (tenant) subdomain. For instance, if your tenant primary domain is contoso.onmicrosoft.com, use contoso.Find the placeholder
Enter_the_Application_Id_Hereand replace the existing value with the application ID (clientId) ofciam-dotnet-mauiapp copied from the Azure portal.Open the
Platforms\Android\MsalActivity.csfile.Find the placeholder
Enter_the_Application_Id_Hereand replace the existing value with the application ID (clientId) ofciam-dotnet-mauiapp copied from the Azure portal.Open the
Platforms\Android\AndroidManifest.xmlfile.Find the placeholder
Enter_the_Application_Id_Hereand replace the existing value with the application ID (clientId) ofciam-dotnet-mauiapp copied from the Azure portal.Open the
Platforms\iOS\AppDelegate.csfile.Find the placeholder
Enter_the_Application_Id_Hereand replace the existing value with the application ID (clientId) ofciam-dotnet-mauiapp copied from the Azure portal.
Step 4: Running the sample
Choose the platform you want to work on by setting the startup project in the Solution Explorer. Make sure that your platform of choice is marked for build and deploy in the Configuration Manager.
Clean the solution, rebuild the solution, and run it:
Explore the sample
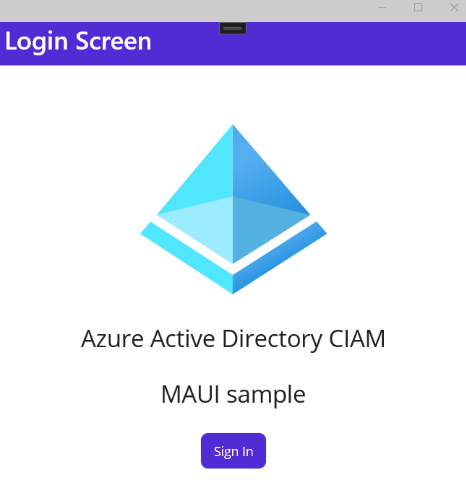
Click the sign-in button at the bottom of the application screen.
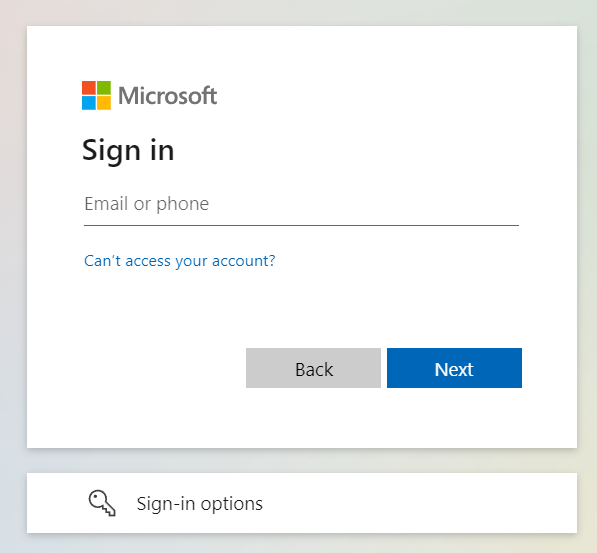
On the sign-in screen, you can sign-in with a microsoft account directly on the screen or through another flow like Facebook or Google if you have that set up on your tenant.
As examples:
Add Google as an identity provider Add Facebook as an identity provider
The sample works exactly in the same way regardless of the account type you choose, apart from some visual differences in the authentication and consent experience. During the sign in process, you will be prompted to grant various permissions (to allow the application to access your data).
Upon successful sign in and consent, the application screen will display the main page.
After you sign-in you will see a screen displaying the scopes available on the access token acquired after signing in.

On WinUI sessions are cached. You can close the application and reopen it. You will see that the app retains access to the API and retrieves the user info right away, without the need to sign in again.
Sign out by clicking the sign out button.
ℹ️ Did the sample not work for you as expected? Then please reach out to us using the GitHub Issues page.
We'd love your feedback!
Were we successful in addressing your learning objective? Consider taking a moment to share your experience with us.
About the code
The structure of the solution is straightforward. Authentication logic resides in the MSALClient folder and UX logic within the Views folder.
MSAL's main primitive for native clients,
PublicClientApplication, is initialized as a static variable inMSALClientHelper.cs(For details see Client applications in MSAL.NET)When the app tries to get an access token to make an API call after the sign in button is clicked (
MainView.xaml.cs) it will attempt to get a token without showing any UX - just in case a suitable token is already present in the cache from previous sessions. This is the code performing that logic:
private async void OnSignInClicked(object sender, EventArgs e)
{
    await PublicClientSingleton.Instance.AcquireTokenSilentAsync();
    await Shell.Current.GoToAsync("scopeview");
}
- If the attempt to obtain a token silently fails, a screen with the sign in button (at the bottom of the application) is displayed.
- When the sign in button is pressed, we execute the same logic - but using a method that shows interactive UX:
return await this.PublicClientApplication.AcquireTokenInteractive(scopes)
    .WithParentActivityOrWindow(PlatformConfig.Instance.ParentWindow)
    .ExecuteAsync()
    .ConfigureAwait(false);
The
Scopesparameter indicates the permissions the application needs to gain access to the data requested through subsequent web API call.The sign out logic is very simple. In this sample we have just one user, however we are demonstrating a more generic sign out logic that you can apply if you have multiple concurrent users and you want to clear up the entire cache.
await this.PublicClientApplication.RemoveAsync(user).ConfigureAwait(false);
iOS specific considerations
The Platforms\iOS project only requires one extra line, in AppDelegate.cs.
You need to ensure that the OpenUrl handler looks as the snippet below:
public override bool OpenUrl(UIApplication application, NSUrl url, NSDictionary options)
{
    if (AuthenticationContinuationHelper.IsBrokerResponse(null))
    {
        // Done on different thread to allow return in no time.
        _ = Task.Factory.StartNew(() => AuthenticationContinuationHelper.SetBrokerContinuationEventArgs(url));

        return true;
    }

    else if (!AuthenticationContinuationHelper.SetAuthenticationContinuationEventArgs(url))
    {
        return false;
    }

    return true;
}
This logic is meant to ensure that once the interactive portion of the authentication flow is concluded by the Authenticator app, the flow goes back to MSAL.
Also, in order to make the token cache work and have the AcquireTokenSilentAsync work multiple steps must be followed :
- Enable Keychain access in your
Entitlements.plistfile and specify in the Keychain Groups your bundle identifier. - In your project options, on iOS Bundle Signing view, select your
Entitlements.plistfile for the Custom Entitlements field. - When signing a certificate, make sure XCode uses the same Apple Id.
Troubleshooting
Some projects don't load in Visual Studio
This might be because you have not installed all the required components from Visual Studio. You need to add the .NET Mutli-platform App UI development workload, in the Visual Studio Installer.
The project you want is not built
you need to right click on the visual studio solution, choose Configuration Properties > Configuration and make sure that you check the projects and configuration you want to build (and deploy)
Contributing
If you'd like to contribute to this sample, see CONTRIBUTING.MD.
This project has adopted the Microsoft Open Source Code of Conduct. For more information, see the Code of Conduct FAQ or contact opencode@microsoft.com with any additional questions or comments.