Simple Chat Application using Azure OpenAI (Python)
This repository includes a simple Python Quart app that streams responses from ChatGPT to an HTML/JS frontend using JSON Lines over a ReadableStream.
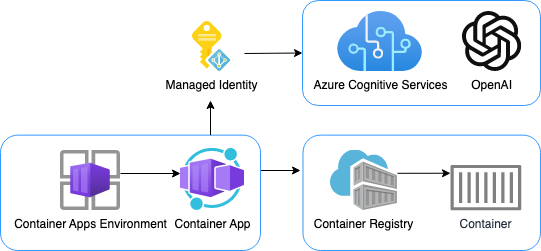
The repository is designed for use with Docker containers, both for local development and deployment, and includes infrastructure files for deployment to Azure Container Apps. 🐳
We recommend first going through the deployment steps before running this app locally, since the local app needs credentials for Azure OpenAI to work properly.
Opening the project
This project has Dev Container support, so it will be be setup automatically if you open it in Github Codespaces or in local VS Code with the Dev Containers extension.
If you're not using one of those options for opening the project, then you'll need to:
Create a Python virtual environment and activate it.
Install the requirements:
python3 -m pip install -r requirements-dev.txtInstall the app as an editable package:
python3 -m pip install -e src
Deployment
This repo is set up for deployment on Azure Container Apps using the configuration files in the infra folder.
Prerequisites for deployment
- Sign up for a free Azure account and create an Azure Subscription.
- Request access to Azure OpenAI Service by completing the form at https://aka.ms/oai/access and awaiting approval.
- Install the Azure Developer CLI. (If you open this repository in Codespaces or with the VS Code Dev Containers extension, that part will be done for you.)
Deployment from scratch
Login to Azure:
azd auth loginProvision and deploy all the resources:
azd upIt will prompt you to provide an
azdenvironment name (like "chat-app"), select a subscription from your Azure account, and select a location where OpenAI is available (like "francecentral"). Then it will provision the resources in your account and deploy the latest code. If you get an error or timeout with deployment, changing the location can help, as there may be availability constraints for the OpenAI resource.When
azdhas finished deploying, you'll see an endpoint URI in the command output. Visit that URI, and you should see the chat app! 🎉When you've made any changes to the app code, you can just run:
azd deploy
Deployment with existing resources
If you already have an OpenAI resource and would like to re-use it, first follow these steps.
Run
azd env newto create a new environment. Provide a name that will be used in the name of new resources that are created.Run
azd env setto specify the values for the existing OpenAI resource.azd env set AZURE_OPENAI_RESOURCE {name of OpenAI resource} azd env set AZURE_OPENAI_RESOURCE_GROUP {name of resource group that it's inside} azd env set AZURE_OPENAI_RESOURCE_GROUP_LOCATION {location for that group} azd env set AZURE_OPENAI_SKU_NAME {name of the SKU, defaults to "S0"}Then follow the steps for deployment above.
CI/CD pipeline
This project includes a Github workflow for deploying the resources to Azure on every push to main. That workflow requires several Azure-related authentication secrets to be stored as Github action secrets. To set that up, run:
azd pipeline config
Costs
Pricing varies per region and usage, so it isn't possible to predict exact costs for your usage. The majority of the Azure resources used in this infrastructure are on usage-based pricing tiers. However, Azure Container Registry has a fixed cost per registry per day.
You can try the Azure pricing calculator for the resources:
- Azure OpenAI Service: S0 tier, ChatGPT model. Pricing is based on token count. Pricing
- Azure Container App: Consumption tier with 0.5 CPU, 1GiB memory/storage. Pricing is based on resource allocation, and each month allows for a certain amount of free usage. Pricing
- Azure Container Registry: Basic tier. Pricing
- Log analytics: Pay-as-you-go tier. Costs based on data ingested. Pricing
⚠️ To avoid unnecessary costs, remember to take down your app if it's no longer in use,
either by deleting the resource group in the Portal or running azd down.
Local development without Docker
Assuming you've run the steps in Opening the project and have run azd up, you can now run the Quart app locally using the development server:
python -m quart --app src.quartapp run --port 50505 --reload
Using a local LLM server
You may want to save costs by developing against a local LLM server, such as llamafile. Note that a local LLM will generally be slower and not as sophisticated.
Once you've got your local LLM running and serving an OpenAI-compatible endpoint, define LOCAL_OPENAI_ENDPOINT in your .env file.
For example, to point at a local llamafile server running on its default port:
LOCAL_OPENAI_ENDPOINT="http://localhost:8080/v1"
If you're running inside a dev container, use this local URL instead:
LOCAL_OPENAI_ENDPOINT="http://host.docker.internal:8080/v1"
Local development with Docker
In addition to the Dockerfile that's used in production, this repo includes a docker-compose.yaml for
local development which creates a volume for the app code. That allows you to make changes to the code
and see them instantly.
Install Docker Desktop. If you opened this inside Github Codespaces or a Dev Container in VS Code, installation is not needed. ⚠️ If you're on an Apple M1/M2, you won't be able to run
dockercommands inside a Dev Container; either use Codespaces or do not open the Dev Container.Make sure that the
.envfile exists. Theazd updeployment step should have created it.Store a key for the OpenAI resource in the
.envfile. You can get the key from the Azure Portal, or from the output of./infra/getkey.sh. The key should be stored in the.envfile asAZURE_OPENAI_KEY. This is necessary because Docker containers don't have access to your user Azure credentials.Start the services with this command:
docker-compose up --buildClick 'http://0.0.0.0:50505' in the terminal, which should open a new tab in the browser. You may need to navigate to 'http://localhost:50505' if that URL doesn't work.
Getting help
If you're working with this project and running into issues, please post in Discussions.