Note
Access to this page requires authorization. You can try signing in or changing directories.
Access to this page requires authorization. You can try changing directories.
Site attestation policies help you periodically verify that SharePoint sites continue to meet your organization's governance requirements. These policies request reviews from site owners or site administrators, who confirm whether a site is still needed and whether its ownership, membership, permissions, and sharing settings remain appropriate.
You can configure site attestation policies to send recurring review requests and apply enforcement actions when required reviews aren't completed.
For an overview of site lifecycle management policies, see SharePoint site lifecycle management.

This article describes how to create a site attestation policy with notifications and enforcement actions.
Requirements for a site attestation policy
See SharePoint Advanced Management prerequisites.
How a site attestation policy works
When a site attestation policy runs, SharePoint identifies sites that are due for review based on the policy configuration.
The policy sends attestation requests to designated recipients, such as site owners or site administrators. Recipients review site information and confirm that the site remains necessary and appropriately configured.
If a review isn't completed after the configured notification cycle, the policy can apply an enforcement action, depending on the policy settings.
Each policy run generates a report that administrators can use to track attestation status and monitor policy compliance.
Create a site attestation policy
As a SharePoint administrator, go to the SharePoint admin center and sign in.
In the navigation pane, expand Policies, and then select Site lifecycle management.

Under Site attestation policies, select Open. Then select Create a policy.
On the Overview page of Manage site attestation, review the information, and then select Next. Then proceed to the next section.
To define the scope of a site attestation policy, on the Set policy scope page, select one of the following options:
- Upload a CSV file with a list of up to 10,000 URLs; or
- Select sites at scale

For more information, see the following sections in this article:
On the Configure policy step, specify the following options:
- Choose how often you want the sites to be attested (3 months, 6 months, and 12 months).
- Identify who is responsible for attesting the site (site owners, site admins, or both).
- Exclude site owners or admins from receiving requests.
- Specify what action the policy should take after three notifications.
Keep the following points in mind:
- Recently attested sites are skipped.
- Newly created sites are skipped (because a grace period applies).
- Only sites that are both old enough and due for reattestation are included.
For more information about your policy options, see About site attestation policy configuration settings (in this article).
On the Finish step, specify whether to test your policy or activate it immediately.
- Give your policy a name and description.
- Under Policy mode, select either the Simulation or Active mode. For more information, see About policy modes (in this article).


About the scope of site attestation policies
Note
A policy scopes a site for attestation only if both of the following conditions are true:
- The site's creation date is older than the attestation threshold
- The site's last attestation date is also older than the same threshold
The attestation threshold is calculated using the policy run date minus the attestation period (how often you want sites to be attested, configured by SharePoint administrators). If either condition isn't met, the site is excluded from attestation for that run.
You can create site lifecycle policies with different scopes based on your organization's requirements. Choose the sites to include in the policy based on:
- Site templates
- Creation sources
- Sensitivity labels
- Whether to include sites under retention policies and retention holds
To exclude specific sites, add the site URLs of up to 100 sites in the Exclude sites section while configuring the policy.
Uploading a CSV file with the list of sites
If you select Upload a CSV file with a list of up to 10,000 URLs, you can upload a list of site URLs for the policy.

Tip
- You can export the site list from the SharePoint active sites page.
- Ensure that the CSV file uses the same format as the sample CSV file and has no duplicate URLs. Also, make sure the URLs are valid and complete.
- Ensure the URLs listed in the CSV file belong to your tenant's domain.
Selecting sites at scale
If you select Select sites at scale, you can choose site templates to include in this policy, and then filter them by:
- Sensitivity label
- Site creation source
You can also choose whether to:
- Include sites with retention policies and retention holds
- Exclude specific sites from this policy

Selecting site template types
Select site template types from the following list:
- All sites
- Classic sites
- Communication sites
- Group connected sites without teams
- Team sites without Microsoft 365 group
- Teams-connected sites
Filtering sites by sensitivity labels
Set policy scope by filtering sites by their sensitivity labels.
Note
If your tenant doesn't use sensitivity labels, this option is unavailable.
Filtering sites by creation source
Filter sites for the policy scope by site creation source:
- SharePoint Home
- SharePoint admin center
- PowerShell
- PnP
- Teams
Include sites with retention policies and retention holds
The include or exclude option for sites with retention policies and holds applies only to sites that are governed by Microsoft Purview retention policies and labels.
This setting doesn't impact the inclusion or exclusion of sites that are in read-only or locked states.
For sites that are in a read-only or locked state, the following behaviors are expected:
Unlocked sites: Always included in policy scope
Read-only sites locked by the same policy type:
- Included in scope
- Report indicates the site was previously actioned by this policy
Read-only sites locked by a different policy type:
- Excluded from policy scope
- Another policy already owns and governs this site
Read-only sites externally locked (locked because of reasons other than site lifecycle management):
- Included in scope
- External locks don't prevent the policy from evaluating the site
No access (fully locked) sites:
- Included in scope, but the policy takes no enforcement action
- The policy skips action because the site is already in a no access locked state
You can't change these default behaviors through policy configuration options.
About site attestation policy configuration settings
Excluding specific sites from the policy
Enter up to 100 sites that you want to exclude from the site attestation policy. Be sure to separate each URL by new lines.

After setting the policy's scope, select Next, and then proceed to the next section.
Excluding site owners or admins from receiving requests
You can exclude specific users, Microsoft 365 Groups, or security groups from receiving site lifecycle management requests and notifications, even if they're site owners or site admins for sites that are included in a policy.
Key behaviors:
- Exclusions are used only to determine notification recipients.
- Excluding a user or group doesn't change site permissions or ownership, and doesn't exclude the site from lifecycle policy evaluation
- Sites continue to be evaluated by the policy as usual.
Limits:
- You can add up to 100 entries to the exclusion list.
- Each entry can be an individual user, a Microsoft 365 Group, or a security group
- The 100-entry limit applies to the number of entries, not the number of users within a group. For example, a group with more than 100 members counts as one entry.
Group exclusion behavior (important):
- When a group is added to the exclusion list for a policy, that group is excluded from notifications only when the group is directly added to the site or is a nested group within other groups that are directly added to the site.
- A member of an excluded group might still receive a notification if they're directly added to the site or are part of some other group that is directly added to the site.
Actions to take on unattested sites after three notifications
For sites that are unattested after three monthly notifications, you can choose to either do nothing or take one of the following enforcement actions. The following table summarizes how the inactive site policy behaves for each selected enforcement action:
| Enforcement action | Policy behavior |
|---|---|
| Do nothing | Site owners or site admins receive monthly notifications for three months. After this period, no notifications are sent for the next three months. If the site remains unattested after six months, monthly notifications resume. The policy execution report lists unattested sites as unactioned by the site owner. You can download this report and filter out sites marked as unactioned. |
| Read-only access | Site owners or site admins receive monthly notifications for three months. If the notification recipients don't mark the site as attested during this period, the site goes into read-only mode. |
| Archive sites after mandatory read-only period | Site owners or site admins receive monthly notifications for three months. If the notification recipients don't mark the site as attested during this period, then the site goes into a read-only mode for a configurable duration (3, 6, 9, or 12 months). After the configured number of months, the site gets archived through Microsoft 365 Archive. Archival is subject to the tenant enabling Microsoft 365 Archive in the Microsoft 365 admin center. |

Note
If you configure the policy to take an enforcement action:
- The notifications stop after the policy action succeeds.
- The site and its status are included in the monthly report.
Customizing email notifications
Administrators can customize the email messages that site lifecycle management policies send when site issues require attention.
Customizing email content helps improve the read-through rate of the emails, which effectively improves response efficiency and contributes to better governance across the tenant.
You can customize emails in the configure step. When you select Customize email to be sent, the customization window opens as shown in the following screenshot:
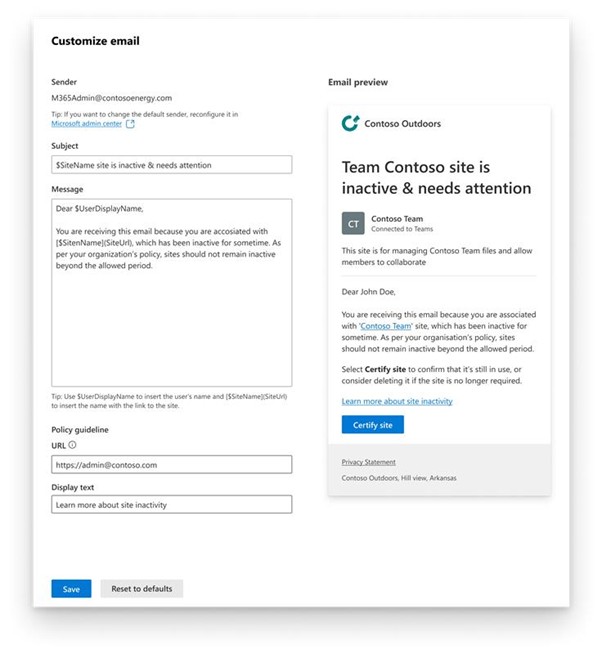
The following table describes the sections you can customize:
| Customizable section | Description |
|---|---|
| Sender | You must configure a custom domain in the Microsoft 365 admin center before you can use the email customization feature. For more information, see Choose which domain to use for your email. |
| Subject (up to 100 characters) | Use $UserDisplayName to insert the user's name and $SiteName to insert the name of the site. |
| Message (up to 500 characters) | Use $UserDisplayName to insert the user's name, $SiteName to insert the name of the site, and $SiteUrl to insert the URL of the site. |
| Policy guideline URL | Only valid HTTP links are allowed. |
| Policy guideline description text | The default value is the placeholder text. |
To customize emails for existing policies, follow these steps:
Select an existing policy.
Select Edit configuration.
Find the email customization option.
Note
If you don't configure email customization for a policy, the system continues to send default emails from noreply@sharepoint.com.
What to do if you can't customize email messages
You can't customize emails if the custom domain setting isn't configured or is turned off.
You must configure the Send email notifications from your domain setting in the Microsoft 365 admin center before you can customize emails. If you don't configure this setting, you see a warning message at the top of the policy list, as shown in the following image:

You might also see the warning message during the configuration step, as shown in the following screenshot:

If you previously customized emails in one or more policies, but later turn off the Send email notifications from your domain setting in the Microsoft 365 admin center, you see the message bar in the policy list, and a warning message in the email customization window, as shown in the following screenshot:

Note
Only someone who has the Global Administrator role can configure domain settings in the Microsoft 365 admin center.
After configuring the policy settings, select Next to finish your policy. Name the policy, add a description (optional), and select a policy mode.
Select Finish. You can now view and manage your policy from the Site lifecycle management > Site attestation policy dashboard.
Read-only mode
When you configure an unattested site policy with the read-only enforcement action, it sends extra notifications to inform site owners or site admins that the site goes into read-only mode.

When the site is in read-only mode, the following banner appears on the site:

Removing sites from read-only mode
To remove a site from read-only mode in the SharePoint admin center, go to the Active sites page, select the site, and then select Unlock from the site page panel.
Site owners can't remove a site from read-only mode. They must contact the tenant admin to remove read-only mode.

Unarchiving a site
To unarchive a site in SharePoint admin center, expand Sites and select Archived sites. Select the site you want to unarchive and select Reactivate.
Note
Only tenant admins can reactivate an archived site.
Sites managed by multiple site attestation policies
For each type of site lifecycle management policy, such as site ownership policy, inactive site policy, and site attestation policy, if you create multiple policies, the system doesn't send duplicate notification emails. If any policy of that type sent a notification within the last 30 days and the site remains unattested or uncertified, the system doesn't send further notifications. The policy execution report shows the site's status as "Notified by another policy."
For example, if two different site attestation policies cover a site and the first policy sends a notification email, the second policy doesn't send any extra notifications within the next 30 days if the site remains unattested.
Make sure that policies of the same type don't have overlapping scopes. If sites fall under the scope of multiple policies of the same type, the notification schedule and enforcement actions on the site can become unpredictable.
About policy modes
Policy modes
Site ownership policies support two operating modes:
- Simulation mode – Runs the policy once and generates a report without ongoing enforcement.
- Active mode – Runs monthly, generates reports, sends notifications, and can apply enforcement actions based on policy configuration.
Note
Site lifecycle policies in simulation mode are now available in GCCH and DoD environments as of November 17, 2025.
For more information about policy modes across site lifecycle management policies, see Overview of SharePoint site lifecycle management.
Reporting
After each run of the configured policy, you can view a detailed report about the sites it identifies. In the Site attestation policies page, select the desired policy from the list.
The panel outlines the numbers of:
- Sites to attest
- Sites that didn't have anyone to notify
- Sites attested
- Sites set to read-only
- Archived sites You can also view the policy's scope, configuration, and general information on the report.

You can also view the policy's scope, configuration, and general information on the panel. Select the Download detailed report option to download the report in CSV containing the following details for each of the sites identified due for attestation:
| Column | Definition |
|---|---|
| Site name | Name of the site |
| URL | URL of the site |
| Template | Template of the site |
| Connected to Teams | Indicates if it's a Teams-connected site |
| Sensitivity label | Sensitivity label assigned to the site |
| Retention policy | Indicates if any retention policy is applied to the site |
| Site lock state | State of site access before the policy runs (Unlock/Read-Only/No access) |
| Notified site admins | Email addresses of site admins receiving attestation notifications |
| Notified site owners | Email addresses of site owners receiving attestation notifications |
| Last attested by | Email address of the person who last attested the site |
| Last attestation date (UTC) | Date when the site was last attested |
| Number of site owners | Total count of site owners for the site |
| Email address of site owners | Email addresses of all site owners |
| Number of site admins | Total count of site admins for the site |
| Email address of site admins | Email addresses of all site admins |
| Total notifications count | Total notifications sent so far by any policy under the same policy template |
| Action status of policy | Status of the site (First, second, or third notification sent, Site in read-only mode, Site archived, Action taken by another policy such as read-only, archive, or notified by another policy) |
| Action taken on (UTC) | Date on which the enforcement action was taken (date when site was archived or put in read-only mode) |
| Last activity date (UTC) | Date of last activity detected across SharePoint site and connected workloads |
| Site creation date (UTC) | Date when the site was created |
| Storage used (GB) | Storage consumed by the site |
| Duration in read-only (days) | Number of days the site is in the enforced read-only state |
Configure actionable emails for US Government Cloud (GCC High or DoD) environments
In US Government Cloud (GCC High and DoD) environments, a tenant administrator must complete an extra, one-time setup for SharePoint site lifecycle management (SLM) policies to use actionable messages. This step helps ensure that policy notification emails display and function correctly. For example, site admins and site owners can take actions directly from email.
Unlike other commercial cloud environments, GCC High and DoD tenants require explicit administrator approval of the actionable message provider before it can send interactive email messages. Without this approval, SLM policy emails are delivered, but action buttons don't function as expected.
Important
You must be a Global Administrator or Exchange Administrator in the tenant to set up actionable messages.
Approve the SLM actionable message provider
Go to the Outlook Actionable Messages – Connectors admin portal for GCCH or DoD and sign in.
In the Provider Status filter, select Approved by Microsoft – Pending Your Approval.
Locate the provider named
InactiveSiteOAMProviderGCCH.Select the provider, and then select Approve.
After you approve the provider, the SLM policy notifications send actionable messages.
Note
This approval applies only to SLM policy notifications. Other applications or services that use actionable messages might require separate approval.
Ensure actionable messages are enabled for the tenant
Site lifecycle management policies use Outlook actionable messages to enable site owners or site administrators to take necessary actions by using links within email messages.
- For notifications to render properly, make sure your organization meets the Outlook version requirements.
- To troubleshoot rendering problems, see frequently asked questions.
Troubleshooting actionable messages
If actionable messages don't work as expected, try these steps:
- Make sure that the
InactiveSiteOAMProviderGCCHprovider is in an approved state. - Allow sufficient time. It can take up to 24 hours for changes to propagate.