Intune kullanarak profilleri yönetme ve uzantıları onaylama
Bu makalede, Intune yönetim aracını kullanarak profilleri düzgün bir şekilde yönetmek için izleyebileceğiniz yordamlar açıklanmaktadır.
Intune
Intune Sistem Uzantıları İlkesi
Sistem uzantılarını onaylamak için:
Intune'da Cihaz yapılandırmasını yönet'i >ve ardından Profilleri > Yönet İçerik Oluşturucu Profil'i >seçin.
Profil için bir ad seçin. Platform=macOSdeğerini Profil türü=Uzantılar olarak değiştirin ve İçerik Oluşturucu'ı seçin.
Temel Bilgiler sekmesinde, bu yeni profile bir ad verin.
Yapılandırma ayarları sekmesinde İzin verilen sistem uzantıları bölümüne aşağıdaki girdileri ekleyin:
Paket tanımlayıcısı Ekip tanımlayıcısı com.microsoft.wdav.epsext UBF8T346G9 com.microsoft.wdav.netext UBF8T346G9 Atamalar sekmesinde, bu profili Tüm Kullanıcılar & Tüm cihazlar'a atayın.
Bu yapılandırma profilini gözden geçirin ve oluşturun.
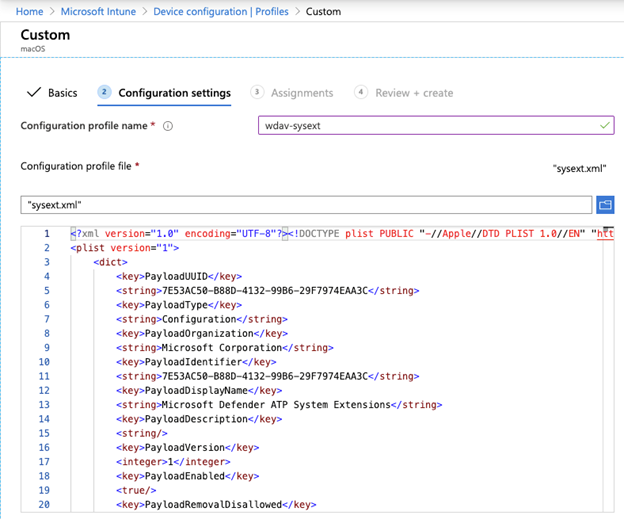
Özel yapılandırma profilini İçerik Oluşturucu
Özel yapılandırma profili ağ uzantısını etkinleştirir ve Endpoint Security sistem uzantısına Tam Disk Erişimi verir.
- Aşağıdaki içeriği sysext.xmladlı bir dosyaya kaydedin:
<?xml version="1.0" encoding="UTF-8"?><!DOCTYPE plist PUBLIC "-//Apple//DTD PLIST 1.0//EN" "http://www.apple.com/DTDs/PropertyList-1.0.dtd">
<plist version="1">
<dict>
<key>PayloadUUID</key>
<string>7E53AC50-B88D-4132-99B6-29F7974EAA3C</string>
<key>PayloadType</key>
<string>Configuration</string>
<key>PayloadOrganization</key>
<string>Microsoft Corporation</string>
<key>PayloadIdentifier</key>
<string>7E53AC50-B88D-4132-99B6-29F7974EAA3C</string>
<key>PayloadDisplayName</key>
<string>Microsoft Defender System Extensions</string>
<key>PayloadDescription</key>
<string/>
<key>PayloadVersion</key>
<integer>1</integer>
<key>PayloadEnabled</key>
<true/>
<key>PayloadRemovalDisallowed</key>
<true/>
<key>PayloadScope</key>
<string>System</string>
<key>PayloadContent</key>
<array>
<dict>
<key>PayloadUUID</key>
<string>2BA070D9-2233-4827-AFC1-1F44C8C8E527</string>
<key>PayloadType</key>
<string>com.apple.webcontent-filter</string>
<key>PayloadOrganization</key>
<string>Microsoft Corporation</string>
<key>PayloadIdentifier</key>
<string>CEBF7A71-D9A1-48BD-8CCF-BD9D18EC155A</string>
<key>PayloadDisplayName</key>
<string>Approved Network Extension</string>
<key>PayloadDescription</key>
<string/>
<key>PayloadVersion</key>
<integer>1</integer>
<key>PayloadEnabled</key>
<true/>
<key>FilterType</key>
<string>Plugin</string>
<key>UserDefinedName</key>
<string>Microsoft Defender Network Extension</string>
<key>PluginBundleID</key>
<string>com.microsoft.wdav</string>
<key>FilterSockets</key>
<true/>
<key>FilterDataProviderBundleIdentifier</key>
<string>com.microsoft.wdav.netext</string>
<key>FilterDataProviderDesignatedRequirement</key>
<string>identifier "com.microsoft.wdav.netext" and anchor apple generic and certificate 1[field.1.2.840.113635.100.6.2.6] /* exists */ and certificate leaf[field.1.2.840.113635.100.6.1.13] /* exists */ and certificate leaf[subject.OU] = UBF8T346G9</string>
</dict>
<dict>
<key>PayloadUUID</key>
<string>56105E89-C7C8-4A95-AEE6-E11B8BEA0366</string>
<key>PayloadType</key>
<string>com.apple.TCC.configuration-profile-policy</string>
<key>PayloadOrganization</key>
<string>Microsoft Corporation</string>
<key>PayloadIdentifier</key>
<string>56105E89-C7C8-4A95-AEE6-E11B8BEA0366</string>
<key>PayloadDisplayName</key>
<string>Privacy Preferences Policy Control</string>
<key>PayloadDescription</key>
<string/>
<key>PayloadVersion</key>
<integer>1</integer>
<key>PayloadEnabled</key>
<true/>
<key>Services</key>
<dict>
<key>SystemPolicyAllFiles</key>
<array>
<dict>
<key>Identifier</key>
<string>com.microsoft.wdav.epsext</string>
<key>CodeRequirement</key>
<string>identifier "com.microsoft.wdav.epsext" and anchor apple generic and certificate 1[field.1.2.840.113635.100.6.2.6] /* exists */ and certificate leaf[field.1.2.840.113635.100.6.1.13] /* exists */ and certificate leaf[subject.OU] = UBF8T346G9</string>
<key>IdentifierType</key>
<string>bundleID</string>
<key>StaticCode</key>
<integer>0</integer>
<key>Allowed</key>
<integer>1</integer>
</dict>
</array>
</dict>
</dict>
</array>
</dict>
</plist>
Yukarıdaki içeriğin dosyaya doğru şekilde kopyalandığını doğrulayın. Terminalden aşağıdaki komutu çalıştırın ve aşağıdaki örnekte gösterildiği gibi sonucun alındığını doğrulayın:
$ plutil -lint sysext.xml
sysext.xml: OK
Bu özel yapılandırma profilini dağıtın
- Intune Cihaz yapılandırmasını yönet'i >ve ardından Profilleri > Yönet İçerik Oluşturucu profili'ni >seçin.
- Profil için bir ad seçin. Platform özniteliği için değeri macOS ve Profil türü özniteliği için özel olarak ayarlayın ve yapılandır'ı seçin. Dosya sysext.xml oluşturulur.
- Yapılandırma profilini açın ve sysext.xml dosyasını karşıya yükleyin.
- Tamam'ı seçin.
- Atamalar sekmesinde, bu profili Tüm Kullanıcılar & Tüm cihazlar'a atayın.
- Bu yapılandırma profilini gözden geçirin ve oluşturun.

