Use app centric management to manage access to apps
Important
All organizations don't have app centric management feature available. If you were not using custom permission policies and you weren't an enterprise customer, we automatically migrated your organization to use this feature. You see the following message on the permission policy page:
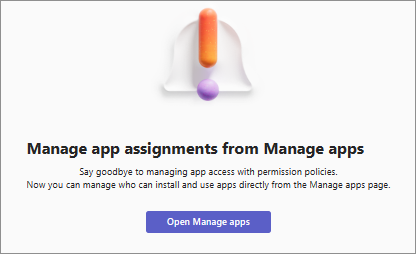
If you're using custom permission policies or you're an enterprise customer, then you must manually migrate to the app centric management feature. For timelines, see Message Center post MC688930 or Microsoft 365 roadmap item 151829.
If you see policies on the permission policies page, continue to use app permission policies or migrate to this feature on your own.
With the introduction of app centric management functionality, admins have two methods to control the access and availability of apps and copilot agents.
- Continue to use permission policies.
- Use the feature if already auto-migrated or manually migrate to app centric management. It replaces app permission policies.
This functionality lets you specify which users and groups can use each app or a copilot agent and you can control it on a per-app basis.
Whatever method your use, you can manage access to apps for individual users, supported groups, or everyone in the organization. You have complete control over who can or can't add apps in your organization. You can also control the access to new apps that we publish to Teams app store.
How is app centric management different than permission policy
Previously, when using permission policies, you determined access to apps using the following three settings:
- Org-wide app setting for third party apps: It applies at an org-level and controls if all third party apps are available for every user or not.
- App status: It applies at an app-level as allow or block and controls if it's available to any user or not.
- Permission policy: It applies at a user-level and controls if a specific user is allowed to use an app or not.
App centric management feature simplifies these settings. Each app contains its access definition using a list of users and groups that you assign to it. It lets you manage each app individually based on your user's needs and organization's compliance and risk posture.
When using this functionality, you determine access to apps using one of the following options for each app:
| New option | Who gets the app | How does it map with previous settings |
|---|---|---|
Everyone |
Available to all org users, new users, and guests | Same effect as allowing an app and global (Org-wide default) app permission policy allowing all users to use it. |
Specific users or groups |
Only the users and groups that you select can use the app. The supported group types are security groups, Microsoft 365 groups, dynamic user membership groups, nested groups, and the distribution lists. | Same as using a custom app permission policy to restrict the use of app to selected users or groups. |
No one |
Not available to any user | Same as a blocked app. |
The method to allow users access to an app changes with this functionality. In the past, to allow access to a user, you'd add the app as an allowed app in a policy and assign that policy to the user. Using this functionality, you just modify the availability of an app to let selected users use it. Also, you don't have to create multiple policies for different combinations of apps and allowed users.
Migrate to app centric management
Previously, we automatically migrated organizations that weren't using any custom policies. Admins can now do an on-demand migration. Understand the difference between the two types of migration.
| Type of migration | Who does it | Requirement | How is it done |
|---|---|---|---|
| Assisted | Administrator | Org uses one or more custom policies | Guided UI in admin center |
| Automatic | Microsoft | Org uses only the default global policy | Automatic, without admin intervention |
To migrate your organization, follow these steps:
Log into Teams admin center and access Teams apps > Permission policies page. Take inventory of the apps in the permission policies and identify the users and groups that the apps are allowed or blocked for. During the migration, you may have to manually edit the availability for some apps for the existing users and groups. For details, see step 5.
On the permission policies page, select Get started.

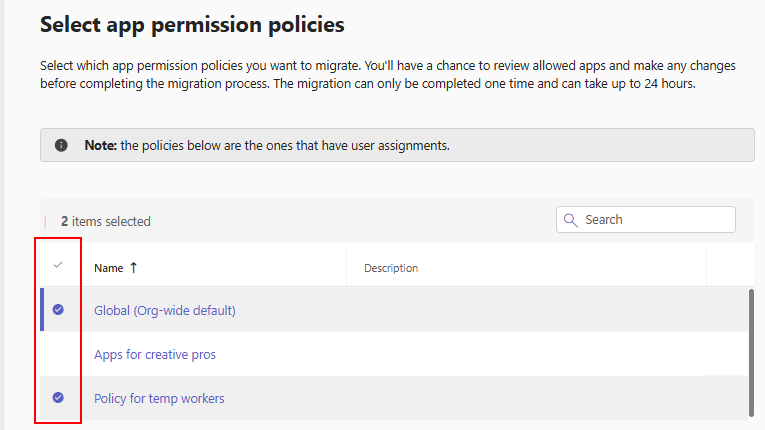
Select policies that you want to migrate and select Next. The page displays only those policies that are assigned to users or groups. Also, we migrate only those apps and their availability that are part of the policies that you choose to migrate. Apps in the unselected policies aren't part of the migration and can’t be migrated later. However, you can manually edit the availability for any app after the migration.
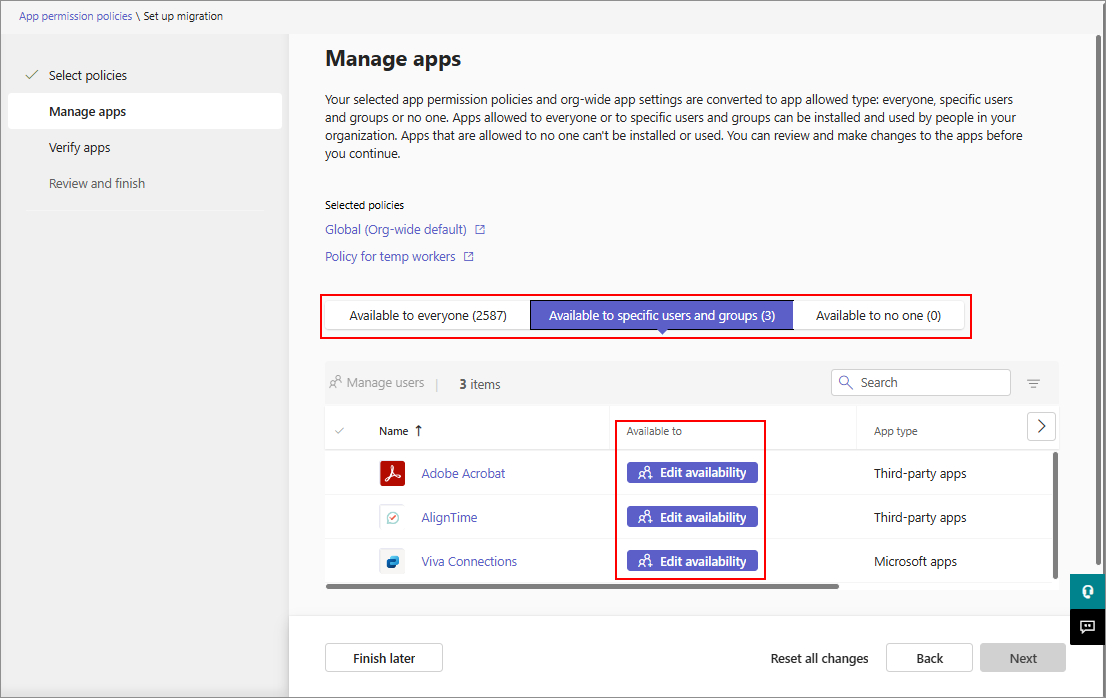
Verify the app availability for the users on the next page. In the following three tabs, it shows a list of apps from your Org-wide app settings and the app permission policies that you choose to migrate.
- Available to everyone: List of apps allowed for everyone in your organization.
- Available to specific users and groups: List of apps that are selectively allowed for at least one org user or a supported group.
- Available to no one: List of apps that nobody in the org can use.
In each tab, you can modify the app availability to one of the three app availability types, as necessary. Edit availability option appears in Available to specific users and groups tab if the app availability isn't clear and admin input is needed to proceed. Either the apps aren't present in the policies that you selected to migrate or selected policies contain conflicting availability. You must assign such apps to one of the availability types before you can proceed.
Tip
If you see many apps in this tab, you likely have policies that have conflicting apps availability. For example, a policy that allows an app and another policy that blocks the same app. In such a scenario, we recommend that you uncheck the policy that leads to a conflict or you edit the availability in this tab.
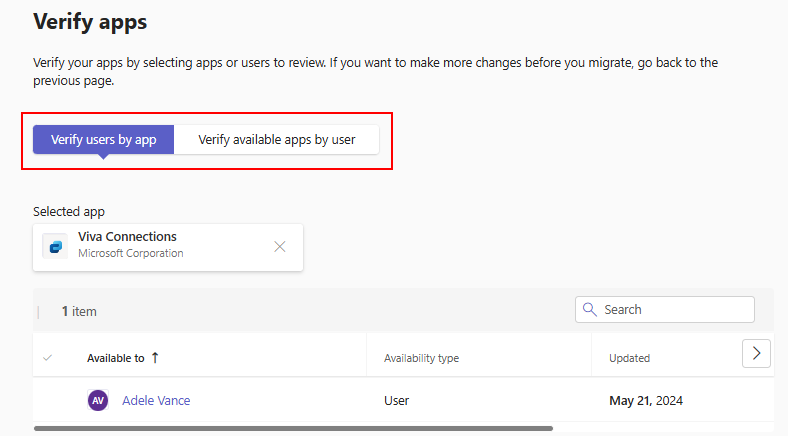
You can validate the changes on a per-app or a per-user basis. Select a tab and type the name of the app or the user.
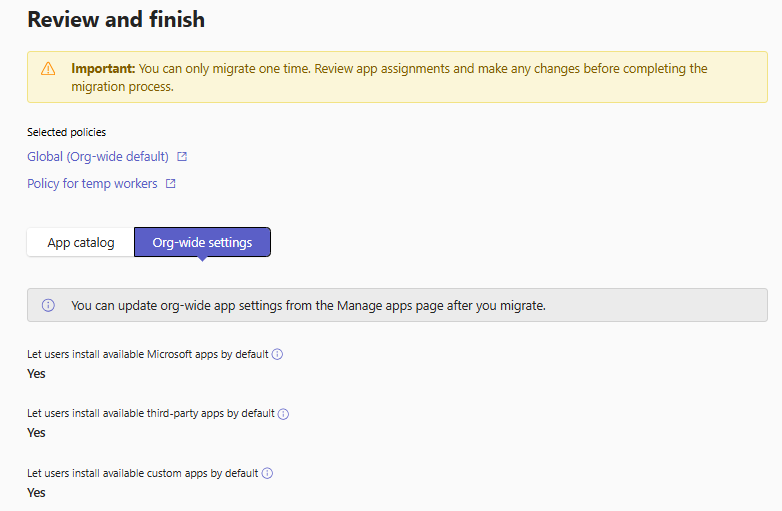
On the final review UI, you can see the apps, their availability, and the Org-wide app settings that apply after the migration. You can download this information as a CSV file to evaluate further. For example, you can use the inventory mapping from Step 1 to ensure that the app availability is as intended. Once assured, select Start migration and follow the prompts. Migration may take up to 24 hours to complete.
During migration, you can save a draft of the migration progress using the Finish later option. You can cancel the migration and delete the saved draft using the Reset all changes option.
Note
While migrating, you can't make changes to app assignments. The existing UI gets disabled when you start the migration. If you aren't ready to proceed or want to make change to the exiting permission policies, open the migration wizard and select the Reset all changes option. You'll lose the progress and can restart the migration later.
After migration, your blocked apps continue to remain unavailable to users. The statuses of such apps show as unblocked now, but the apps are assigned to No one in the Available to column on the Manage apps page. It means that org user can't use the app, just as you intended before. Users can view the apps in store and request access to apps.
Add or modify app availability for users
To allow users to add and use an app or a Copilot agent, you must assign users or groups to an app. To make any app or Copilot agent available in your organization, ensure the following:
- If your organization isn't migrated to unified app management, allow apps and Copilot agents in Teams admin center and under the Integrated apps page in Microsoft 365 admin center.
- If your organization is migrated to unified app management, allow apps and Copilot agents in Teams admin center or under the Integrated apps page in Microsoft 365 admin center.
For more information, see manage apps that work across Teams, Outlook, and Microsoft 365 App.
Note
It takes up to 24 hours for the availability changes to take effect. In rare cases, it may take up to six days for the changes to reflect in the client.
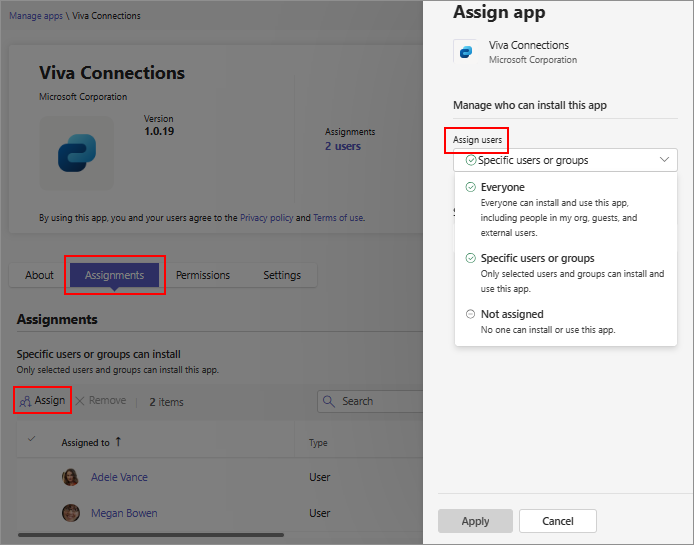
To make any app or Copilot agent available to your organization in Teams admin center, follow these steps:
Go to the Manage apps page.
Search for the required app and select the app name to open its app details page.
Select the Users and groups tab.
Under Select to manage who this app is installed for or available to in your organization, select Availability.
Select Edit availability.
Select the required option from Available to menu. When assigning users or groups, search for the user or the group from the Search for users or groups menu. Select Apply.
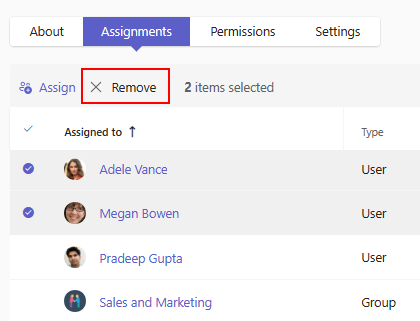
To remove one or more users or groups from an app, select the rows and select Remove.
Default settings for app availability
In addition to defining the availability of an app, you can also control the default app availability of any new apps. You can control it for each type of app. For new organizations, the default setting is set to let users install apps by default. For existing organizations, old settings are mapped to new access settings.
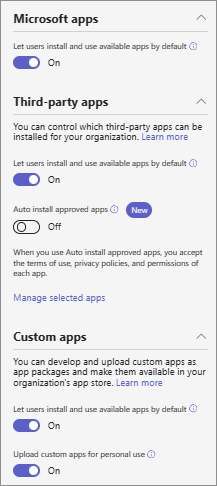
To change this default setting, access Manage apps page, select Actions > Org-wide app settings, and modify the required settings.
The Org-wide app settings apply to:
- All the new apps made available in Teams app store.
- All the existing apps that you didn't actively manage, that is, you didn't change the availability of.
The Org-wide app settings don’t apply to:
- All apps that have user assignment set to Specific users and groups and saved by you.
- All apps that were assigned to Everyone or to No one and saved individually.
- Any blocked apps.
Consider a scenario where you started using the feature and all apps were assigned to everyone. Now, you changed an app's availability to a specific group or some users. After you save this change, if you change the Org-wide app setting titled Let users install and use available apps by default, then this particular app continues to be assigned to the specific group or users. Your change to the org-wide app setting applies only to those apps for which you didn't change the availability. Further, if you again change the Let users install and use available apps by default setting, the availability of all other apps is again impacted, except the app that you actively managed.
View apps in your organization
You can view all apps in the catalog and easily access the app availability from the Manage apps page. You can sort and filter using all three types of app availability. To know about the Microsoft-provided apps, see list of Microsoft created apps.
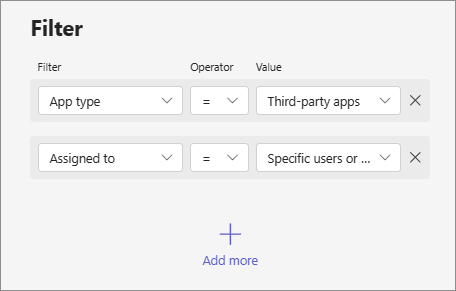
View all apps available to a specific user
On the Manage users page, select a user to open the user details page, and select the Apps tab. The tab lists the apps that the user has access to. To easily locate the type of access for an app, you can search for the name of the app.
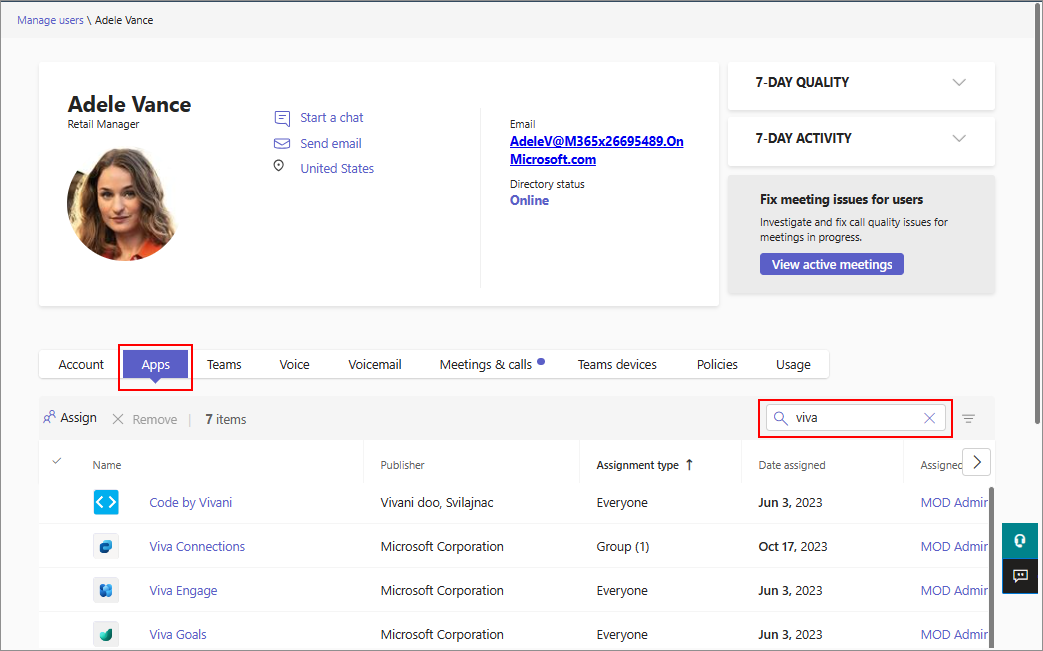
Each app displays the type of its availability, which indicates how the user is assigned to the app: through availability to everyone, direct availability to a user, or through a group. The list shows only those apps that are assigned to the user and that are allowed in the organization for use. Apps assigned to no one and app that are blocked in the organization don't appear in this list.
You can remove app availability for a user. Select an app that is directly assigned to the user and select Remove. You can’t remove availability for a user if the app is available to everyone or to a group.
Mapping between old permission policies and new app availability
When your tenant's admin center receives this feature, the following updates are made to the app access. The access to apps doesn't change and the update only maps your existing permission policies to new availability.
| App permission policy and org settings earlier | Org-wide app settings while using this feature |
|---|---|
Global permission policy for Microsoft apps was Allow all or Global permission policy for Microsoft apps was Block an app(s), allow all others |
Allow users install available apps by default for Microsoft apps is set to on |
Global permission policy for Microsoft apps was Block all or Global permission policy for Microsoft apps was Allow app(s), Block all others |
Allow users install available apps by default for Microsoft apps is set to off |
Third party app setting in the Org-wide app settings was set to on; New third party app setting in the org-wide app setting was set to on; Global permission policy for third party apps was Allow all; or Global permission policy for third party apps was Block an app(s), allow all others |
Allow users install available apps by default for third party apps is set to on |
third party app setting in the Org-wide app settings was set to off; New third party app setting in the org-wide app setting was set to off; Global permission policy for third party apps was Block all; or Global permission policy for third party apps was Allow app(s), Block all others |
Allow users install available apps by default for third party apps is set to off |
Global permission policy for Custom apps was Allow all or Global permission policy for Custom apps was Block an app(s), allow all others |
Allow users install available apps by default for custom apps is set to on |
Global permission policy for custom apps was Block all or Global permission policy for custom apps was Allow app(s), Block all others |
Allow users install available apps by default for custom apps is set to off |
| App status earlier | Permission policy applied earlier | App availability when using this feature |
|---|---|---|
| Blocked | Blocked | No one can install |
| Blocked | Allowed | No one can install |
| Allowed | Blocked | No one can install |
| Allowed | Allowed | Everyone |
Considerations and known limitations
You can add up to 99 users or groups at a time to an app.
When searching for users or groups to add, the UI displays only 20 results. If you don't find the expected results, refine your search query to use the exact name.
After migration, your blocked apps continue to remain unavailable to users. The status of such apps is
unblockednow but the apps are available toNo onein theAvailable tocolumn on the Manage apps page. It means that no org user can use the app as you intended before.After you switch to this feature, you can't access, edit, or use permission policies. Once your organization migrates, you can't revert the migration.
You can't update app availability in bulk.
