Connect to Microsoft Azure Redis Cache from WordPress site
Microsoft Azure Redis Cache is based on the popular open source Redis Cache. It gives users access to a secure, dedicated Redis Cache managed by Microsoft. You can use Microsoft Azure Redis Cache with WordPress site to improve performance. In this article, we cover how to setup Redis cache and connect to it fro WordPress.
1. Create Azure Redis Cache from Azre portal, https://azure.microsoft.com/en-us/services/cache/ 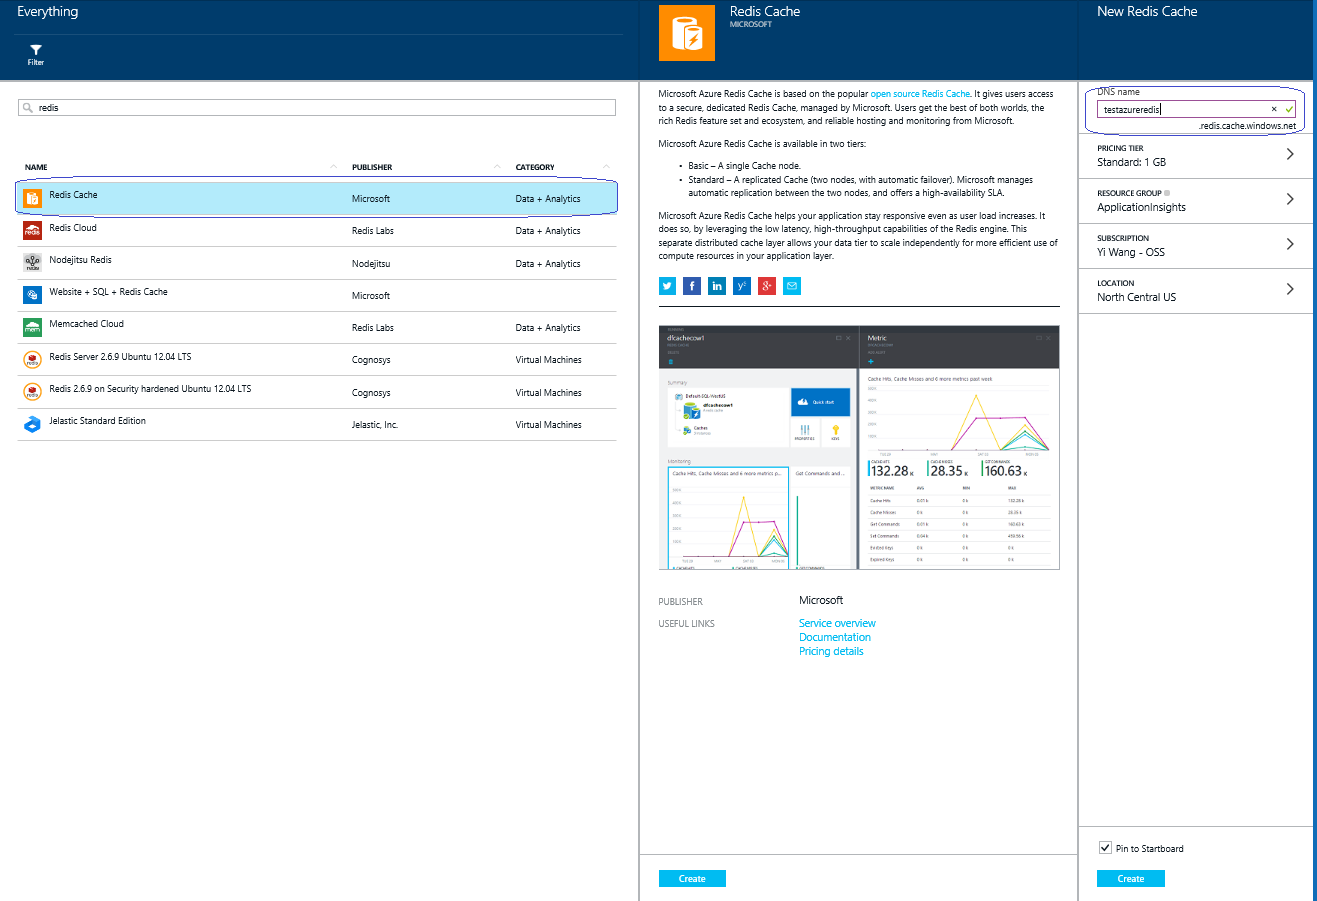
2. Install WordPress "Redis Object Cache" plugin, https://wordpress.org/plugins/redis-cache/
3. Add following information in wp-config.php
define('WP_REDIS_SCHEME', 'tcp');
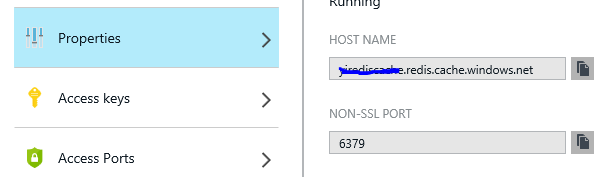
define('WP_REDIS_HOST', '<your redis account name>.redis.cache.windows.net');
define('WP_REDIS_PORT', '6379');
define('WP_REDIS_DATABASE', '0');
define('WP_REDIS_PASSWORD', '<your primary access key>');
Note: Be sure to put the code above /* Thant's all, stop editing! Happy blogging */ comment line
(refer to https://wordpress.org/support/topic/enabling-with-predis-and-remote-redis )
Get Redis host name and Access key from Azre portal. If you need non-SSL port, enable it from "Access Ports".
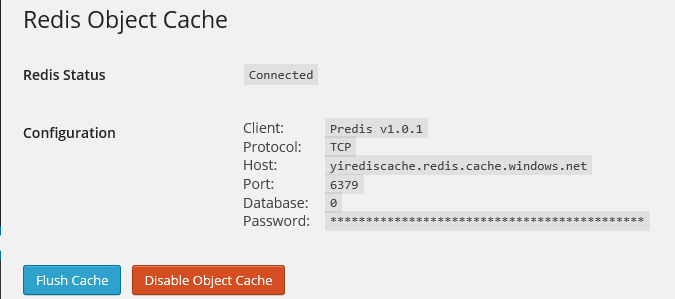
4. Check from WordPress plugins, confirm that "Redis Object Cache" is connected to Microsoft Azure Redis Cache.
There is another way to configure and use Redis Cache on WordPress:
1) Create Azure Redis Cache account
2) Download php_redis.dll from https://windows.php.net/downloads/pecl/releases/redis/2.2.7/. Download nts-vc11-x86.zip for php version being used.
- For php 5.5: https://windows.php.net/downloads/pecl/releases/redis/2.2.7/php_redis-2.2.7-5.5-nts-vc11-x86.zip
- For php 5.6: https://windows.php.net/downloads/pecl/releases/redis/2.2.7/php_redis-2.2.7-5.6-nts-vc11-x86.zip
- For php 5.4: https://windows.php.net/downloads/pecl/releases/redis/2.2.7/php_redis-2.2.7-5.4-nts-vc9-x86.zip
3) Extract php_redis.dll from the zip file.
4) Create D:\home\site\ext folder from ftp/kudu and Copy extracted php_redis.dll to d:\home\site\ext folder
5) Create D:\home\site\ini folder from ftp/kudu and create extensions.ini file. add below lines to the file:
; Enable Extensions
extension=d:\home\site\ext\php_redis.dll
6) Install WP Redis plugin from pantheon from WP dashboard.
7) Add these line above db information (above define('DB_NAME', 'abcdefg')) in wp-config.php:
$redis_server = array(
'host' => 'abcd.redis.cache.windows.net',
'port' => 6379,
'auth' => 'key',
);
8) Copy d:/home/site/wwwroot/wp-content/plugins/wp-redis/object-cache.php file to d:/home/site/wwwroot/wp-content folder.
9) Once you enable the plugin from dashboard, and browse around you should see hits/misses on Azure Redis Cache dashboard.
Comments
Anonymous
May 28, 2015
Port 6379 is the clear-text (non-ssl) port and is disabled by default. Guidance is to use SSL port 6380 whenever the client library supports it. If client does not support SSL, you will need to enable port 6379 through the portal before trying to use it.Anonymous
May 28, 2015
The comment has been removedAnonymous
June 23, 2015
Thanks for the comment. I have added a note in the blog.Anonymous
January 17, 2016
I would just add that Redis settings in wp-config should be even above DB settings. Otherwise it is shown as "Not connected" AND object-cache.php from plugin folder should be placed in wp-content folder as well.