Microsoft Azure Site Recovery – Replicating Hyper-V VMs to Microsoft Azure
Have you ever wished that you could take your virtual machines (VMs) and replicate them to a cloud service for disaster recovery purposes? Now you can with Microsoft Azure Site Recovery!
Azure Site Recovery (ASR) provides the capability to replicate Hyper-V VMs directly to Azure for recovery purposes.
There are two types of recovery that can be configured:
On-premises to Azure protection—Replicate on-premise virtual machines located on Hyper-V host servers in VMM clouds to Azure. You configure and enable protection settings in Azure Site Recovery vaults. Virtual machine data is replicated from the on-premises Hyper-V server to Azure storage.
On-premises to on-premises protection—Replicate virtual machines located on Hyper-V host servers in VMM clouds from one on-premises site to another. You configure and enable protection settings in Azure Site Recovery vaults. Virtual machine data is replicated from one on-premises Hyper-V server to another. Azure Site Recovery simply orchestrates the process. Learn about this scenario in Getting Started with Azure Site Recovery: On-Premises to On-Premises Protection.
Source: https://azure.microsoft.com/en-us/documentation/articles/hyper-v-recovery-manager-azure/
Read more about ASR here: https://azure.microsoft.com/en-us/documentation/articles/hyper-v-recovery-manager-azure/
AZURE SITE RECOVERY WALK-THROUGH
The following walks through how to use Azure to store and recover VM replicas. This service was formerly called Hyper-V Recovery Services and has been renamed to Azure Recovery Services.
System Requirements
- An Azure Subscription
- Management certificate
- System Center Virtual Machine Manager 2012 R2
- Windows Server 2012 R2 Hyper-V – used as VM host
- Gen 1, fixed disk .vhd VMs in Hyper-V
- Guest OS Windows Server 2008 or later
More details on requirements and planning are located here: https://msdn.microsoft.com/en-us/library/dn469074.aspx
Azure Site Recovery
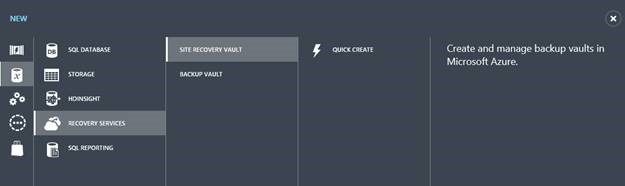
If you haven’t used Azure Site Recovery (formerly Hyper-V Recovery Manager) from the Azure portal we’ll need to create a new Site Recovery Vault:

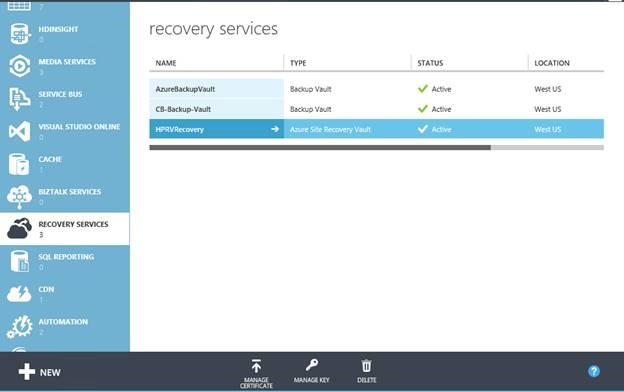
After the vault is created select it from the page:

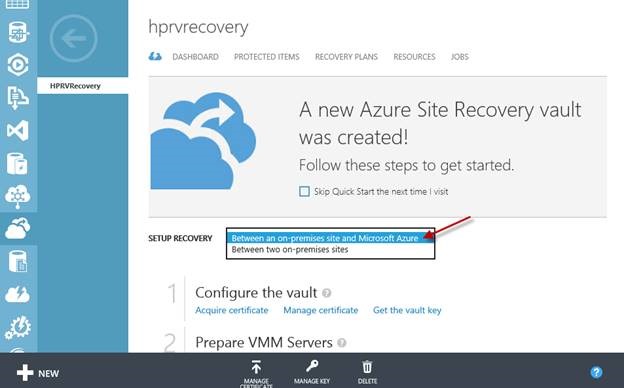
From the drop-down on the main page, select “Between an on-premises site and Microsoft Azure”

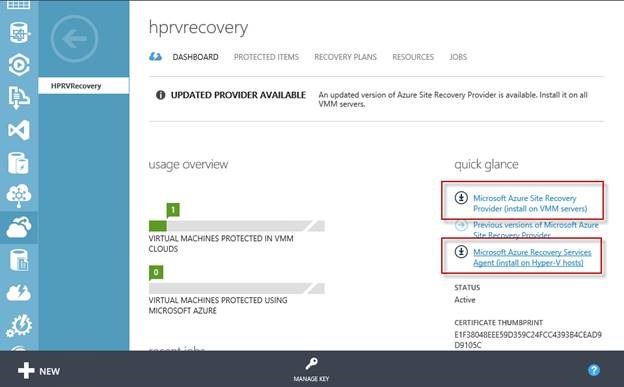
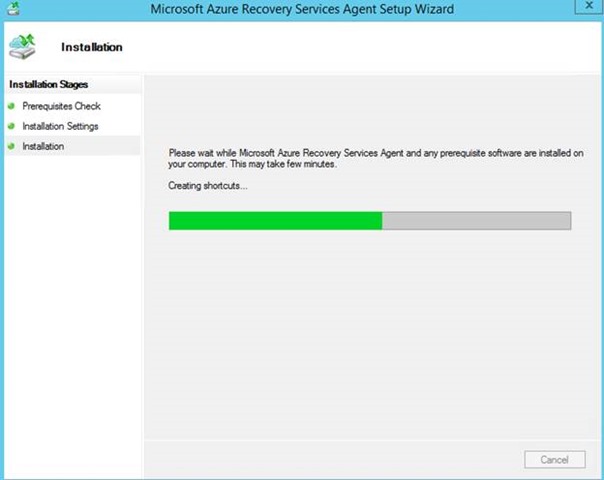
Select DASHBOARD and install Hyper-V ASR agent on Hyper-V hosts and ASR Provider on the VMM server:

View of agent install wizard:

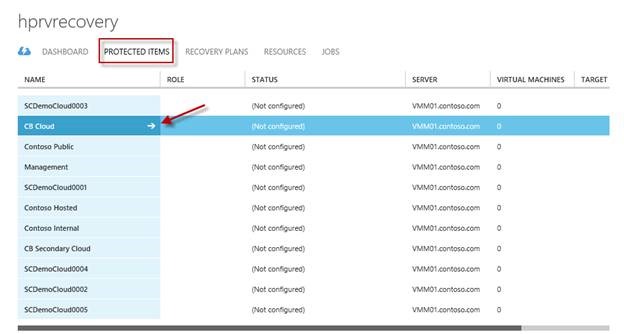
Once the agents are installed, in the Azure portal under RECOVERY SERVICES, select PROTECTED ITEMS and a CLOUD to protect.

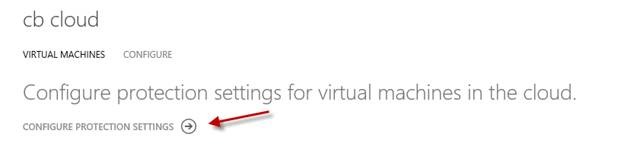
Select “CONFIGURE PROTECTION SETTINGS”

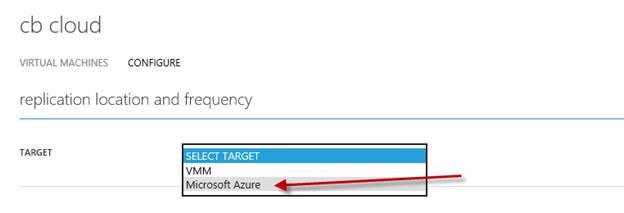
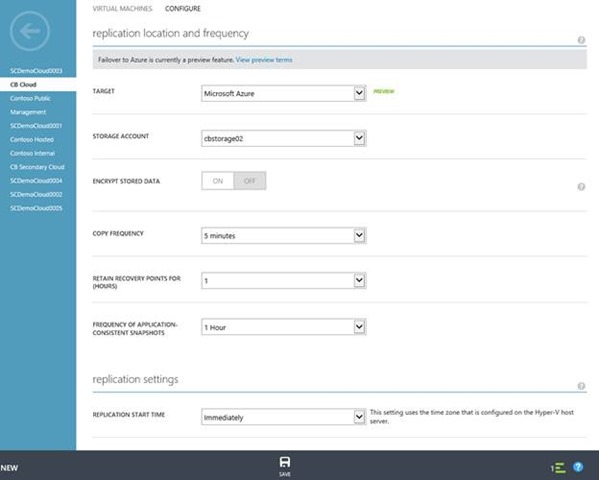
Select a TARGET, there are two options VMM or Microsoft Azure, for the purposes of this post I’m selecting Microsoft Azure:

Select the options that best suits your recovery requirements and save:

The following will be displayed:

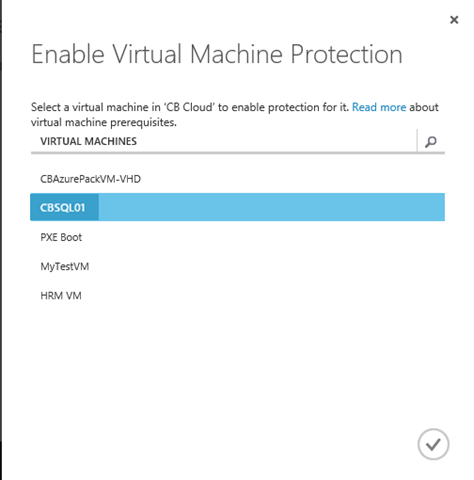
Once configuration is completed, we need to add virtual machines. Select  and select a VM to protect:

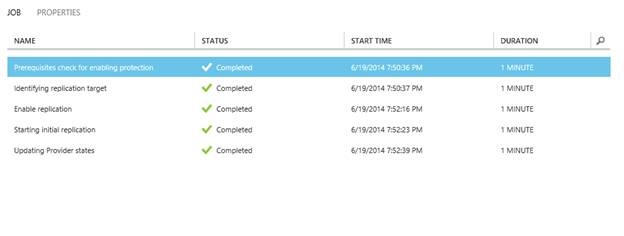
Select the check mark and the initial replication will begin (depends on the setting previously configured for replication start time).

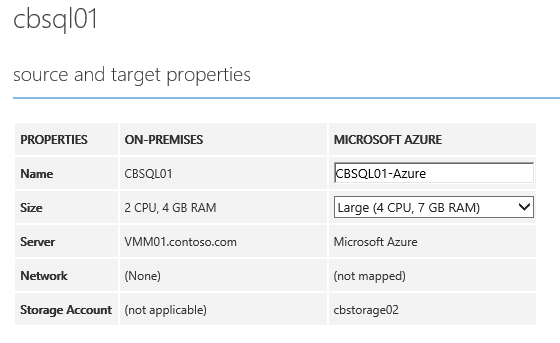
Here are the source and target properties, we can change the name and size of Azure VM. For example I added “-Azure” to the name (storage and network may also be configured as well):


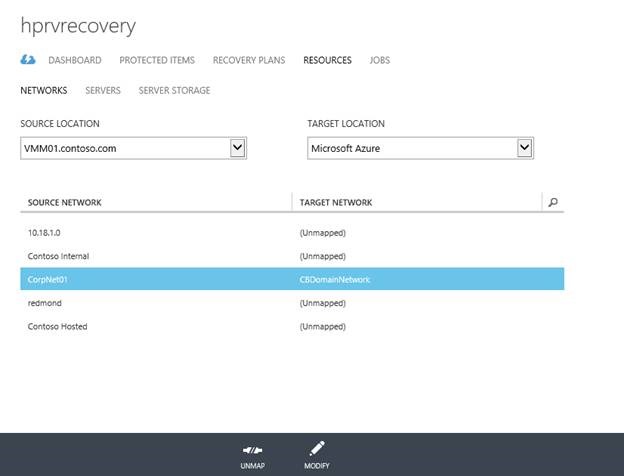
Other tasks to complete are createing maps to networks, e.g. a subent that is part of either an Azure ExpressRoute connection or an Azure Site-to-Site VPN. If recovery occurs the VM will be accessable as it would if it were within your own datacenter (network mapping is not a requirement to use Azure Site Recovery).

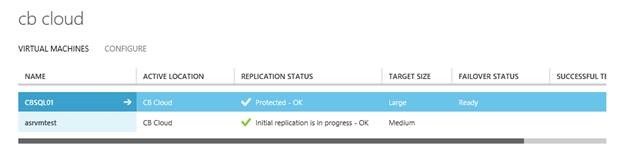
The replication process will automatically enable Hyper-V recovery for the VM in System Center Virtual Machine Manager:

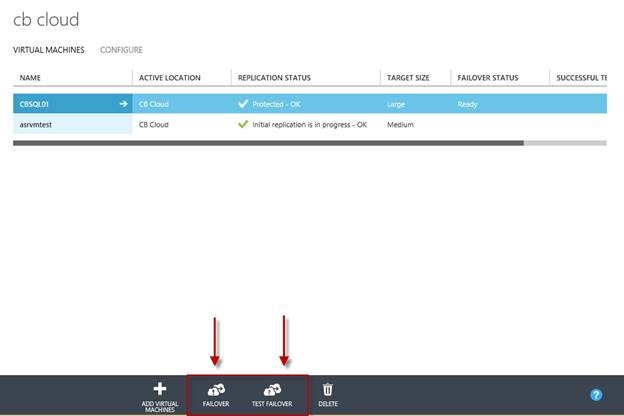
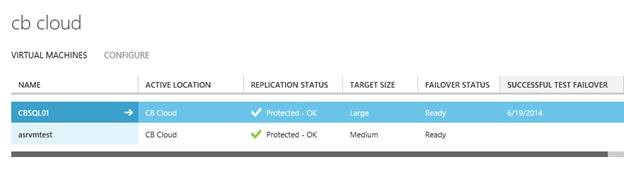
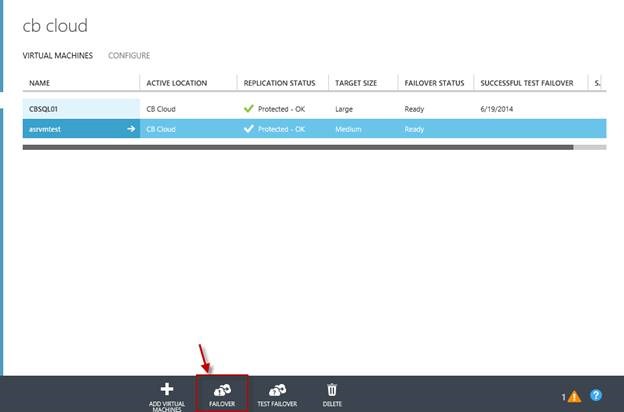
Once the VM is protected we can either FAILOVER the VM or TEST FAILOVER for a VM:

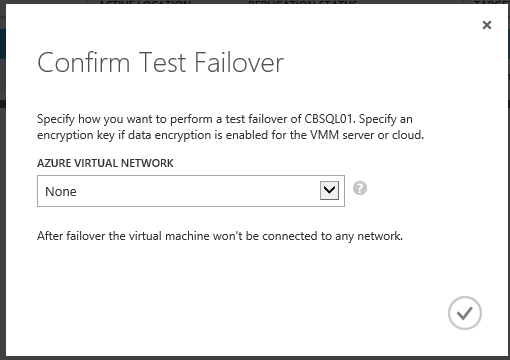
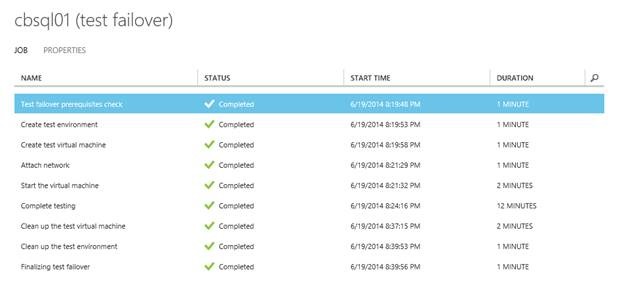
I chose to test a failover by selecting TEST FAILOVER. I’m also going to keep it isolated by not connecting the VM to a network:


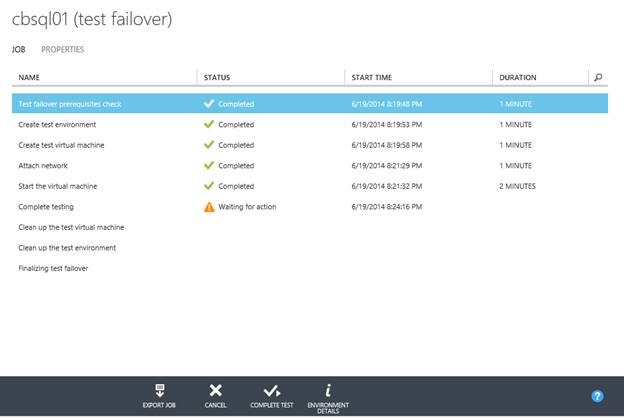
Once the failover of the VM completed we can log onto the VM and run tests:
Note: If you want to RDP into the VM after failover occurs, you’ll need to open up port 3389 under ENDPOINTS.

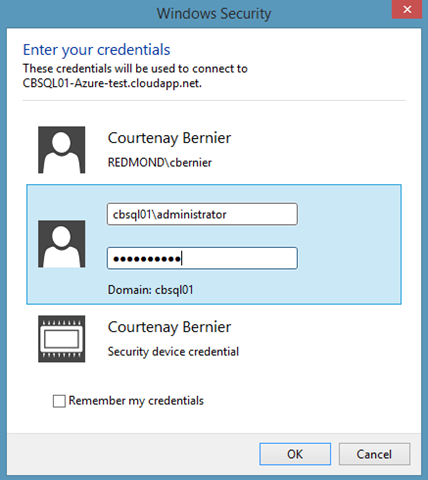
I’m connecting to the test replica VM using RDP:

Type in my credentials:

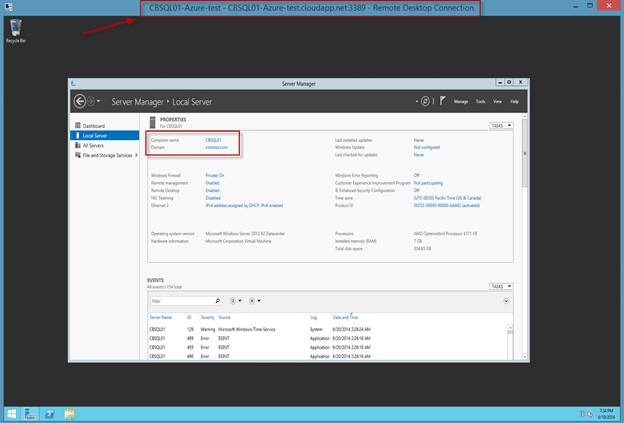
I’ve successfully logged into the test VM:

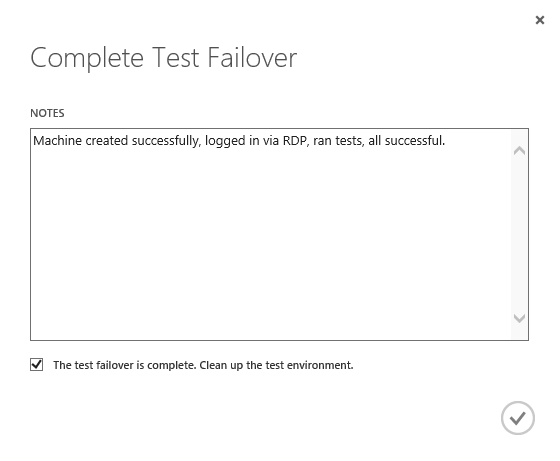
I can run my tests and complete the test by selecting COMPLETE TEST and typing in some notes:


The environment will now be cleaned up by removing the test VM from Azure:


FAILING OVER A VIRTUAL MACHINE
Now I’m going to failover a VM to Azure. On the virtual machines page select FAILOVER:

Select Planned Failover or Unplanned Failover:

For the purposes of this post I’m selecting Unplanned Failover.

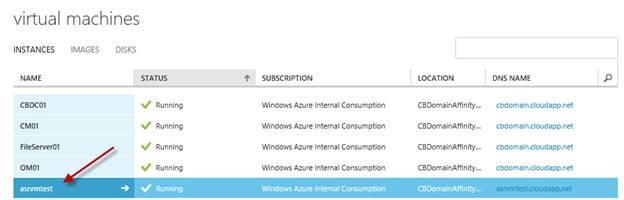
The job will sync data, pause the VM in Virtual Machine Manager and start a new instance of the VM in Azure:

RECOVERY PLANS
I walked through manually managing Azure Site Recovery, however recovery can be automated by creating Recovery Plans.
Select RECOVERY PLANS at the top of the page:

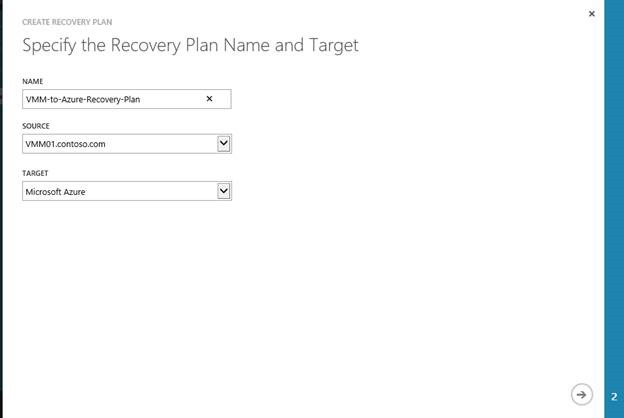
Specify the recovery plan parameters:

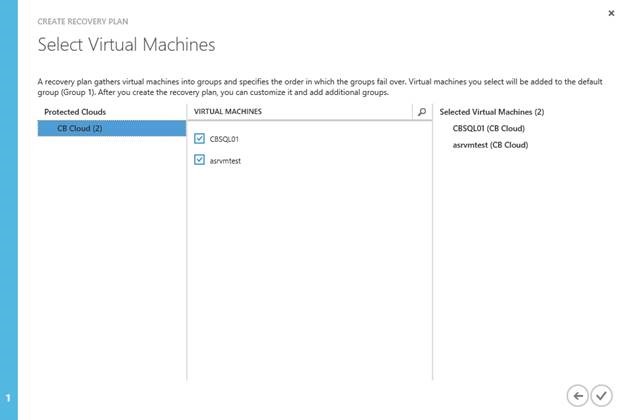
Select the VMs to include in the recovery plan and select the check mark to complete:

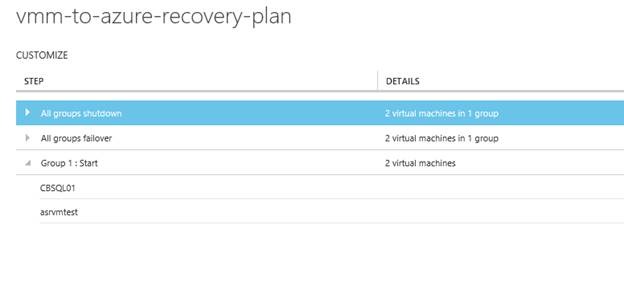
A recovery plan is going to run a sequence of actions defined by you to recover a VM either in Azure or to another data center such as a DR site.

SUMMARY
I’ve walked through creating a site recovery vault, configured Azure Site Recovery from datacenter to Azure, tested and failed over a virtual machine to Azure, and looked at recovery plans for automating VM recovery in Azure.
Azure Site Recovery is a unique offering from Microsoft and I encourage you to start planning your disaster recovery site within Azure today!
ADDITIONAL RESOURCES
Azure Site Recovery Planning and Deployment Guides: https://msdn.microsoft.com/en-us/library/dn440569.aspx
Comments
- Anonymous
January 01, 2003
Hi Jose, yes documentation is located here: http://msdn.microsoft.com/en-us/library/dn788903.aspx - Anonymous
January 01, 2003
Hi Klaus, currently Azure only supports Gen 1 .vhd format. We continue to bring this type of feedback to the the Azure team and I encourage everyone to post their feature requests here:http://feedback.azure.com/. The Azure team monitors and typically reply's to requests and comments. - Anonymous
January 01, 2003
Is it possible to use NVGRE inside Azure? I mean, is there a solution working with the SAME IP Addresses inside the VMs after Failover? Thanks, B. - Anonymous
January 01, 2003
Thanks for the article. What are the plans for customers which are already running their VMs as a Generation 2 machine and want to use the feature? As far as I tested it its currently only possible to do this with G1 machines. - Anonymous
January 01, 2003
Thanks for your reply. I already found a good voting for Gen 2 support which i would like to share here:http://feedback.azure.com/forums/256299-site-recovery/suggestions/6085722-protection-for-generation-2-virtual-machines - Anonymous
June 24, 2014
Hi Courtenay, do you have a documentation reference for the networking map piece? I was writing the same article you just did, but since I have the lab connected to Azure through a VPN, I would like to be able to access my VM after failing-over through the internal network. However, my azure network is not available to be mapped. Any insights?
Thank you,
Jose Fehse