Packaging a Windows Store apps component with Nuget. Part 2
In this 2nd part, we will go deeper into how to create a Nuget package based on a WinRT component.
As a reminder, be sure to check the first part of this article, where the basics of creating a Nuget package is addressed.
WinRT component (*.winmd)
Actually, the subject here is how Nuget works with a component which is not a simple “.dll” assembly, and by the way, how Nuget deals with multitples files which need to be present in the Output directory of your project. (.dll and .winmd files)
We create a un new project, which won’t be a PCL project, but a Windows Runtime Component project. For this sample, we will working with C#:
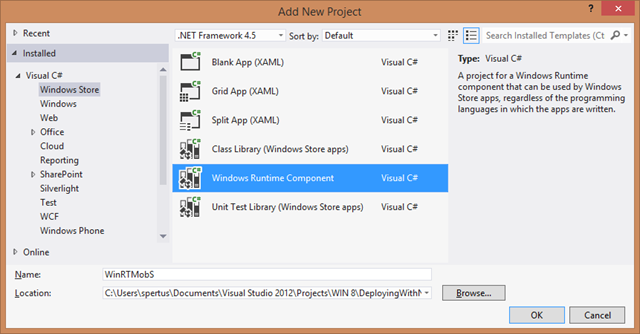
The project code changes “a little” to adapt the constraints of WinRT developing mode.
 public sealed class GamingHelper
    {
        public IAsyncOperation<String> GetGameAsync()
        {
            return GetGameInternal().AsAsyncOperation<String>();
        }

        private async Task<String> GetGameInternal()
        {
            try
            {
                HttpClient client = new HttpClient();
                client.DefaultRequestHeaders.Accept.Add(
                                           new MediaTypeWithQualityHeaderValue("application/json"));

                var uri = "https://babylonjs.azure-mobile.net/api/GetGameByName/Omega Crusher.json";

                HttpRequestMessage hrm = new HttpRequestMessage(HttpMethod.Get, uri);

                hrm.Headers.Add("X-ZUMO-APPLICATION", "dHfEVuqRtCczLCvSdtmAdfVlrWpgfU55");
                var gameString = await client.SendAsync(hrm);

                return await gameString.Content.ReadAsStringAsync();
            }
            catch (Exception ex)
            {
                return ex.Message;
            }


        }

    }
The Nuget deployment required files are :
- The .winmd file (which contains IL and metadatas)
- The .pri file (which contains localization
Here is a screenshot of my local working Nuget directory tree. We have the 2 required files in the /lib folder and the .nuspec file in the /root folder:


Obviously, this first example works as expected, no aditionnal work is mandatory. Even if there is a .pri file in the /lib directory, Nuget won’t add it as a reference in Visual Studio.
Optionnal : Continuous Integration and MSBuild update
This part of the article is not mandatory to understand Nuget packaging. So you can directly go to the next chapter if the continuous integration is not your main focus.
But, if you want to automate the package creation during compilation, I have upgrade the MSbuild tasks (that will create the .nupkg).
Here is all the steps required :
- Create a properties group, to summarize some path.
- Create a filenames group which will contains:
- The .nupkg generated file.
- The mandatories files, in the working directory, required to generate the .nupkg (.winmd, .pri, .dll)
- The /bin/release files generated by Visual Studio.
- Delete all the files generated during the last compilation.
- Copy the /bin/release file to the Nuget working directory.
- Execute Nuget.exe to create the package
- Copy the .nupkg file to the local Nuget repository
Here is the final XML :
 <Target Name="AfterBuild">

    <!-- Working directories, local repository directory and nuget command line exe -->
    <PropertyGroup>
      <NugetOutputDir>$(SolutionDir)Nuget\$(ProjectName)\</NugetOutputDir>
      <NugetOutputDirLibWinRT>$(NugetOutputDir)lib\portable-net4+wp7+win8\</NugetOutputDirLibWinRT>

      <NugetRepositoryDir>C:\Users\spertus\Documents\Visual Studio 2012\Projects\PERSONAL\Nuget\
      </NugetRepositoryDir>
      <NugetCommandLine>C:\Program Files (x86)\NuGet\NuGet.exe</NugetCommandLine>
    </PropertyGroup>

    <!-- Input, output and .nupkg files-->
    <ItemGroup>
      <NugetPkgFileOutput Include="$(SolutionDir)Nuget\$(ProjectName)\*.nupkg" />

      <NugetOutputFiles Include="$(NugetOutputDirLibWinRT)$(TargetFileName)" />
      <NugetOutputFiles Include="$(NugetOutputDirLibWinRT)$(ProjectPriFileName)" />

      <NugetInputFiles Include="$(TargetPath)" />
      <NugetInputFiles Include="$(ProjectPriFullPath)" />
    </ItemGroup>

    <!-- Clean Output Nuget directory (clean .winmd and .pri files)-->
    <Delete Files="@(NugetOutputFiles)" />

    <!-- Copy the .winmd and .pri files to Output lib winrt -->
    <Copy Condition="'$(Configuration)'=='Release'"
          SourceFiles="@(NugetInputFiles)" ContinueOnError="true"
          DestinationFolder="$(NugetOutputDirLibWinRT)" />

    <!-- Launch nuget.exe pack -->
    <Exec Condition="'$(Configuration)'=='Release'"
          WorkingDirectory="$(NugetOutputDir)"
          Command="%22$(NugetCommandLine)%22 pack $(ProjectName).nuspec" >
    </Exec>

    <!-- Copy the .nupkg to the local repository -->
    <Copy Condition="'$(Configuration)'=='Release'"
          SourceFiles="@(NugetPkgFileOutput)" ContinueOnError="true"
          DestinationFiles="@(NugetPkgFileOutput->'$(NugetRepositoryDir)%(Filename)%(Extension)')" />

  </Target>
C++/CX WinRT Component
Here things get a little bit more complicated :)
When you create un WinRT C++/Cx component, the compilation process will generate lot of files, and especially .winmd file and also a .dll file.
In Visual Studio, only the .winmd can be added as a reference. Visual Studio doesn’t allow you to add the .dll as reference.
I have create a simple C++/CX project, and here is the bin/release folder after a first compilation:

What is important here :
- WinRTMobSCx.dll : This file contains the native code. It must be in the Output folder of your project because it contains your code. Dont forget, you can’t add it as a reference in VS.
- WinRTMobSCx.winmd : This file contains the metadatas of you .dll. This file is the file required by Visual Studio as the reference.
- WinRTMobSCx.pri : This file contains the localization resources.
Managing .winmd and .dll files
First try, we create the .nupkg package, without changing anything.
Here is my Nuget working directory:
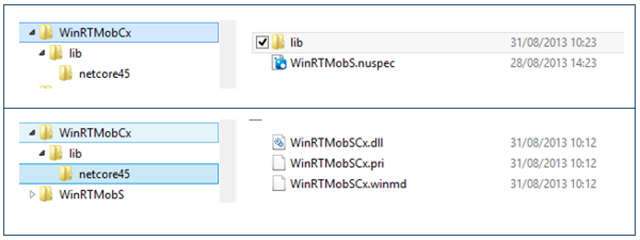
And my .nuspec config file:
 <?xml version="1.0" encoding="utf-8"?>
<package xmlns="https://schemas.microsoft.com/packaging/2010/07/nuspec.xsd">
    <metadata>
        <id>WinRTMobCx</id>
        <version>1.0.0</version>
        <authors>Sébastien Pertus</authors>
        <owners>Sébastien Pertus</owners>
        <requireLicenseAcceptance>false</requireLicenseAcceptance>
        <description>Simple WinRT C++/Cx component</description>
    </metadata>
</package>
And finally, the exec code :
 "C:\Program Files (x86)\NuGet\nuget.exe"
pack "C:\Users\spertus\Documents\Projects\WIN 8\DeployingWithNuget\Nuget\WinRTMobCx\WinRTMobS.nuspec"
-OutputDirectory "C:\Users\spertus\Documents\Projects\WIN 8\DeployingWithNuget\Nuget\WinRTMobCx
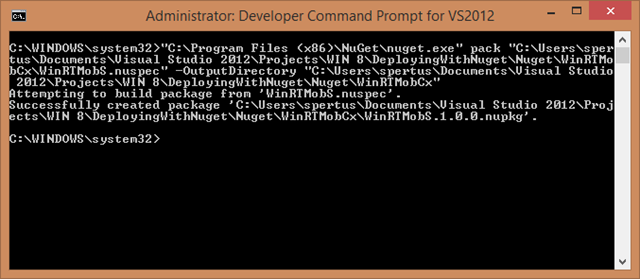
I copy the package in my local repository and test it :

Hum.. Not very successful… Lets give a try with –Verbose:
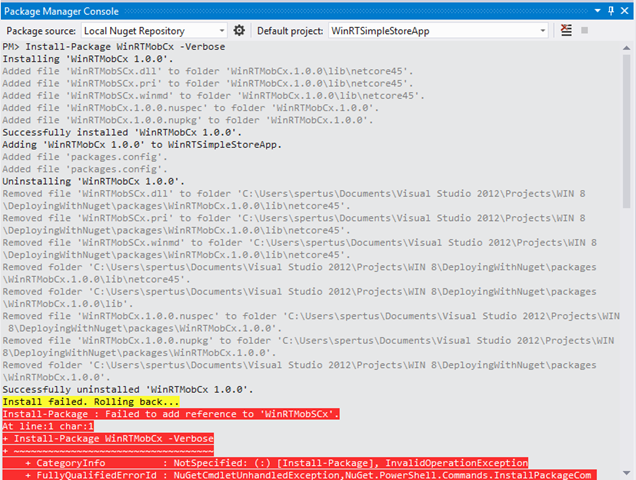
So What can we do ?
You may know something very important with Nuget and the /lib folder :
All the files in the /lib directory will be added as assembly references in Visual Studio. Actually we have .winmd and .dll in our Nuget package /lib directory !
The most simple solution is to complete the .nuspec file to specify only the files to be added as references.
To achieve this, we will use the <references> xml element in the .nuspec file. Don’t forget to check the official documentation about it : nuspec-reference.
From here, only the files referenced in the .nuspec will be added as assembly reference in Visual Studio. Hopefully, on the other side, all the /lib files will continue to be copied in the Output directory !
Here is my modified .nuspec file :
 <?xml version="1.0" encoding="utf-8"?>
<package xmlns="https://schemas.microsoft.com/packaging/2011/08/nuspec.xsd">
    <metadata>
        <id>WinRTMobCx</id>
        <version>1.0.0</version>
        <authors>Sébastien Pertus</authors>
        <owners>Sébastien Pertus</owners>
        <requireLicenseAcceptance>false</requireLicenseAcceptance>
        <description>Simple WinRT C++/Cx component</description>
        <references>
            <reference file="WinRTMobSCx.winmd" />
        </references>
    </metadata>
</package>
From now, your package will work as expected !

And my output directory, after a first compilation of my project, which contains all the required files ( .winmd, .dll, .pri) :
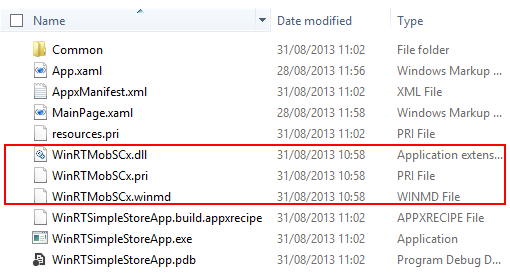
To be honest, your package works.. at least in x86 mode. But what happen if we try to focus ARM mode ?
x86, x64 and ARM ?
Here is the Visual Studio error, if you try a compilation “as is” in ARM mode :

There was a mismatch between the processor architecture of the project being built "ARM" and the processor architecture, "x86", of the implementation file "…\WinRTMobSCx.dll" for "…\WinRTMobSCx.winmd". This mismatch may cause runtime failures.
(Yes, when I copy/paste an error message, my english is pretty good ;) )
At this point, our component is not compatible with ARM. We will modify our package generation to handle both x86, x64 and ARM.
To be clear, there is no “out of the box” solution with Nuget to correct this problem. At lease, we have some tools to help us !
Especially, Nuget provides a new folder “ /build” (introduced with the 2.5 Nuget version)
First of all (and because it’s very simple) we will add a minimum version requirement in the .nuspec header :
minClientVersion="2.5"
By the way, you can add in the /build folder 2 very important files :
- A .props file : This file will be added in your .csproj at the beginning of the document.
- A .targets file : This file will be added in your .csproj at the end of the document.
Those two files must contains, at least :
 <?xml version="1.0" encoding="utf-8"?>
<Project ToolsVersion="4.0" xmlns="https://schemas.microsoft.com/developer/msbuild/2003">

</Project>
Here is my working folder :
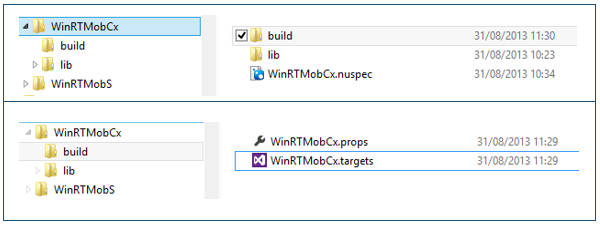
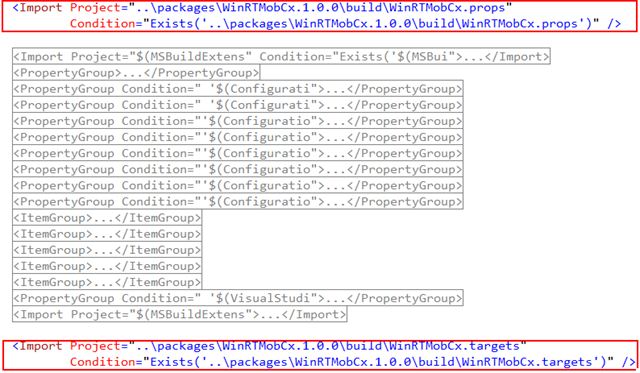
Without doing anything, just because we have added this folder and those 2 files, here is the .csproj after adding the Nuget package in the project :
Now, we can modify our package construction to handle x86, x64 and ARM :
- We need to include all the versioned files (.pri, .winmd, .dll)
- We create 3 folders in the /build directory : /build/x86, /build/x64 and /build/ARM.
- We add in each folder the required files.
- We continue to use the /lib folder and we add the x86 files : this will allow Visual Studio to work correctly in design mode.
Note : Obviously, you have noticed that we will copy the x86 files twice. To be honest, we can skip this redundancy, but to be clear and simple in this article, we won’t do an exception for x86.
Here is a screenshot of my final directory tree :
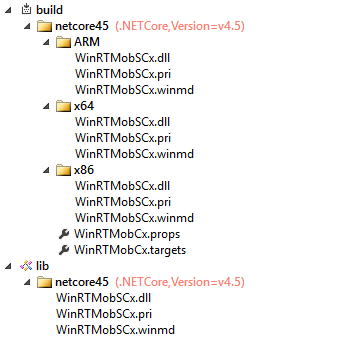
We will edit the WinRTMobCx.targets file and take advantage of a “conditional” compilation :
We need to “override” the default path of the assemblies used in the Reference node, when we are in both x86, x64 or ARM mode. We take the opportunity to make a control of the current mode to prevent the user of making a compilation in AnyCPU mode :
 <?xml version="1.0" encoding="utf-8"?>
<Project ToolsVersion="4.0" xmlns="https://schemas.microsoft.com/developer/msbuild/2003">

  <Target Name="PlatformCheck" BeforeTargets="InjectReference"
    Condition=" ( ('$(Platform)' != 'x86') AND ('$(Platform)' != 'ARM') AND  ('$(Platform)' != 'x64') )">
    <Error  Text="$(MSBuildThisFileName) does not work correctly on '$(Platform)'
                     platform. You need to specify platform (x86 / x64 or ARM)." />
  </Target>

  <Target Name="InjectReference" BeforeTargets="ResolveAssemblyReferences">

    <ItemGroup Condition=" '$(Platform)' == 'x86' or '$(Platform)' == 'x64' or '$(Platform)' == 'ARM'">
      <Reference Include="WinRTMobSCx">
        <HintPath>$(MSBuildThisFileDirectory)$(Platform)\WinRTMobSCx.winmd</HintPath>
      </Reference>
    </ItemGroup>

  </Target>
</Project>
Here is a final screenshot, during a compilation in –Verbose mode, where we can see than the HintPath property is overrided :
You Nuget package is ready to be deployed !
Happy coding
Comments
Anonymous
September 05, 2013
So can you use BOTH .targets files and use the new "References" in a package. Documentation states it looks in the Lib folder but the second method you mention has Dll's and such in the build folder.Anonymous
October 09, 2015
The comment has been removed


