HTTP işleyicilerini ve modüllerini ASP.NET Core ara yazılımına geçirme
Bu makalede, mevcut ASP.NET HTTP modüllerini ve işleyicilerini system.webserver'dan ASP.NET Core ara yazılımına geçirme işlemi gösterilmektedir.
Modüller ve işleyiciler yeniden ziyaret edildi
ASP.NET Core ara yazılımına geçmeden önce HTTP modüllerinin ve işleyicilerinin nasıl çalıştığını özetleyelim:
İşleyiciler şunlardır:
Uygulayan sınıflar IHttpHandler
.report gibi belirli bir dosya adına veya uzantısına sahip istekleri işlemek için kullanılır
Modüller şunlardır:
Uygulayan sınıflar IHttpModule
Her istek için çağrılır
Kısa devre yapabilen (isteğin daha fazla işlenmesini durdurabilen)
HTTP yanıtına ekleme yapabilir veya kendi yanıtlarını oluşturabilir
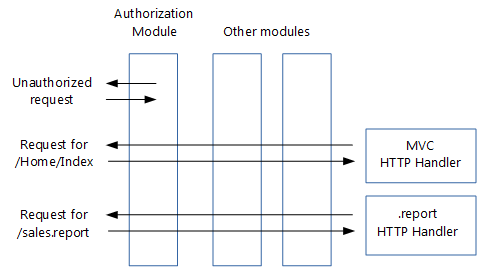
Modüllerin gelen istekleri işleme sırası şu şekilde belirlenir:
ve AuthenticateRequestgibi BeginRequest ASP.NET tarafından tetiklenen bir dizi olayı. Tam liste için bkz System.Web.HttpApplication. . Her modül bir veya daha fazla olay için bir işleyici oluşturabilir.
Aynı olay için, Web.config'de yapılandırıldıkları sıra.
Modüllere ek olarak, dosyanıza Global.asax.cs yaşam döngüsü olayları için işleyiciler ekleyebilirsiniz. Bu işleyiciler, yapılandırılan modüllerdeki işleyicilerden sonra çalışır.
İşleyicilerden ve modüllerden ara yazılıma
Ara yazılım, HTTP modüllerinden ve işleyicilerinden daha basittir:
Modüller, işleyiciler,
Global.asax.cs, Web.config (IIS yapılandırması hariç) ve uygulama yaşam döngüsü yokHem modüllerin hem de işleyicilerin rolleri ara yazılım tarafından devralındı
Ara yazılım Web.config yerine kod kullanılarak yapılandırılır
- İşlem hattı dallanma , yalnızca URL'ye değil, aynı zamanda istek üst bilgilerine, sorgu dizelerine vb. göre belirli ara yazılımlara istek göndermenizi sağlar.
- İşlem hattı dallanma , yalnızca URL'ye değil, aynı zamanda istek üst bilgilerine, sorgu dizelerine vb. göre belirli ara yazılımlara istek göndermenizi sağlar.
Ara yazılım modüllere çok benzer:
Her istek için ilke olarak çağrılır
İsteği bir sonraki ara yazılıma geçirmeyerek isteği kısa devredebiliyor
Kendi HTTP yanıtlarını oluşturabiliyor
Ara yazılım ve modüller farklı bir sırayla işlenir:
Ara yazılım sırası, istek işlem hattına eklenme sırasına göre, modüllerin sırası ise esas olarak olaylara System.Web.HttpApplication dayanır.
Yanıtlar için ara yazılım sırası istekler için bunun tersidir, modül sırası ise istekler ve yanıtlar için aynıdır
Bkz . IApplicationBuilder ile ara yazılım işlem hattı oluşturma
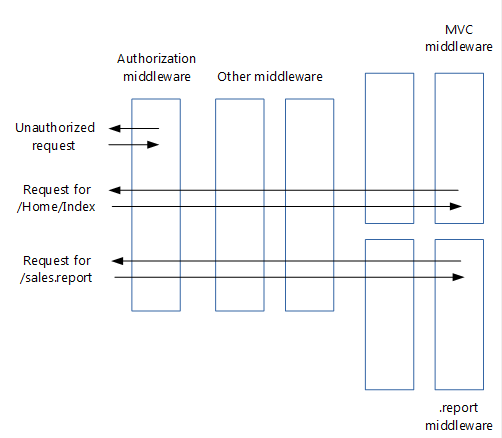
Yukarıdaki görüntüde, kimlik doğrulama ara yazılımının isteği nasıl kısa devrede ayarlamış olduğunu unutmayın.
Modül kodunu ara yazılıma geçirme
Mevcut bir HTTP modülü şuna benzer olacaktır:
// ASP.NET 4 module

using System;
using System.Web;

namespace MyApp.Modules
{
    public class MyModule : IHttpModule
    {
        public void Dispose()
        {
        }

        public void Init(HttpApplication application)
        {
            application.BeginRequest += (new EventHandler(this.Application_BeginRequest));
            application.EndRequest += (new EventHandler(this.Application_EndRequest));
        }

        private void Application_BeginRequest(Object source, EventArgs e)
        {
            HttpContext context = ((HttpApplication)source).Context;

            // Do something with context near the beginning of request processing.
        }

        private void Application_EndRequest(Object source, EventArgs e)
        {
            HttpContext context = ((HttpApplication)source).Context;

            // Do something with context near the end of request processing.
        }
    }
}
Ara Yazılım sayfasında gösterildiği gibi, ASP.NET Core ara yazılımı bir alan HttpContext ve döndüren bir Invoke yöntemi kullanıma sunan bir Tasksınıftır. Yeni ara yazılımınız şöyle görünür:
// ASP.NET Core middleware

using Microsoft.AspNetCore.Builder;
using Microsoft.AspNetCore.Http;
using System.Threading.Tasks;

namespace MyApp.Middleware
{
    public class MyMiddleware
    {
        private readonly RequestDelegate _next;

        public MyMiddleware(RequestDelegate next)
        {
            _next = next;
        }

        public async Task Invoke(HttpContext context)
        {
            // Do something with context near the beginning of request processing.

            await _next.Invoke(context);

            // Clean up.
        }
    }

    public static class MyMiddlewareExtensions
    {
        public static IApplicationBuilder UseMyMiddleware(this IApplicationBuilder builder)
        {
            return builder.UseMiddleware<MyMiddleware>();
        }
    }
}
Önceki ara yazılım şablonu, ara yazılım yazma bölümünden alınmıştır.
MyMiddlewareExtensions yardımcı sınıfı, sınıfınızda ara yazılımınızı Startup yapılandırmayı kolaylaştırır. yöntemi, UseMyMiddleware ara yazılım sınıfınızı istek işlem hattına ekler. Ara yazılım için gereken hizmetler ara yazılımının oluşturucusunda eklenmiştir.
Modülünüz, örneğin kullanıcı yetkili değilse bir isteği sonlandırabilir:
// ASP.NET 4 module that may terminate the request

private void Application_BeginRequest(Object source, EventArgs e)
{
    HttpContext context = ((HttpApplication)source).Context;

    // Do something with context near the beginning of request processing.

    if (TerminateRequest())
    {
        context.Response.End();
        return;
    }
}
Ara yazılım, işlem hattındaki sonraki ara yazılımı çağırmayarak Invoke bunu işler. Yanıt işlem hattından geri döndüğünde önceki ara yazılımların çağrılmaya devam edeceğinden, bunun isteği tam olarak sonlandırmadığını unutmayın.
// ASP.NET Core middleware that may terminate the request

public async Task Invoke(HttpContext context)
{
    // Do something with context near the beginning of request processing.

    if (!TerminateRequest())
        await _next.Invoke(context);

    // Clean up.
}
Modülünüzün işlevselliğini yeni ara yazılımınıza geçirirken, sınıfı ASP.NET Core'da önemli ölçüde değiştiğinden kodunuzun HttpContext derlenmiyor olduğunu fark edebilirsiniz. Daha sonra yeni ASP.NET Core HttpContext'e nasıl geçiş yapacağınızı göreceksiniz.
Modül eklemeyi istek işlem hattına geçirme
HTTP modülleri genellikle Web.config kullanılarak istek işlem hattına eklenir:
<?xml version="1.0" encoding="utf-8"?>
<!--ASP.NET 4 web.config-->
<configuration>
  <system.webServer>
    <modules>
      <add name="MyModule" type="MyApp.Modules.MyModule"/>
    </modules>
  </system.webServer>
</configuration>
Sınıfınızdaki istek işlem hattına yeni ara yazılımınızı Startup ekleyerek bunu dönüştürün:
public void Configure(IApplicationBuilder app, IHostingEnvironment env, ILoggerFactory loggerFactory)
{
    loggerFactory.AddConsole(Configuration.GetSection("Logging"));
    loggerFactory.AddDebug();

    if (env.IsDevelopment())
    {
        app.UseDeveloperExceptionPage();
        app.UseBrowserLink();
    }
    else
    {
        app.UseExceptionHandler("/Home/Error");
    }

    app.UseMyMiddleware();

    app.UseMyMiddlewareWithParams();

    var myMiddlewareOptions = Configuration.GetSection("MyMiddlewareOptionsSection").Get<MyMiddlewareOptions>();
    var myMiddlewareOptions2 = Configuration.GetSection("MyMiddlewareOptionsSection2").Get<MyMiddlewareOptions>();
    app.UseMyMiddlewareWithParams(myMiddlewareOptions);
    app.UseMyMiddlewareWithParams(myMiddlewareOptions2);

    app.UseMyTerminatingMiddleware();

    // Create branch to the MyHandlerMiddleware.
    // All requests ending in .report will follow this branch.
    app.MapWhen(
        context => context.Request.Path.ToString().EndsWith(".report"),
        appBranch => {
            // ... optionally add more middleware to this branch
            appBranch.UseMyHandler();
        });

    app.MapWhen(
        context => context.Request.Path.ToString().EndsWith(".context"),
        appBranch => {
            appBranch.UseHttpContextDemoMiddleware();
        });

    app.UseStaticFiles();

    app.UseMvc(routes =>
    {
        routes.MapRoute(
            name: "default",
            template: "{controller=Home}/{action=Index}/{id?}");
    });
}
Yeni ara yazılımınızı eklediğiniz işlem hattındaki tam nokta, modül (BeginRequest, EndRequestvb.) olarak işlediği olaya ve Web.config'deki modüller listenizdeki sırasına bağlıdır.
Daha önce belirtildiği gibi, ASP.NET Core'da uygulama yaşam döngüsü yoktur ve yanıtların ara yazılım tarafından işlenme sırası modüller tarafından kullanılan sıraylan farklıdır. Bu, sipariş kararınızı daha zor hale getirebilir.
Sıralama bir sorun haline gelirse modülünüzü bağımsız olarak sıralanabilir birden çok ara yazılım bileşenine bölebilirsiniz.
İşleyici kodunu ara yazılıma geçirme
HTTP işleyicisi şuna benzer:
// ASP.NET 4 handler

using System.Web;

namespace MyApp.HttpHandlers
{
    public class MyHandler : IHttpHandler
    {
        public bool IsReusable { get { return true; } }

        public void ProcessRequest(HttpContext context)
        {
            string response = GenerateResponse(context);

            context.Response.ContentType = GetContentType();
            context.Response.Output.Write(response);
        }

        // ...

        private string GenerateResponse(HttpContext context)
        {
            string title = context.Request.QueryString["title"];
            return string.Format("Title of the report: {0}", title);
        }

        private string GetContentType()
        {
            return "text/plain";
        }
    }
}
ASP.NET Core projenizde bunu şuna benzer bir ara yazılıma çevirebilirsiniz:
// ASP.NET Core middleware migrated from a handler

using Microsoft.AspNetCore.Builder;
using Microsoft.AspNetCore.Http;
using System.Threading.Tasks;

namespace MyApp.Middleware
{
    public class MyHandlerMiddleware
    {

        // Must have constructor with this signature, otherwise exception at run time
        public MyHandlerMiddleware(RequestDelegate next)
        {
            // This is an HTTP Handler, so no need to store next
        }

        public async Task Invoke(HttpContext context)
        {
            string response = GenerateResponse(context);

            context.Response.ContentType = GetContentType();
            await context.Response.WriteAsync(response);
        }

        // ...

        private string GenerateResponse(HttpContext context)
        {
            string title = context.Request.Query["title"];
            return string.Format("Title of the report: {0}", title);
        }

        private string GetContentType()
        {
            return "text/plain";
        }
    }

    public static class MyHandlerExtensions
    {
        public static IApplicationBuilder UseMyHandler(this IApplicationBuilder builder)
        {
            return builder.UseMiddleware<MyHandlerMiddleware>();
        }
    }
}
Bu ara yazılım, modüllere karşılık gelen ara yazılıma çok benzer. Tek gerçek fark, burada çağrısı _next.Invoke(context)olmamasıdır. bu mantıklıdır, çünkü işleyici istek işlem hattının sonundadır, bu nedenle çağırılacak bir sonraki ara yazılım olmayacaktır.
İşleyici eklemeyi istek işlem hattına geçirme
HTTP işleyicisini yapılandırma Işlemi Web.config içinde yapılır ve şuna benzer:
<?xml version="1.0" encoding="utf-8"?>
<!--ASP.NET 4 web.config-->
<configuration>
  <system.webServer>
    <handlers>
      <add name="MyHandler" verb="*" path="*.report" type="MyApp.HttpHandlers.MyHandler" resourceType="Unspecified" preCondition="integratedMode"/>
    </handlers>
  </system.webServer>
</configuration>
Bunu, yeni işleyici ara yazılımınızı modüllerden dönüştürülen ara yazılıma benzer şekilde sınıfınızdaki Startup istek işlem hattına ekleyerek dönüştürebilirsiniz. Bu yaklaşımın sorunu, tüm istekleri yeni işleyici ara yazılımınıza göndermesidir. Ancak, yalnızca belirli bir uzantıya sahip isteklerin ara yazılımınıza ulaşmasını istersiniz. Bu, HTTP işleyicinizle sahip olduğunuz işlevlerin aynısını sağlar.
Çözümlerden biri, uzantı yöntemini kullanarak belirli bir uzantıya sahip istekler için işlem hattını dallara ayırmaktır MapWhen . Bunu Configure , diğer ara yazılımı eklediğiniz yöntemde yaparsınız:
public void Configure(IApplicationBuilder app, IHostingEnvironment env, ILoggerFactory loggerFactory)
{
    loggerFactory.AddConsole(Configuration.GetSection("Logging"));
    loggerFactory.AddDebug();

    if (env.IsDevelopment())
    {
        app.UseDeveloperExceptionPage();
        app.UseBrowserLink();
    }
    else
    {
        app.UseExceptionHandler("/Home/Error");
    }

    app.UseMyMiddleware();

    app.UseMyMiddlewareWithParams();

    var myMiddlewareOptions = Configuration.GetSection("MyMiddlewareOptionsSection").Get<MyMiddlewareOptions>();
    var myMiddlewareOptions2 = Configuration.GetSection("MyMiddlewareOptionsSection2").Get<MyMiddlewareOptions>();
    app.UseMyMiddlewareWithParams(myMiddlewareOptions);
    app.UseMyMiddlewareWithParams(myMiddlewareOptions2);

    app.UseMyTerminatingMiddleware();

    // Create branch to the MyHandlerMiddleware.
    // All requests ending in .report will follow this branch.
    app.MapWhen(
        context => context.Request.Path.ToString().EndsWith(".report"),
        appBranch => {
            // ... optionally add more middleware to this branch
            appBranch.UseMyHandler();
        });

    app.MapWhen(
        context => context.Request.Path.ToString().EndsWith(".context"),
        appBranch => {
            appBranch.UseHttpContextDemoMiddleware();
        });

    app.UseStaticFiles();

    app.UseMvc(routes =>
    {
        routes.MapRoute(
            name: "default",
            template: "{controller=Home}/{action=Index}/{id?}");
    });
}
MapWhen şu parametreleri alır:
İsteğin daldan
HttpContextaşağı inmesi gerekiyorsa öğesini alan ve döndürentruebir lambda. Bu, istekleri yalnızca uzantılarına değil, istek üst bilgilerine, sorgu dizesi parametrelerine vb. göre dallayabileceğiniz anlamına gelir.bir alan ve dal için tüm ara yazılımı ekleyen bir
IApplicationBuilderlambda. Bu, işleyici ara yazılımınızın önündeki dala ek ara yazılım ekleyebileceğiniz anlamına gelir.
Tüm isteklerde dal çağrılmadan önce işlem hattına eklenen ara yazılım; dalın bunlar üzerinde hiçbir etkisi olmayacaktır.
Seçenekler desenini kullanarak ara yazılım seçeneklerini yükleme
Bazı modüller ve işleyiciler Web.config içinde depolanan yapılandırma seçeneklerine sahiptir. Ancak ASP.NET Core'da Web.config yerine yeni bir yapılandırma modeli kullanılır.
Yeni yapılandırma sistemi bunu çözmek için size şu seçenekleri sunar:
Sonraki bölümde gösterildiği gibi seçenekleri doğrudan ara yazılıma ekler.
Ara yazılım seçeneklerinizi barındırmak için bir sınıf oluşturun, örneğin:
public class MyMiddlewareOptions
{
    public string Param1 { get; set; }
    public string Param2 { get; set; }
}
Seçenek değerlerini depolama
Yapılandırma sistemi, seçenek değerlerini istediğiniz yerde depolamanıza olanak tanır. Ancak çoğu site kullanır
appsettings.json, bu nedenle bu yaklaşımı kullanacağız:{ "MyMiddlewareOptionsSection": { "Param1": "Param1Value", "Param2": "Param2Value" } }MyMiddlewareOptionsSection burada bir bölüm adı verilmiştir. Seçenekler sınıfınızın adıyla aynı olması gerekmez.
Seçenek değerlerini options sınıfıyla ilişkilendirme
Seçenekler düzeni, ASP.NET Core'un bağımlılık ekleme çerçevesini kullanarak seçenekler türünü (örneğin
MyMiddlewareOptions) gerçek seçeneklere sahip birMyMiddlewareOptionsnesneyle ilişkilendirir.Sınıfınızı güncelleştirin
Startup:kullanıyorsanız
appsettings.jsonoluşturucudaki yapılandırma oluşturucusununStartupiçine ekleyin:public Startup(IHostingEnvironment env) { var builder = new ConfigurationBuilder() .SetBasePath(env.ContentRootPath) .AddJsonFile("appsettings.json", optional: true, reloadOnChange: true) .AddJsonFile($"appsettings.{env.EnvironmentName}.json", optional: true) .AddEnvironmentVariables(); Configuration = builder.Build(); }Seçenekler hizmetini yapılandırın:
public void ConfigureServices(IServiceCollection services)
{
    // Setup options service
    services.AddOptions();

    // Load options from section "MyMiddlewareOptionsSection"
    services.Configure<MyMiddlewareOptions>(
        Configuration.GetSection("MyMiddlewareOptionsSection"));

    // Add framework services.
    services.AddMvc();
}
Seçeneklerinizi seçenekler sınıfınızla ilişkilendirin:
public void ConfigureServices(IServiceCollection services)
{
    // Setup options service
    services.AddOptions();

    // Load options from section "MyMiddlewareOptionsSection"
    services.Configure<MyMiddlewareOptions>(
        Configuration.GetSection("MyMiddlewareOptionsSection"));

    // Add framework services.
    services.AddMvc();
}
Seçenekleri ara yazılım oluşturucunuza ekleme. Bu, bir denetleyiciye seçenek eklemeye benzer.
public class MyMiddlewareWithParams
{
    private readonly RequestDelegate _next;
    private readonly MyMiddlewareOptions _myMiddlewareOptions;

    public MyMiddlewareWithParams(RequestDelegate next,
        IOptions<MyMiddlewareOptions> optionsAccessor)
    {
        _next = next;
        _myMiddlewareOptions = optionsAccessor.Value;
    }

    public async Task Invoke(HttpContext context)
    {
        // Do something with context near the beginning of request processing
        // using configuration in _myMiddlewareOptions

        await _next.Invoke(context);

        // Do something with context near the end of request processing
        // using configuration in _myMiddlewareOptions
    }
}
Ara yazılımınızı
IApplicationBuilderöğesine ekleyen UseMiddleware uzantısı yöntemi bağımlılık ekleme işlemini üstlenir.Bu, nesnelerle
IOptionssınırlı değildir. Ara yazılımınızın gerektirdiği diğer tüm nesneler bu şekilde eklenebilir.
Doğrudan ekleme yoluyla ara yazılım seçeneklerini yükleme
Seçenekler deseni, seçenek değerleriyle tüketicileri arasında gevşek bağlantı oluşturma avantajına sahiptir. Bir seçenek sınıfını gerçek seçenekler değerleriyle ilişkilendirdikten sonra, bağımlılık ekleme çerçevesi aracılığıyla diğer tüm sınıflar seçeneklere erişebilir. Seçenek değerlerini geçirmeye gerek yoktur.
Ancak aynı ara yazılımı farklı seçeneklerle iki kez kullanmak istiyorsanız bu durum bozulur. Örneğin, farklı dallarda kullanılan ve farklı rollere izin veren bir yetkilendirme ara yazılımı. İki farklı seçenek nesnesini tek seçenek sınıfıyla ilişkilendiremezsiniz.
Çözüm, sınıfınızdaki gerçek seçenek değerlerine sahip seçenekler nesnelerini almak ve bunları doğrudan ara yazılımınızın Startup her örneğine geçirmektir.
İkinci bir anahtar ekleme
appsettings.jsonDosyaya ikinci bir seçenek kümesi eklemek için
appsettings.json, dosyayı benzersiz bir şekilde tanımlamak için yeni bir anahtar kullanın:{ "MyMiddlewareOptionsSection2": { "Param1": "Param1Value2", "Param2": "Param2Value2" }, "MyMiddlewareOptionsSection": { "Param1": "Param1Value", "Param2": "Param2Value" } }Seçenek değerlerini alın ve ara yazılıma geçirin.
Use...Uzantı yöntemi (ara yazılımınızı işlem hattına ekler) seçenek değerlerini geçirmek için mantıksal bir yerdir:public void Configure(IApplicationBuilder app, IHostingEnvironment env, ILoggerFactory loggerFactory) { loggerFactory.AddConsole(Configuration.GetSection("Logging")); loggerFactory.AddDebug(); if (env.IsDevelopment()) { app.UseDeveloperExceptionPage(); app.UseBrowserLink(); } else { app.UseExceptionHandler("/Home/Error"); } app.UseMyMiddleware(); app.UseMyMiddlewareWithParams(); var myMiddlewareOptions = Configuration.GetSection("MyMiddlewareOptionsSection").Get<MyMiddlewareOptions>(); var myMiddlewareOptions2 = Configuration.GetSection("MyMiddlewareOptionsSection2").Get<MyMiddlewareOptions>(); app.UseMyMiddlewareWithParams(myMiddlewareOptions); app.UseMyMiddlewareWithParams(myMiddlewareOptions2); app.UseMyTerminatingMiddleware(); // Create branch to the MyHandlerMiddleware. // All requests ending in .report will follow this branch. app.MapWhen( context => context.Request.Path.ToString().EndsWith(".report"), appBranch => { // ... optionally add more middleware to this branch appBranch.UseMyHandler(); }); app.MapWhen( context => context.Request.Path.ToString().EndsWith(".context"), appBranch => { appBranch.UseHttpContextDemoMiddleware(); }); app.UseStaticFiles(); app.UseMvc(routes => { routes.MapRoute( name: "default", template: "{controller=Home}/{action=Index}/{id?}"); }); }Bir seçenekler parametresi almak için ara yazılımı etkinleştirin. Uzantı yönteminin aşırı yüklemesini
Use...sağlayın (options parametresini alır ve bunu öğesineUseMiddlewaregeçirir). parametrelerle çağrıldığındaUseMiddleware, ara yazılım nesnesinin örneğini oluşturduğunda parametreleri ara yazılım oluşturucunuza geçirir.public static class MyMiddlewareWithParamsExtensions { public static IApplicationBuilder UseMyMiddlewareWithParams( this IApplicationBuilder builder) { return builder.UseMiddleware<MyMiddlewareWithParams>(); } public static IApplicationBuilder UseMyMiddlewareWithParams( this IApplicationBuilder builder, MyMiddlewareOptions myMiddlewareOptions) { return builder.UseMiddleware<MyMiddlewareWithParams>( new OptionsWrapper<MyMiddlewareOptions>(myMiddlewareOptions)); } }Bunun seçenekler nesnesini bir
OptionsWrappernesneye nasıl sarmalaya dikkat edin. Bu, ara yazılım oluşturucu tarafından beklendiği gibi uygularIOptions.
Yeni HttpContext'e geçiş
Daha önce, ara yazılımınızdaki yönteminin Invoke türünde HttpContextbir parametre aldığını gördünüz:
public async Task Invoke(HttpContext context)
HttpContext ASP.NET Core'da önemli ölçüde değişti. Bu bölümde, en yaygın kullanılan özelliklerinin System.Web.HttpContext yeni Microsoft.AspNetCore.Http.HttpContextöğesine nasıl çevrildiği gösterilir.
HttpContext
HttpContext.Items şu şekilde çevrilir:
IDictionary<object, object> items = httpContext.Items;
Benzersiz istek kimliği (System.Web.HttpContext karşılığı yok)
Her istek için size benzersiz bir kimlik verir. Günlüklerinize eklemek için çok kullanışlıdır.
string requestId = httpContext.TraceIdentifier;
HttpContext.Request
HttpContext.Request.HttpMethod şu şekilde çevrilir:
string httpMethod = httpContext.Request.Method;
HttpContext.Request.QueryString şu şekilde çevrilir:
IQueryCollection queryParameters = httpContext.Request.Query;

// If no query parameter "key" used, values will have 0 items
// If single value used for a key (...?key=v1), values will have 1 item ("v1")
// If key has multiple values (...?key=v1&key=v2), values will have 2 items ("v1" and "v2")
IList<string> values = queryParameters["key"];

// If no query parameter "key" used, value will be ""
// If single value used for a key (...?key=v1), value will be "v1"
// If key has multiple values (...?key=v1&key=v2), value will be "v1,v2"
string value = queryParameters["key"].ToString();
HttpContext.Request.Url ve HttpContext.Request.RawUrl şu şekilde çevrilir:
// using Microsoft.AspNetCore.Http.Extensions;
var url = httpContext.Request.GetDisplayUrl();
HttpContext.Request.IsSecureConnection şu şekilde çevrilir:
var isSecureConnection = httpContext.Request.IsHttps;
HttpContext.Request.UserHostAddress şu şekilde çevrilir:
var userHostAddress = httpContext.Connection.RemoteIpAddress?.ToString();
HttpContext.Request.Cookies şu şekilde çevrilir:
IRequestCookieCollection cookies = httpContext.Request.Cookies;
string unknownCookieValue = cookies["unknownCookie"]; // will be null (no exception)
string knownCookieValue = cookies["cookie1name"];     // will be actual value
HttpContext.Request.RequestContext.RouteData şu şekilde çevrilir:
var routeValue = httpContext.GetRouteValue("key");
HttpContext.Request.Headers şu şekilde çevrilir:
// using Microsoft.AspNetCore.Http.Headers;
// using Microsoft.Net.Http.Headers;

IHeaderDictionary headersDictionary = httpContext.Request.Headers;

// GetTypedHeaders extension method provides strongly typed access to many headers
var requestHeaders = httpContext.Request.GetTypedHeaders();
CacheControlHeaderValue cacheControlHeaderValue = requestHeaders.CacheControl;

// For unknown header, unknownheaderValues has zero items and unknownheaderValue is ""
IList<string> unknownheaderValues = headersDictionary["unknownheader"];
string unknownheaderValue = headersDictionary["unknownheader"].ToString();

// For known header, knownheaderValues has 1 item and knownheaderValue is the value
IList<string> knownheaderValues = headersDictionary[HeaderNames.AcceptLanguage];
string knownheaderValue = headersDictionary[HeaderNames.AcceptLanguage].ToString();
HttpContext.Request.UserAgent şu şekilde çevrilir:
string userAgent = headersDictionary[HeaderNames.UserAgent].ToString();
HttpContext.Request.UrlReferrer şu şekilde çevrilir :
string urlReferrer = headersDictionary[HeaderNames.Referer].ToString();
HttpContext.Request.ContentType şu şekilde çevrilir:
// using Microsoft.Net.Http.Headers;

MediaTypeHeaderValue mediaHeaderValue = requestHeaders.ContentType;
string contentType = mediaHeaderValue?.MediaType.ToString();   // ex. application/x-www-form-urlencoded
string contentMainType = mediaHeaderValue?.Type.ToString();    // ex. application
string contentSubType = mediaHeaderValue?.SubType.ToString();  // ex. x-www-form-urlencoded

System.Text.Encoding requestEncoding = mediaHeaderValue?.Encoding;
HttpContext.Request.Form şu şekilde çevrilir:
if (httpContext.Request.HasFormContentType)
{
    IFormCollection form;

    form = httpContext.Request.Form; // sync
    // Or
    form = await httpContext.Request.ReadFormAsync(); // async

    string firstName = form["firstname"];
    string lastName = form["lastname"];
}
Uyarı
Form değerlerini yalnızca içerik alt türü x-www-form-urlencoded veya form-data ise okuyun.
HttpContext.Request.InputStream şu şekilde çevrilir:
string inputBody;
using (var reader = new System.IO.StreamReader(
    httpContext.Request.Body, System.Text.Encoding.UTF8))
{
    inputBody = reader.ReadToEnd();
}
Uyarı
Bu kodu yalnızca bir işleyici türü ara yazılımında, işlem hattının sonunda kullanın.
Ham gövdeyi yukarıda gösterildiği gibi istek başına yalnızca bir kez okuyabilirsiniz. İlk okumadan sonra gövdeyi okumaya çalışan ara yazılım boş bir gövdeyi okur.
Bu, daha önce gösterildiği gibi formu okumak için geçerli değildir, çünkü bu bir arabellekten yapılır.
HttpContext.Response
HttpContext.Response.Status ve HttpContext.Response.StatusDescription şu şekilde çevrilir:
// using Microsoft.AspNetCore.Http;
httpContext.Response.StatusCode = StatusCodes.Status200OK;
HttpContext.Response.ContentEncoding ve HttpContext.Response.ContentType şu şekilde çevrilir:
// using Microsoft.Net.Http.Headers;
var mediaType = new MediaTypeHeaderValue("application/json");
mediaType.Encoding = System.Text.Encoding.UTF8;
httpContext.Response.ContentType = mediaType.ToString();
HttpContext.Response.ContentType kendi başına da şu şekilde çevrilir:
httpContext.Response.ContentType = "text/html";
HttpContext.Response.Output şu şekilde çevrilir:
string responseContent = GetResponseContent();
await httpContext.Response.WriteAsync(responseContent);
HttpContext.Response.TransmitFile
Dosya sunma konusu, ASP.NET Core'daki İstek Özellikleri bölümünde ele alınmıştı.
HttpContext.Response.Headers
Yanıt üst bilgilerinin gönderilmesi, yanıt gövdesine herhangi bir şey yazıldıktan sonra bunları ayarlarsanız gönderilmemeleri nedeniyle karmaşıktır.
Çözüm, yanıta yazmadan hemen önce çağrılacak bir geri çağırma yöntemi ayarlamaktır. Bu en iyi, ara yazılımınızdaki yöntemin Invoke başlangıcında yapılır. Yanıt üst bilgilerinizi ayarlayan bu geri çağırma yöntemidir.
Aşağıdaki kod adlı SetHeadersbir geri çağırma yöntemi ayarlar:
public async Task Invoke(HttpContext httpContext)
{
    // ...
    httpContext.Response.OnStarting(SetHeaders, state: httpContext);
SetHeaders Geri çağırma yöntemi şöyle görünür:
// using Microsoft.AspNet.Http.Headers;
// using Microsoft.Net.Http.Headers;

private Task SetHeaders(object context)
{
    var httpContext = (HttpContext)context;

    // Set header with single value
    httpContext.Response.Headers["ResponseHeaderName"] = "headerValue";

    // Set header with multiple values
    string[] responseHeaderValues = new string[] { "headerValue1", "headerValue1" };
    httpContext.Response.Headers["ResponseHeaderName"] = responseHeaderValues;

    // Translating ASP.NET 4's HttpContext.Response.RedirectLocation
    httpContext.Response.Headers[HeaderNames.Location] = "http://www.example.com";
    // Or
    httpContext.Response.Redirect("http://www.example.com");

    // GetTypedHeaders extension method provides strongly typed access to many headers
    var responseHeaders = httpContext.Response.GetTypedHeaders();

    // Translating ASP.NET 4's HttpContext.Response.CacheControl
    responseHeaders.CacheControl = new CacheControlHeaderValue
    {
        MaxAge = new System.TimeSpan(365, 0, 0, 0)
        // Many more properties available
    };

    // If you use .NET Framework 4.6+, Task.CompletedTask will be a bit faster
    return Task.FromResult(0);
}
HttpContext.Response.Cookies
Tanımlama bilgileri, Set yanıtCookie üst bilgisinde tarayıcıya gelir. Sonuç olarak, tanımlama bilgilerinin gönderilmesi, yanıt üst bilgilerini göndermek için kullanılan geri çağırmanın aynısını gerektirir:
public async Task Invoke(HttpContext httpContext)
{
    // ...
    httpContext.Response.OnStarting(SetCookies, state: httpContext);
    httpContext.Response.OnStarting(SetHeaders, state: httpContext);
SetCookies Geri çağırma yöntemi aşağıdaki gibi görünür:
private Task SetCookies(object context)
{
    var httpContext = (HttpContext)context;

    IResponseCookies responseCookies = httpContext.Response.Cookies;

    responseCookies.Append("cookie1name", "cookie1value");
    responseCookies.Append("cookie2name", "cookie2value",
        new CookieOptions { Expires = System.DateTime.Now.AddDays(5), HttpOnly = true });

    // If you use .NET Framework 4.6+, Task.CompletedTask will be a bit faster
    return Task.FromResult(0);
}
Ek kaynaklar
ASP.NET Core