Creating and Deploying A4SWIFT Pipelines
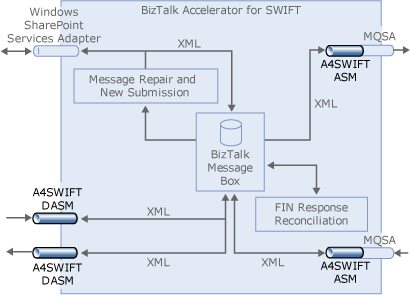
Perform the following steps to create and deploy SWIFT pipelines for message repair and new submission, as shown in the following figure.

Summary
Deploy the following schemas:
Custom receive pipeline with the SWIFT Disassembler. Set BRE Validation and XML Validation properties to True, and the SWIFT Header Schema property to (None).
Custom send pipeline with the SWIFT Assembler
To create a pipeline project
In Visual Studio, click File, point to New, and then click Project.
In the New Project dialog box, in the Project types pane, select the BizTalk Projects folder.
In the Templates pane, select Empty BizTalk Server Project.
In the Name box, type the name you want for the project name.
In the Solution box, select Add to Solution. In the Location box, enter the location of the schema project that you created in Deploying A4SWIFT Schemas.
Click OK to open the new project.
Visual Studio.NET adds a new project to Solution Explorer, and creates the project folder and files in the folder specified.Create and assign a strong key file to the project. For more information, see "To create a strong-named SWIFT project" in Deploying A4SWIFT Schemas.
To add a custom receive pipeline
In Solution Explorer, right-click your pipeline project, point to Add, and then click New Item.
In the Add New Item dialog box, click Pipeline Files in the Categories pane, and then select Receive Pipeline from the Templates pane.
In the Name box, type a name for the pipeline.
Click Add to open the blank pipeline in BizTalk Pipeline Designer.
In Visual Studio, click View and then Toolbox.
From the BizTalk Pipeline Components Toolbox, drag the SWIFT Disassembler to the Drop Here box below the Disassemble stage shape in BizTalk Pipeline Designer. Leave the SWIFT Disassembler as selected in the BizTalk Pipeline Designer.
In Properties, verify that the BRE Validation and XML Validation properties are set to True.
Note
The SWIFT Header Schema property should be set to (None).
In Visual Studio, click File, and then Save All.
To add a custom send pipeline
In Solution Explorer, right-click the SWIFTPipelines project, point to Add, and then click New Item.
In the Add New Item dialog box, verify that Pipeline Files is selected in the Categories pane, and then select Send Pipeline from the Templates pane.
In the Name box, type a name for the pipeline.
Click Add to open the blank pipeline in BizTalk Pipeline Designer.
Note
An empty pipeline appears in the BizTalk Pipeline Designer. Visual Studio adds the new pipeline to Solution Explorer under the SWIFTPipelines project.
In Visual Studio, click View and then Toolbox.
In the BizTalk Pipeline Components Toolbox, drag SWIFT Assembler to the Drop Here box below the Assemble stage shape in BizTalk Pipeline Designer.
In Visual Studio, click File, and then Save All.
Right click the pipelines project, and then click Build.
Note
During the compilation process, you should not see any failures. If you do, check the source of the error, correct it and then re-build the project. You may, however, see warnings. You can correct the condition leading to the warnings. For more information, see "Building a pipeline project may result in warnings" in Miscellaneous Known Issues.
Right click the pipelines project, and then click Deploy.
Geri Bildirim
Çok yakında: 2024 boyunca, içerik için geri bildirim mekanizması olarak GitHub Sorunları’nı kullanımdan kaldıracak ve yeni bir geri bildirim sistemiyle değiştireceğiz. Daha fazla bilgi için bkz. https://aka.ms/ContentUserFeedback.
Gönderin ve geri bildirimi görüntüleyin