Prepare Autodesk Inventor 3D objects for use in Dynamics 365 Guides and for mixed-reality components included in apps created with Power Apps
This tutorial shows how to prepare Autodesk Inventor files for use in Microsoft Dynamics 365 Guides and for mixed-reality components included in apps created with Microsoft Power Apps.
Important
This document is created strictly for informative purposes to demonstrate how Autodesk Inventor works with Dynamics 365 Guides and Power Apps. Your use of third-party applications is subject to terms between you and the third party. Microsoft Corporation is not affiliated with, is not a partner to, and does not endorse or sponsor Autodesk or any of Autodesk's products. There are other content-creation apps you can use to prepare your 3D objects.
What is Autodesk Inventor?
Autodesk Inventor is professional-grade 3D CAD software for product design and engineering. For more information, see Autodesk Inventor.
Optimize 3D objects for mixed reality
The first step is to remove any unneeded detail from the 3D object. This vastly improves performance and increases the visual quality of the 3D object. Inventor has a tool called Shrinkwrap that can assist by removing fillets, chamfers, small parts, holes, and more.
On the Assemble tab in Inventor, select Shrinkwrap.

From here, there are several optimization options you can choose to help increase the performance of your model in Dynamics 365 Guides and Power Apps.
Select the Remove parts by size check box, select the mouse arrow, and then select the largest object you're willing to remove, such as a bolt. This will remove all objects (nuts, bolts, washers) that are smaller than the object you selected.

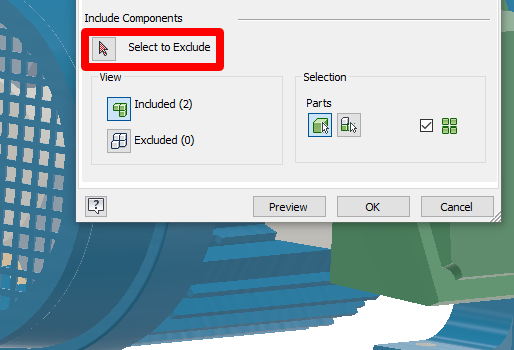
If there are specific items such as grates or cooling fins that are extremely complex and you don't need to see them, you can use the Select to Exclude option to remove them piece by piece.

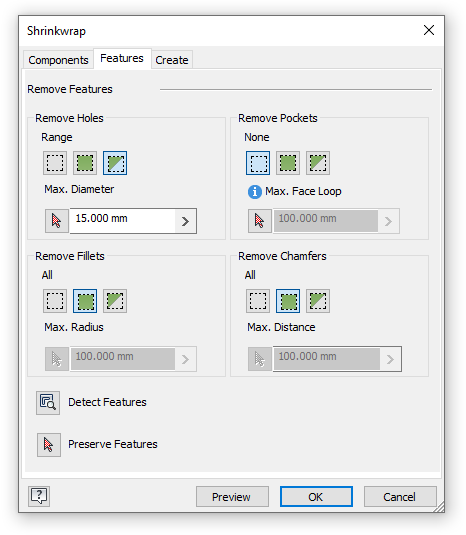
On the Features tab, you'll see options to remove some or all features such as holes, fillets, pockets, and chamfers. This works the same as removing parts by size, but for features instead of entire parts. Experiment with these features to gain additional optimizations for your model. The results can be significant.

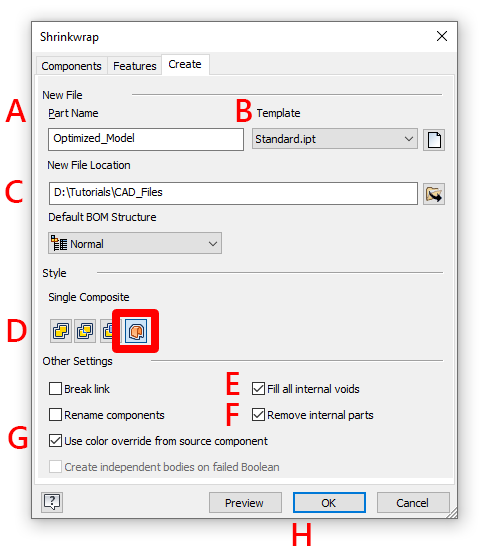
On the Create tab, do the following:
a. Choose a part name for the export.
b. Use the Standard.ipt template.
c. Set the new file location.
d. Under Style, select Single Composite.
e. Select the Fill all internal voids check box.
f. Select the Remove internal parts check box.
g. Select the Use color override from source component check box.
h. Select OK.

Save your file.
Export the 3D object
Next, you need to export the model to a usable format, adjusting settings so the lowest-density model is exported.
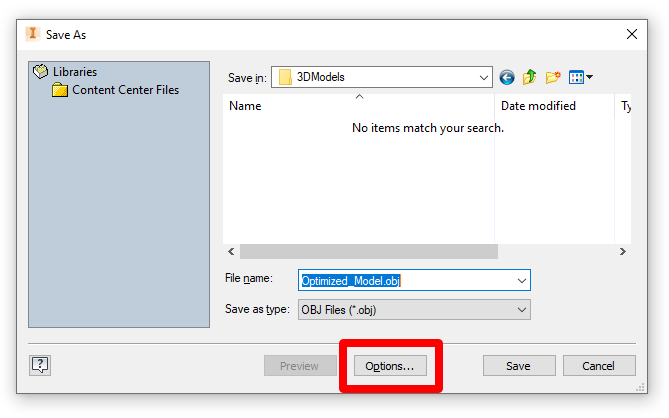
In the Save as type box, select OBJ files (*.obj).
Select the Options button.

This is what the OBJ export settings look like in Inventor:

We recommend using the Brep ("boundary representation") setting, which produces the lowest poly output for Inventor files. If your model isn't overly complex and you want a higher level of detail, you can use the Low setting (see Performance targets).
Convert your OBJ file to a GLB file
Dynamics 365 Guides and mixed-reality components in apps created in Power Apps use the GLB format for 3D objects. You can use a digital content creation (DCC) platform to convert your 3D objects into GLB files. Using these software platforms is a manual process, but it gives you opportunities for optimization. To assist with this process, see the following tutorials:
View a 3D object in Dynamics 365 Guides or Power Apps
After you've prepared a 3D object, use the following links to learn more about using the model in Dynamics 365 Guides or Power Apps:
More information
Several screenshots in this document were taken from the Autodesk Inventor software program to provide clear instructions on how to use Autodesk's software. Read more about Autodesk Inventor.
Microsoft Corporation is not responsible for, and expressly disclaims all liability for damages of any kind arising out of the use of Autodesk Inventor, or reliance on these instructions. This document is created only to provide general information to our customers and does not take into consideration any individualized business plans or specifications.
The use in this document of trademarked names and images is strictly for informative and descriptive purposes, and no commercial claim to their use, or suggestion of sponsorship or endorsement, is made by Microsoft.