Build productivity apps by using Microsoft Graph Toolkit
Microsoft Graph Toolkit is a collection of web components and authentication providers for connecting apps to Microsoft 365 data and intelligence. This tutorial shows you how to create a web application to monitor your calendar events, to-do tasks, and files by using Microsoft Graph Toolkit components and an MSAL2 provider.
How does the sample work?
This sample creates a web app that consumes the Microsoft Graph Toolkit MSAL2 provider to enable authentication through Microsoft Entra ID and uses UI components to render calendar events, to-do tasks, and files that will look and feel like native Microsoft experiences.
Prerequisites
- You need a Microsoft 365 developer tenant. You might qualify for one through the Microsoft 365 Developer Program; for details, see the FAQ. Alternatively, you can sign up for a 1-month free trial or purchase a Microsoft 365 plan.
- Install Visual Studio Code.
- Install Visual Studio Code Live Server to test your web app.
Stay on this site and follow instructions with your own machine.
Continue to first stepVisit the Hands-on Lab site for integrated instruction.
Hands-on LabRegister the application in the Microsoft Entra ID to enable user authentication.
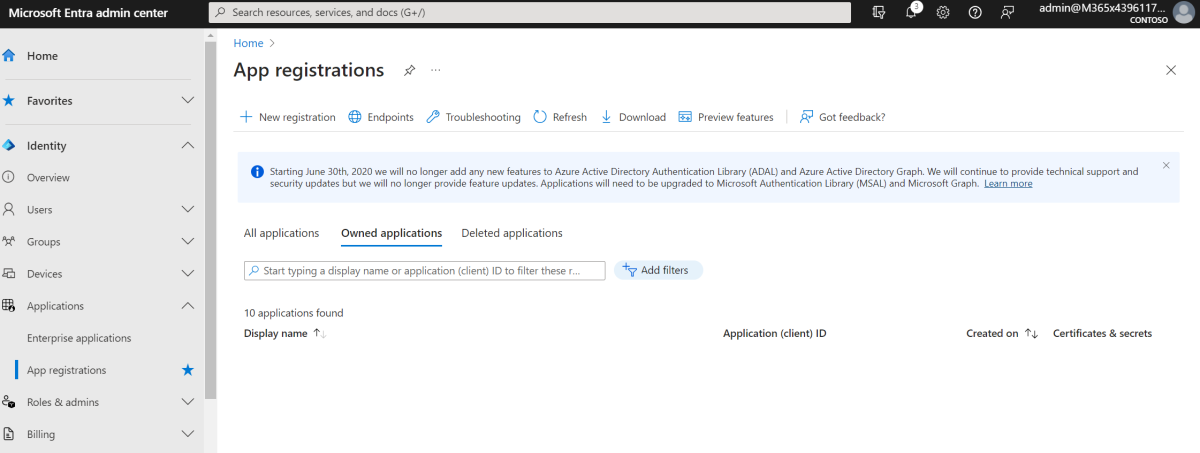
Go to the Microsoft Entra admin center and sign in with your Microsoft 365 Developer Program tenant.
Expand the Identity menu > expand Applications > select App registrations > New registration.
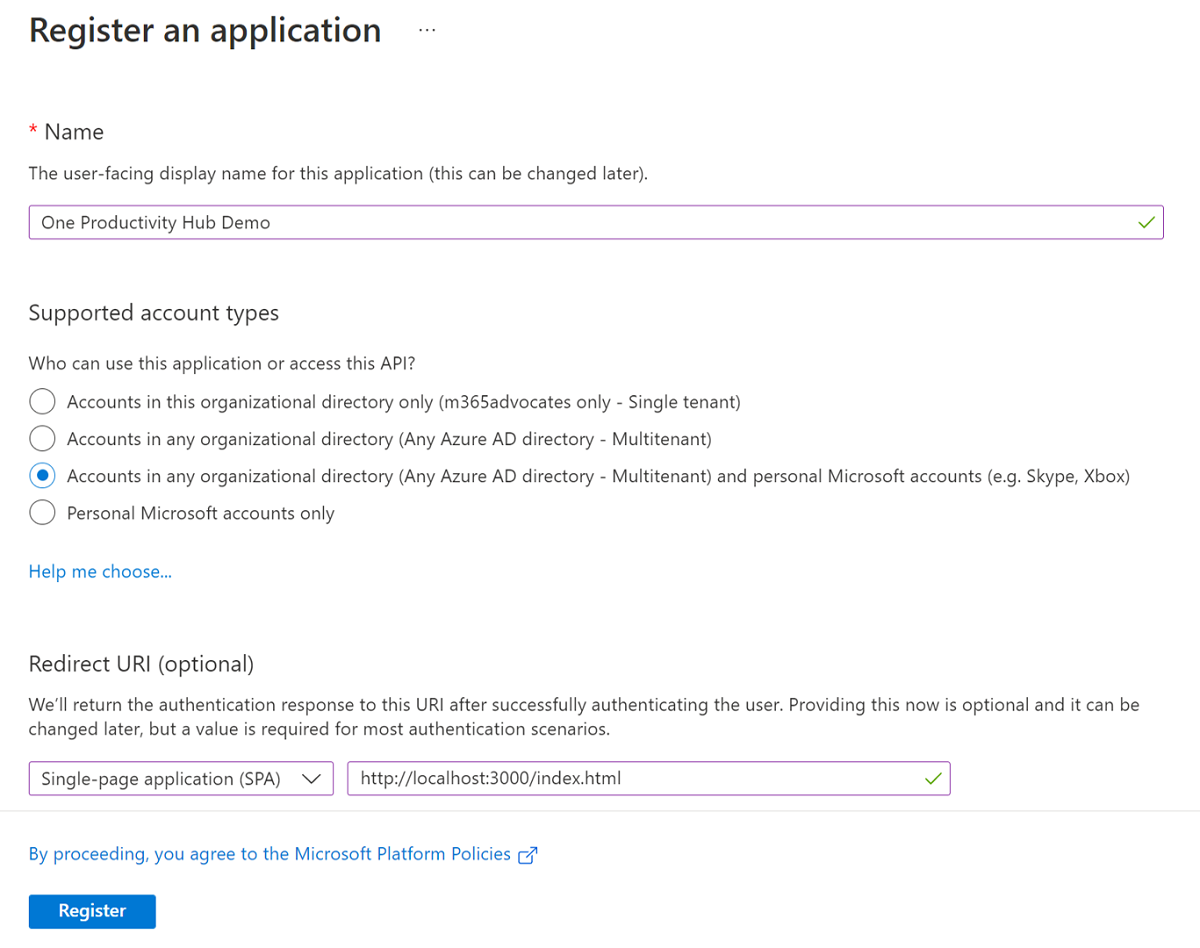
Complete the Register an application form using the following values, and then select Register.
- Name: One Productivity Hub Demo
- Supported account types: Accounts in any organizational directory (Any Microsoft Entra directory - Multitenant) and personal Microsoft accounts (for example, Skype, Xbox)
- Redirect URI: Select Single-page application (SPA) as a type of redirect URI and put
http://localhost:3000/index.htmlas a redirect URI to test locally.
When app registration is completed, go to the Overview tab in your application page and copy Application (client) ID. You need this ID for the following step.
Stay on this site and follow instructions with your own machine.
Continue to first stepVisit the Hands-on Lab site for integrated instruction.
Hands-on LabIn this step, you'll create a web app and enable authentication with the Microsoft Graph Toolkit MSAL2 provider.
Create a web app
Create a new folder and name it OneProductivityHub. Right-click and open the folder with Visual Studio Code.
Create a new file in the OneProductivityHub folder and name it index.html.
Select
CTRL + SPACEand choose HTML sample from the options.To enable authentication with Microsoft Graph Toolkit via a CDN, add the following script tag in index.html inside the
<body></body>section:<script type="module"> import { registerMgtComponents, registerMgtMsal2Provider } from "https://unpkg.com/@microsoft/mgt@4"; registerMgtMsal2Provider(); registerMgtComponents(); </script>
Initialize the MSAL2 provider
In index.html, add the MSAL2 provider in the
<body></body>section as follows:<mgt-msal2-provider client-id="<YOUR_CLIENT_ID>" scopes="User.Read, User.ReadBasic.All, Calendars.Read, Files.Read, Files.Read.All, Sites.Read.All, Tasks.Read, Tasks.ReadWrite, People.Read"> </mgt-msal2-provider>Important
The following scopes defined in the provider will be shown as a list of required permissions to request user's consent during the authentication process:
User.Read, User.ReadBasic.All, Calendars.Read, Files.Read, Files.Read.All, Sites.Read.All, Tasks.Read, Tasks.ReadWrite, People.Read.Replace
<YOUR_CLIENT_ID>with the client ID you copied from the Microsoft Entra application.Make sure that the final version of index.html is similar to the following example:
<!DOCTYPE html>
<html>
<head>
  <meta charset='utf-8'>
  <meta http-equiv='X-UA-Compatible' content='IE=edge'>
  <title>One Productivity Hub</title>
  <meta name='viewport' content='width=device-width, initial-scale=1'>
  <link rel='stylesheet' type='text/css' media='screen' href='main.css'>
  <script src='main.js'></script>
</head>
<body>
  <script type="module">
    import { registerMgtComponents, registerMgtMsal2Provider } from "https://unpkg.com/@microsoft/mgt@4";
    registerMgtMsal2Provider();
    registerMgtComponents();
  </script>
  <mgt-msal2-provider
      client-id="<YOUR_CLIENT_ID>"
      scopes="User.Read,
      User.ReadBasic.All,
      Calendars.Read,
      Files.Read,
      Files.Read.All,
      Sites.Read.All,
      Tasks.Read
      Tasks.ReadWrite,
      People.Read">
  </mgt-msal2-provider>
</body>
</html>
Stay on this site and follow instructions with your own machine.
Continue to first stepVisit the Hands-on Lab site for integrated instruction.
Hands-on LabIn this step, you'll design your web app by using Microsoft Graph Toolkit components and style it with CSS.
Initialize the Login component
In index.html in the <body></body>section, add the following code under the provider.
<div>
  <mgt-login />
</div>
Create a title and column for the rest of the components
To make your app look structured, create a title and a column for each feature that will be added in the One Productivity Hub. In index.html under <body></body>, add the following HTML code inside the div, under the login component.
<div class="features">

  <div class="header"><div class="title">
    <h2>One Productivity Hub</h2>
    <div class="row">
      <div class="column"><h3>Calendar events</h3></div>
      <div class="column"><h3>To-do tasks</h3></div>
      <div class="column"><h3>Files</h3></div>
    </div>
  </div></div>

  <div class="row" id="content">
    <div class="column" id="mgt-col"></div>
    <div class="column" id="mgt-col"></div>
    <div class="column" id="mgt-col"></div>
  </div>

</div>
Agenda component
Under the div tagged with class="row", add the Agenda component inside the first column div.
<mgt-agenda />
To-do component
Under the div tagged with class="row", add the To-do component inside the second column div.
<mgt-todo />
FileList component
Under the div tagged with class="row", add the File list component inside the third column div.
<mgt-file-list />
Style your web app with CSS
Create an index.css file under your project and add the following CSS code.
body,
#root>div {
    background-color: #F3F2F1;
}
.features {
    min-height: 80vh;
    margin: 20px;
    background-color: #FFF;
    box-shadow: 0px 1.2px 3.6px rgba(0, 0, 0, 0.11), 0px 6.4px 14.4px rgba(0, 0, 0, 0.13);
    border-radius: 4px;
    font-family: 'Segoe UI', Tahoma, Geneva, Verdana, sans-serif;
}
.header {
    display: flex;
    background-color: #f0f0f0;
}
.title {
    margin-top: 20px;
    margin-left: 10px;
    width: 100%;
}
.title h2 {
    font-size: 24px;
    padding-left: 5px;
    display: inline;
    font-weight: 600;
}
.title h3 {
    float: left;
    width: 32%;
    background:transparent;
    font-size: 16px;
    margin-bottom: 10px;
    padding-left: 10px;
    padding-top: 10px;
    color: #8A8886;
    font-weight: 600;
}
mgt-login {
    margin-left: 20px;
    --avatar-size: 60px;
    --font-family: 'Segoe UI';
    --font-size: 20px;
    --font-weight: 700;
    --color: black;
    --text-transform: none;
    --line2-font-size: 14px;
    --line2-font-weight: 400;
    --line2-color: #8A8886;
    --line2-text-transform: none;
}
#content, html, body {
    height: 98%;
  }
#mgt-col {
  float: left;
  width: 32%;
  background:transparent;
  height:500px;
  overflow: hidden;
  padding: 5px;
  margin-top: 5px;
}
#mgt-col:hover {
  overflow-y: auto;
}
In index.html within
<head></head>, define the stylesheet linkhrefas index.css.<link rel='stylesheet' type='text/css' media='screen' href='index.css'>Make sure that the final version of index.html is similar to the following.
<!DOCTYPE html>
  <html>
  <head>
    <meta charset='utf-8'>
    <meta http-equiv='X-UA-Compatible' content='IE=edge'>
    <title>One Productivity Hub</title>
    <meta name='viewport' content='width=device-width, initial-scale=1'>
    <link rel='stylesheet' type='text/css' media='screen' href='index.css'>
    <script src='main.js'></script>
  </head>
  <body>
    <script type="module">
      import { registerMgtComponents, registerMgtMsal2Provider } from "https://unpkg.com/@microsoft/mgt@4";
      registerMgtMsal2Provider();
      registerMgtComponents();
    </script>
    <mgt-msal2-provider
        client-id="<YOUR_CLIENT_ID>"
        scopes="User.Read,
        User.ReadBasic.All,
        Calendars.Read,
        Files.Read,
        Files.Read.All,
        Sites.Read.All,
        Tasks.Read,
        Tasks.ReadWrite,
        People.Read">
    </mgt-msal2-provider>
    <div>
      <mgt-login />
    </div>
    <div class="features">
        <div class="header">
            <div class="title">
                <h2>One Productivity Hub</h2>
                <div class="row">
                    <div class="column"><h3>Calendar events</h3></div>
                    <div class="column"><h3>To-do tasks</h3></div>
                    <div class="column"><h3>Files</h3></div>
                </div>
            </div>
        </div>
        <div class="row" id="content">
            <div class="column" id="mgt-col"><mgt-agenda /></div>
            <div class="column" id="mgt-col"><mgt-todo /></div>
            <div class="column" id="mgt-col"><mgt-file-list /></div>
        </div>
    </div>
  </body>
</html>
Stay on this site and follow instructions with your own machine.
Continue to first stepVisit the Hands-on Lab site for integrated instruction.
Hands-on LabIn this step, you will run your sample app in the browser by using Live Server.
Select
CTRL + SHIFT + Pto open the panel in Visual Studio Code, typePreferenceson the panel and selectPreferences: Open Workspace Settings (JSON)from the options.In the
settings.jsonfile that opens, add the following code.{ "liveServer.settings.host": "localhost", "liveServer.settings.port": 3000 }Select
CTRL + SHIFT + Pto open the panel in Visual Studio Code, typeLive Serveron the panel and selectLive Server: Open with Live Serverfrom the options. Live Server will run the app in your browser.Select Sign in and use your Microsoft 365 Developer Program tenant to sign in.
Consent to the required permissions to use the application features such as viewing calendar events, to-do tasks, and file folders.
To make sure that One Productivity Hub app works properly, add some calendar events, to-do tasks, and file folders in your Microsoft 365 Developer tenant.
Stay on this site and follow instructions with your own machine.
Continue to first stepVisit the Hands-on Lab site for integrated instruction.
Hands-on LabYou have successfully built your One Productivity Hub sample app using Microsoft Graph Toolkit. In this tutorial, you created a web app and consumed the Microsoft Graph Toolkit MSAL2 provider and UI components.
If you're looking for ways to enhance your One Productivity Hub app, see the list of web components that are available in Microsoft Graph Toolkit and include additional components in your app.
Next steps
To find out more about Microsoft Graph Toolkit, see the Microsoft Graph Toolkit overview and the Develop apps with the Microsoft Graph Toolkit learning path.
Stay on this site and follow instructions with your own machine.
Continue to first stepVisit the Hands-on Lab site for integrated instruction.
Hands-on LabHave an issue with this section? If so, please give us some feedback so we can improve this section.