Not
Bu sayfaya erişim yetkilendirme gerektiriyor. Oturum açmayı veya dizinleri değiştirmeyi deneyebilirsiniz.
Bu sayfaya erişim yetkilendirme gerektiriyor. Dizinleri değiştirmeyi deneyebilirsiniz.
Bu makalede, deklanşör durumu raporlamayı destekleyen bir kamera için görüntü değişiminin nasıl etkinleştirileceği açıklanmaktadır. Ayrıca özel bir değiştirme görüntüsünün nasıl sağlandığı da açıklanır.
Bu özellik uygulanmadan önce gizlilik panjurları/anahtarları olan kamera sürücüleri, kamera sensöründen örnekler sağladı veya deklanşör durumunu algılamak ve örneğin kendisini değiştirmek için özel bir işlevsellik uygulamak zorunda kaldı. Bu özellik, kamera sürücüsünün örnekteki görüntüyü işletim sistemi tarafından sağlanan bir çözümle veya Kamera sürücüsü tarafından sağlanan özel bir görüntüyle değiştirmek için işletim sistemine güvenmesini sağlar.
Windows 11, sürüm 21H2'den itibaren, Windows Donanım Uyumluluk Programı (WHCP), gizlilik perdelerine veya kapatma anahtarlarına sahip kameraların kamera deklanşör durumunu rapor etmelerini gerektirir. Bu gereksinim, işletim sisteminin ve uygulamaların deklanşörün geçerli durumunu bilmesini sağlar ve deklanşörün durumunu değiştirme konusunda yardımcı kullanıcı kılavuzu sağlamak için kullanılır. OEM iş ortakları, kameradan gelen görüntüyü kullanıcılara bilgilendirici bir şeyle değiştirmek için sürücülerine işlevsellik oluşturmak için bu mekanizmayı kullanır. Bu özellik, BIR OEM'in bir DeviceMFT içine özel kod yazmak zorunda kalmadan aynı işlevi kullanmasına olanak tanır.
Gereksinimler
Bu özellik yalnızca gizlilik panjurları/sonlandırma anahtarları olan kameralar tarafından uygulanır. Gizlilik deklanşörleri için uygulama ayrıntıları Gizlilik deklanşör/anahtar bildirim makalesinde açıklanmıştır.
Görüntü değiştirme için özel bir görüntüyü desteklemek isteyen cihazların, sürücü paketinin yedek görüntüsünü içeren imzalı bir ikili dosyası da sağlaması gerekir.
Görüntü değiştirme işlemi çıkış arabelleğini yazdığı için, cihaz sıkıştırılmamış görüntü kareleri çıkarır. MJPEG ve JPEG gibi sıkıştırılmış çerçeveler için hiçbir görüntü değişikliği gerçekleşmez ve bunun yerine sürücüdeki özgün görüntü teslim edilir.
Uygulamaya genel bakış
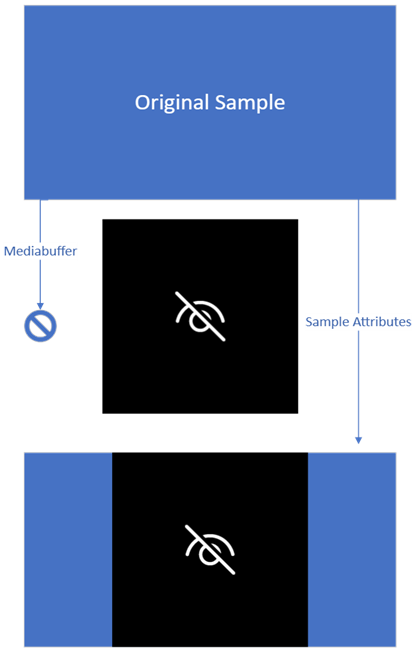
Görüntü değiştirme işlemi, cihaz için deklanşörün kapatıldığını belirten bir bildirim gönderdiğinde gerçekleşir. Deklanşör durumu kapalıysa ve görüntü değiştirme etkinleştirildiyse, kamera işlem hattı, kamera sürücüsü tarafından sağlanan özel bir görüntüden veya burada gösterilen gelen kutusu değiştirme görüntüsünü kullanarak yedek görüntüyü yükler.

Yüklendiğinde işlem hattı, görüntüyü kamera sürücü yazılımının mevcut medya türüyle aynı çözünürlükte ve medya türünde bir çıkış arabelleğine çevirir. Çözünürlükler farklıysa, görüntü ölçeği artırılır veya küçültür, ancak mevcut en boy oranının dışına uzatılamaz.
Bu noktadan sonra deklanşör durumu açılacak şekilde değiştirilene kadar, kamera sürücüsü tarafından teslim edilen tüm örneklerin meta verileri ve örnek öznitelikleri yeni bir örneğe kopyalanır ve medya tamponu atılır. Çevrilmiş deklanşör görüntüsünden yeni bir mediabuffer kopyalanır ve bunun yerine kullanılır. Bu yeni örnek daha sonra işlem hattı üzerinden özgün örnekmiş gibi gönderilir.
Uygulama kılavuzu
Görüntü değişimini etkinleştirmek için aşağıdaki kayıt defteri girişinin kameranın cihaz arabirimi düğümüne eklenmesi ve değerin 1 olarak ayarlanması gerekir.
| Regkey Türü | Regkey Adı | Regkey Değeri |
|---|---|---|
| REG_DWORD | ResimDeğişiminiEtkinleştir | 0x1 |
Bir sürücü INF dosyası için bu, burada gösterildiği gibi eklenebilir.
...

[Device.AddReg]
HKR,,EnableImageReplacement,%REG_DWORD%,1

...

[Strings]
REG_DWORD=0x00010001
MS-OS Tanımlayıcısı için bu, aşağıdaki ad olarak eklenebilir:
UVC-EnableImageReplacement
Özel görüntü
Özel görüntü değişimi için sürücünün aşağıdakileri sağlaması gerekir:
Boyutu 1000 x 1000 piksel olan BMP türünde ARGB32 biçiminde bir veya daha fazla görüntü dosyası. Bu örnekte, bu "TestImage.bmp"dır.
Görüntü dosyasının kaynak olarak bulunduğu bir kaynak DLL'i. Bu örnekte, bu SampleSocMFT.dll.
Sürücü tarafından sağlanan görüntü dosyaları 1000 x 1000 piksellik bir ARGB32 görüntüsü olmalıdır. Bu, uygulamaya genel bakışta gösterilen görüntünün yerini alır. Örnekteki diğer tüm değişiklikler açıklandığı gibi gerçekleşir, yalnızca değiştirilen görüntü sürücü için özeldir. Kaynak DLL'sinin sürücü paketinin bir parçası olması ve imzalanması gerekir. Çoğu cihaz için bu, cihazı Driver DeviceMFT'ye yerleştirmek anlamına gelir.
Görüntü dosyasını kaynak DLL'ye eklemek için projenin *.rc kaynak dosyasını aşağıdaki örnekle değiştirin.
#ifdef ID_REPLACEMENT_IMAGE
#define ID_REPLACEMENT_IMAGE    200
#endif

ID_REPLACEMENT_IMAGE     RCDATA    "TestImage.bmp"
Sonraki adım, sürücü INF'sini değiştirmektir. Kullanılan kaynak DLL'i yeniyse CopyFiles yönergesinin bir parçası olması gerekir. Son olarak, üç ek AddReg yönergesi eklenmelidir.
[SourceDisksFiles]
AvsCameraSim.sys=1
SampleSocMFT.dll=1

[DestinationDir]
AvsCameraSim.CopySys=13
AvsCameraSim.CopyDMFT=13

[AvsCameraSim.CopySys]
AvsCameraSim.sys

[AvsCameraSim.CopyDMFT]
SampleSocMFT.dll

[AvsCameraSim]
Include=ks.inf, kscaptur.inf
Needs=KS.registration, KSCaptur.Registration.NT
CopyFiles=AvsCameraSim.CopySys, AvsCameraSim.CopyDMFT
AddReg=AvsCameraSim.AddReg

[AvsCameraSim.AddReg]
HKR,,CameraImageResource,,%13%\%DMFT.NAME%
HKR,,CameraImageResourceID,%REG_DWORD%,%ResourceID%
HKR,,EnableImageReplacement,%REG_DWORD%,1

[Strings]
DMFT.Name="SampleSocMFT.dll"
REG_DWORD=0x00010001

;localizable
ResourceID=200

...
Kaynağın INF ResourceID ve ID_REPLACEMENT_IMAGE tanımlayıcısı eşleşmelidir. Bu değerler, tek bir kaynak DLL'sinin birden çok kaynak kimliği ve birden çok görüntü içerebileceği şekilde ayarlanabilir ve doğru kaynak kimliğini seçmek için bir INF yerelleştirilebilir.
Özel görüntü kenarı
Letterboxing gerçekleştiğinde siyah kenarlık istemeyen özelleştirilmiş görüntüler için, değiştirme örneğinin kenarlık rengini özelleştiren bir MFARGB yapısını kayıt defteri aracılığıyla belirtebilirler.
| Regkey Türü | Regkey Adı | Regkey Değeri |
|---|---|---|
| REG_BINARY | KameraGörüntüArkaplanRengi | 0x1 |
Bir sürücü INF için, burada gösterildiği gibi eklenebilir:
...

[Device.AddReg]
HKR,,CameraImageBackgroundColor,%REG_ BINARY%,00,00,00,FF

[Strings]
REG_BINARY=0x00000001