Not
Bu sayfaya erişim yetkilendirme gerektiriyor. Oturum açmayı veya dizinleri değiştirmeyi deneyebilirsiniz.
Bu sayfaya erişim yetkilendirme gerektiriyor. Dizinleri değiştirmeyi deneyebilirsiniz.
Etkileşimleri algılandığında, yorumlandığında ve işlendiğinde kullanıcıları göstermek için görsel geri bildirim kullanın. Görsel geri bildirim, etkileşimi teşvik ederek kullanıcılara yardımcı olabilir. Kullanıcının denetim duygusunu geliştiren bir etkileşimin başarısını gösterir. Ayrıca sistem durumunu da aktarır ve hataları azaltır.
Önemli API'ler: Windows.Devices.Input, Windows.UI.Input, Windows.UI.Core
Recommendations
- Kapsamlı değişiklikler hem denetimin hem de uygulamanızın performansını ve erişilebilirliğini etkileyene kadar denetim şablonunun değişikliklerini doğrudan tasarım amacınızla ilgili olanlarla sınırlamaya çalışın.
- Görsel durum özellikleri dahil olmak üzere denetimin özelliklerini özelleştirme hakkında daha fazla bilgi için bkz. XAML stilleri .
- Denetim şablonunda değişiklik yapma hakkında ayrıntılı bilgi için bkz. UserControl Sınıfı
- Bir denetim şablonunda önemli değişiklikler yapmanız gerekiyorsa kendi özel şablonlu denetiminizi oluşturmayı göz önünde bulundurun. Özel şablonlu denetim örneği için bkz. Özel Düzenleme Denetimi örneği.
- Dokunmatik görselleştirmeleri, uygulamanın kullanımını engelleyebilecekleri durumlarda kullanmayın. Daha fazla bilgi için bkz . ShowGestureFeedback.
- Kesinlikle gerekli olmadıkça geri bildirim göstermeyin. Başka bir yerde kullanılamayan bir değer eklemediğiniz sürece görsel geri bildirim göstermeyerek kullanıcı arabirimini temiz ve dağınık tutun.
- Yerleşik Windows hareketlerinin görsel geri bildirim davranışlarını önemli ölçüde özelleştirmemeye çalışın, bu da tutarsız ve kafa karıştırıcı bir kullanıcı deneyimine neden olabilir.
Ek kullanım kılavuzu
Temas görselleştirmeleri, doğruluk ve hassasiyet gerektiren dokunmatik etkileşimler için özellikle kritik öneme sahiptir. Örneğin, uygulamanız bir kullanıcıya hedefini kaçırıp kaçırmadığını, ne kadar kaçırdığını ve hangi ayarlamaları yapması gerektiğini bildirmek için bir dokunmanın konumunu açıkça belirtmelidir.
Kullanılabilir varsayılan XAML platformu denetimlerini kullanmak, uygulamanızın tüm cihazlarda ve tüm giriş durumlarında düzgün çalışmasını sağlar. Uygulamanızda özelleştirilmiş geri bildirim gerektiren özel etkileşimler varsa, geri bildirimin uygun olduğundan, giriş cihazlarını yaydığından ve kullanıcının görevinin dikkatini dağıtmadığından emin olmanız gerekir. Bu, görsel geri bildirimin kritik kullanıcı arabirimiyle çakışabileceği veya gizlenebileceği oyun veya çizim uygulamalarında belirli bir sorun olabilir.
Önemli
Yerleşik hareketlerin etkileşim davranışını değiştirmenizi önermiyoruz.
Cihazlar Arasında Geri Bildirim
Görsel geri bildirim genellikle giriş cihazına (dokunmatik, dokunmatik yüzey, fare, kalem/ekran kalemi, klavye vb.) bağlıdır. Örneğin, fare için yerleşik geri bildirim genellikle imleci taşımayı ve değiştirmeyi içerirken, dokunma ve kalem için temas görselleştirmeleri gerekir ve klavye girişi ve gezintisi odak dikdörtgenleri ve vurgulama ile yapılır.
Platform hareketleri için geri bildirim davranışını ayarlamak için ShowGestureFeedback kullanın.
Geri bildirim kullanıcı arabirimini özelleştiriyorsanız, tüm giriş modlarını destekleyen ve buna uygun geri bildirim sağladığınızı unutmayın.
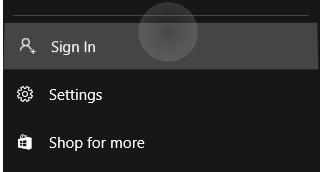
Windows'daki yerleşik kişi görselleştirmelerine bazı örnekler aşağıda verilmiştir.

|

|

|

|
|---|---|---|---|
| Dokunmatik görselleştirme | Fare/dokunmatik yüzey görselleştirmesi | Kalem görselleştirme | Klavye görselleştirmesi |
Yüksek Görünürlüklü Odak Görselleri
Tüm Windows uygulamaları, uygulama içindeki etkileşime dönüştürülebilir denetimler etrafında daha tanımlı bir odak görseli oluşturur. Bu yeni odak görselleri, gerektiğinde tamamen özelleştirilebilir ve devre dışı bırakılabilir.
Xbox ve TV kullanımına özgü 3 metrelik deneyim için Windows, oyun yüzeyi veya klavye girişi aracılığıyla odak aldıklarında düğme gibi odaklanılabilir öğelerin kenarlarına animasyon ekleyen bir aydınlatma efekti olan Odak gösterme özelliğini destekler.
Renk Markalama ve Özelleştirme
Kenarlık Özellikleri
Yüksek görünürlük odağı görsellerinin iki bölümü vardır: birincil kenarlık ve ikincil kenarlık. Birincil kenarlık 
Kenarlık türü (birincil veya ikincil) kalınlığını değiştirmek için sırasıyla FocusVisualPrimaryThickness veya FocusVisualSecondaryThickness kullanın:
<Slider Width="200" FocusVisualPrimaryThickness="5" FocusVisualSecondaryThickness="2"/>

Kenar boşluğu Kalınlık türünde bir özelliktir ve bu nedenle kenar boşluğu denetimin yalnızca belirli taraflarında görünecek şekilde özelleştirilebilir. Aşağıya bakın: 
Kenar boşluğu, denetimin görsel sınırları ile odak görsellerinin ikincil kenarlığı arasındaki boşlukdur. Varsayılan kenar boşluğu, denetim sınırlarından 1 piksel uzaktadır. Bu kenar boşluğunu, FocusVisualMargin özelliğini değiştirerek denetim başına temelinde düzenleyebilirsiniz:
<Slider Width="200" FocusVisualMargin="-5"/>

Negatif bir kenar boşluğu, kenarlığı denetimin merkezinden uzaklaştırır ve pozitif bir kenar boşluğu, kenarlığı denetimin merkezine yaklaştırır.
Denetimdeki odak görsellerini tamamen kapatmak için UseSystemFocusVisuals'ı devre dışı bırakmanız yeterlidir:
<Slider Width="200" UseSystemFocusVisuals="False"/>
Kalınlık, kenar boşluğu veya uygulama geliştiricisinin odak görsellerinin görülmesini isteyip istemediği her bir denetim bazında belirlenir.
Renk Özellikleri
Odak görselleri için yalnızca iki renk özelliği vardır: birincil kenarlık rengi ve ikincil kenarlık rengi. Bu odak görseli kenarlık renkleri, sayfa düzeyinde, kontrol bazında ve uygulama genelinde değiştirilebilir.
Uygulama genelindeki marka odaklı görseller için sistem fırçalarını geçersiz kılın:
<SolidColorBrush x:Key="SystemControlFocusVisualPrimaryBrush" Color="DarkRed"/>
<SolidColorBrush x:Key="SystemControlFocusVisualSecondaryBrush" Color="Pink"/>

Renkleri denetim temelinde değiştirmek için odak görseli özelliklerini istediğiniz denetimde düzenlemeniz gerekir:
<Slider Width="200" FocusVisualPrimaryBrush="DarkRed" FocusVisualSecondaryBrush="Pink"/>
İlgili makaleler
Tasarımcılar için
Geliştiriciler için
Samples
- Temel giriş örneği
- Düşük gecikmeli giriş örneği
- Kullanıcı etkileşim modu örneği
- Odak görselleri örneği
Arşiv örnekleri
- Giriş: XAML kullanıcı giriş etkinlikleri örneği
- Giriş: Cihaz özellikleri örneği
- Giriş: Dokunmatik isabet testi örneği
- XAML kaydırma, sürükleme ve yakınlaştırma örneği
- Giriş: Basitleştirilmiş mürekkep örneği
- Giriş: Windows 8 hareketleri örneği
- Giriş: Manipülasyonlar ve jestler örneği
- DirectX dokunmatik giriş örneği
Windows developer
