Not
Bu sayfaya erişim yetkilendirme gerektiriyor. Oturum açmayı veya dizinleri değiştirmeyi deneyebilirsiniz.
Bu sayfaya erişim yetkilendirme gerektiriyor. Dizinleri değiştirmeyi deneyebilirsiniz.
C#/WinRT, .NET kullanan geliştiricilerin bir sınıf kitaplığı projesi kullanarak C# dilinde kendi Windows Çalışma Zamanı bileşenlerini yazmasına olanak tanır. Yazılan bileşenler, yerel masaüstü uygulamalarında birkaç değişiklikle paket başvurusu veya proje başvurusu olarak kullanılabilir.
Bu kılavuzda C#/WinRT kullanarak basit bir Windows Çalışma Zamanı bileşeni oluşturma, bileşeni NuGet paketi olarak dağıtma ve C++/WinRT konsol uygulamasından bileşeni kullanma işlemleri gösterilmektedir. Bu makalenin kodunu sağlayan tam örnek için bkz. C#/WinRT yazma örneği. Yazma hakkında daha fazla ayrıntı için bkz. Authoring components.
Özellikle Windows Uygulama SDK'sı uygulamalarında kullanılmak üzere C#/WinRT ile WinUI 3 denetimleri yazma konusunda izlenecek yol için
Önkoşullar
Bu izlenecek yol için aşağıdaki araçlar ve bileşenler gerekir:
- Visual Studio 2022 veya üzeri
- .NET 8.0 SDK (LTS) veya üzeri
- C++/WinRT project şablonları için C++/WinRT VSIX
C#/WinRT kullanarak basit bir Windows Çalışma Zamanı Bileşeni oluşturma
Visual Studio'da yeni bir proje oluşturarak başlayın. Class Library project şablonunu seçin ve project AuthoringDemo olarak adlandırın. Proje üzerinde aşağıdaki eklemeleri ve değişiklikleri yapmanız gerekecek.
TargetFrameworköğesini AuthoringDemo.csproj dosyasında güncelleyin vePropertyGroupöğesine aşağıdaki öğeleri ekleyin:<PropertyGroup> <TargetFramework>net8.0-windows10.0.19041.0</TargetFramework> <Platforms>x64</Platforms> </PropertyGroup>Windows Çalışma Zamanı türlerine erişmek için TFM'de belirli bir Windows SDK sürümü ayarlamanız gerekir. Desteklenen sürüm hakkında daha fazla bilgi için bkz. .NET 6 ve üzeri: TFM seçeneğini kullanma.
Projenize Microsoft.Windows.CsWinRT NuGet paketini yükleyin.
a. Çözüm Gezgini'da proje düğümüne sağ tıklayın ve NuGet Paketlerini Yönet öğesini seçin.
b. Microsoft.Windows.CsWinRT NuGet paketini arayın ve en son sürümü yükleyin.
Yeni bir
PropertyGroupöğesi ekleyin veCsWinRTComponentözelliğini ayarlayın. Bu, projenizin Windows Çalışma Zamanı bir bileşen olduğunu belirtir, böylece projeyi oluştururken bir.winmddosyası oluşturulur.<PropertyGroup> <CsWinRTComponent>true</CsWinRTComponent> </PropertyGroup>C#/WinRT project özelliklerinin tam listesi için C#/WinRT NuGet belgelerine bakın.
Kitaplık
.cssınıf dosyalarını kullanarak çalışma zamanı sınıflarınızı yazabilirsiniz.Class1.csdosyasına sağ tıklayın veExample.csolarak yeniden adlandırın. Çalışma zamanı sınıfına bir ortak özellik ve yöntem ekleyen bu dosyaya aşağıdaki kodu ekleyin. Çalışma zamanı bileşeninde kullanıma açmak istediğiniz sınıfları olarakpublicişaretlemeyi unutmayın.namespace AuthoringDemo { public sealed class Example { public int SampleProperty { get; set; } public static string SayHello() { return "Hello from your C# WinRT component"; } } }Artık bileşeninizin
.winmddosyasını oluşturmak için project oluşturabilirsiniz. Çözüm Gezgini'da projeye sağ tıklayın ve Build öğesine tıklayın. OluşturulanAuthoringDemo.winmddosyayı derleme çıktı klasörünüzde görürsünüz.
Bileşen için NuGet paketi oluşturma
Geliştiricilerin çoğu Windows Çalışma Zamanı bileşenini NuGet paketi olarak dağıtmak ve paylaşmak isteyecektir. Bir diğer seçenek de bileşeni proje referansı olarak kullanmaktır. Aşağıdaki adımlarda AuthoringDemo bileşeninin nasıl paketlenmesi gösterilmektedir. Paketi oluşturduğunuzda, C#/WinRT yerel uygulamalardan tüketimi etkinleştirmek için bileşen ve barındırma derlemelerini pakette yapılandırıyor.
NuGet paketini oluşturmanın birkaç yolu vardır:
project her oluşturduğunuzda bir NuGet paketi oluşturmak istiyorsanız, AuthoringDemo project dosyasına aşağıdaki özelliği ekleyin ve project yeniden oluşturun.
<PropertyGroup>
    <GeneratePackageOnBuild>true</GeneratePackageOnBuild>
</PropertyGroup>
Alternatif olarak, Çözüm Gezgini içindeki AuthoringDemo projesine sağ tıklayıp Pack seçerek bir NuGet paketi oluşturabilirsiniz.
Paketi oluşturduğunuzda , Derleme penceresi NuGet paketinin AuthoringDemo.1.0.0.nupkg başarıyla oluşturulduğunu göstermelidir. .NET CLI ile NuGet paket özellikleri hakkında daha fazla bilgi için bkz. Dotnet CLI kullanarak paket oluşturma.
C++/WinRT uygulamasından bileşeni kullanma
C#/WinRT tarafından yazılan Windows Çalışma Zamanı bileşenleri, Windows Çalışma Zamanı (WinRT) uyumlu herhangi bir dilden kullanılabilir. Aşağıdaki adımlar, bir C++/WinRT konsol uygulamasında yukarıda yazılan bileşenin nasıl çağrılduğunu gösterir.
Uyarı
C#/.NET uygulamalarından C#/WinRT bileşeninin kullanılması hem paket başvurusu hem de proje başvurusu tarafından desteklenir. Bu senaryo, sıradan bir C# sınıf kitaplığının tüketilmesiyle eşdeğerdir ve çoğu durumda WinRT etkinleştirmesi içermez. C#/WinRT 1.3.5'ten başlayarak, C# tüketicileri için proje referansları .NET 6 veya daha üzeri bir sürüm gerektirir.
Çözümünüze yeni bir C++/WinRT Konsol Uygulaması project ekleyin. Bu project da tercih ederseniz farklı bir çözümün parçası olabileceğini unutmayın.
a. Çözüm Gezgini'da çözüm düğümünüzü sağ tıklatın ve Add ->Yeni Project'e tıklayın.
b. Yeni Project Ekle iletişim kutusundaC++/WinRT Konsol Uygulaması project şablonunu arayın. Şablonu seçin ve İleri'ye tıklayın.
ç. Yeni project CppConsoleApp olarak adlandırın ve Oluştur öğesine tıklayın.
AuthoringDemo bileşenine NuGet paketi veya proje başvurusu olarak bir başvuru ekleyin.
Seçenek 1 (Paket referansı):
a. CppConsoleApp project öğesine sağ tıklayın ve NuGet paketlerini yönet öğesini seçin. AuthoringDemo NuGet paketine başvuru eklemek için paket kaynaklarınızı yapılandırmanız gerekebilir. Bunu yapmak için NuGet Paket Yöneticisi'da Settings simgesine tıklayın ve uygun yola bir paket kaynağı ekleyin.
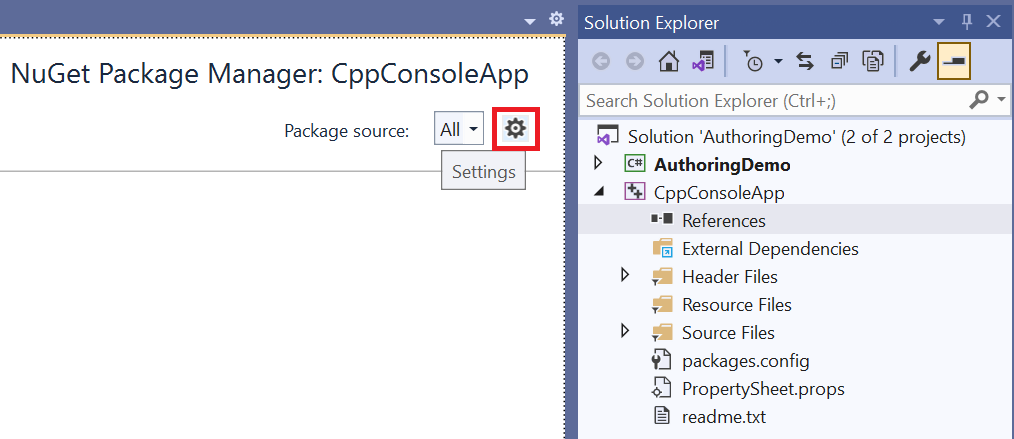
b. Paket kaynaklarınızı yapılandırdıktan sonra AuthoringDemo paketini arayın ve Yükle'ye tıklayın.
NuGet paketi yükleme
Option 2 (Proje referansı):
a. CppConsoleApp project öğesine sağ tıklayın ve Add ->Reference öğesini seçin. Projects düğümü altında AuthoringDemo projesine bir başvuru ekleyin.
Bileşeni barındırmak için, eyleme geçilebilir sınıf kayıtları için bir bildirim dosyası eklemeniz gerekir. Yönetilen bileşen barındırma hakkında daha fazla bilgi için bkz. Yönetilen bileşen barındırma.
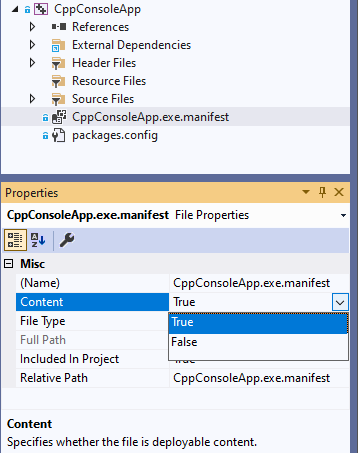
a. Bildirim dosyasını eklemek için projeye yeniden sağ tıklayın ve Ekle -> Yeni Öğe öğesini seçin. Metin Dosyası şablonunu arayın ve .manifestCppConsoleApp.exeadlandırın. Çalışma zamanı sınıflarını etkinleştirilebilir sınıf kayıt girdilerini kullanarak belirten aşağıdaki içeriği yapıştırın.
<?xml version="1.0" encoding="utf-8"?>
<assembly manifestVersion="1.0" xmlns="urn:schemas-microsoft-com:asm.v1">
    <assemblyIdentity version="1.0.0.0" name="CppConsoleApp"/>
    <file name="WinRT.Host.dll">
        <activatableClass
            name="AuthoringDemo.Example"
            threadingModel="both"
            xmlns="urn:schemas-microsoft-com:winrt.v1" />
    </file>
</assembly>
Paketlenmeyen uygulamalar için uygulama bildirim dosyası gereklidir. Paketlenmiş uygulamalar için uygulama tüketicisinin,
Package.appxmanifestbölümünde açıklandığı gibi, uygulama tüketicisinin paket bildirim dosyasına activatable sınıflarını kaydetmesi gerekir.b. Projenin dağıtımı sırasında bildirim dosyasını çıkışa eklemek için projeyi değiştirin. Çözüm Gezgini içindeki CppConsoleApp.exe.manifest dosyasına tıklayın ve Content özelliğini True olarak ayarlayın. Bunun nasıl göründüğüne bir örnek aşağıda verilmiştir.
project Üst Bilgi Dosyaları altında pch.h açın ve bileşeninizi eklemek için aşağıdaki kod satırını ekleyin.
#include <winrt/AuthoringDemo.h>project Kaynak Dosyaları altında main.cpp açın ve aşağıdaki içerikle değiştirin.
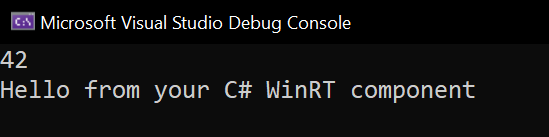
#include "pch.h"
#include "iostream"

using namespace winrt;
using namespace Windows::Foundation;

int main()
{
    init_apartment();

    AuthoringDemo::Example ex;
    ex.SampleProperty(42);
    std::wcout << ex.SampleProperty() << std::endl;
    std::wcout << ex.SayHello().c_str() << std::endl;
}
CppConsoleApp project derleyin ve çalıştırın. Şimdi aşağıdaki sonucu görüyor olmalısınız.
İlgili konular
GitHub'da bizimle işbirliği yapın
Bu içeriğin kaynağı GitHub'da bulunabilir; burada ayrıca sorunları ve çekme isteklerini oluşturup gözden geçirebilirsiniz. Daha fazla bilgi için katkıda bulunan kılavuzumuzu inceleyin.

Windows developer