Revenue splits
You can use revenue splits to split the revenue that's associated with an item across several other items. The revenue split function is useful if you're creating bundles. A bundle occurs when a customer purchases a collection of items.
For example, you've bought a computer system. The computer system consists of a monitor, keyboard, and mouse. Though you've ordered only one item number, it's considered a parent item that has child items. In this scenario, the parent item is the computer system. The child items are the monitor, keyboard, and mouse. In simpler terms, the parent item is the collection of items or the term that refers to the one item number, whereas the child items are included within that bundle.
The Allocation method that you select on the revenue split template determines how the revenue is distributed between the parent item and its child items:
| Allocation method | Description |
|---|---|
| Equal amount | The allocation percentages are calculated automatically and split equally among all the items in the template. |
| Percentage | You specify a percentage for each child item. The sum of all percentages must equal 100. |
| Variable amount | Child items are added with a net amount of 0 (zero). You specify the price of the child items at the transaction level. |
| Zero amount | The parent item keeps its unit price and net amount, so it has 100 percent of the revenue presented to the customer. All child items have a net amount of 0 (zero) and are informational. |
| Zero parent amount | The parent item has a fixed net amount of 0 (zero), and each child item is treated as a standard item that shows a portion of the revenue. No validation verifies that the sum of the child item amounts equals the parent item amount. |
When you create a parent item, keep these restrictions in mind: you can specify an item as a parent item only one time, a valid template requires at least one child item, each parent-child relation must be unique, and the same item can be a child item for more than one bundle.
Before using the revenue split functionality, you'll need to enable the parameters:
Go to Subscription billing > Recurring contract billing > Setup > Recurring contract billing parameters.
In the General section, set the Automatically create revenue split toggle to Yes.
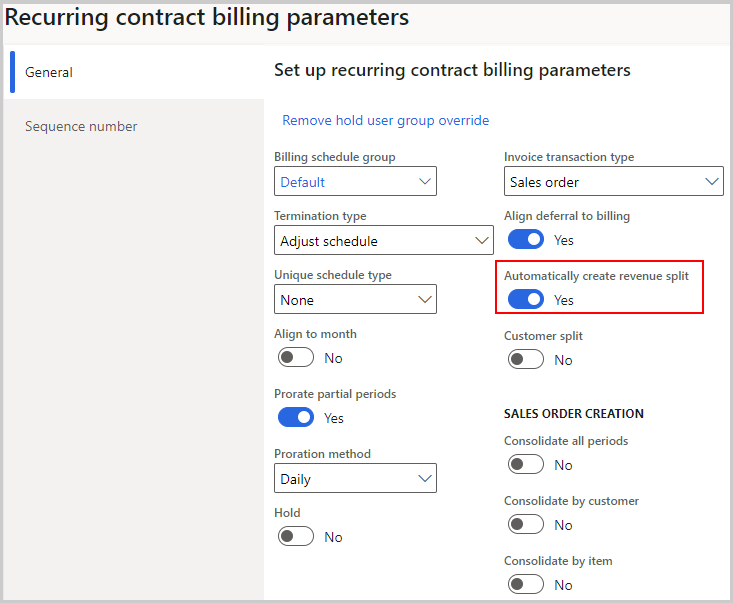
To create a parent item that has a child item, follow these steps:
Go to Subscription billing > Recurring contract billing > Setup > Revenue split template.
Select New.
Select the parent item in the Parent item field. The Variant number field updates automatically, and you can change the value if needed.
Select the allocation method in the Allocation method field.
In Component items, select Add to add child items.
Select an item inside the Component item field and designate a percentage for each item in the Percentage field, if you selected Percentage as your allocation method. If you selected Equal amount, the Percentage field updates automatically so that every item has an equal percentage. If you selected Variable amount, Zero parent amount, or Zero amount, the Percentage field stays at 0 and can't be changed.
Select Save.
Follow these steps to create a revenue split on a sales order:
Go to Accounts receivable > Orders > All sales orders.
Select New to create a new sales order.
Enter the customer account name in the Customer account field and then select OK.
Inside your new sales order, scroll down to the Sales order lines tab and select Add line.
Enter the item number in the Item number field.
Note
As you enter the parent item that you previously created, the child items will appear on your sales order lines.
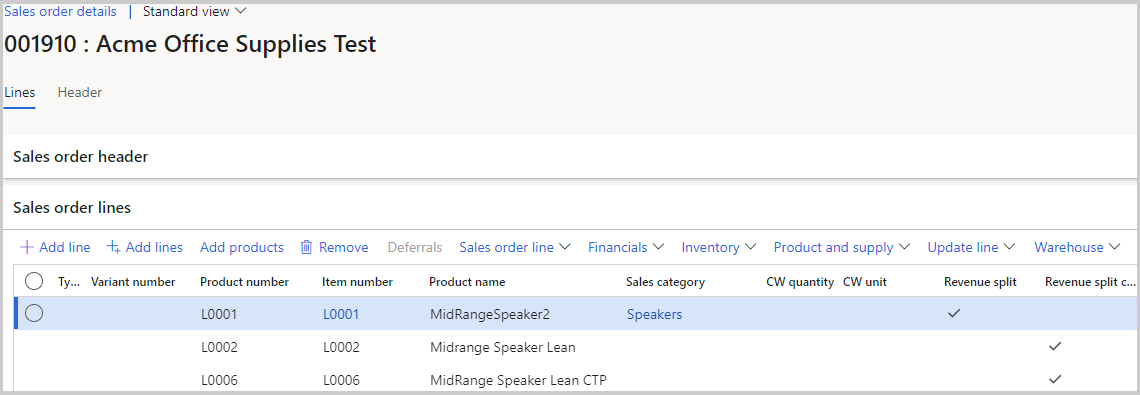
Follow these steps to create a billing schedule that has an item that's set up for revenue split:
Go to Subscription billing > Recurring contract billing > Billing schedules > All billing schedules.
Select New.
Enter the Customer account, Billing start date, and Billing end date information. Select OK.
Under the Billing schedule lines tab, select Add line.
Add the item number in the Item number field that's associated with the parent item.
Select the checkbox in the Revenue split field.
Note
When you select the Revenue split field, the child items that are associated with that specific parent item will appear. To add more child items to a sales order or billing schedule, select Add revenue split child, and then select the child item that you want to add.
You can use the Split billing functionality to allow users to select customers as other responsible parties on a billing schedule.
This feature allows multiple customers to be billed from a single contract. This single contract can have a single billing schedule for each customer. You can produce an invoice for multiple customers based on a single billing schedule. Inside of the Split billing functionality, you can define each customer's individual responsibility.
You can also add Quotation enhancements to generate sales quotations by using the pre-existing quotations report from your billing schedule. When you do so, data is automatically stored in existing sales quotation tables, which allows you to reprint sales quotations. This data is valuable because many customers import billing information from external systems, whereas customers who start with a billing schedule don't have an existing process for creating a quotation.