Terminate billing scheduling
You can terminate billing scheduling in situations where users need to cancel contracts and give prorated refunds or when users need to adjust the deferral schedule on contract termination. Specifically, this action will stop further billings to the client starting at a certain time. To do so, you'll activate the terminate billing scheduling functionality.
You can terminate a billing schedule or billing schedule line from the All/Active billing schedules list page, from a specific billing schedule, or from a specific billing schedule line. The schedule or line must have a status of Active; you can't terminate a schedule that has a status of On hold.
Note
To terminate several billing schedules at the same time, use the Mass termination processing page.
To terminate billing scheduling, follow these steps:
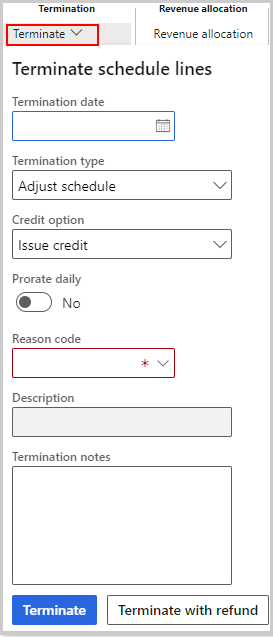
Select the Billing schedule or Billing schedule line that has an Active status. When you've made your selection, select Terminate.
Enter the appropriate information in the Termination date field and the Termination type and Reason code dropdown menus.
Set the Credit option to Issue credit.
Select Terminate.
Note
Based on the termination type that you select, the billing schedule status will change. Bill remaining will change the status of all lines in the billing schedule to Last billing. Until the last invoice is processed, the Billing schedule will remain Active. However, if you select Adjust schedule as the termination type, it will be updated immediately to Terminated.
To terminate a billing schedule or line and apply a refund, follow these steps:
Select the Billing schedule or Billing schedule line that has an Active status.
When you've made your selection, select Terminate.
Enter the appropriate information in the Termination date field and the Termination type and Reason code dropdown menus.
Set the Credit option to Issue credit.
Select Terminate with refund. The Mass termination processing page appears, filtered to show the billing schedule.
Select View preview to review the billing schedule lines, and then select Process.
Note
After the credit is processed, open the View billing detail page to review the credit that was applied. If the credit amount is more than zero, all future unbilled lines are deleted and replaced with billing detail lines that show the negative credit amounts.
To terminate a billing schedule or line without applying a credit, follow these steps:
Select the Billing schedule or Billing schedule line, and then select Terminate.
Enter the Termination date.
Set the Termination type to No adjustment. The Credit option field is automatically set to No credit.
Set the Reason code and enter any required Termination notes.
Select Terminate.
Note
When the termination is processed, all billing detail lines after the termination date are removed, including the line that contains the termination date. If you remove the termination, the terminated lines are added back to the View billing details page and become available for invoicing.