Unbilled revenue
You can use unbilled revenue to recognize revenue that you've earned but aren't able to contractually bill yet. You can also use unbilled revenue to recognize an amount that's different from what you bill each period. This functionality lets you recognize revenue based on the actual quantity consumed or revenue earned.
A journal entry is created to move the sales amount into deferred revenue. It complies with the correct revenue amounts according to ASC 606/IFRS 15. Then, billing moves amounts from unbilled Accounts Receivable (AR) to AR.
Consider a scenario where you have a contract with the customer to bill them for 20 hours of professional services each month. You want to recognize only what you have used by the end of each period, not what you've billed. First, you'll need to set up items to use on a billing schedule. Then, you'll create a new billing schedule and add the items that you previously set up to implement the unbilled revenue functionality and generate an invoice for your customer.
Note
Before you set up items, complete the fields in the Unbilled revenue section of the Subscription billing > Recurring contract billing > Setup > Recurring contract billing parameters page. You can use unbilled revenue for items where the Item type field is set to Standard, and for deferral items.
Follow these steps to set up items to use unbilled revenue:
Go to Subscription billing > Recurring contract billing > Setup > Unbilled revenue setup.
On the Items tab, select Add.
Enter Item code and Item relation. Repeat these steps to add more lines.
Select Save.
Follow these steps to set up the unbilled revenue accounts:
On the Unbilled revenue setup page, select the Accounts tab and then select Add to create a line.
Enter the Item code and Item relation values, and then select the unbilled revenue, unbilled discount, and unbilled revenue offset accounts.
Note
The offset accounts become available when you set the Use unbilled offset accounts option to Yes on the Recurring contract billing parameters page. Use them when billing schedules are created in a currency other than the accounting currency, so that the unbilled revenue and unbilled discount accounts are reversed by using the same exchange rates as the initial entries.
Note
To use the short-term accounts, set the Short-term unbilled method field to Rolling periods or Fixed year on the Recurring contract billing parameters page.
Select Save.
Follow these steps to set up items and unbilled revenue accounts:
Go to Subscription billing > Recurring contract billing > Billing schedules > All billing schedules.
Select New to create a new billing schedule.
In Billing schedule lines, select Add line.
In the new line, enter the Item number.
Note
When you enter the Item number, the other fields will automatically update. Make sure that you verify that the rest of the fields are automatically updated with the correct information.
Adjust the Deferred field as necessary.
Note
If the Deferred field is turned off, the journal entry will automatically recognize 100 percent of that revenue today, even if you haven't yet billed the customer. If the Deferred field is turned on, you can customize the portion of the revenue that will be seen today.
To implement the Unbilled revenue functionality to your newly created item, set the option to Yes.
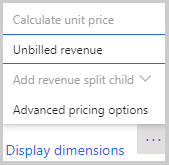
Go to the Action Pane and select Create journal entry under Unbilled revenue processing. You must complete this step before the billing schedule is invoiced. Alternatively, you can use the Unbilled revenue mass processing page to create the journal entry.
Enter any missing information.
Select Preview and then verify the information on the preview page.
Select Process.
After the journal entry has been processed, go to Invoice > Generate invoice.
Select View billing schedule.
Select Generate all.
Note
A prompt will appear, indicating when you have successfully generated an invoice.
After the invoices are posted, you can review the audit information for items that use unbilled revenue by selecting Unbilled revenue journal entry audit on the Renewals tab of the All billing schedules page.
Consumer price index schedule
You can use a consumer price index schedule to determine the prices for consumer goods and services that you add as a billing schedule line. In addition, you can use the consumer price index schedule with escalation and discount pricing on a billing schedule. You can also manually update the billing amounts that are located in the billing schedule. You can enter consumer price index schedules manually, or import them by using the consumer price index schedule composite entity.
The Consumer price index calculation field determines how an escalation is calculated. Set a default value on the Recurring contract billing parameters page, and select the value for an individual escalation on the Escalation and discount page:
Base consumer price index - Use the base consumer price index value (the value when the contract started) for the escalation calculation.
Prior consumer price index - Use the previous consumer price index value for the escalation calculation.
Follow these steps to add a consumer price index schedule:
Go to Subscription billing > Recurring contract billing > Setup > Consumer price index schedule.
Select New.
Enter a name in the Consumer price index schedule field.
In the Description field, enter a description.
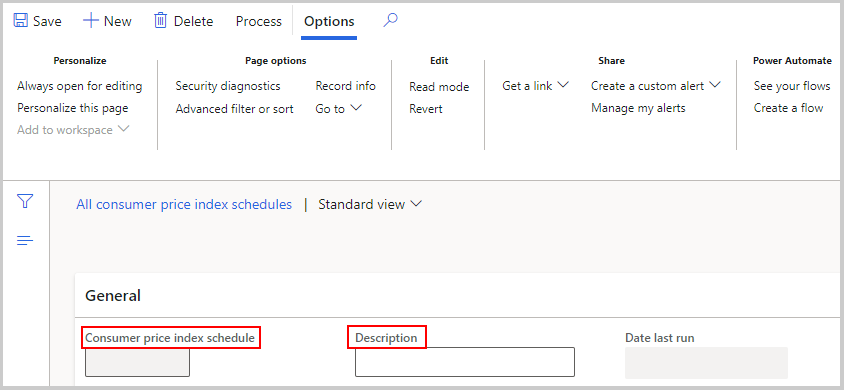
Under the Consumer price index schedule tab, select Add.
In the Consumer price index date field, specify the date when the Consumer price index schedule will become active.
Enter a value in the Consumer price index schedule.
Select Save.
If you want to delete a line in the consumer price index schedule, follow these steps:
Go to Subscription billing > Recurring contract billing > Setup > Consumer price index schedule.
Select the billing schedule that you want to delete the line from.
Select the lines that you want to delete. Select Remove.
If you want to delete the whole consumer price index schedule, follow these steps:
Go to Subscription billing > Recurring contract billing > Setup > Consumer price index schedule.
Select the schedule that you want to remove.
Select Delete.
Note
You can't delete the whole consumer price index schedule if it's associated with any billing schedule.
Select Process on the Action Pane to update the billing schedules that use the selected consumer price index schedule. The latest dates and schedule amounts will be used to update the billing schedule prices.
On the Consumer price index process FastTab, review the updated Billing schedule number, Item number, Billing start date, Billing end date, Escalation date, and Escalation frequency fields.