Note
Access to this page requires authorization. You can try signing in or changing directories.
Access to this page requires authorization. You can try changing directories.
Original product version: Azure Backup
Original KB number: 4033999
This article describes how to resolve issues that you may experience when you use Azure Site Recovery in situations in which the following security protocol settings are made to achieve security hardening for Peripheral Component Interconnect (PCI) compliance:
- Transport Layer Security (TLS) 1.0 is disabled
- TLS 1.1 and TLS 1.2 are enabled
To update TLS settings, refer to this article.
Symptoms
After you disable TLS 1.0, you may experience one or more of the following issues:
- Ongoing protection starts to fail.
- Scale-out Process Server (PS) registrations fail.
- Mobility service installations fail.
- Services that are related to the Azure Site Recovery agents do not stop or start as usual.
Cause
These issues can occur for the following reasons:
- The .NET Framework version 4.6 or a later version is not available.
- The .NET Framework version 4.6 or a later version is available but strong cryptography (SchUseStrongCrypto) is disabled.
Resolution
Important
Follow the steps in this section carefully. Serious problems might occur if you modify the registry incorrectly. Before you modify it, back up the registry for restoration in case problems occur.
To fix these issues, make sure that the .NET Framework 4.6 or a later version is installed and TLS 1.2 is enabled as the default protocol. To enable TLS 1.2, follow these steps:
Open a Command Prompt window as an administrator.
At the elevated command prompt, run the following command:
net stop obengineStart Registry Editor, and then navigate to the following registry subkeys:
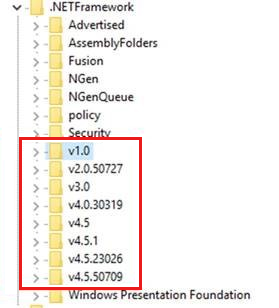
HKEY_LOCAL_MACHINE\Software\Wow6432Node\Microsoft\.NETFrameworkHKEY_LOCAL_MACHINE \Software\Microsoft\.NETFrameworkUnder each of these registry keys, locate the subkeys that indicate a version.
Note
These subkeys appear in the "v<VersionNumber>" format.

For each of these subkeys, add a DWORD Value that is named SchUseStrongCrypto, and set its value to 1.

Repeat step 5 for all the subkeys that have the "v<VersionNumber>" format.
Exit Registry Editor.
At an elevated command prompt, run the following command:
net start obengine
After you complete these steps, you should be able to install and use Azure Site Recovery as expected.
Contact us for help
If you have questions or need help, create a support request, or ask Azure community support. You can also submit product feedback to Azure feedback community.