Customize the user interface in Azure Active Directory B2C
Before you begin, use the Choose a policy type selector at the top of this page to choose the type of policy you’re setting up. Azure Active Directory B2C offers two methods to define how users interact with your applications: through predefined user flows or through fully configurable custom policies. The steps required in this article are different for each method.
Branding and customizing the user interface that Azure Active Directory B2C (Azure AD B2C) displays to your customers, helps provide a seamless user experience in your application. These experiences include signing up, signing in, profile editing, and password resetting. In this article, you customize your Azure AD B2C pages using page template, and company branding.
Tip
To customize other aspects of your user flow pages beyond the page template, banner logo, background image, or background color, see how to customize the UI with HTML template.
Prerequisites
- Create a user flow so users can sign up and sign in to your application.
- Register a web application.
- Complete the steps in Get started with custom policies in Active Directory B2C. This tutorial guides you how to update custom policy files to use your Azure AD B2C tenant configuration.
- Register a web application.
Overview
Azure AD B2C provide several built-in templates you can choose from to give your user experience pages a professional look. These page templates can also and serve as starting point for your own customization, using the company branding feature.
Note
Supported browsers for the Classic template include current and previous versions of Internet Explorer, Microsoft Edge, Google Chrome, Mozilla Firefox, and Safari. The Ocean Blue and Slate Gray templates may have limited support with older browser versions, such as Internet Explorer 11 and 10; we recommend that you test your application with the browsers you intend to support.
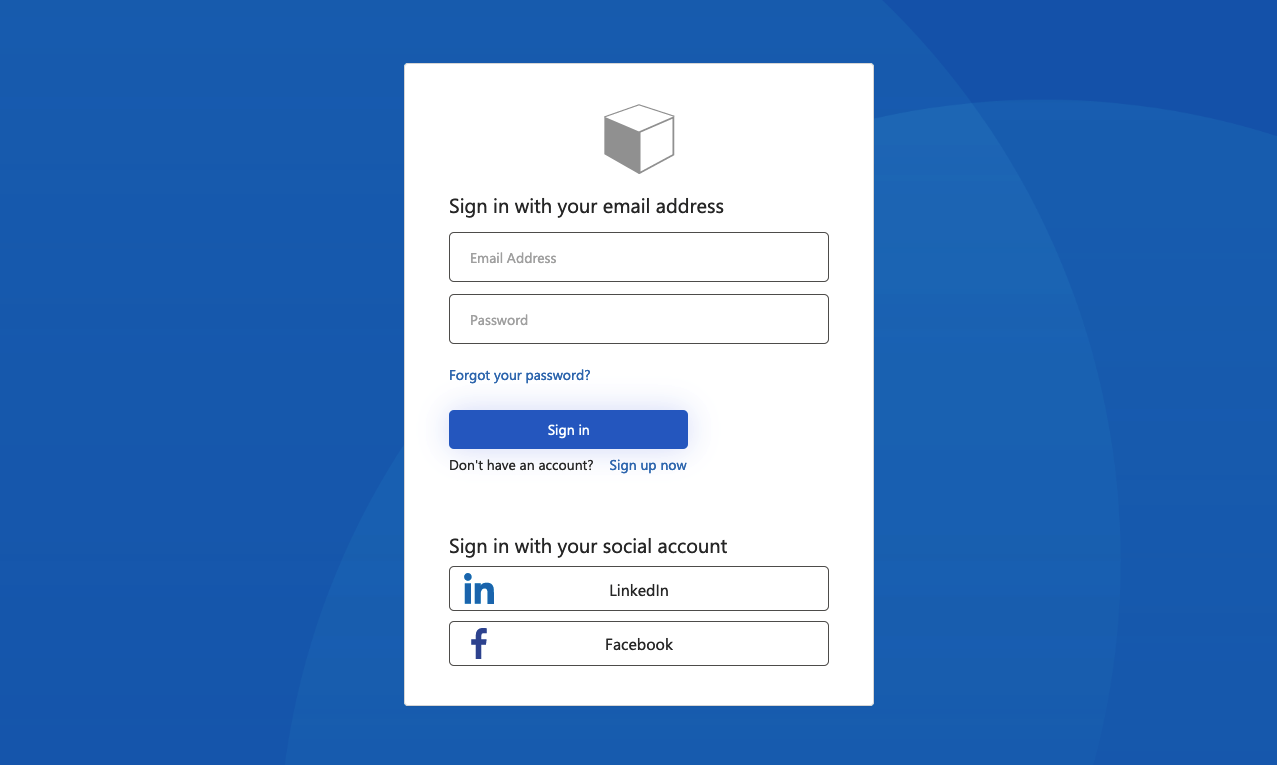
Ocean Blue
Example of the Ocean Blue template rendered on sign-up and sign-in page:
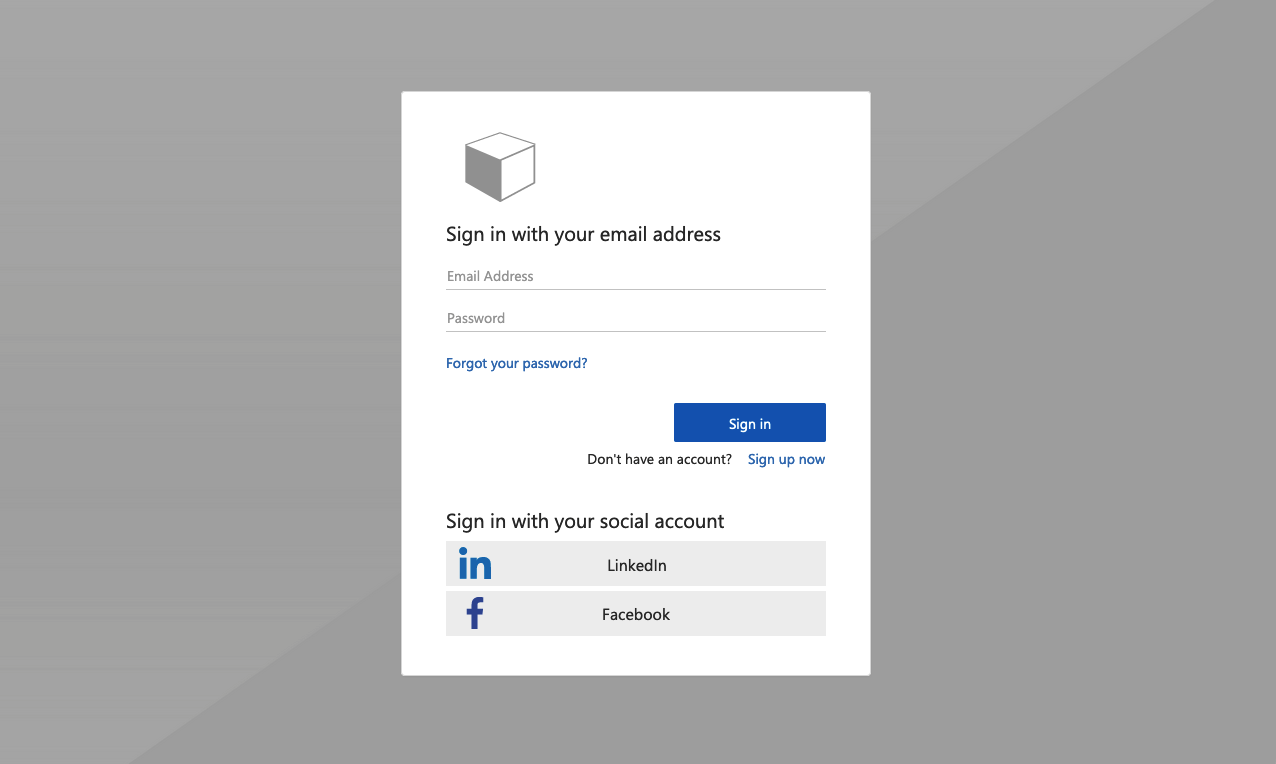
Slate Gray
Example of the Slate Gray template rendered on sign-up sign-in page:
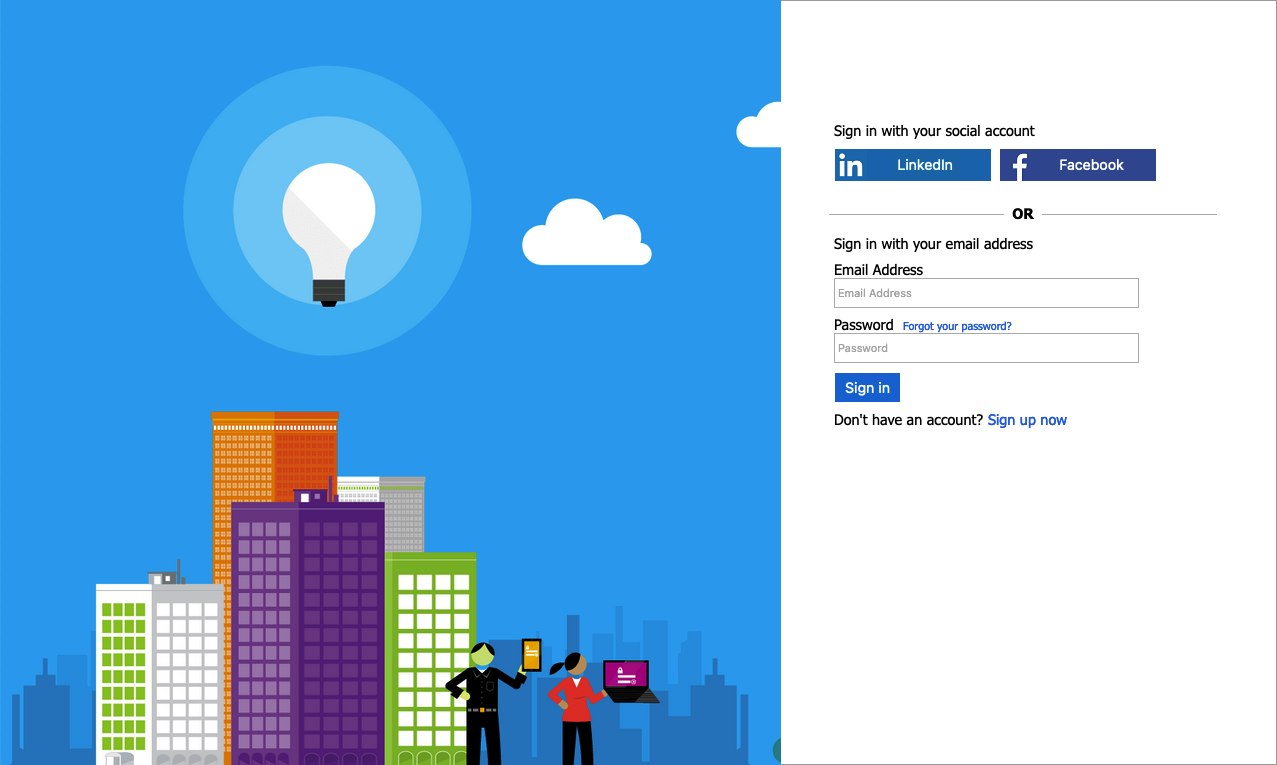
Classic
Example of the Classic template rendered on sign-up sign-in page:
Company branding
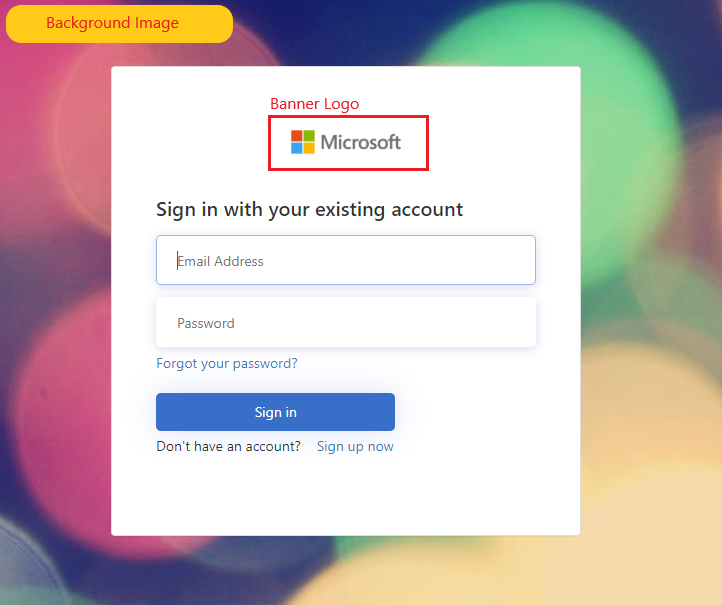
You can customize your Azure AD B2C pages with a banner logo, background image, and background color by using Microsoft Entra ID Company branding. The company branding includes signing up, signing in, profile editing, and password resetting.
The following example shows a Sign-up and sign-in page with a custom logo, background image, using Ocean Blue template:
Select a page template
- Sign in to the Azure portal.
- If you have access to multiple tenants, select the Settings icon in the top menu to switch to your Azure AD B2C tenant from the Directories + subscriptions menu.
- In the Azure portal, search for and select Azure AD B2C.
- Select User flows.
- Select a user flow you want to customize.
- Under Customize in the left menu, select Page layouts and then select a Template.
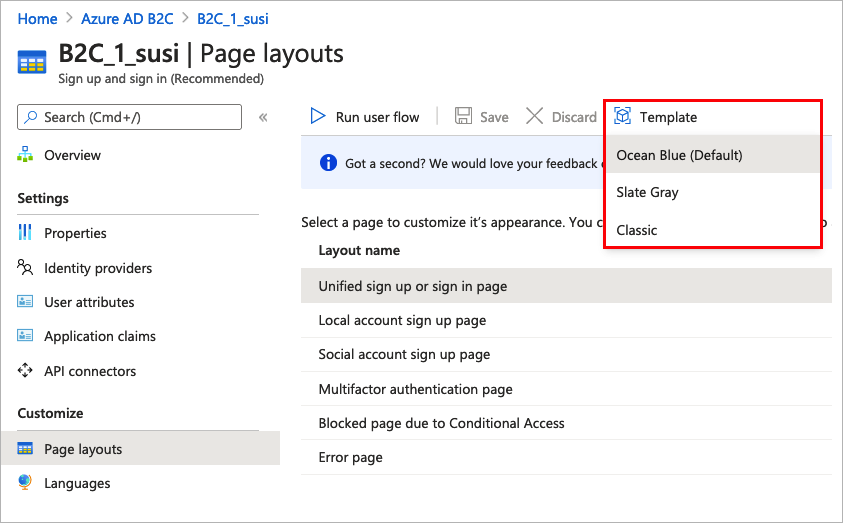
When you choose a template, the selected template is applied to all pages in your user flow. The URI for each page is visible in the Custom page URI field.
To select a page template, set the LoadUri element of the content definitions. The following example shows the content definition identifiers and the corresponding LoadUri.
Ocean Blue:
<ContentDefinitions>
  <ContentDefinition Id="api.error">
    <LoadUri>~/tenant/templates/AzureBlue/exception.cshtml</LoadUri>
  </ContentDefinition>
  <ContentDefinition Id="api.idpselections">
    <LoadUri>~/tenant/templates/AzureBlue/idpSelector.cshtml</LoadUri>
  </ContentDefinition>
  <ContentDefinition Id="api.idpselections.signup">
    <LoadUri>~/tenant/templates/AzureBlue/idpSelector.cshtml</LoadUri>
  </ContentDefinition>
  <ContentDefinition Id="api.signuporsignin">
    <LoadUri>~/tenant/templates/AzureBlue/unified.cshtml</LoadUri>
  </ContentDefinition>
  <ContentDefinition Id="api.selfasserted">
    <LoadUri>~/tenant/templates/AzureBlue/selfAsserted.cshtml</LoadUri>
  </ContentDefinition>
  <ContentDefinition Id="api.selfasserted.profileupdate">
    <LoadUri>~/tenant/templates/AzureBlue/selfAsserted.cshtml</LoadUri>
  </ContentDefinition>
  <ContentDefinition Id="api.localaccountsignup">
    <LoadUri>~/tenant/templates/AzureBlue/selfAsserted.cshtml</LoadUri>
  </ContentDefinition>
  <ContentDefinition Id="api.localaccountpasswordreset">
    <LoadUri>~/tenant/templates/AzureBlue/selfAsserted.cshtml</LoadUri>
  </ContentDefinition>
  <ContentDefinition Id="api.phonefactor">
    <LoadUri>~/tenant/templates/AzureBlue/multifactor-1.0.0.cshtml</LoadUri>
  </ContentDefinition>
</ContentDefinitions>
Slate Gray:
<ContentDefinitions>
  <ContentDefinition Id="api.error">
    <LoadUri>~/tenant/templates/MSA/exception.cshtml</LoadUri>
  </ContentDefinition>
  <ContentDefinition Id="api.idpselections">
    <LoadUri>~/tenant/templates/MSA/idpSelector.cshtml</LoadUri>
  </ContentDefinition>
  <ContentDefinition Id="api.idpselections.signup">
    <LoadUri>~/tenant/templates/MSA/idpSelector.cshtml</LoadUri>
  </ContentDefinition>
  <ContentDefinition Id="api.signuporsignin">
    <LoadUri>~/tenant/templates/MSA/unified.cshtml</LoadUri>
  </ContentDefinition>
  <ContentDefinition Id="api.selfasserted">
    <LoadUri>~/tenant/templates/MSA/selfAsserted.cshtml</LoadUri>
  </ContentDefinition>
  <ContentDefinition Id="api.selfasserted.profileupdate">
    <LoadUri>~/tenant/templates/MSA/selfAsserted.cshtml</LoadUri>
  </ContentDefinition>
  <ContentDefinition Id="api.localaccountsignup">
    <LoadUri>~/tenant/templates/MSA/selfAsserted.cshtml</LoadUri>
  </ContentDefinition>
  <ContentDefinition Id="api.localaccountpasswordreset">
    <LoadUri>~/tenant/templates/MSA/selfAsserted.cshtml</LoadUri>
  </ContentDefinition>
  <ContentDefinition Id="api.phonefactor">
    <LoadUri>~/tenant/templates/MSA/multifactor-1.0.0.cshtml</LoadUri>
  </ContentDefinition>
</ContentDefinitions>
Classic:
<ContentDefinitions>
  <ContentDefinition Id="api.error">
    <LoadUri>~/tenant/default/exception.cshtml</LoadUri>
  </ContentDefinition>
  <ContentDefinition Id="api.idpselections">
    <LoadUri>~/tenant/default/idpSelector.cshtml</LoadUri>
  </ContentDefinition>
  <ContentDefinition Id="api.idpselections.signup">
    <LoadUri>~/tenant/default/idpSelector.cshtml</LoadUri>
  </ContentDefinition>
  <ContentDefinition Id="api.signuporsignin">
    <LoadUri>~/tenant/default/unified.cshtml</LoadUri>
  </ContentDefinition>
  <ContentDefinition Id="api.selfasserted">
    <LoadUri>~/tenant/default/selfAsserted.cshtml</LoadUri>
  </ContentDefinition>
  <ContentDefinition Id="api.selfasserted.profileupdate">
    <LoadUri>~/tenant/default/selfAsserted.cshtml</LoadUri>
  </ContentDefinition>
  <ContentDefinition Id="api.localaccountsignup">
    <LoadUri>~/tenant/default/selfAsserted.cshtml</LoadUri>
  </ContentDefinition>
  <ContentDefinition Id="api.localaccountpasswordreset">
    <LoadUri>~/tenant/default/selfAsserted.cshtml</LoadUri>
  </ContentDefinition>
  <ContentDefinition Id="api.phonefactor">
    <LoadUri>~/tenant/default/multifactor-1.0.0.cshtml</LoadUri>
  </ContentDefinition>
</ContentDefinitions>
Configure company branding
To customize your user flow pages, you first configure company branding in Microsoft Entra ID, then you enable it in your user flows in Azure AD B2C.
Start by setting the banner logo, background image, and background color within Company branding.
- Sign in to the Azure portal.
- If you have access to multiple tenants, select the Settings icon in the top menu to switch to your Azure AD B2C tenant from the Directories + subscriptions menu.
- In the Azure portal, search for and select Azure AD B2C.
- Under Manage, select Company branding.
- Follow the steps in Add branding to your organization's Microsoft Entra sign-in page.
Keep these things in mind when you configure company branding in Azure AD B2C:
- Company branding in Azure AD B2C is currently limited to background image, banner logo, and background color customization. The other properties in the company branding pane, for example, Advanced settings, aren't supported.
- In your user flow pages, the background color is shown before the background image is loaded. We recommended you choose a background color that closely matches the colors in your background image for a smoother loading experience.
- The banner logo appears in the verification emails sent to your users when they initiate a sign-up user flow.
Enable company branding in user flow pages
Once you've configured company branding, enable it in your user flows.
- In the left menu of the Azure portal, select Azure AD B2C.
- Under Policies, select User flows (policies).
- Select the user flow for which you'd like to enable company branding. Company branding is not supported for the standard Sign in and standard Profile editing user flow types.
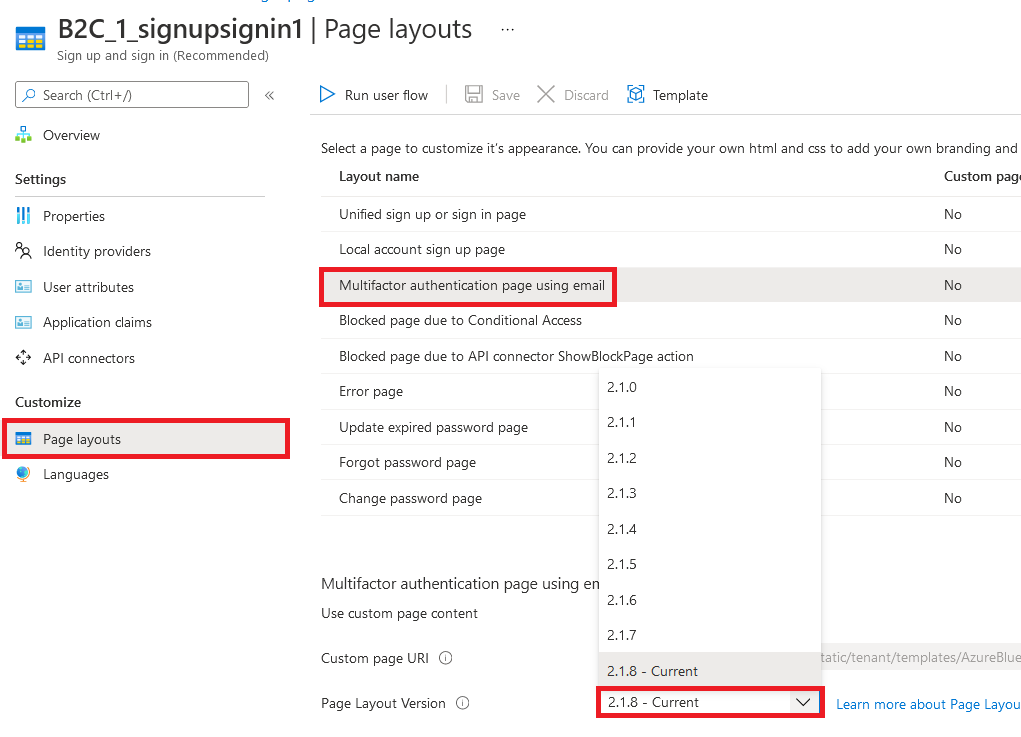
- Under Customize, select Page layouts, and then select the page you'd like to brand. For example, select Unified sign up or sign in page.
- For the Page Layout Version (Preview), choose version 1.2.0 or above.
- Select Save.
If you'd like to brand all pages in the user flow, set the page layout version for each page layout in the user flow.
Enable company branding in custom policy pages
Once you've configured company branding, enable it in your custom policy. Configure the page layout version with page contract version for all of the content definitions in your custom policy. The format of the value must contain the word contract: urn:com:microsoft:aad:b2c:elements:contract:page-name:version. To specify a page layout in your custom policies that use an old DataUri value. For more information, learn how to migrate to page layout with page version.
The following example shows the content definitions with their corresponding the page contract, and Ocean Blue page template:
<ContentDefinitions>
  <ContentDefinition Id="api.error">
    <LoadUri>~/tenant/templates/AzureBlue/exception.cshtml</LoadUri>
    <DataUri>urn:com:microsoft:aad:b2c:elements:contract:globalexception:1.2.0</DataUri>
  </ContentDefinition>
  <ContentDefinition Id="api.idpselections">
    <LoadUri>~/tenant/templates/AzureBlue/idpSelector.cshtml</LoadUri>
    <DataUri>urn:com:microsoft:aad:b2c:elements:contract:providerselection:1.2.0</DataUri>
  </ContentDefinition>
  <ContentDefinition Id="api.idpselections.signup">
    <LoadUri>~/tenant/templates/AzureBlue/idpSelector.cshtml</LoadUri>
    <DataUri>urn:com:microsoft:aad:b2c:elements:contract:providerselection:1.2.0</DataUri>
  </ContentDefinition>
  <ContentDefinition Id="api.signuporsignin">
    <LoadUri>~/tenant/templates/AzureBlue/unified.cshtml</LoadUri>
    <DataUri>urn:com:microsoft:aad:b2c:elements:contract:unifiedssp:1.2.0</DataUri>
  </ContentDefinition>
  <ContentDefinition Id="api.selfasserted">
    <LoadUri>~/tenant/templates/AzureBlue/selfAsserted.cshtml</LoadUri>
    <DataUri>urn:com:microsoft:aad:b2c:elements:contract:selfasserted:1.2.0</DataUri>
  </ContentDefinition>
  <ContentDefinition Id="api.selfasserted.profileupdate">
     <LoadUri>~/tenant/templates/AzureBlue/selfAsserted.cshtml</LoadUri>
    <DataUri>urn:com:microsoft:aad:b2c:elements:contract:selfasserted:1.2.0</DataUri>
  </ContentDefinition>
  <ContentDefinition Id="api.localaccountsignup">
     <LoadUri>~/tenant/templates/AzureBlue/selfAsserted.cshtml</LoadUri>
    <DataUri>urn:com:microsoft:aad:b2c:elements:contract:selfasserted:1.2.0</DataUri>
  </ContentDefinition>
  <ContentDefinition Id="api.localaccountpasswordreset">
     <LoadUri>~/tenant/templates/AzureBlue/selfAsserted.cshtml</LoadUri>
    <DataUri>urn:com:microsoft:aad:b2c:elements:contract:selfasserted:1.2.0</DataUri>
  </ContentDefinition>
  <ContentDefinition Id="api.phonefactor">
    <LoadUri>~/tenant/templates/AzureBlue/multifactor-1.0.0.cshtml</LoadUri>
    <DataUri>urn:com:microsoft:aad:b2c:elements:contract:multifactor:1.2.0</DataUri>
  </ContentDefinition>
</ContentDefinitions>
Rearrange input fields in the sign-up form
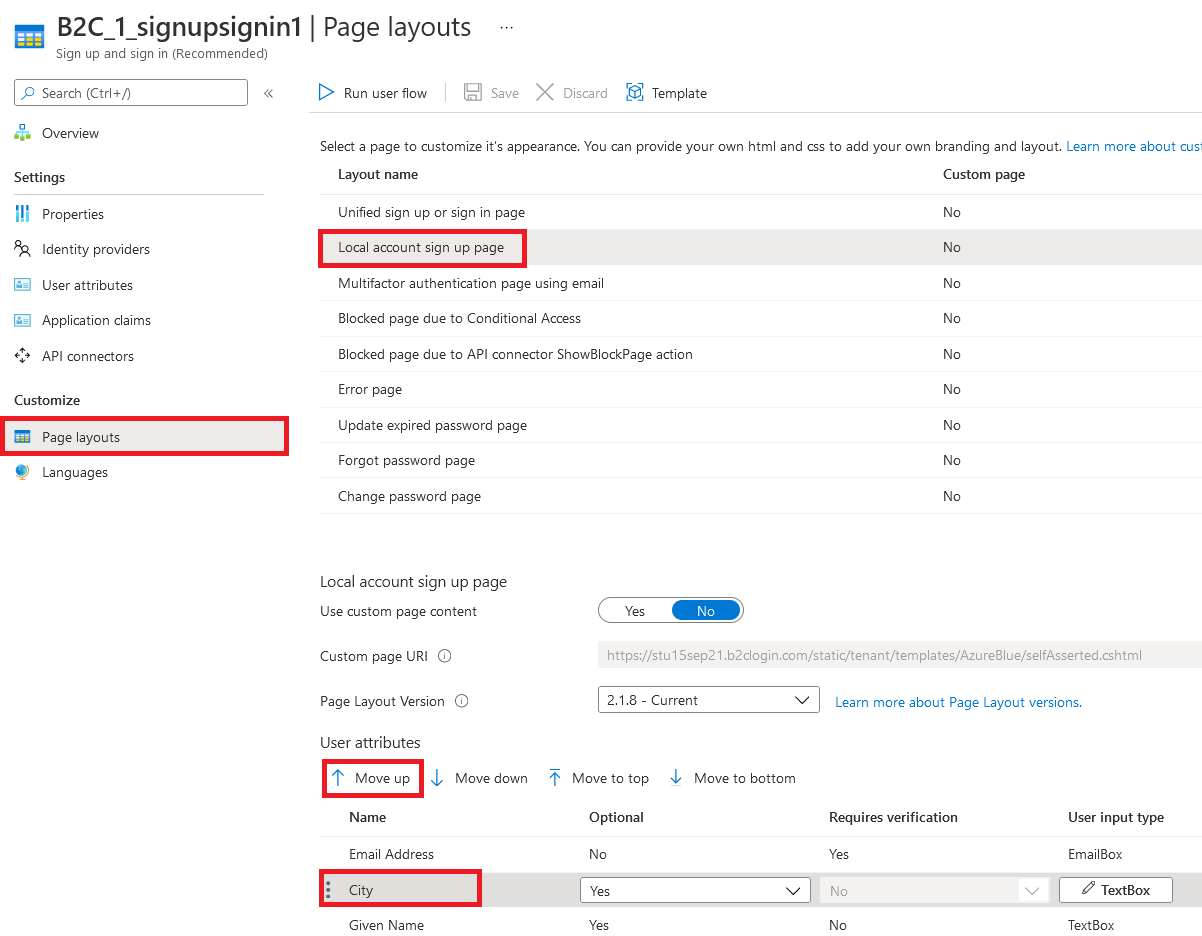
To rearrange the input fields on the sign-up page for local accounts form, follow these steps:
- Sign in to the Azure portal.
- If you have access to multiple tenants, select the Settings icon in the top menu to switch to your Azure AD B2C tenant from the Directories + subscriptions menu.
- In the Azure portal, search for and select Azure AD B2C.
- In the left menu, select User flows.
- Select a user flow (for local accounts only) that you want to rearrange its input fields.
- In the left menu, select Page layouts
- In the table, select the row Local account sign up page.
- Under User attributes, select the input field you want to rearrange, and drag (up or down) and drop or use the Move Up or Move down controls to achieve the desired order.
- At the top of the page, select Save.
Next steps
Find more information about how you can customize the user interface of your applications in Customize the user interface of your application in Azure Active Directory B2C.