Tutorial: Build out an end-to-end solution
This Azure Digital Twins tutorial describes how to build out an end-to-end solution that demonstrates the functionality of the service. To set up a full end-to-end solution driven by live data from your environment, you can connect your Azure Digital Twins instance to other Azure services for management of devices and data.
In this tutorial, you will...
- Set up an Azure Digital Twins instance
- Learn about the sample building scenario and instantiate the pre-written components
- Use an Azure Functions app to route simulated telemetry from an IoT Hub device into digital twin properties
- Propagate changes through the twin graph by processing digital twin notifications with Azure Functions, endpoints, and routes
Prerequisites
Before beginning this tutorial, start with these prerequisites:
- If you don't have an Azure subscription, create a free account before you begin.
- This tutorial uses .NET. You can download the latest version of the .NET SDK for multiple platforms from Download .NET.
Then, continue through the rest of this section to set up the remaining prerequisites.
Get sample resources
The tutorial is driven by an Azure Digital Twins end-to-end sample project written in C#. Get the sample project on your machine by navigating to the sample link, and selecting the Browse code button underneath the title.
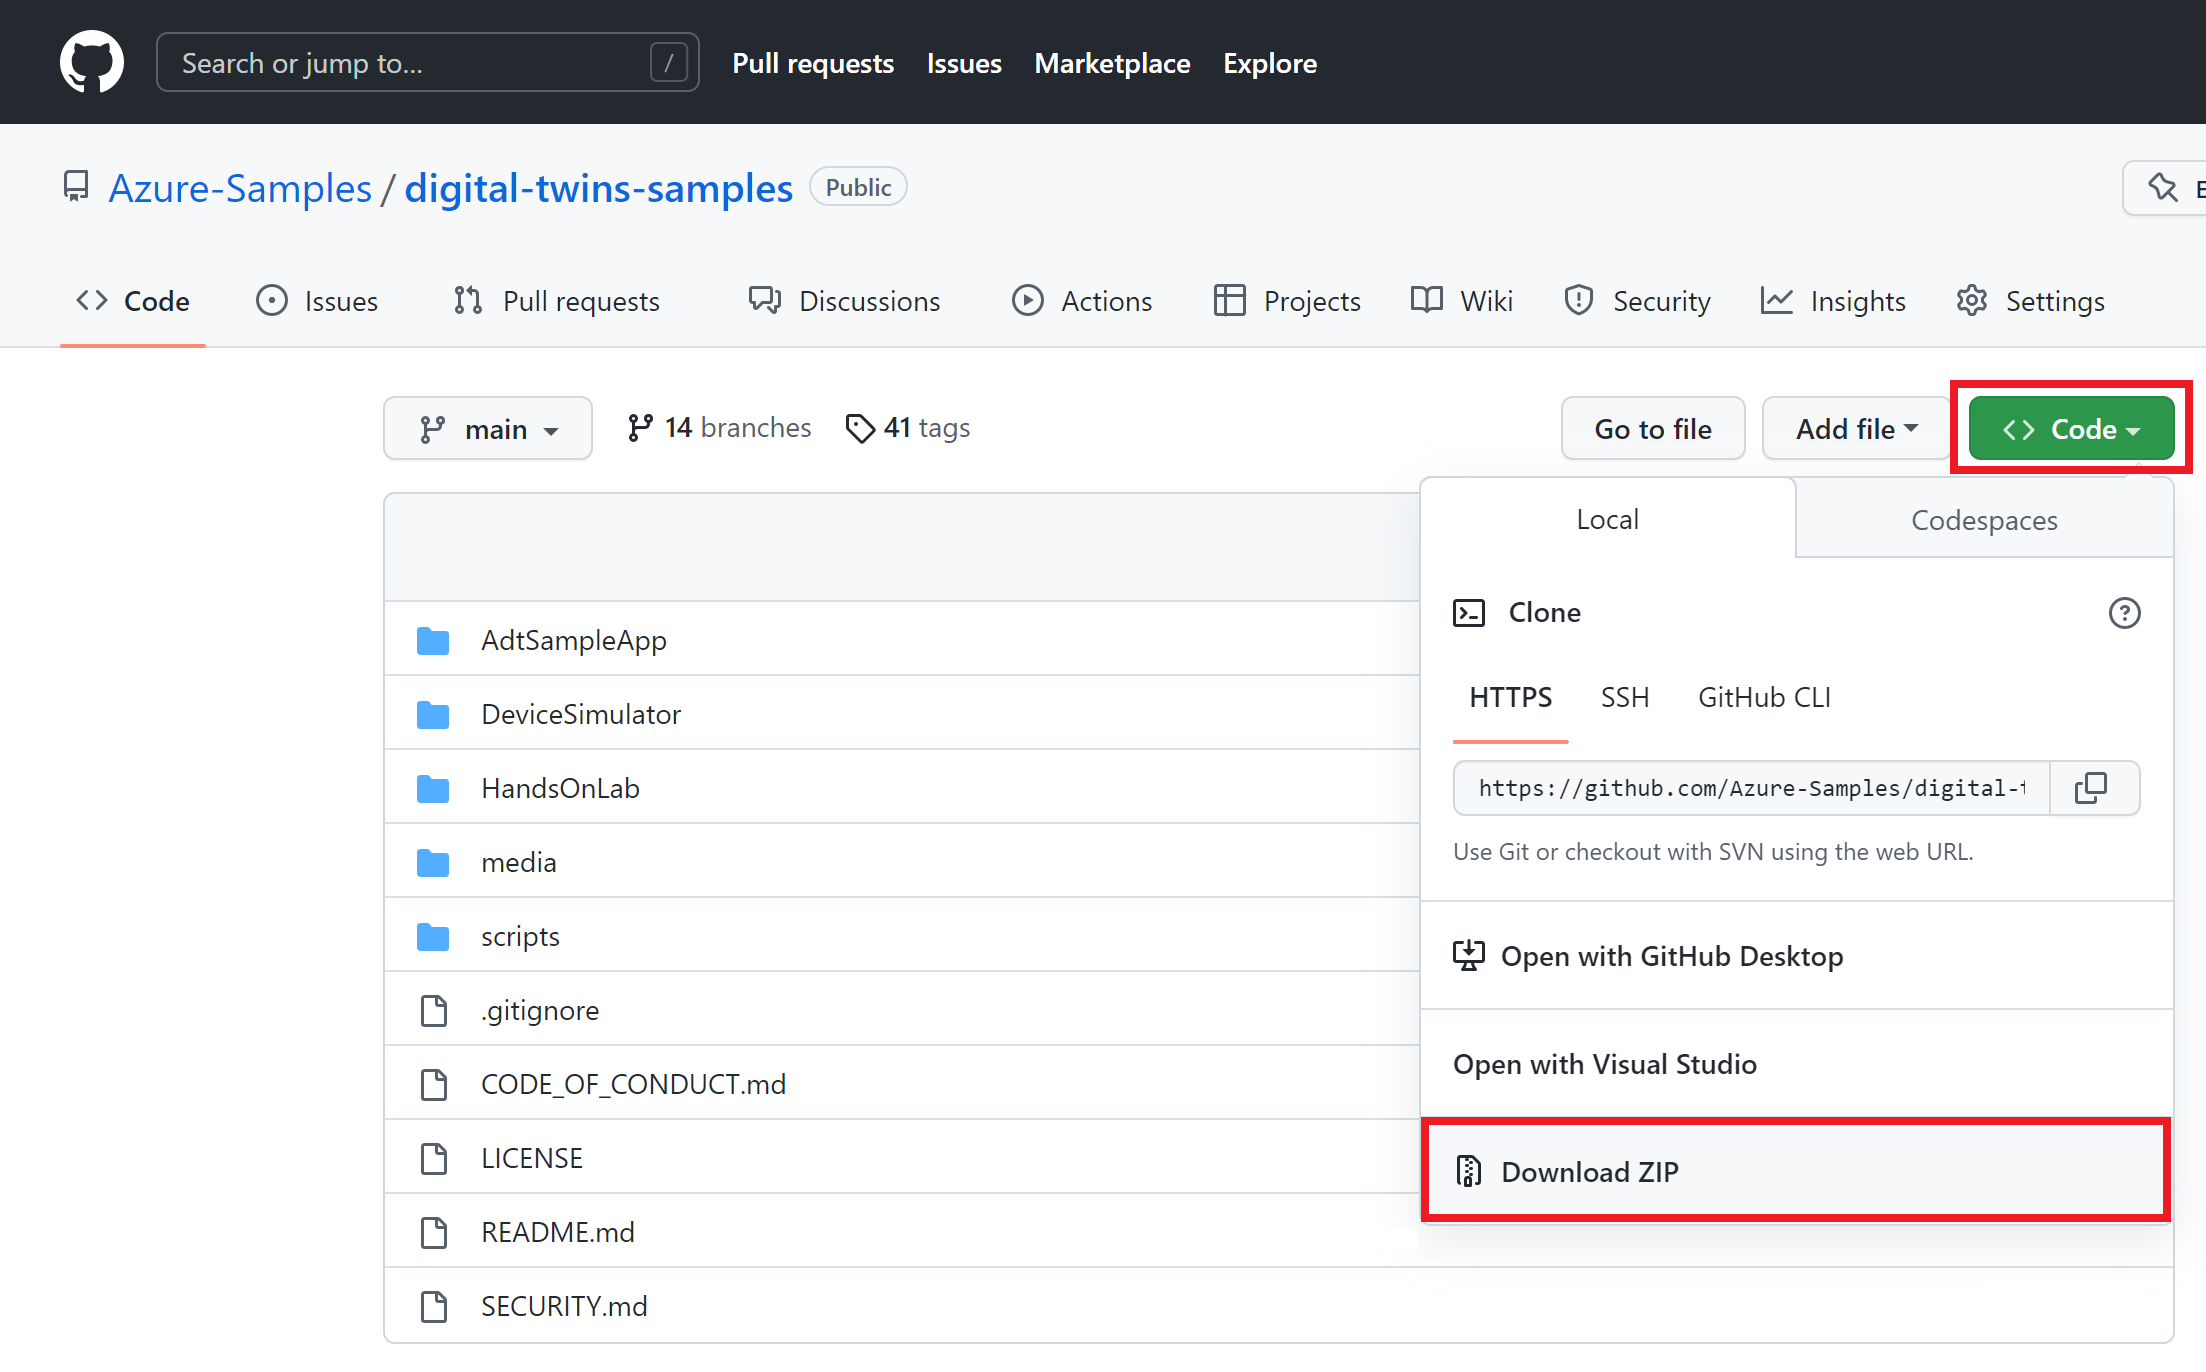
This will take you to the GitHub repo for the samples, which you can download as a .zip by selecting the Code button followed by Download ZIP.
This will download a .zip folder to your machine as digital-twins-samples-main.zip. Unzip the folder and extract the files.
Prepare an Azure Digital Twins instance
To work with Azure Digital Twins in this article, you'll need an Azure Digital Twins instance and the required permissions for using it. If you already have an Azure Digital Twins instance set up, you can use that instance and skip to the next section. Otherwise, follow the instructions in Set up an instance and authentication. The instructions contain information to help you verify that you've completed each step successfully.
After you set up your instance, make a note of the instance's host name. You can find the host name in the Azure portal.
Prepare your environment for the Azure CLI
Use the Bash environment in Azure Cloud Shell. For more information, see Quickstart for Bash in Azure Cloud Shell.
If you prefer to run CLI reference commands locally, install the Azure CLI. If you're running on Windows or macOS, consider running Azure CLI in a Docker container. For more information, see How to run the Azure CLI in a Docker container.
If you're using a local installation, sign in to the Azure CLI by using the az login command. To finish the authentication process, follow the steps displayed in your terminal. For other sign-in options, see Sign in with the Azure CLI.
When you're prompted, install the Azure CLI extension on first use. For more information about extensions, see Use extensions with the Azure CLI.
Run az version to find the version and dependent libraries that are installed. To upgrade to the latest version, run az upgrade.
Set up CLI session
To start working with Azure Digital Twins in the CLI, the first thing to do is log in and set the CLI context to your subscription for this session. Run these commands in your CLI window:
az login
az account set --subscription "<your-Azure-subscription-ID>"
Tip
You can also use your subscription name instead of the ID in the command above.
If this is the first time you've used this subscription with Azure Digital Twins, run this command to register with the Azure Digital Twins namespace. (If you're not sure, it's ok to run it again even if you've done it sometime in the past.)
az provider register --namespace 'Microsoft.DigitalTwins'
Next you'll add the Microsoft Azure IoT Extension for Azure CLI, to enable commands for interacting with Azure Digital Twins and other IoT services. Run this command to make sure you have the latest version of the extension:
az extension add --upgrade --name azure-iot
Now you are ready to work with Azure Digital Twins in the Azure CLI.
You can verify this by running az dt --help at any time to see a list of the top-level Azure Digital Twins commands that are available.
Configure the sample project
Next, set up a sample client application that will interact with your Azure Digital Twins instance.
Navigate on your machine to the folder you downloaded earlier from Azure Digital Twins end-to-end samples (and unzip it if you haven't already).
Once inside the folder, navigate into digital-twins-samples-main\AdtSampleApp\SampleClientApp and open the appsettings.json file. This JSON file contains a configuration variable that's necessary to run the project.
In the file body, change the instanceUrl to your Azure Digital Twins instance host name URL (by adding https:// in front of the host name, as shown below).
{
  "instanceUrl": "https://<your-Azure-Digital-Twins-instance-host-name>"
}
Save and close the file.
Set up local Azure credentials
This sample uses DefaultAzureCredential (part of the Azure.Identity library) to authenticate users with the Azure Digital Twins instance when you run it on your local machine. For more information on different ways a client app can authenticate with Azure Digital Twins, see Write app authentication code.
With DefaultAzureCredential, the sample will search for credentials in your local environment, like an Azure sign-in in a local Azure CLI or in Visual Studio or Visual Studio Code. For this reason, you should sign in to Azure locally through one of these mechanisms to set up credentials for the sample.
If you're using Visual Studio or Visual Studio Code to run code samples, make sure you're signed in to that editor with the same Azure credentials that you want to use to access your Azure Digital Twins instance. If you're using a local CLI window, run the az login command to sign in to your Azure account. After this, when you run your code sample, you should be authenticated automatically.
Get started with the building scenario
The sample project used in this tutorial represents a real-world building scenario, containing a floor, a room, and a thermostat device. These components will be digitally represented in an Azure Digital Twins instance, which will then be connected to IoT Hub, Event Grid, and two Azure functions to enable movement of data.
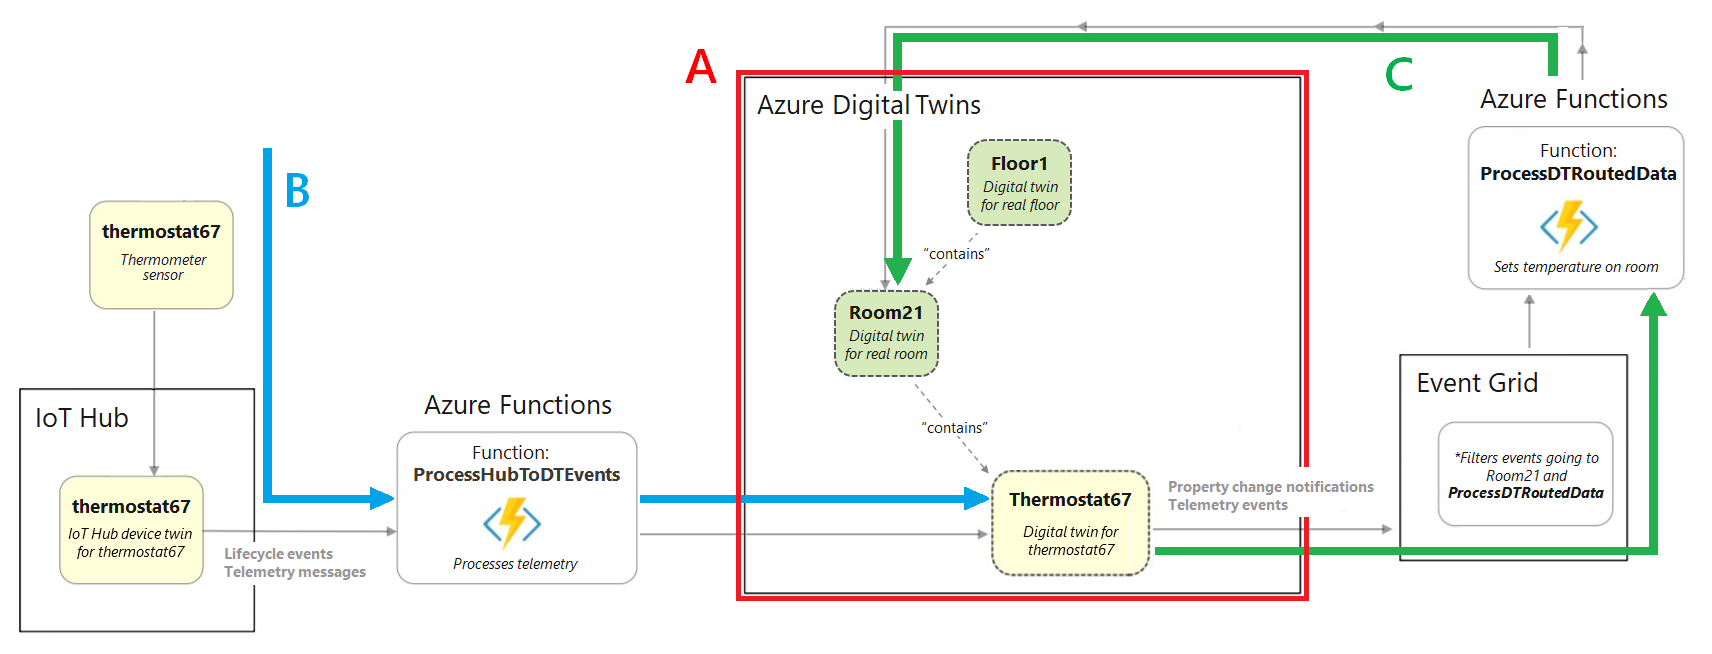
Below is a diagram representing the full scenario.
You'll first create the Azure Digital Twins instance (section A in the diagram), then set up the device telemetry data flow into the digital twins (arrow B), then set up the data propagation through the twin graph (arrow C).
To work through the scenario, you'll interact with components of the pre-written sample app you downloaded earlier.
Here are the components implemented by the building scenario AdtSampleApp sample app:
- Device authentication
- .NET (C#) SDK usage examples (found in CommandLoop.cs)
- Console interface to call the Azure Digital Twins API
- SampleClientApp - A sample Azure Digital Twins solution
- SampleFunctionsApp - An Azure Functions app that updates your Azure Digital Twins graph based on device telemetry from IoT Hub and Azure Digital Twins events
Instantiate the pre-created twin graph
First, you'll use the AdtSampleApp solution from the sample project to build the Azure Digital Twins piece of the end-to-end scenario (section A):
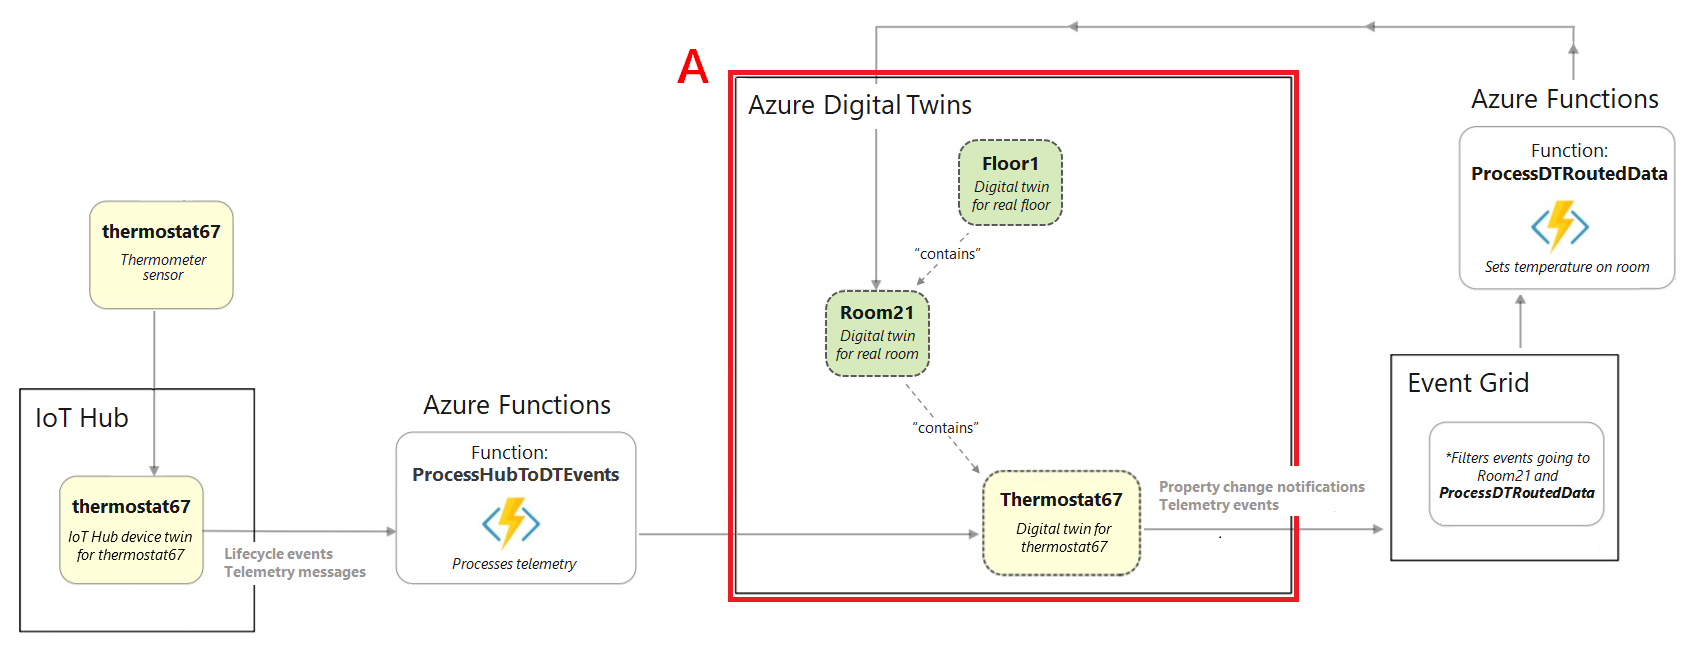
Open a local console window and navigate into the digital-twins-samples-main\AdtSampleApp\SampleClientApp folder. Run the SampleClientApp project with this dotnet command:
dotnet run
The project will start running, carry out authentication, and wait for a command. In this console, run the next command to instantiate the sample Azure Digital Twins solution.
Important
If you already have digital twins and relationships in your Azure Digital Twins instance, running this command will delete them and replace them with the twins and relationships for the sample scenario.
SetupBuildingScenario
The output of this command is a series of confirmation messages as three digital twins are created and connected in your Azure Digital Twins instance: a floor named floor1, a room named room21, and a temperature sensor named thermostat67. These digital twins represent the entities that would exist in a real-world environment.
They're connected via relationships into the following twin graph. The twin graph represents the environment as a whole, including how the entities interact with and relate to each other.

You can verify the twins that were created by running the following command, which queries the connected Azure Digital Twins instance for all the digital twins it contains:
Query
You can now stop running the project. Keep the console window open at this location, though, as you'll use this app again later in the tutorial.
Set up the sample function app
The next step is setting up an Azure Functions app that will be used throughout this tutorial to process data. The function app, SampleFunctionsApp, contains two functions:
- ProcessHubToDTEvents: processes incoming IoT Hub data and updates Azure Digital Twins accordingly
- ProcessDTRoutedData: processes data from digital twins, and updates the parent twins in Azure Digital Twins accordingly
In this section, you'll publish the pre-written function app, and ensure the function app can access Azure Digital Twins by assigning it a Microsoft Entra identity.
The function app is part of the sample project you downloaded, located in the digital-twins-samples-main\AdtSampleApp\SampleFunctionsApp folder.
Publish the app
To publish the function app to Azure, you'll need to create a storage account, then create the function app in Azure, and finally publish the functions to the Azure function app. This section completes these actions using the Azure CLI. In each command, replace any placeholders in angle brackets with the details for your own resources.
Create an Azure storage account by running the following command:
az storage account create --name <name-for-new-storage-account> --location <location> --resource-group <resource-group> --sku Standard_LRSCreate an Azure function app by running the following command:
az functionapp create --name <name-for-new-function-app> --storage-account <name-of-storage-account-from-previous-step> --functions-version 4 --consumption-plan-location <location> --runtime dotnet-isolated --resource-group <resource-group>Next, you'll zip up the functions and publish them to your new Azure function app.
Open a console window on your machine (if you're using the local Azure CLI, it can be the same window), and navigate into the digital-twins-samples-main\AdtSampleApp\SampleFunctionsApp folder inside your downloaded sample project.
In the console, run the following command to publish the project locally:
dotnet publish -c Release -o publishThis command publishes the project to the digital-twins-samples-main\AdtSampleApp\SampleFunctionsApp\publish directory.
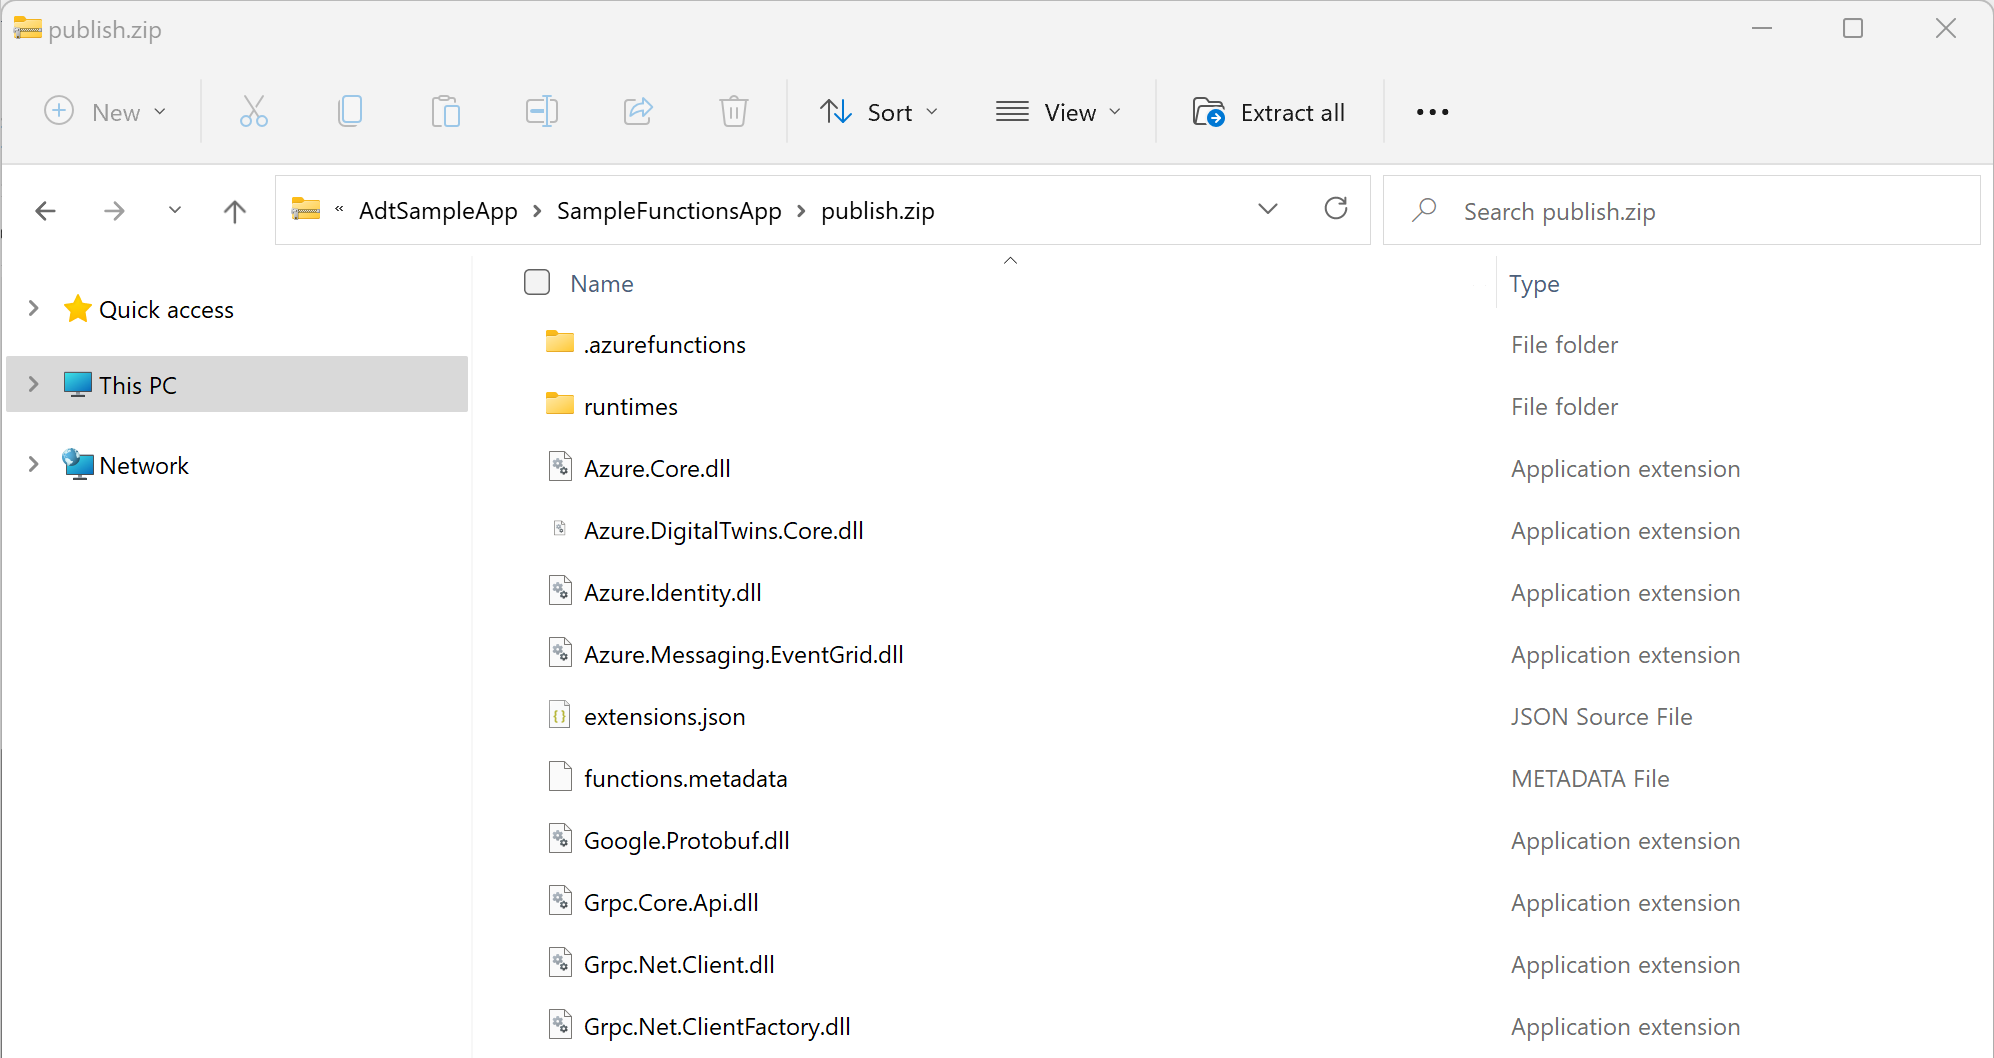
Using your preferred method, create a zip of the published files that are located inside the digital-twins-samples-main\AdtSampleApp\SampleFunctionsApp\publish directory. Name the zipped folder publish.zip.
Important
Make sure the zipped folder does not include an extra layer for the publish folder itself. It should only contain the contents that were inside the publish folder.
Here's an image of how the zip contents might look (it may change depending on your version of .NET).
The last step will be done in the Azure CLI.
In the Azure CLI, run the following command to deploy the published and zipped functions to your Azure function app:
az functionapp deployment source config-zip --resource-group <resource-group> --name <name-of-your-function-app> --src "<full-path-to-publish.zip>"Tip
If you're using the Azure CLI locally, you can access the ZIP file on your computer directly using its path on your machine.
If you're using the Azure Cloud Shell, upload the ZIP file to Cloud Shell with this button before running the command:
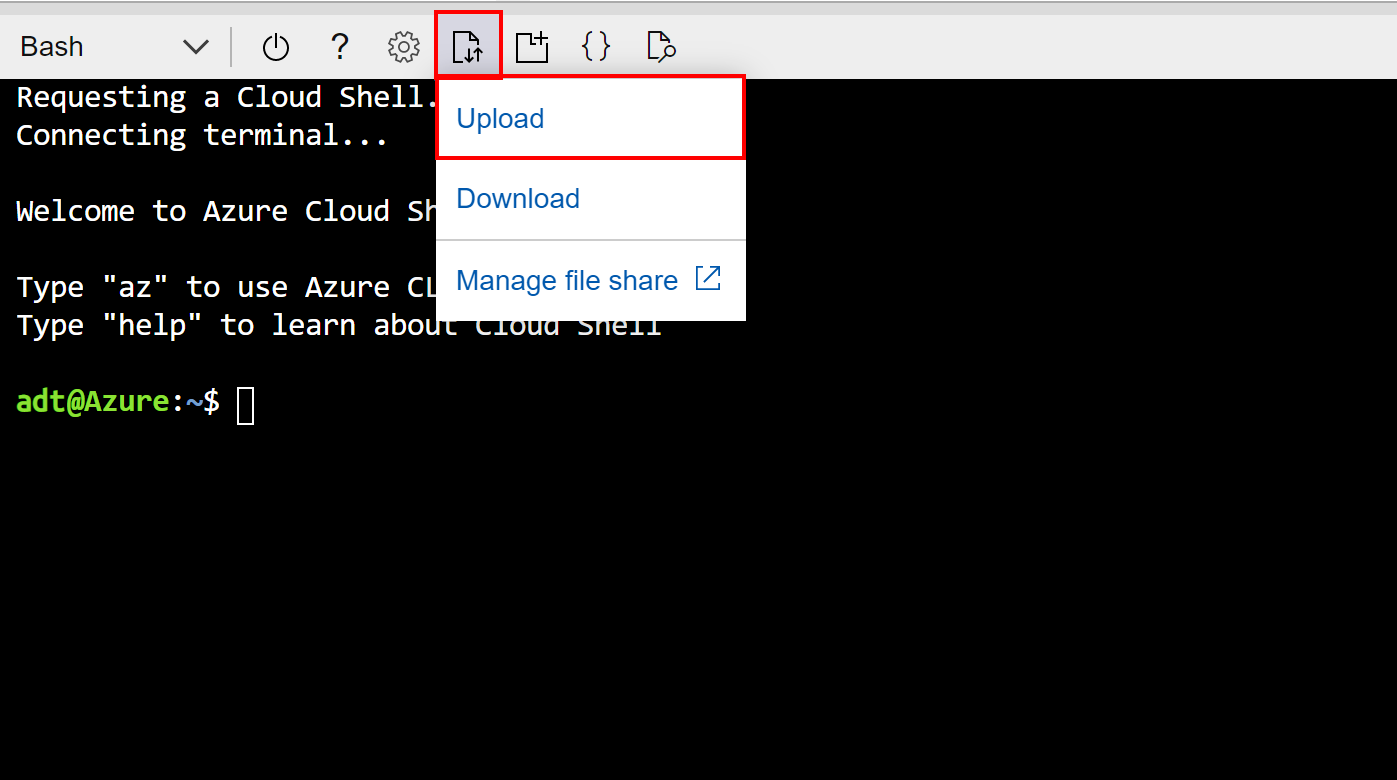
In this case, the file will be uploaded to the root directory of your Cloud Shell storage, so you can refer to the file directly by its name for the
--srcparameter of the command (as in,--src publish.zip).A successful deployment will respond with status code 202 and output a JSON object containing details of your new function. You can confirm the deployment succeeded by looking for this field in the result:
"provisioningState": "Succeeded",
The functions should now be published to a function app in Azure. You can use the following CLI commands to verify both functions were published successfully. Each command has placeholders for your resource group and the name of your function app. The commands will print information about the ProcessDTRoutedData and ProcessHubToDTEvents functions that have been published.
az functionapp function show --resource-group <your-resource-group> --name <your-function-app> --function-name ProcessDTRoutedData
az functionapp function show --resource-group <your-resource-group> --name <your-function-app> --function-name ProcessHubToDTEvents
Next, your function app will need to have the right permission to access your Azure Digital Twins instance. You'll configure this access in the next section.
Configure permissions for the function app
There are two settings that need to be set for the function app to access your Azure Digital Twins instance, both of which can be done using the Azure CLI.
Assign access role
The first setting gives the function app the Azure Digital Twins Data Owner role in the Azure Digital Twins instance. This role is required for any user or function that wants to perform many data plane activities on the instance. You can read more about security and role assignments in Security for Azure Digital Twins solutions.
Use the following command to create a system-assigned identity for the function. The output will display details of the identity that's been created. Take note of the principalId field in the output to use in the next step.
az functionapp identity assign --resource-group <your-resource-group> --name <your-function-app-name>Use the principalId value in the following command to assign the function app's identity to the Azure Digital Twins Data Owner role for your Azure Digital Twins instance.
az dt role-assignment create --resource-group <your-resource-group> --dt-name <your-Azure-Digital-Twins-instance> --assignee "<principal-ID>" --role "Azure Digital Twins Data Owner"
The result of this command is outputted information about the role assignment you've created. The function app now has permissions to access data in your Azure Digital Twins instance.
Configure application setting
The second setting creates an environment variable for the function with the URL of your Azure Digital Twins instance. The function code will use the value of this variable to refer to your instance. For more information about environment variables, see Manage your function app.
Run the command below, filling in the placeholders with the details of your resources.
az functionapp config appsettings set --resource-group <your-resource-group> --name <your-function-app-name> --settings "ADT_SERVICE_URL=https://<your-Azure-Digital-Twins-instance-host-name>"
The output is the list of settings for the Azure Function, which should now contain an entry called ADT_SERVICE_URL.
Process simulated telemetry from an IoT Hub device
An Azure Digital Twins graph is meant to be driven by telemetry from real devices.
In this step, you'll connect a simulated thermostat device registered in IoT Hub to the digital twin that represents it in Azure Digital Twins. As the simulated device emits telemetry, the data will be directed through the ProcessHubToDTEvents Azure function that triggers a corresponding update in the digital twin. In this way, the digital twin stays up to date with the real device's data. In Azure Digital Twins, the process of directing events data from one place to another is called routing events.
Processing the simulated telemetry happens in this part of the end-to-end scenario (arrow B):
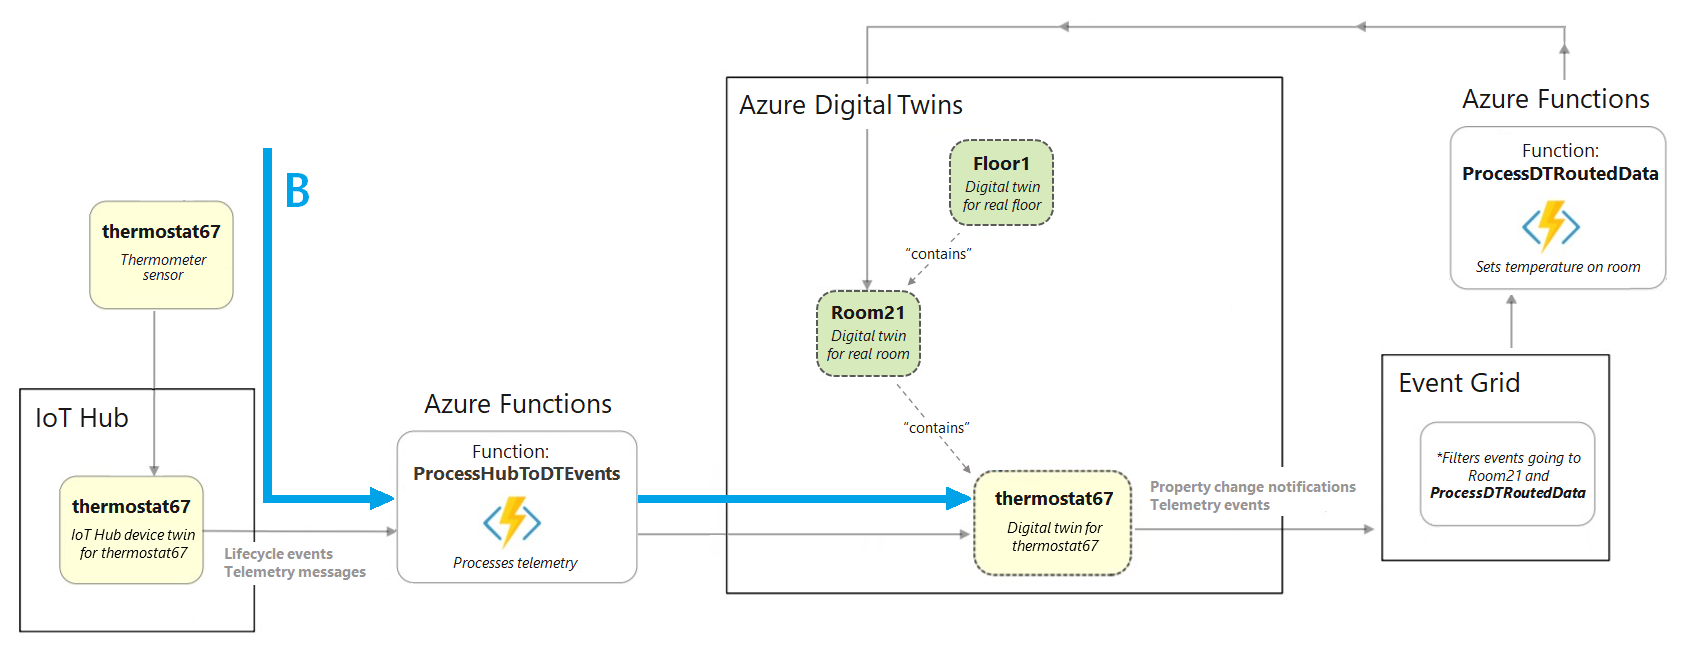
Here are the actions you'll complete to set up this device connection:
- Create an IoT hub that will manage the simulated device
- Connect the IoT hub to the appropriate Azure function by setting up an event subscription
- Register the simulated device in IoT hub
- Run the simulated device and generate telemetry
- Query Azure Digital Twins to see the live results
Create an IoT Hub instance
Azure Digital Twins is designed to work alongside IoT Hub, an Azure service for managing devices and their data. In this step, you'll set up an IoT hub that will manage the sample device in this tutorial.
In the Azure CLI, use this command to create a new IoT hub:
az iot hub create --name <name-for-your-IoT-hub> --resource-group <your-resource-group> --sku S1
The output of this command is information about the IoT hub that was created.
Save the name that you gave to your IoT hub. You'll use it later.
Connect the IoT hub to the Azure function
Next, connect your IoT hub to the ProcessHubToDTEvents Azure function in the function app you published earlier, so that data can flow from the device in IoT Hub through the function, which updates Azure Digital Twins.
To do so, you'll create an event subscription on your IoT Hub, with the Azure function as an endpoint. This "subscribes" the function to events happening in IoT Hub.
Use the following CLI command to create the event subscription. There's a placeholder for you to enter a name for the event subscription, and there are also placeholders for you to enter your subscription ID, resource group, IoT hub name, and the name of your function app.
az eventgrid event-subscription create --name <name-for-hub-event-subscription> --event-delivery-schema eventgridschema --source-resource-id /subscriptions/<your-subscription-ID>/resourceGroups/<your-resource-group>/providers/Microsoft.Devices/IotHubs/<your-IoT-hub> --included-event-types Microsoft.Devices.DeviceTelemetry --endpoint-type azurefunction --endpoint /subscriptions/<your-subscription-ID>/resourceGroups/<your-resource-group>/providers/Microsoft.Web/sites/<your-function-app>/functions/ProcessHubToDTEvents
The output will show information about the event subscription that has been created. You can confirm that the operation completed successfully by verifying the provisioningState value in the result:
"provisioningState": "Succeeded",
Tip
If the command returns a resource provider error, add Microsoft.EventGrid as a resource provider to your subscription. You can do this in the Azure portal by following the instructions in Register resource provider.
Register the simulated device with IoT Hub
This section creates a device representation in IoT Hub with the ID thermostat67. The simulated device will connect into this representation, which is how telemetry events will go from the device into IoT Hub. The IoT hub is where the subscribed Azure function from the previous step is listening, ready to pick up the events and continue processing.
In the Azure CLI, create a device in IoT Hub with the following command:
az iot hub device-identity create --device-id thermostat67 --hub-name <your-IoT-hub-name> --resource-group <your-resource-group>
The output is information about the device that was created.
Configure and run the simulation
Important
This article includes steps to connect a device using a shared access signature, also called symmetric key authentication. This authentication method is convenient for testing and evaluation, but authenticating a device using X.509 certificates is a more secure approach. To learn more, see Security best practices > Connection security.
Next, configure the device simulator to send data to your IoT Hub instance.
Begin by getting the IoT hub connection string with the following command. The connection string value will start with HostName=.
az iot hub connection-string show --hub-name <your-IoT-hub-name>
Then, get the device connection string with this command:
az iot hub device-identity connection-string show --device-id thermostat67 --hub-name <your-IoT-hub-name>
Next, plug these values into the device simulator code in your local project to connect the simulator into this IoT hub and IoT hub device.
Navigate on your local machine to the downloaded sample folder, and into the digital-twins-samples-main\DeviceSimulator\DeviceSimulator folder. Open the AzureIoTHub.cs file for editing. Change the following connection string values to the values you gathered above:
private const string iotHubConnectionString = "<your-hub-connection-string>";
//...
private const string deviceConnectionString = "<your-device-connection-string>";
Save the file.
Now, to see the results of the data simulation that you've set up, open a new local console window and navigate to digital-twins-samples-main\DeviceSimulator\DeviceSimulator.
Note
You should now have two open console windows: one that's open to the DeviceSimulator\DeviceSimulator folder, and one from earlier that's still open to the AdtSampleApp\SampleClientApp folder.
Use the following dotnet command to run the device simulator project:
dotnet run
The project will start running and begin displaying simulated temperature telemetry messages. These messages are being sent to IoT Hub, where they're then picked up and processed by the Azure function.

You don't need to do anything else in this console, but leave it running while you complete the next steps.
See the results in Azure Digital Twins
The ProcessHubToDTEvents function you published earlier listens to the IoT Hub data, and calls an Azure Digital Twins API to update the Temperature property on the thermostat67 twin.
To see the data from the Azure Digital Twins side, switch to your other console window that's open to the AdtSampleApp\SampleClientApp folder. Run the SampleClientApp project with dotnet run.
dotnet run
Once the project is running and accepting commands, run the following command to get the temperatures being reported by the digital twin thermostat67:
ObserveProperties thermostat67 Temperature
You should see the live updated temperatures from your Azure Digital Twins instance being logged to the console every two seconds. They should reflect the values that the data simulator is generating (you can place the console windows side-by-side to verify that the values coordinate).
Note
It may take a few seconds for the data from the device to propagate through to the twin. The first few temperature readings may show as 0 before data begins to arrive.

Once you've verified the live temperature logging is working successfully, you can stop running both projects. Keep the console windows open, as you'll use them again later in the tutorial.
Propagate Azure Digital Twins events through the graph
So far in this tutorial, you've seen how Azure Digital Twins can be updated from external device data. Next, you'll see how changes to one digital twin can propagate through the Azure Digital Twins graph—in other words, how to update twins from service-internal data.
To do so, you'll use the ProcessDTRoutedData Azure function to update a Room twin when the connected Thermostat twin is updated. The update functionality happens in this part of the end-to-end scenario (arrow C):
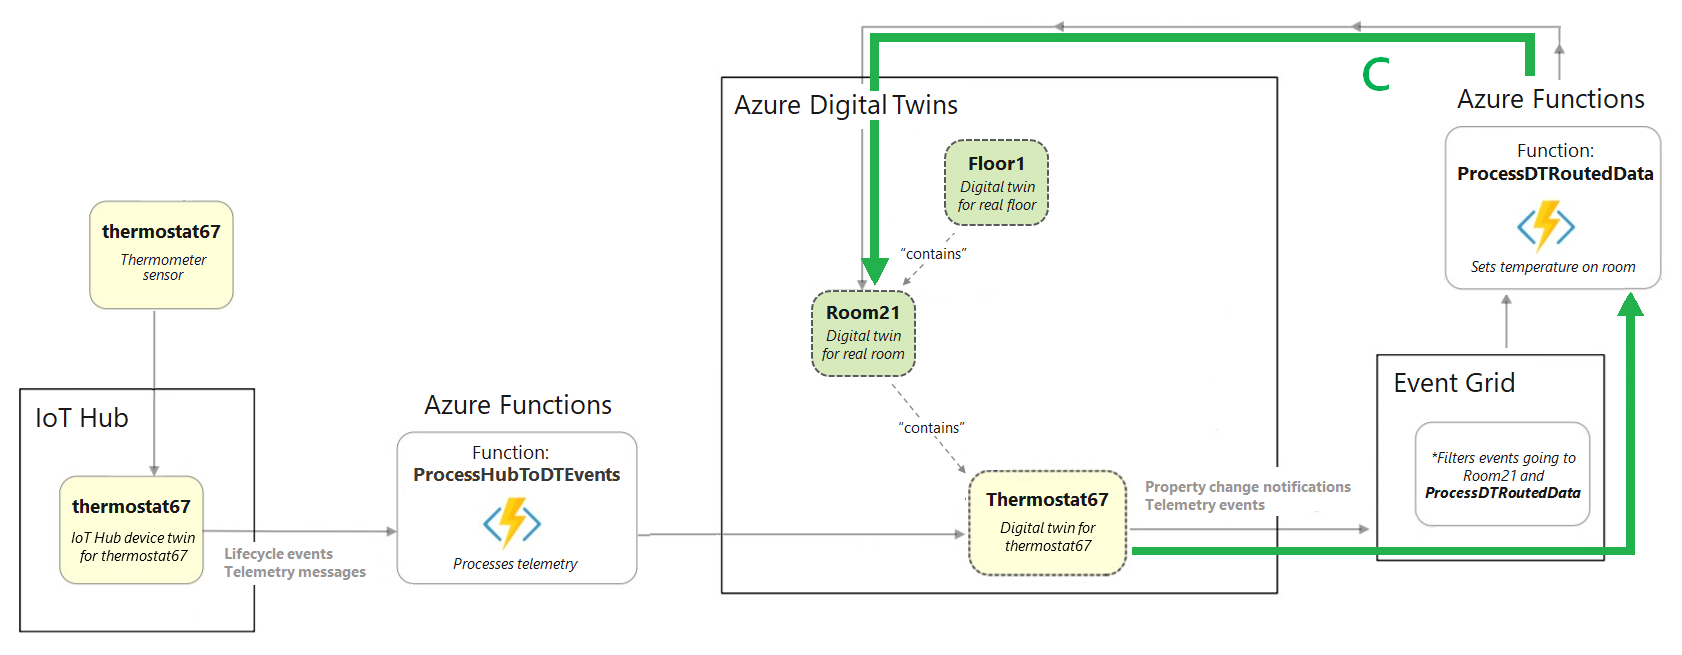
Here are the actions you'll complete to set up this data flow:
- Create an Event Grid topic to enable movement of data between Azure services
- Create an endpoint in Azure Digital Twins that connects the instance to the Event Grid topic
- Set up a route within Azure Digital Twins that sends twin property change events to the endpoint
- Set up an Azure function that listens on the Event Grid topic at the endpoint, receives the twin property change events that are sent there, and updates other twins in the graph accordingly
Create the Event Grid topic
Event Grid is an Azure service that helps route and deliver events from Azure services to other places within Azure. You can create an Event Grid topic to collect certain events from a source, and then subscribers can listen on the topic to receive the events as they come through.
In the Azure CLI, run the following command to create an Event Grid topic:
az eventgrid topic create --resource-group <your-resource-group> --name <name-for-your-event-grid-topic> --location <region>
The output from this command is information about the Event Grid topic you've created. Save the name that you gave to your Event Grid topic, because you'll use it later.
Create the endpoint
Next, create an Event Grid endpoint in Azure Digital Twins, which will connect your instance to your Event Grid topic. Use the command below, filling in the name of your Event Grid topic from the previous step and the other placeholder fields as needed.
az dt endpoint create eventgrid --dt-name <Azure-Digital-Twins-instance> --eventgrid-resource-group <your-resource-group> --eventgrid-topic <your-event-grid-topic> --endpoint-name <name-for-your-Azure-Digital-Twins-endpoint>
The output from this command is information about the endpoint you've created.
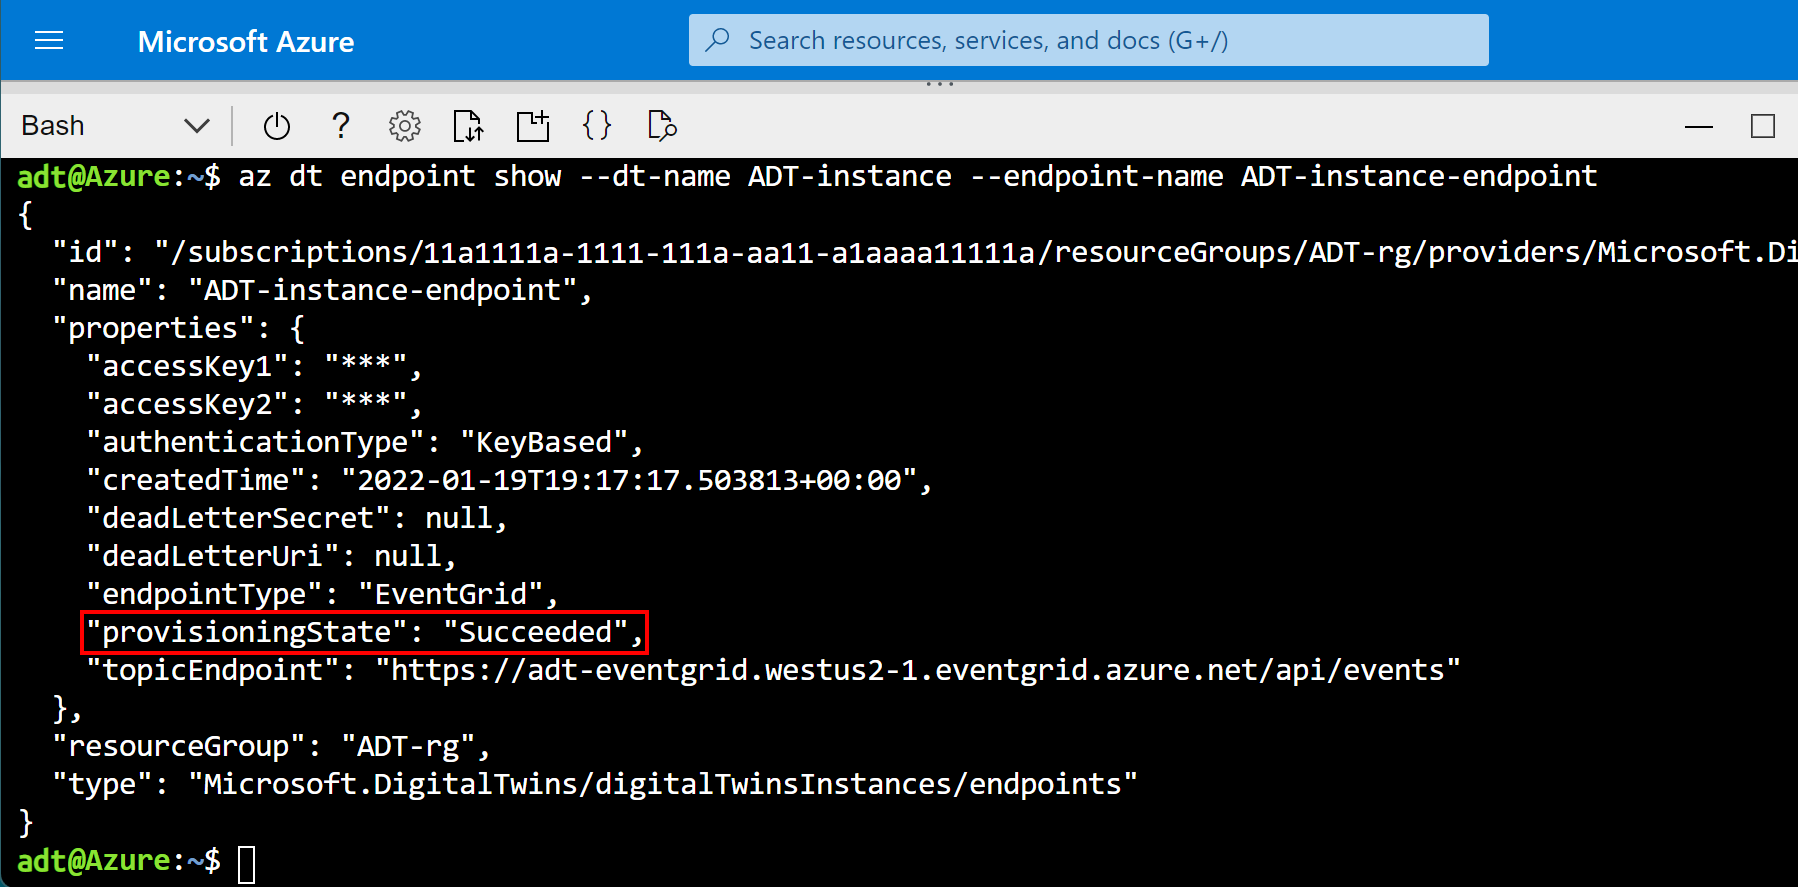
Look for the provisioningState field in the output, and check that the value is "Succeeded."
It may also say "Provisioning", meaning that the endpoint is still being created. If so, wait a few seconds and run the following command to check the status of the endpoint. Repeat until the provisioningState shows "Succeeded."
az dt endpoint show --dt-name <your-Azure-Digital-Twins-instance> --endpoint-name <your-Azure-Digital-Twins-endpoint>
Save the name of your endpoint, because you'll use it later.
Create the route
Next, create an Azure Digital Twins route that sends events to the Event Grid endpoint you created.
Use the following CLI command, filling in the name of your endpoint from the previous step and the other placeholder fields as needed. This command forwards all events that occur in the twin graph.
Tip
You can limit the events to only specific ones if you want, by using filters.
az dt route create --dt-name <your-Azure-Digital-Twins-instance> --endpoint-name <your-Azure-Digital-Twins-endpoint> --route-name <name-for-your-Azure-Digital-Twins-route>
The output from this command is some information about the route you've created.
Note
Endpoints (from the previous step) must be finished provisioning before you can set up an event route that uses them. If the route creation fails because the endpoints aren't ready, wait a few minutes and then try again.
Connect the Azure function
Next, subscribe the ProcessDTRoutedData Azure function to the Event Grid topic you created earlier, so that telemetry data can flow from the thermostat67 twin through the Event Grid topic to the function, which goes back into Azure Digital Twins and updates the room21 twin accordingly.
To do so, you'll create an Event Grid subscription that sends data from the Event Grid topic that you created earlier to your ProcessDTRoutedData Azure function.
Use the following CLI command to create the event subscription. There's a placeholder for you to enter a name for this event subscription, and there are also placeholders for you to enter your subscription ID, resource group, the name of your Event Grid topic, and the name of your function app.
az eventgrid event-subscription create --name <name-for-topic-event-subscription> --event-delivery-schema eventgridschema --source-resource-id /subscriptions/<your-subscription-ID>/resourceGroups/<your-resource-group>/providers/Microsoft.EventGrid/topics/<your-event-grid-topic> --endpoint-type azurefunction --endpoint /subscriptions/<your-subscription-ID>/resourceGroups/<your-resource-group>/providers/Microsoft.Web/sites/<your-function-app>/functions/ProcessDTRoutedData
Run the simulation and see the results
Now, events should have the capability to flow from the simulated device into Azure Digital Twins, and through the Azure Digital Twins graph to update twins as appropriate. In this section, you'll run the device simulator again to kick off the full event flow you've set up, and query Azure Digital Twins to see the live results
Go to your console window that's open to the DeviceSimulator\DeviceSimulator folder, and run the device simulator project with dotnet run.
Like the first time you ran the device simulator, the project will start running and display simulated temperature telemetry messages. These events are going through the flow you set up earlier to update the thermostat67 twin, and then going through the flow you set up recently to update the room21 twin to match.

You don't need to do anything else in this console, but leave it running while you complete the next steps.
To see the data from the Azure Digital Twins side, go to your other console window that's open to the AdtSampleApp\SampleClientApp folder, and run the SampleClientApp project with dotnet run.
Once the project is running and accepting commands, run the following command to get the temperatures being reported by both the digital twin thermostat67 and the digital twin room21.
ObserveProperties thermostat67 Temperature room21 Temperature
You should see the live updated temperatures from your Azure Digital Twins instance being logged to the console every two seconds. Notice that the temperature for room21 is being updated to match the updates to thermostat67.

Once you've verified the live temperatures logging from your instance is working successfully, you can stop running both projects. You can also close both console windows, as the tutorial is now complete.
Review
Here's a review of the scenario that you built in this tutorial.
- An Azure Digital Twins instance digitally represents a floor, a room, and a thermostat (represented by section A in the diagram below)
- Simulated device telemetry is sent to IoT Hub, where the ProcessHubToDTEvents Azure function is listening for telemetry events. The ProcessHubToDTEvents Azure function uses the information in these events to set the
Temperatureproperty on thermostat67 (arrow B in the diagram). - Property change events in Azure Digital Twins are routed to an Event Grid topic, where the ProcessDTRoutedData Azure function is listening for events. The ProcessDTRoutedData Azure function uses the information in these events to set the
Temperatureproperty on room21 (arrow C in the diagram).

Clean up resources
After completing this tutorial, you can choose which resources you want to remove, depending on what you want to do next.
If you do not need any of the resources you created in this tutorial, you can delete the Azure Digital Twins instance and all other resources from this article with the az group delete CLI command. This deletes all Azure resources in a resource group, as well as the resource group itself.
Important
Deleting a resource group is irreversible. The resource group and all the resources contained in it are permanently deleted. Make sure that you don't accidentally delete the wrong resource group or resources.
Open Azure Cloud Shell or a local CLI window, and run the following command to delete the resource group and everything it contains.
az group delete --name <your-resource-group>
If you want to continue using the Azure Digital Twins instance you set up in this article, but clear out some or all of its models, twins, and relationships, you can use the az dt CLI commands to delete the elements you want to remove.
This option won't remove any of the other Azure resources created in this tutorial (IoT Hub, Azure Functions app, and so on). You can delete these individually using the dt commands appropriate for each resource type.
You may also want to delete the project folder from your local machine.
Next steps
In this tutorial, you created an end-to-end scenario that shows Azure Digital Twins being driven by live device data.
Next, start looking at the concept documentation to learn more about elements you worked with in the tutorial:
