How to define and start a migration job
When you migrate a share to Azure, you need to describe the source share, the Azure target, and any migration settings you want to apply. These attributes are defined in a job definition within your storage mover resource. This article describes how to create and run such a job definition.
Prerequisites
Before you begin following the examples in this article, it's important that you have an understanding of the Azure Storage Mover resource hierarchy. Review the Understanding the Storage Mover resource hierarchy article, to understand the necessity of the job definition prerequisites.
The following are the prerequisites to the definition the migration of your source shares:
- An existing storage mover resource.
If you haven't deployed a storage mover resource, follow the steps in the Create a storage mover resource article. These steps help you deploy a storage mover resource to the desired region within your Azure subscription. - At least one existing Azure Storage Mover agent virtual machine (VM).
The steps in the Azure Storage Mover agent VM deployment and agent registration articles guide you through the deployment and registration process. - A job definition to define migration.
Job definitions are organized in a migration project. You need at least one migration project in your storage mover resource. If you haven't already done so, follow the deployment steps in the manage projects article to create a migration project. - Storage account access in case of firewall setting.
If you have storage account firewall (security system) restrictions set, ensure that the traffic from agent VM is permitted to the storage account. - Accessible endpoints.
The below endpoints must be accessible from the agent.
| Source protocol | Target | Azure Endpoint | Description |
|---|---|---|---|
| SMB 2.x mount | Azure file share (SMB) | < your-storage-account-name>.file.core.windows.net |
Azure Files endpoint. |
| SMB 2.x mount | Azure file share (SMB) | <your-keyvault-name>.vault.azure.net |
Azure Key Vault endpoint. |
| NFS 3 & 4 mount | Azure blob storage container | < your-storage-account-name>.blob.core.windows.net |
Azure Blob container endpoint. |
Create and start a job definition
A job definition is created within a project resource. Creating a job definition requires you to select or configure a project, a source and target storage endpoint, and a job name. If you've followed the examples contained in previous articles, you might have an existing project within a previously deployed storage mover resource. Follow the steps in this section to add a job definition to a project.
Storage endpoints are separate resources in your storage mover. You need to create a source and target endpoint before you can reference them within a job definition. The examples in this section describe the process of creating endpoints.
Refer to the resource naming convention article for help with choosing supported resource names.
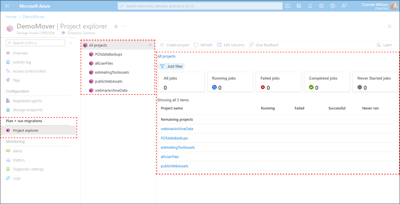
Navigate to the Project explorer page within the Azure portal to view a list of available projects. If no projects exist, or you need to create a new project, you can follow the steps included in the Manage Azure Storage Mover projects article.
From within the project explorer pane or the results list, select the name of an available project. The project's properties and job summary data are displayed in the details pane. Any existing job definitions and deployed jobs defined for the project are also shown.
In the actions menu within the project's details pane, select Create job definition to open the Create a migration job window. If no job definitions exist within the project, you can also select Create a job definition near the bottom of the pane, as shown in the following example.
In the Basics tab of the Create a migration job window, enter a value in the required Name field. You can also add an optional description value of less than 1024 characters. Finally, in the Migration agent section, select the agent to perform the data migration and then select Next to open the Source tab. You should choose an agent located as near your data source as possible. The selected agent should also have resources appropriate to the size and complexity of the job. You can assign a different agent to your job at a later time if desired.
In the Source tab, select an option within the Source endpoint field. You can choose to either use an existing source endpoint or create a new endpoint resource.
If you want to use an existing source endpoint that you've previously defined, choose the Select an existing endpoint option. Next, select the Select an existing endpoint as a source link to open the source endpoint pane. This pane displays a detailed list of your previously defined endpoints. Select the appropriate endpoint and select Select to return to the Source tab and populate the Existing source endpoint field.
To define a new source endpoint from which to migrate your data, select the Create a new endpoint option. Next, provide values for the required Host name or IP, Share name, and Protocol version fields. You can also add an optional description value of less than 1024 characters.
Only certain types of endpoints can be used as a source or a target, respectively. The steps to create different endpoint types are similar, as are their corresponding data fields. The key differentiator between the creation of NFS- and SMB-enabled endpoints is the use of Azure Key Vault to store the shared credential for SMB resources. When you create an endpoint resource that supports the SMB protocol, you're required to provide values for the Key Vault name, and the names of the username and password secrets as well.
Select the name of the Key Vault from the Key Vault drop-down lists. You can provide values for the Secret for username and Secret for password by selecting the relevant secret from the corresponding drop-down list. Alternatively, you can provide the URI to the secret as shown in the following screen capture.
For more information on endpoint resources, see the Managing Storage Mover endpoints article.
By default, migration jobs start from the root of your share. However, if your use case involves copying data from a specific path within your source share, you can provide the path in the Sub-path field. Supplying this value starts the data migration from the location you've specified. If the sub path you've specified isn't found, no data is copied.
Prior to creating an endpoint and a job resource, it's important to verify that the path you've provided is correct and that the data is accessible. You're unable to modify endpoints or job resources after they're created. If the specified path is wrong, your only option is to delete the resources and re-create them.
Values for host, share name, and subpath are concatenated to form the full migration source path. The path is displayed in the Full path field within the Verify full path section. Copy the path provided and verify that you're able to access it before committing your changes.
After you've confirmed that the share is accessible, select Next to save your source endpoint settings and begin defining your target.
In the Target tab, select an option for the Target endpoint field.
As with the source endpoint, choose the Select an existing endpoint reference option if you want to use a previously defined endpoint. Next, select the Select an existing endpoint as a target link to open the target endpoint pane. A detailed list of your previously defined endpoints is displayed. From the endpoint list, select the desired endpoint, then Select to populate the Existing source endpoint field and return to the Source tab.
Similarly, to define a new target endpoint, choose the Create a new endpoint option. Next, select values from the drop-down lists for the required Subscription and Storage account fields. You can also add an optional description value of less than 1024 characters. Depending on your use case, select the appropriate *Target type.
Recall that certain types of endpoints can only be used as a source or a target, respectively.
The current Azure Storage Mover release supports full-fidelity migrations for specific source-target pair combinations. Always utilize the latest agent version to benefit from these supported sources and destinations:
Source protocol Target Comments SMB 2.x mount Azure file share (SMB) SMB 1.x sources and NFS Azure file shares are currently not supported. NFS 3 & 4 mount Azure blob storage container Containers with the "Hierarchical Namespace Service (HNS)" feature enabled, are supported and the ADLS Gen2 REST API set is used for migration. A target subpath value can be used to specify a location within the target container where your migrated data to be copied. The subpath value is relative to the container's root. You can provide a unique value to generate a new subfolder. If you omit the subpath value, data is copied to the root.
After ensuring the accuracy of your settings, select Next to continue.
Within the Settings tab, take note of the settings associated with the Copy mode and Migration outcomes. The service's copy mode affects the behavior of the migration engine when files or folders change between copy iterations.
- Files are in the target, even if they don’t exist in the source.
- Files with matching names and paths are updated to match the source.
- File or folder renames between copies create duplicate content in the target.
Mirror source to target:
- Files in the target are deleted if they don’t exist in the source.
- Files and folders in the target are updated to match the source.
- File or folder renames between copies don't generate duplicate content. A renamed item on the source side leads to the deletion of the item with the original name in the target. Additionally, the renamed item is also uploaded to the target. If the renamed item is a folder, the described behavior of delete and reupload applies to all files and folders contained in it. Avoid renaming folders during a migration, especially near the root level of your source data.
Migration outcomes are based upon the specific storage types of the source and target endpoints. For example, because blob storage only supports "virtual" folders, source files in folders have their paths prepended to their names and placed in a flat list within a blob container. Empty folders are represented as an empty blob in the target. Source folder metadata is persisted in the custom metadata field of a blob, as they are with files.
After viewing the effects of the copy mode and migration outcomes, select Next to review the values from the previous tabs.
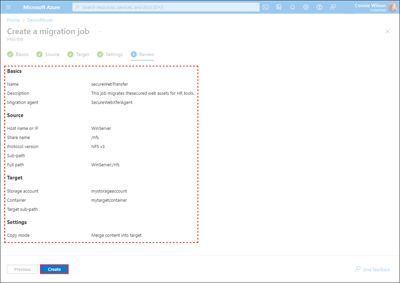
Review the settings for job name and description, and source and target storage endpoint settings. Use the Previous and Next options to navigate through the tabs and correct any mistakes, if needed. Finally, select Create to provision the job definition.
Next steps
Now that you've created a job definition with source and target endpoints, learn how to estimate the time required to perform your migration job.


