Configure a lifecycle management policy
Azure Blob Storage lifecycle management offers a rule-based policy that you can use to transition blob data to the appropriate access tiers or to expire data at the end of the data lifecycle. A lifecycle policy acts on a base blob, and optionally on the blob's versions or snapshots. For more information about lifecycle management policies, see Optimize costs by automatically managing the data lifecycle.
A lifecycle management policy is composed of one or more rules that define a set of actions to take based on a condition being met. For a base blob, you can choose to check one of the following conditions:
- The number of days since the blob was created.
- The number of days since the blob was last modified.
- The number of days since the blob was last accessed. To use this condition in an action, you should first optionally enable last access time tracking.
Note
Any operation that modifies the blob, including an update of the blob's metadata or properties, changes the last-modified time of the blob.
When the selected condition is true, then the management policy performs the specified action. For example, if you have defined an action to move a blob from the hot tier to the cool tier if it hasn't been modified for 30 days, then the lifecycle management policy will move the blob 30 days after the last write operation to that blob.
For a blob snapshot or version, the condition that is checked is the number of days since the snapshot or version was created.
Note
Lifecycle management policies are supported for block blobs and append blobs in general-purpose v2, premium block blob, and Blob Storage accounts.
Optionally enable access time tracking
Before you configure a lifecycle management policy, you can choose to enable blob access time tracking. When access time tracking is enabled, a lifecycle management policy can include an action based on the time that the blob was last accessed with a read or write operation. To minimize the effect on read access latency, only the first read of the last 24 hours updates the last access time. Subsequent reads in the same 24-hour period don't update the last access time. If a blob is modified between reads, the last access time is the more recent of the two values.
If last access time tracking isn't enabled, daysAfterLastAccessTimeGreaterThan uses the date the lifecycle policy was enabled instead of the LastAccessTime
property of the blob. This date is also used when the LastAccessTime
property is a null value. For more information about using last access time tracking, see Move data based on last accessed time.
To enable last access time tracking with the Azure portal, follow these steps:
Navigate to your storage account in the Azure portal.
In the Data management section, select Lifecycle management.
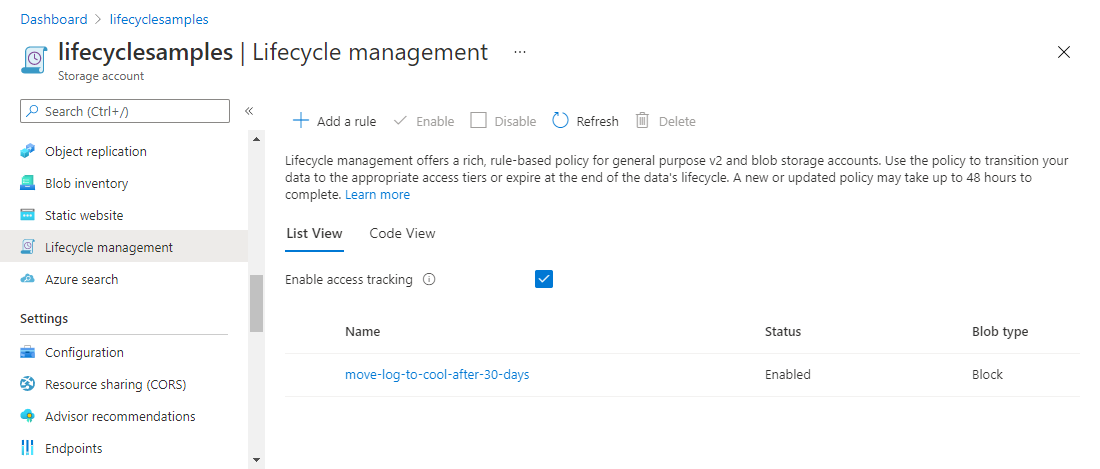
Check the checkbox "Enable access tracking"
Use the daysAfterLastAccessTimeGreaterThan property to specify the number of days from last access after which an action should be taken on a blob.
Create or manage a policy
You can add, edit, or remove a lifecycle management policy with the Azure portal, PowerShell, Azure CLI, or an Azure Resource Manager template.
There are two ways to add a policy through the Azure portal.
List view
In the Azure portal, navigate to your storage account.
Under Data management, select Lifecycle Management to view or change lifecycle management policies.
Select the List View tab.
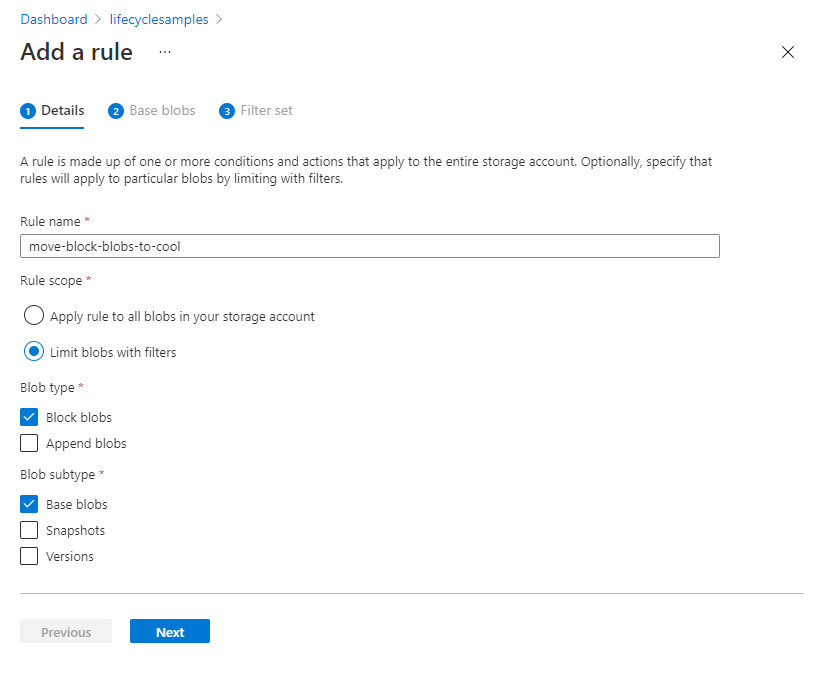
Select Add a rule and name your rule on the Details form. You can also set the Rule scope, Blob type, and Blob subtype values. The following example sets the scope to filter blobs. This causes the Filter set tab to be added.
- Select Base blobs to set the conditions for your rule. In the following example, blobs are moved to cool storage if they haven't been modified for 30 days.
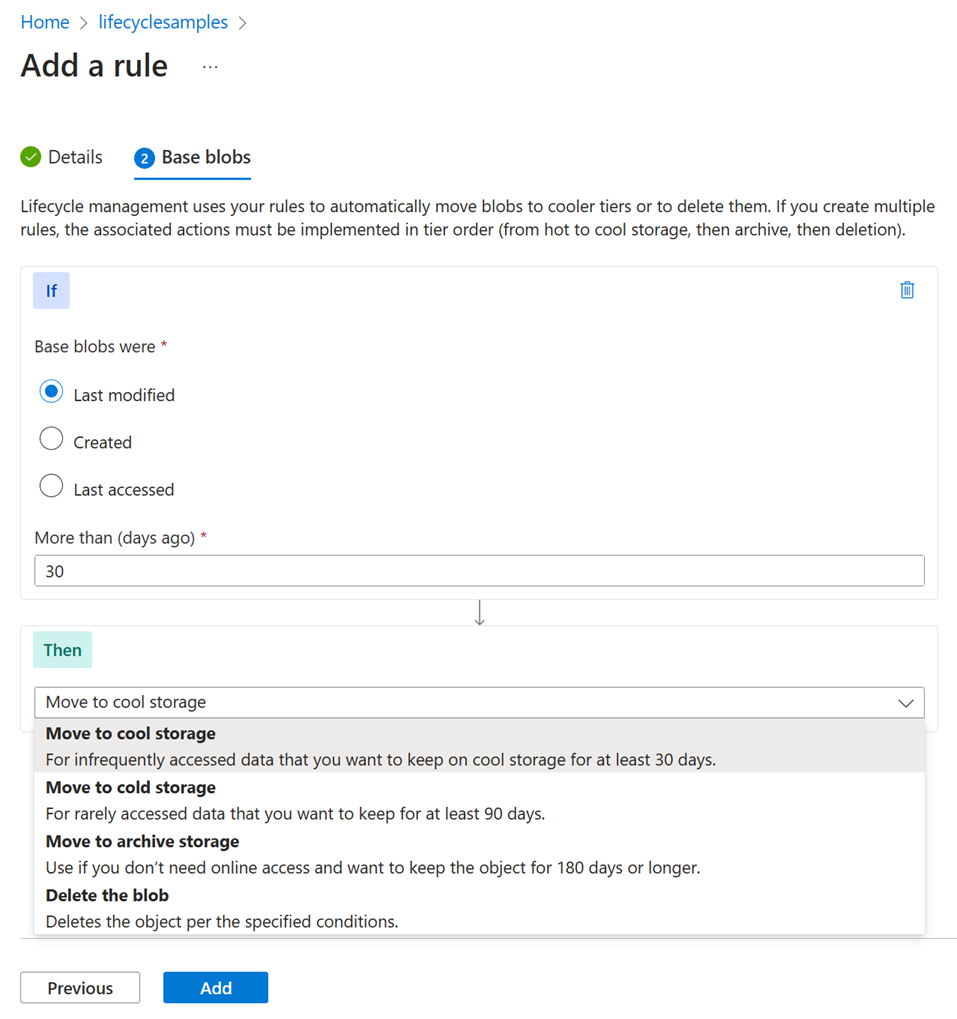
The Last accessed option is available only if you have enabled access time tracking and you've selected Block blobs as the blob type. To learn how to enable access tracking, see Optionally enable access time tracking.
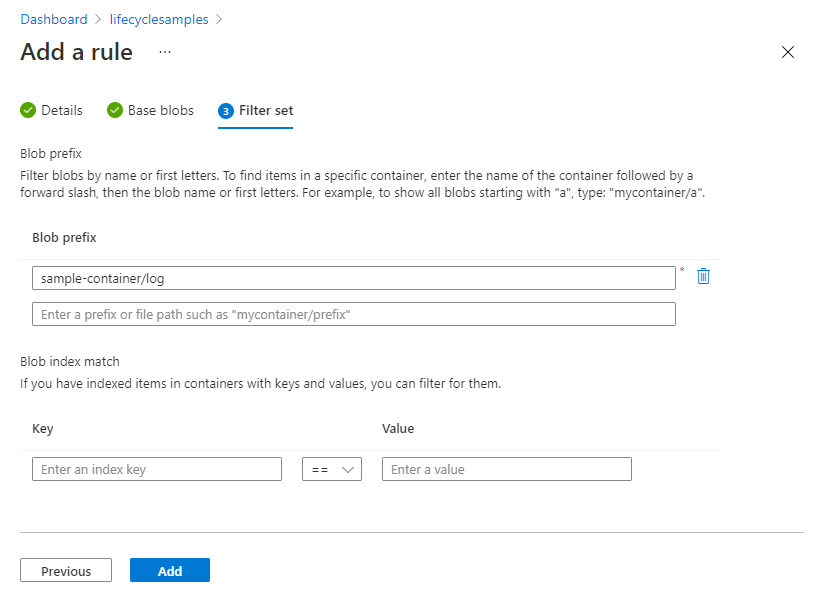
- If you selected Limit blobs with filters on the Details page, select Filter set to add an optional filter. The following example filters on blobs whose name begins with log in a container called sample-container.
- Select Add to add the new policy.
Keep in mind that a lifecycle management policy won't delete the current version of a blob until any previous versions or snapshots associated with that blob are deleted. If blobs in your storage account have previous versions or snapshots, then you should select Base blobs, Snapshots, and Versions in the Blob Subtype section when you're specifying a delete action as part of the policy.
Code view
- In the Azure portal, navigate to your storage account.
- Under Data management, select Lifecycle Management to view or change lifecycle management policies.
- Select the Code View tab. On this tab, you can define a lifecycle management policy in JSON.
The following sample JSON defines a lifecycle policy that moves a block blob whose name begins with log to the cool tier if it has been more than 30 days since the blob was modified.
{
"rules": [
{
"enabled": true,
"name": "move-to-cool",
"type": "Lifecycle",
"definition": {
"actions": {
"baseBlob": {
"tierToCool": {
"daysAfterModificationGreaterThan": 30
}
}
},
"filters": {
"blobTypes": [
"blockBlob"
],
"prefixMatch": [
"sample-container/log"
]
}
}
}
]
}