Manual deployment for Microsoft Defender for Endpoint on macOS
Applies to:
- Microsoft Defender for Endpoint Plan 1
- Microsoft Defender for Endpoint Plan 2
- Microsoft Defender XDR
Want to experience Defender for Endpoint? Sign up for a free trial.
This article describes how to deploy Microsoft Defender for Endpoint on macOS manually. A successful deployment requires the completion of all of the following steps:
- Download installation and onboarding packages
- Application installation (macOS 11 and newer versions)
- Onboarding Package
- Grant Full Disk Access
- Ensure Background Execution
Prerequisites and system requirements
Before you get started, see the main Microsoft Defender for Endpoint on macOS page for a description of prerequisites and system requirements for the current software version.
Download installation and onboarding packages
Download the installation and onboarding packages from Microsoft Defender portal.
Warning
Repackaging the Defender for Endpoint installation package is not a supported scenario. Doing so can negatively impact the integrity of the product and lead to adverse results, including but not limited to triggering tampering alerts and updates failing to apply.
In the Microsoft Defender portal, go to Settings > Endpoints > Device management > Onboarding.
In Section 1 of the page, set operating system to macOS and Deployment method to Local script.
In Section 2 of the page, select Download installation package. Save it as wdav.pkg to a local directory.
In Section 2 of the page, select Download onboarding package. Save it as WindowsDefenderATPOnboardingPackage.zip to the same directory.

From a command prompt, verify that you have the two files.
- Type cd Downloads and press Enter.
- Type ls and press Enter.

Copy the wdav.pkg and MicrosoftDefenderATPOnboardingMacOs.sh to the device where you want to deploy the Microsoft Defender for Endpoint on macOS.
Application installation (macOS 11 and newer versions)
To complete this process, you must have admin privileges on the device.
Do one of the following steps:
- Navigate to the downloaded wdav.pkg in Finder and open it.
Or
You can download the wdav.pkg- from Terminal
sudo installer -store -pkg /Users/admin/Downloads/wdav.pkg -target /

Select Continue.
Read through the Software License Agreement and select Continue to agree with the terms.

Read through the End-User License Agreement (EULA) and select Agree.

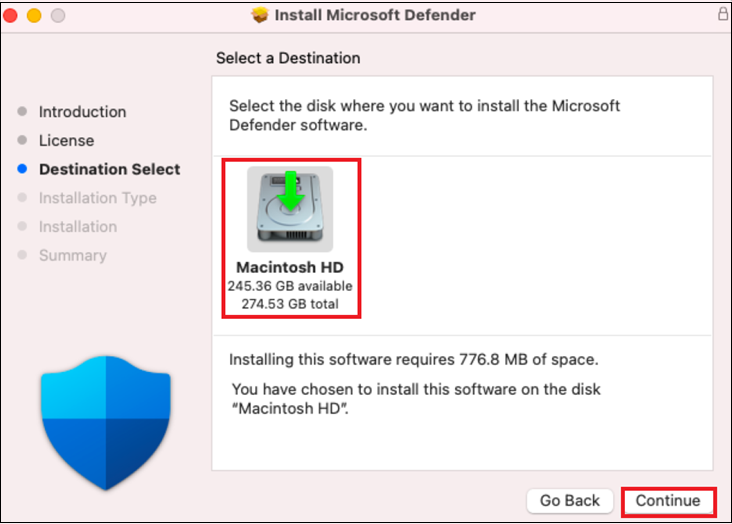
From Destination Select, select the disk where you want to install the Microsoft Defender Software, for example, Macintosh HD and select Continue.

Note
The amount of disk space required for installation is around 777 MB.
To change the installation destination, select Change Install Location....

Select Install.
Enter the password, when prompted.

Select Install Software.
At the end of the installation process, for macOS Big Sur (11.0) or latest version, you're prompted to approve the system extensions used by the product. Select Open Security Preferences.

To enable system extension, select Details.

From the Security & Privacy window, select the checkboxes next to Microsoft Defender and select OK.

Repeat steps 11 and 12 for all system extensions distributed with Microsoft Defender for Endpoint on Mac.
As part of the Endpoint Detection and Response capabilities, Microsoft Defender for Endpoint on Mac inspects socket traffic and reports this information to the Microsoft Defender portal. When prompted to grant Microsoft Defender for Endpoint permissions to filter network traffic, select Allow.

To troubleshoot System Extension issues, refer Troubleshoot System Extension.
Allow Full Disk Access
The macOS Catalina (10.15) and newer versions require full disk access to be granted to Microsoft Defender for Endpoint in order to be able to protect and monitor.
Note
Full disk access grant to Microsoft Defender for Endpoint is a new requirement for non-Microsoft software by Apple for files and folders containing personal data.
To grant full disk access:
Open System Preferences > Security & Privacy > Privacy > Full Disk Access. Select the lock icon to make changes (bottom of the dialog box).
Grant Full Disk Access permission to Microsoft Defender and Microsoft Defenders Endpoint Security Extension.

Select General > Restart for the new system extensions to take effect.

Enable Potentially Unwanted Application (PUA) in block mode.
To enable PUA, refer configure PUA protection.
Enable Network Protection.
To enable Network protection, refer manual deployment.
Enable Device Control.
To enable Device Control, refer device control for macOS.
Enable Tamper Protection in block mode.
To enable Tamper Protection, refer Protect macOS security settings with tamper protection.
If you have the Microsoft Purview – Endpoint data loss prevention license, you can review Get started with Microsoft Purview - Endpoint data loss prevention.
Background execution
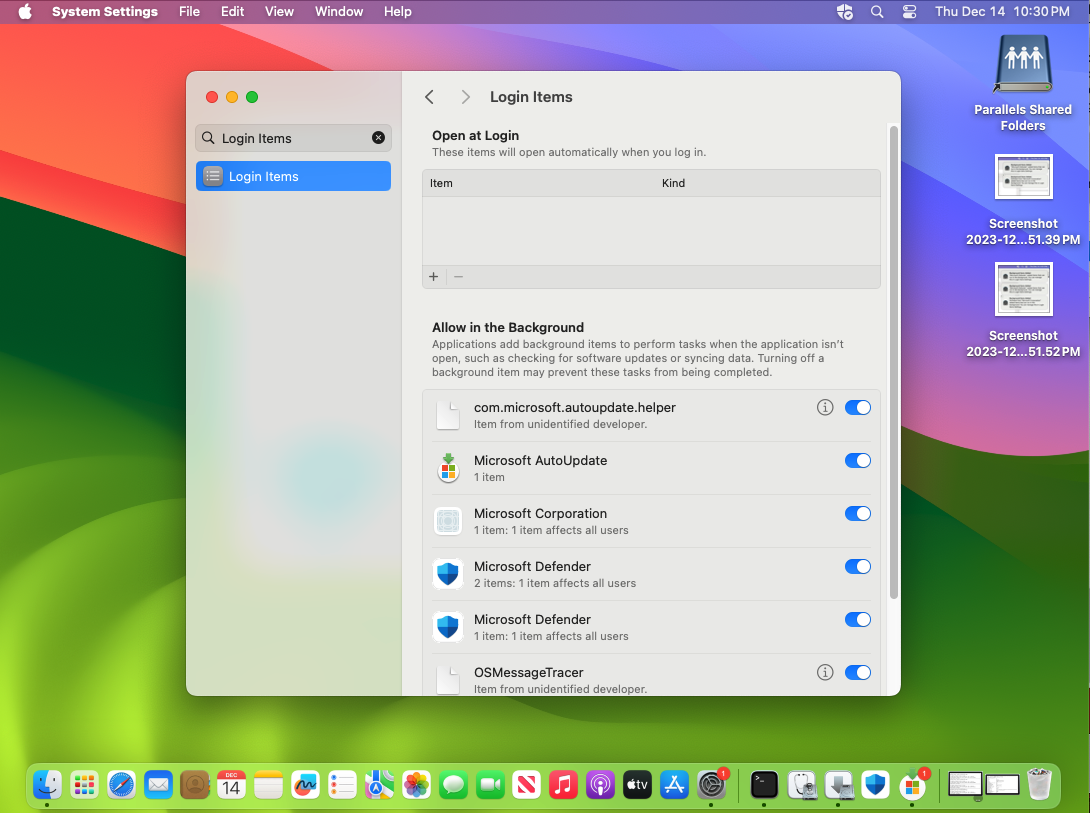
Starting with macOS 13, a user must explicitly allow an application to run in background. macOS will pop a prompt up, telling the user that Microsoft Defender can run in background.

You can view applications permitted to run in background in System Settings => sign in Items => Allow in the Background at any time:

Make sure all Microsoft Defender and Microsoft Corporation items are enabled. If they are disabled, then macOS won't start Microsoft Defender after a machine restart.
Bluetooth permissions
Starting with macOS 14, a user must explicitly allow an application to access Bluetooth. macOS will pop a prompt up, telling the user that Microsoft Defender can access Bluetooth (applies only if you use Bluetooth based policies for Device Control). Select Allow to grant Microsoft Defender to access Bluetooth.

You can confirm that permissions are granted in System Settings => Privacy Settings => Bluetooth.

Onboarding Package
Once you install the MDE on macOS client, you must now onboard the package, which registers to your Microsoft Defender for Endpoint tenant and licenses it.
Verify if MDE on macOS is onboard.
Copy wdav.pkg and MicrosoftDefenderATPOnboardingMacOs.sh to the device where you deployed Microsoft Defender for Endpoint on macOS.
The client device isn't associated with org_id. The org_id attribute is blank.
mdatp health --field org_idRun the Bash script to install the onboarding package:
sudo bash -x MicrosoftDefenderATPOnboardingMacOs.shVerify that the device is now associated with your organization and reports a valid org ID:
mdatp health --field org_idAfter installation, you'll see the Microsoft Defender icon in the macOS status bar in the top-right corner.

You can troubleshoot license issues for Microsoft Defender for Endpoint on macOS.
Run the connectivity test.
mdatp connectivity test
You can troubleshoot cloud connectivity issues for Microsoft Defender for Endpoint on macOS.
Verifying anti-malware detection
See the following article to test for anti-malware detection review: Antivirus detection test to verify device onboarding and reporting services
Verifying EDR detection
See the following article to test for an EDR detection review: EDR detection test to verify device onboarding and reporting services.
Logging installation issues
For more information on how to find the automatically generated log that's created by the installer, see Logging installation issues.
For information on troubleshooting procedures, see:
- Troubleshoot system extension issues in Microsoft Defender for Endpoint on macOS
- Troubleshoot installation issues for Microsoft Defender for Endpoint on macOS
- Troubleshoot license issues for Microsoft Defender for Endpoint on macOS
- Troubleshoot cloud connectivity issues for Microsoft Defender for Endpoint on macOS
- Troubleshoot performance issues for Microsoft Defender for Endpoint on macOS
Uninstallation
See Uninstalling for details on how to remove Microsoft Defender for Endpoint on macOS from client devices.
Tip
- Do you want to learn more? Engage with the Microsoft Security community in our Tech Community: Microsoft Defender for Endpoint Tech Community.
- If you have any feedback that you'll like to share, submit it by opening Microsoft Defender Endpoint on Mac on your device and navigate to Help > Send feedback.
Recommended content
- Learn how to install, configure, update, and use Microsoft Defender for Endpoint on Mac.
- Learn how to set up the Microsoft Defender for Endpoint on macOS policies in Jamf.
- Learn how to deploy Microsoft Defender for Endpoint on macOS with Jamf Pro.
- Learn how to troubleshoot license issues in Microsoft Defender for Endpoint on Mac.
- Learn how to use resources for Microsoft Defender for Endpoint on Mac, including how to uninstall it, how to collect diagnostic logs, CLI commands, and known issues with the product.
- Learn how to configure Microsoft Defender for Endpoint on Mac in enterprise organizations.
- Learn how to install Microsoft Defender for Endpoint on Mac on other management solutions.
- Learn how to detect and block Potentially Unwanted Applications (PUA) using Microsoft Defender for Endpoint on macOS.