Нотатка
Доступ до цієї сторінки потребує авторизації. Можна спробувати ввійти або змінити каталоги.
Доступ до цієї сторінки потребує авторизації. Можна спробувати змінити каталоги.
Applies to:  SQL Server
This article describes how to create a full database backup in SQL Server using SQL Server Management Studio (SSMS), Transact-SQL, or PowerShell.
For more information, see SQL Server backup and restore with Azure Blob Storage and SQL Server backup to URL for Azure Blob Storage. For an overview of backup concepts and tasks, see Backup overview (SQL Server).
Recommendations
As a database grows, full database backups take longer and require more storage. For large databases, supplement full backups with a series of differential database backups.
Estimate the size of a full database backup with the sp_spaceused system stored procedure.
By default, each successful backup adds an entry to the SQL Server error log and the system event log. Frequent backups can fill these logs and make other messages hard to find.
To suppress backup log entries, use trace flag 3226, provided your scripts don't rely on them.
Limitations
You can't use the BACKUP statement in an explicit or implicit transaction.
You can't restore backups from newer versions of SQL Server on earlier versions. For example, you can't restore a SQL Server 2025 (17.x) backup on SQL Server 2022 (16.x).
Security
TRUSTWORTHY is set to OFF on a database backup. To set TRUSTWORTHY to ON, see ALTER DATABASE SET options.
Starting with SQL Server 2012 (11.x), the PASSWORD and MEDIAPASSWORD options aren't available for creating backups. You can still restore backups created with passwords.
Permissions
BACKUP DATABASE and BACKUP LOG permissions default to members of the sysadmin fixed server role, and the db_owner and db_backupoperator fixed database roles.
The SQL Server service account must have read and write permissions on the backup device's physical file. Ownership or permission problems on that file prevent backup and restore operations, and only appear when the backup or restore operation runs.
For example, the sp_addumpdevice system stored procedure, which adds a backup device entry to the system tables, doesn't validate file access.
Use SQL Server Management Studio
In Object Explorer, connect to the Database Engine, and then expand the server tree.
Expand Databases, and then select a user database. Or, expand System Databases and select a system database.
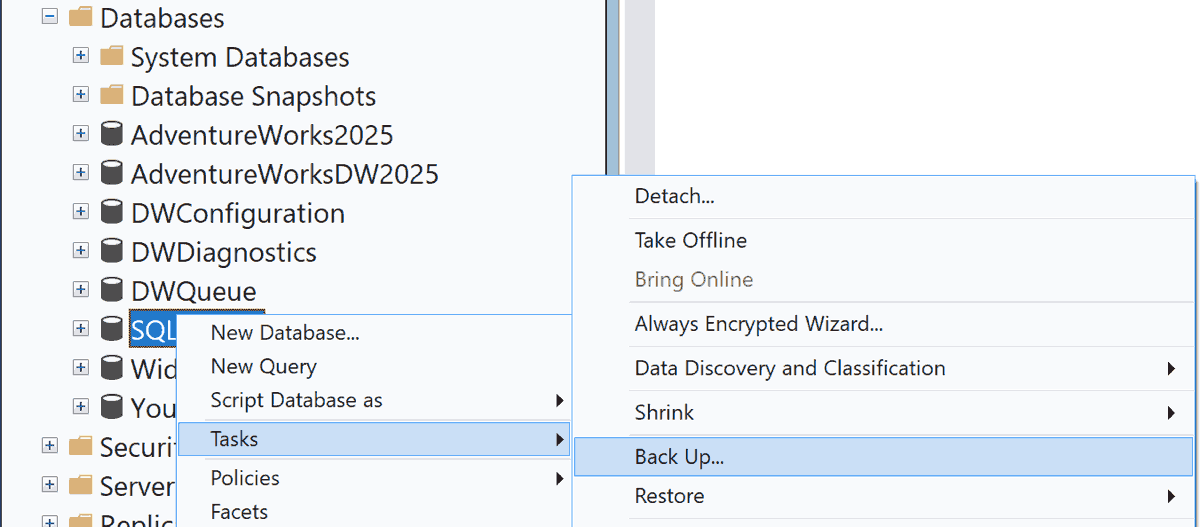
Right-click the database you want to back up, point to Tasks, and then select Back Up....
In the Back Up Database dialog box, the database you selected appears in the dropdown list. You can change the database to any other database on the server.
In the Backup type list, select a backup type. The default is Full.
Important
You must perform at least one full database backup before you can perform a differential or transaction log backup.
Under Backup component, select Database.
In the Destination section, review the default location for the backup file (in the ../mssql/data folder).
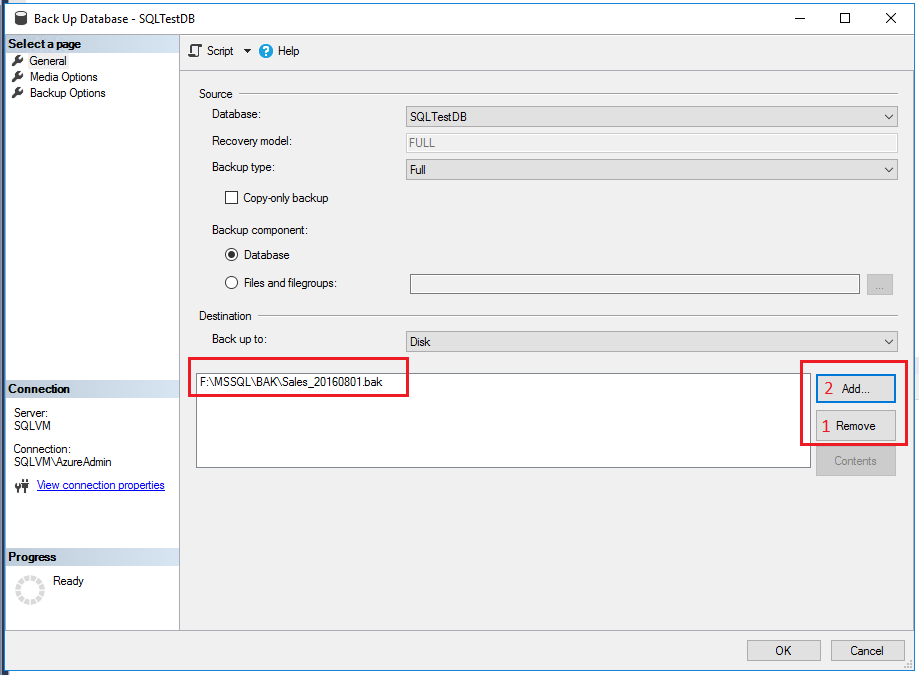
Use the Back up to list to select a different device. Select Add to add backup objects or destinations. You can stripe the backup set across multiple files to increase backup speed.
To remove a backup destination, select it and select Remove. To view the contents of an existing backup destination, select it and select Contents.
Optionally, review the other settings on the Media Options and Backup Options pages.
For more information about backup options, see Back Up Database (General Page), Back Up Database (Media Options page), and Back Up Database (Backup Options Page).
Select OK to start the backup.
When the backup completes successfully, select OK to close the dialog.
Remarks
When you specify a backup task in SQL Server Management Studio, you can generate the corresponding Transact-SQL BACKUP script by selecting the Script button and then selecting a script destination.
After you create a full database backup, you can create a differential database backup or a transaction log backup.
Optionally, select the Copy-only backup check box to create a copy-only backup. A copy-only backup is a SQL Server backup that's independent of the sequence of conventional SQL Server backups. For more information, see Copy-only backups. Copy-only backups aren't available for the Differential backup type.
The Overwrite media option is disabled on the Media Options page when you back up to a URL.
Examples
For the following examples, create a test database by using the following Transact-SQL code:
USE master;
GO

CREATE DATABASE [SQLTestDB];
GO

USE [SQLTestDB];
GO

CREATE TABLE SQLTest
(
    ID INT NOT NULL PRIMARY KEY,
    c1 VARCHAR (100) NOT NULL,
    dt1 DATETIME DEFAULT getdate() NOT NULL
);
GO

USE [SQLTestDB];
GO

INSERT INTO SQLTest (ID, c1) VALUES (1, 'test1');
INSERT INTO SQLTest (ID, c1) VALUES (2, 'test2');
INSERT INTO SQLTest (ID, c1) VALUES (3, 'test3');
INSERT INTO SQLTest (ID, c1) VALUES (4, 'test4');
INSERT INTO SQLTest (ID, c1) VALUES (5, 'test5');
GO

SELECT *
FROM SQLTest;
GO
A. Full backup to disk to the default location
This example backs up the SQLTestDB database to disk at the default backup location.
In Object Explorer, connect to the Database Engine, and then expand the server tree.
Expand Databases, right-click
SQLTestDB, point to Tasks, and then select Back Up....Select OK.
When the backup completes successfully, select OK to close the dialog.
B. Full backup to disk to a nondefault location
This example backs up the SQLTestDB database to disk at a location you choose.
In Object Explorer, connect to the Database Engine, and then expand the server tree.
Expand Databases, right-click
SQLTestDB, point to Tasks, and then select Back Up....On the General page, in the Destination section, select Disk in the Back up to list.
Select Remove until all existing backup files are removed.
Select Add. The Select Backup Destination dialog box opens.
Enter a valid path and file name in the File name box. Use .bak as the extension to simplify file classification.
Select OK, and then select OK again to start the backup.
When the backup completes successfully, select OK to close the dialog.
C. Create an encrypted backup
This example backs up the SQLTestDB database with encryption to the default backup location.
In Object Explorer, connect to the Database Engine, and then expand the server tree.
Expand Databases, expand System Databases, right-click
master, and then select New Query to open a query window with a connection to yourSQLTestDBdatabase.Run the following commands to create a database master key and a certificate in the
masterdatabase.-- Create the master key. CREATE MASTER KEY ENCRYPTION BY PASSWORD = '<password>'; -- If the master key already exists, open it in the same session that you create the certificate. (See next step.) OPEN MASTER KEY DECRYPTION BY PASSWORD = '<password>'; -- Create the certificate encrypted by the master key. CREATE CERTIFICATE MyCertificate WITH SUBJECT = 'Backup Cert', EXPIRY_DATE = '20201031';In Object Explorer, in the Databases node, right-click
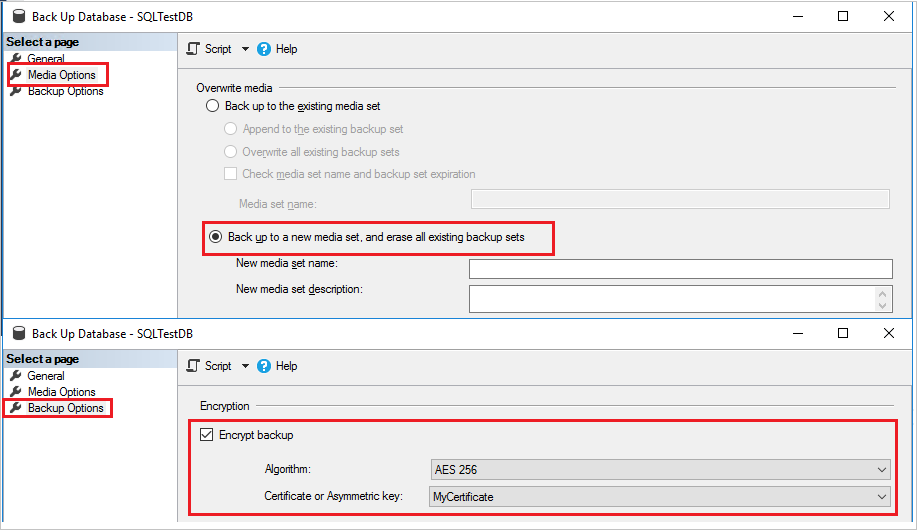
SQLTestDB, point to Tasks, and then select Back Up....On the Media Options page, in the Overwrite media section, select Back up to a new media set, and erase all existing backup sets.
On the Backup Options page, in the Encryption section, select Encrypt backup.
In the Algorithm list, select AES 256.
In the Certificate or Asymmetric key list, select
MyCertificate.Select OK.
D. Back up to Azure Blob Storage
This example creates a full database backup of SQLTestDB to Azure Blob Storage. The example assumes you already have a storage account with a blob container. The example creates a shared access signature, and fails if the container has an existing shared access signature.
If you don't have a Blob Storage container in a storage account, create one before you continue. See Create a general purpose storage account and Create a container.
In Object Explorer, connect to the Database Engine, and then expand the server tree.
Expand Databases, right-click
SQLTestDB, point to Tasks, and then select Back Up....On the General page, in the Destination section, select URL in the Back up to list.
Select Add. The Select Backup Destination dialog box opens.
If you previously registered the Azure storage container you want to use with SSMS, select it. Otherwise, select New container to register a new container.
In the Connect to a Microsoft Subscription dialog box, sign in to your account.
In the Select Storage Account box, select your storage account.
In the Select Blob Container box, select your blob container.
In the Shared Access Policy Expiration calendar box, select an expiration date for the shared access policy that this example creates.
Select Create Credential to generate a shared access signature and credential in SSMS.
Select OK to close the Connect to a Microsoft Subscription dialog box.
In the Backup File box, change the name of the backup file if you want to.
Select OK to close the Select a backup destination dialog box.
Select OK to start the backup.
When the backup completes successfully, select OK to close the dialog.
Note
Backing up to Blob Storage by using managed identities isn't currently supported.
Use Transact-SQL
Create a full database backup by running the BACKUP DATABASE statement. Specify:
- The name of the database to back up.
- The backup device where the full database backup is written.
The basic Transact-SQL syntax for a full database backup is:
BACKUP DATABASE <database>
TO <backup_device> [ , ...n ]
[ WITH <with_options> [ , ...o ] ];
| Option | Description |
|---|---|
<database> |
The database to back up. |
<backup_device> [ , ...n ] |
Specifies 1 to 64 backup devices to use for the backup operation. Specify a physical backup device, or specify a corresponding logical backup device if one is already defined. To specify a physical backup device, use the DISK, TAPE, or URL option:{ DISK | TAPE | URL } = physical_backup_device_nameUse URL to back up to Azure Blob Storage or S3-compatible object storage. For more information, see Backup Devices (SQL Server). |
WITH <with_options> [ , ...n ] |
Used to specify one or more options, n. Some of the basic WITH options are described in the following list. |
Optionally, specify one or more WITH options. A few basic WITH options are described here. For information about all WITH options, see BACKUP.
Basic backup set WITH options:
{ COMPRESSION | NO_COMPRESSION }. SQL Server specifies whether backup compression is performed on the backup, overriding the server-level default.
ENCRYPTION (ALGORITHM, SERVER CERTIFICATE | ASYMMETRIC KEY). In SQL Server 2014 or later, specifies the encryption algorithm to use, and the certificate or asymmetric key to use to secure the encryption.
DESCRIPTION = { 'text' | @text_variable }. Specifies the free-form text that describes the backup set. The string can have a maximum of 255 characters.
NAME = { backup_set_name | @backup_set_name_var }. Specifies the name of the backup set. Names can have a maximum of 128 characters. If you don't specify
NAME, it's blank.
By default, BACKUP appends the backup to an existing media set, preserving existing backup sets. To explicitly specify this configuration, use the NOINIT option. For information about appending to existing backup sets, see Media sets, media families, and backup sets (SQL Server).
To format the backup media, use the FORMAT option:
FORMAT [ , MEDIANAME = { media_name | @media_name_variable } ] [ , MEDIADESCRIPTION = { text | @text_variable } ]
Use the FORMAT clause when you use media for the first time, or when you want to overwrite all existing data. Optionally, assign the new media a media name and description.
Important
Be cautious when you use the FORMAT clause of the BACKUP statement because this option destroys any backups previously stored on the backup media.
Examples
For the following examples, create a test database by using the following Transact-SQL code:
USE master;
GO

CREATE DATABASE [SQLTestDB];
GO

USE [SQLTestDB];
GO

CREATE TABLE SQLTest
(
    ID INT NOT NULL PRIMARY KEY,
    c1 VARCHAR (100) NOT NULL,
    dt1 DATETIME DEFAULT GETDATE() NOT NULL
);
GO

USE [SQLTestDB];
GO

INSERT INTO SQLTest (ID, c1) VALUES (1, 'test1');
INSERT INTO SQLTest (ID, c1) VALUES (2, 'test2');
INSERT INTO SQLTest (ID, c1) VALUES (3, 'test3');
INSERT INTO SQLTest (ID, c1) VALUES (4, 'test4');
INSERT INTO SQLTest (ID, c1) VALUES (5, 'test5');
GO

SELECT *
FROM SQLTest;
GO
A. Back up to a disk device
The following example backs up the complete SQLTestDB database to disk. It uses FORMAT to create a new media set.
USE SQLTestDB;
GO

BACKUP DATABASE SQLTestDB
TO DISK = 'c:\tmp\SQLTestDB.bak'
WITH FORMAT,
     MEDIANAME = 'SQLServerBackups',
     NAME = 'Full Backup of SQLTestDB';
GO
B. Back up to a tape device
The following example backs up the complete SQLTestDB database to tape. It appends the backup to the previous backups.
USE SQLTestDB;
GO

BACKUP DATABASE SQLTestDB
TO TAPE = '\\.\Tape0'
WITH NOINIT,
     NAME = 'Full Backup of SQLTestDB';
GO
C. Back up to a logical tape device
The following example creates a logical backup device for a tape drive. The example then backs up the complete SQLTestDB database to that device.
-- Create a logical backup device,
-- SQLTestDB_Bak_Tape, for tape device \\.\tape0.
USE master;
GO

EXECUTE sp_addumpdevice 'tape', 'SQLTestDB_Bak_Tape', '\\.\tape0';

USE SQLTestDB;
GO

BACKUP DATABASE SQLTestDB
TO SQLTestDB_Bak_Tape
WITH FORMAT,
     MEDIANAME = 'SQLTestDB_Bak_Tape',
     MEDIADESCRIPTION = '\\.\tape0',
     NAME = 'Full Backup of SQLTestDB';
GO
PowerShell
Use the Backup-SqlDatabase cmdlet. To explicitly indicate a full database backup, specify the -BackupAction parameter with its default value, Database. This parameter is optional for full database backups.
If you open a PowerShell window from within SSMS to connect to the SQL Server Database Engine, you can omit the credential portion because your credential in SSMS automatically establishes the connection between PowerShell and Database Engine.
Note
This example requires the SqlServer module. For more information, see SQL Server PowerShell Provider.
Examples
A. Full backup (local)
The following example creates a full database backup of the <myDatabase> database to the default backup location of the server instance Computer\Instance. Optionally, this example specifies -BackupAction Database.
For full syntax examples, see Backup-SqlDatabase.
$credential = Get-Credential

Backup-SqlDatabase -ServerInstance Computer[\Instance] -Database <myDatabase> -BackupAction Database -Credential $credential
B. Full backup to Azure
The following example creates a full backup of the database <myDatabase> on the <myServer> instance to Blob Storage. A stored access policy is created with read, write, and list rights. The SQL Server credential, https://<myStorageAccount>.blob.core.windows.net/<myContainer>, is created by using a shared access signature associated with the stored access policy. The command uses the $backupFile parameter to specify the location (URL) and the backup file name.
$credential = Get-Credential
$container = 'https://<myStorageAccount>blob.core.windows.net/<myContainer>'
$fileName = '<myDatabase>.bak'
$server = '<myServer>'
$database = '<myDatabase>'
$backupFile = $container + '/' + $fileName

Backup-SqlDatabase -ServerInstance $server -Database $database -BackupFile $backupFile -Credential $credential
Related tasks
- Create a differential database backup (SQL Server)
- Restore a database backup using SSMS
- Restore a database backup under the simple recovery model
- Restore database to point of failure - full recovery
- Restore a database to a new location (SQL Server)
- Use the Maintenance Plan Wizard
Related content
- Troubleshoot SQL Server backup and restore operations
- Backup overview (SQL Server)
- Transaction log backups (SQL Server)
- Media sets, media families, and backup sets (SQL Server)
- sys.sp_addumpdevice (Transact-SQL)
- BACKUP (Transact-SQL)
- Back Up Database (General Page)
- Back Up Database (Backup Options Page)
- Differential backups (SQL Server)
- Full database backups (SQL Server)