Нотатка
Доступ до цієї сторінки потребує авторизації. Можна спробувати ввійти або змінити каталоги.
Доступ до цієї сторінки потребує авторизації. Можна спробувати змінити каталоги.
A Python environment is a context in which you run Python code and includes global, virtual, and conda environments. An environment consists of an interpreter, a library (typically the Python Standard Library), and a set of installed packages. These components together determine valid language constructs and syntax, operating-system functionality that you can access, and packages you can use.
In Visual Studio on Windows, you use the Python Environments window, as described in this article, to manage environments and select one as the default for new projects.
You can learn about other aspects of environments in the following articles:
For any given project, you can select a specific environment rather than use the default.
For details on creating and using virtual environments for Python projects, see Use virtual environments.
If you want to install packages in an environment, refer to the Packages tab reference.
To install another Python interpreter, see Install Python interpreters. In general, if you download and run an installer for a mainline Python distribution, Visual Studio detects that new installation and the environment appears in the Python Environments window and can be selected for projects.
Note
You can manage environments for Python code that open as a folder by selecting File > Open > Folder. The Python toolbar allows you to switch between all detected environments, and also add a new environment. The environment information is stored in the PythonSettings.json file in the workspace .vs folder.
Prerequisites
- A Python workload installed
If you're new to Python in Visual Studio, see the following articles for general background:
The Python Environments window
The environments that Visual Studio knows about are displayed in the Python Environments window. To open the window, use one of the following methods:
- Select View > Other Windows > Python Environments.
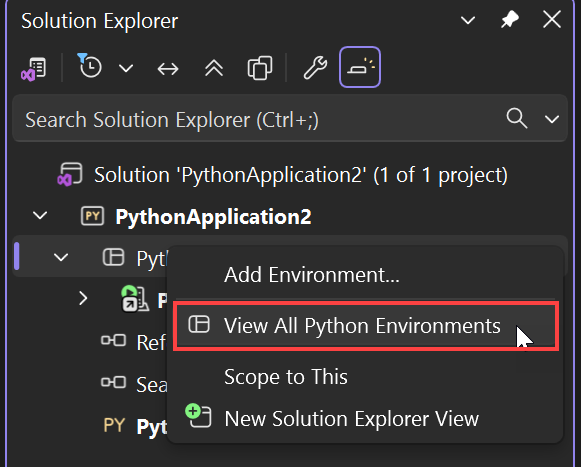
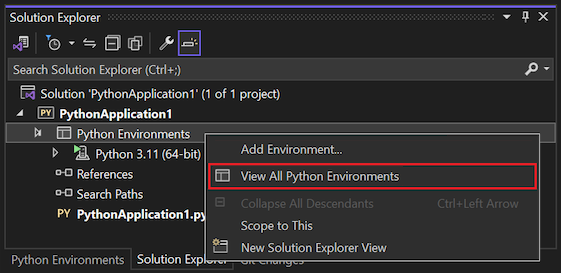
- Right-click the Python Environments node for a project in Solution Explorer and select View All Python Environments.
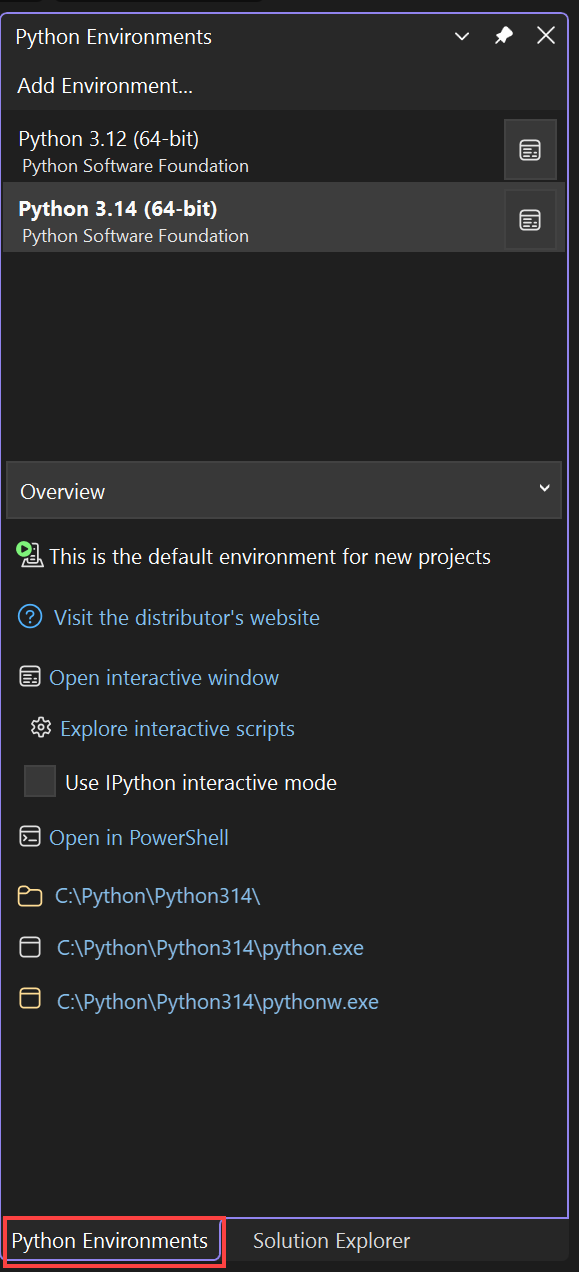
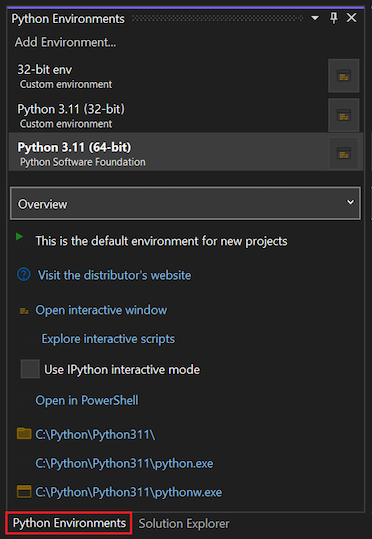
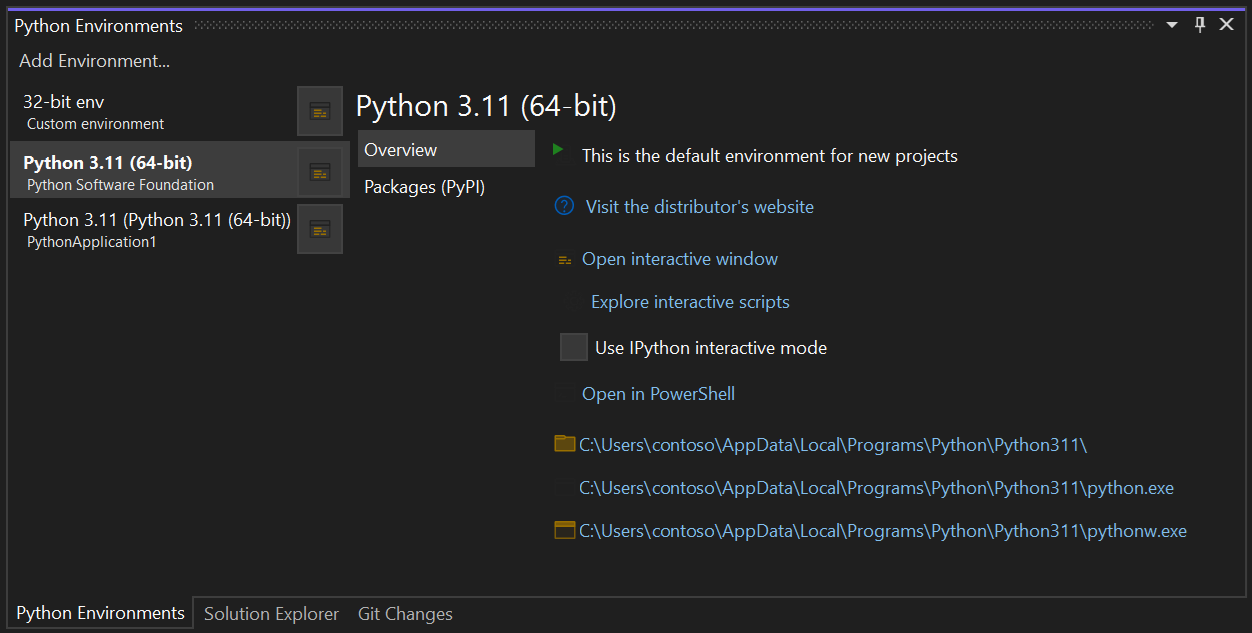
The Python Environments window appears alongside Solution Explorer in Visual Studio:
Visual Studio looks for installed global environments by using the registry (following PEP 514), along with virtual environments and conda environments. If you don't see an expected environment in the list, see Manually identify an existing environment.
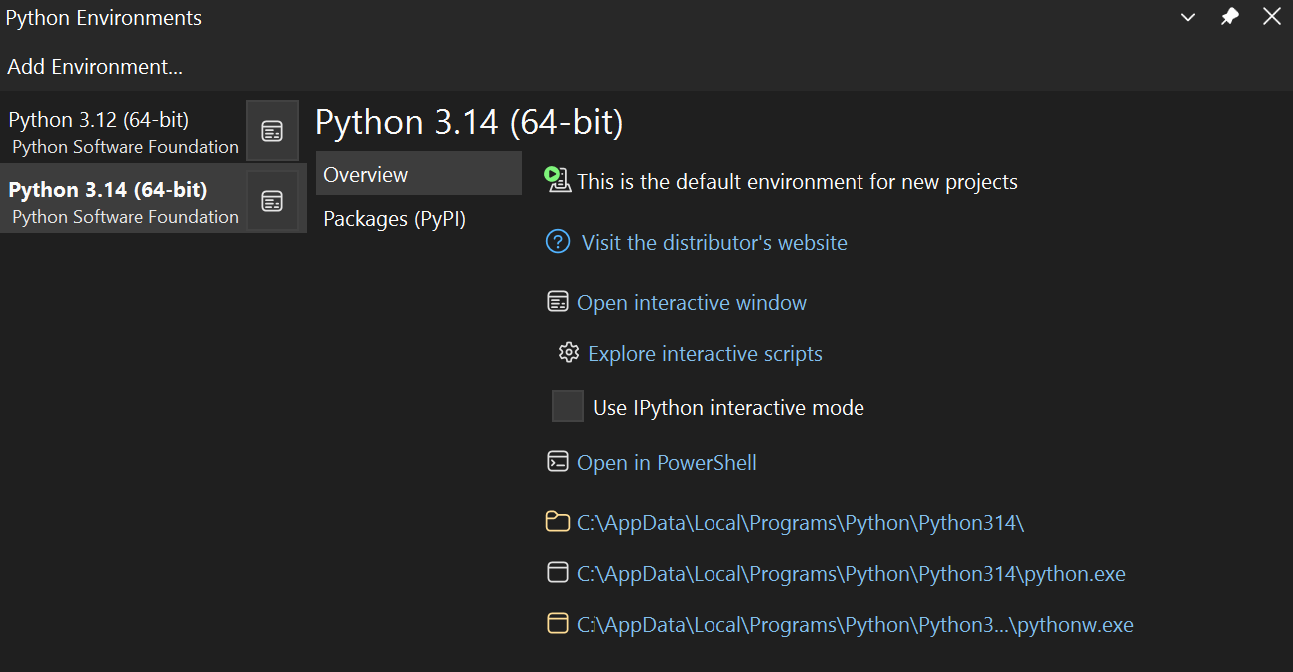
When you select an environment in the list, Visual Studio displays various properties and commands for that environment on the Overview tab of the Python Environments window, such as the interpreter location. The commands at the bottom of the Overview tab each open a command prompt with the interpreter running. For more information, see Python Environments window tab reference - Overview.
Use the dropdown list under the list of environments to switch to different tabs such as Packages and IntelliSense. These tabs are also described in the Python Environments window tab reference.
Selecting an environment doesn't change its relation to any projects. The default environment, shown in boldface in the list, is the one that Visual Studio uses for any new projects. To use a different environment with new projects, use the Make this the default environment for new projects command. Within the context of a project, you can always select a specific environment. For more information, see Select an environment for a project.
To the right of each listed environment, is a control that opens an Interactive window for that environment.
Note
In Visual Studio 2017 15.5 and earlier, another control appears that refreshes the IntelliSense database for that environment. For details about the database, see Python Environments window tab reference.
Note
Although Visual Studio respects the system-site-packages option, it doesn't provide a way to change it from within Visual Studio.
What if no environments appear?
If you don't see any environments in the Python Environments window, it means Visual Studio failed to detect any Python installations in standard locations. Maybe you installed Visual Studio 2017 or later but cleared all the interpreter options in the installer options for the Python workload. Similarly, you possibly installed Visual Studio 2015 or earlier but didn't install an interpreter manually. For more information, see Install Python interpreters.
If you know you have a Python interpreter on your computer but Visual Studio (any version) didn't detect it, use the + Custom command to specify the interpreter location manually. For more information, see Manually identify an existing environment.
Types of environments
Visual Studio can work with global, virtual, and conda environments.
Global environments
Each Python installation maintains its own global environment. For example, Python 2.7, Python 3.6, Python 3.7, Anaconda 4.4.0, and so on. For more information, see Install Python interpreters.
Each environment is composed of the specific Python interpreter, its standard library, and a set of preinstalled packages. It also contains any other packages you install while the environment is activated. Installing a package into a global environment makes it available to all projects using that environment. If the environment is located in a protected area of the file system (within c:\program files, for example), then installing packages requires administrator privileges.
Global environments are available to all projects on the computer. In Visual Studio, you select one global environment as the default, which is used for all projects unless you specifically choose a different one for a project. For more information, see Select an environment for a project.
Virtual environments
Working in a global environment is an easy way to get started. Over time, environments can become cluttered with many different packages installed for different projects. The clutter can make it difficult to thoroughly test your application against a specific set of packages with known versions. But this kind of environment is what you would expect to set up on a build server or web server. Conflicts can also occur when two projects require incompatible packages or different versions of the same package.
For these reasons, developers often create a virtual environment for a project. A virtual environment is a subfolder in a project that contains a copy of a specific interpreter. If you activate the virtual environment, any packages you install are installed only in that environment's subfolder. When you run a Python program within the virtual environment, you can be confident that the program is running against only those specific packages.
Visual Studio provides direct support for creating a virtual environment for a project. If you open a project that contains a requirements.txt file, Visual Studio prompts you automatically to create a virtual environment and install those dependencies. You see the same behavior when you create a project from a template that includes requirements.txt file.
At any time within an open project, you can create a new virtual environment. In Solution Explorer, expand the project node, right-click Python Environments, and choose Add environment. In Add Environment, choose Virtual environment. For more information, see Create a virtual environment.
Visual Studio also provides a command to generate a requirements.txt file from a virtual environment, making it easy to recreate the environment on other computers. For more information, see Use virtual environments.
Conda environments
You can create a conda environment by using the conda tool, or with integrated conda management in Visual Studio 2017 version 15.7 and later. A conda environment requires Anaconda or Miniconda. These platforms are available through the Visual Studio Installer. For more information, see Install Python support in Visual Studio.
In the Python Environments window or from the Python toolbar, select Add Environment to open the Add environment dialog.
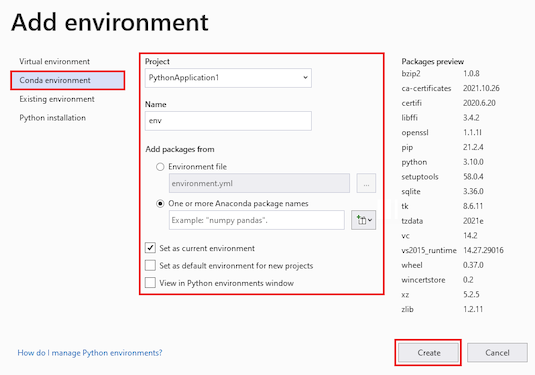
In the Add environment dialog, select the Conda environment tab:
Configure the following fields:
Field Description Project Identifies the project in which to create the environment. Name Provides the name for the conda environment. Add packages from Specifies how to add packages to the conda environment.
- Environment file: Select this option if you have an environment.yml file that describes your dependencies. Enter the name of the file or browse (...) to the file location and select the file.
- One or more Anaconda package names: Select this option if you want to list one or more Python packages or Python versions.
The package list instructs conda to create a Python environment. To install the latest version of Python, use thepythoncommand. To install a specific version, use the commandpython=,major>.<minor>as inpython=3.7. You can also use the package button to select Python versions and common packages from a series of menus.Set as current environment Activates the new environment in the selected project after the environment is created. Set as default environment for new projects Automatically sets and activates the conda environment in any new projects created in Visual Studio. This option is the same as using the Make this the default environment for new projects in the Python Environments window. View in Python Environments window Specifies whether to show the Python Environments window after creating the environment. Important
When you create a conda environment, be sure to specify at least one Python version or Python package to ensure the environment contains a Python runtime. You can use an environments.yml file or the package list. If you don't provide this specification, Visual Studio ignores the environment. The environment doesn't appear anywhere in the Python Environments window, it's not set as the current environment for a project, and it's not available as a global environment.
If you happen to create a conda environment without a Python version, use the
conda infocommand to see the locations of conda environment folders. You can then manually remove the subfolder for the environment from that location.Select Create.
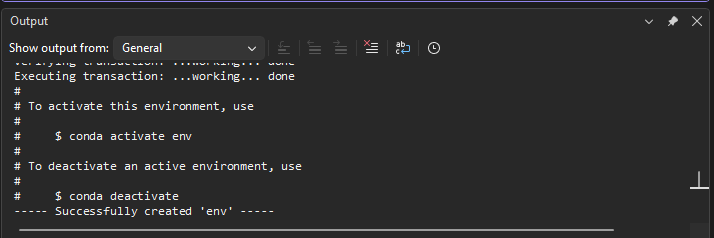
You can monitor creation of the conda environment in the Output window. After creation completes, the output displays some command-line interface (CLI) instructions, such as conda activate env:
You can monitor creation of the conda environment in the Output window. After creation completes, the output displays some command-line interface (CLI) instructions, such as activate env:
In Visual Studio, you can activate a conda environment for your project in the same way that you would any other environment. For more information, see Select an environment for a project.
To install more packages in the environment, use the Packages tab on the Python Environments window.
Note
For best results with conda environments, use conda 4.4.8 or later. Keep in mind that conda versions are different from Anaconda versions. You can install suitable versions of Miniconda (Visual Studio 2019 and Visual Studio 2022) and Anaconda (Visual Studio 2017) through the Visual Studio Installer.
To see the conda version, where conda environments are stored, and other information, run the conda info command at an Anaconda command prompt (a command prompt where Anaconda is in the path):
conda info
Your conda environment folders appear as follows:
       envs directories : C:\Users\user\.conda\envs
                          c:\anaconda3\envs
                          C:\Users\user\AppData\Local\conda\conda\envs
Because conda environments aren't stored with a project, they behave similarly to global environments. For example, installing a new package into a conda environment makes that package available to all projects that use the environment.
For Visual Studio 2017 version 15.6 and earlier, you can use conda environments by pointing to them manually as described in Manually identify an existing environment.
Visual Studio 2017 version 15.7 and later detects conda environments automatically and displays them in the Python Environments window as described in the next section.
Manually identify an existing environment
Use the following steps to identify an environment installed in a nonstandard location.
In the Python Environments window or from the Python toolbar, select Add Environment to open the Add environment dialog.
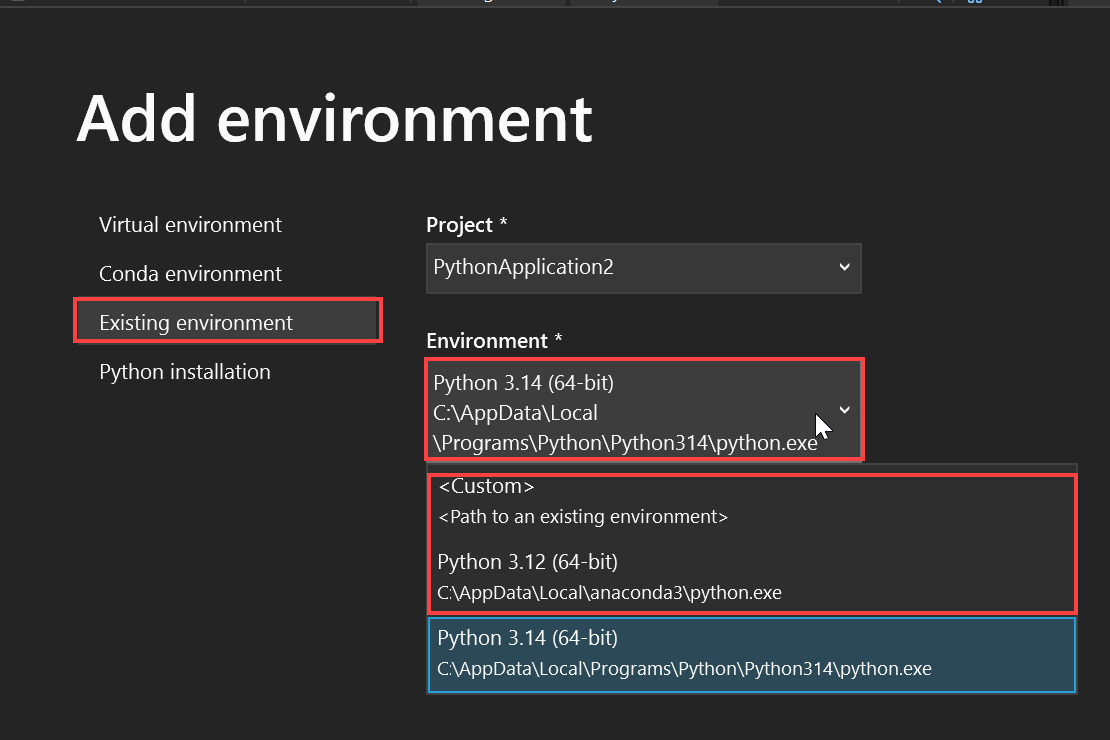
In the Add environment dialog, on the Existing environment tab, set the Environment field to <Custom>:
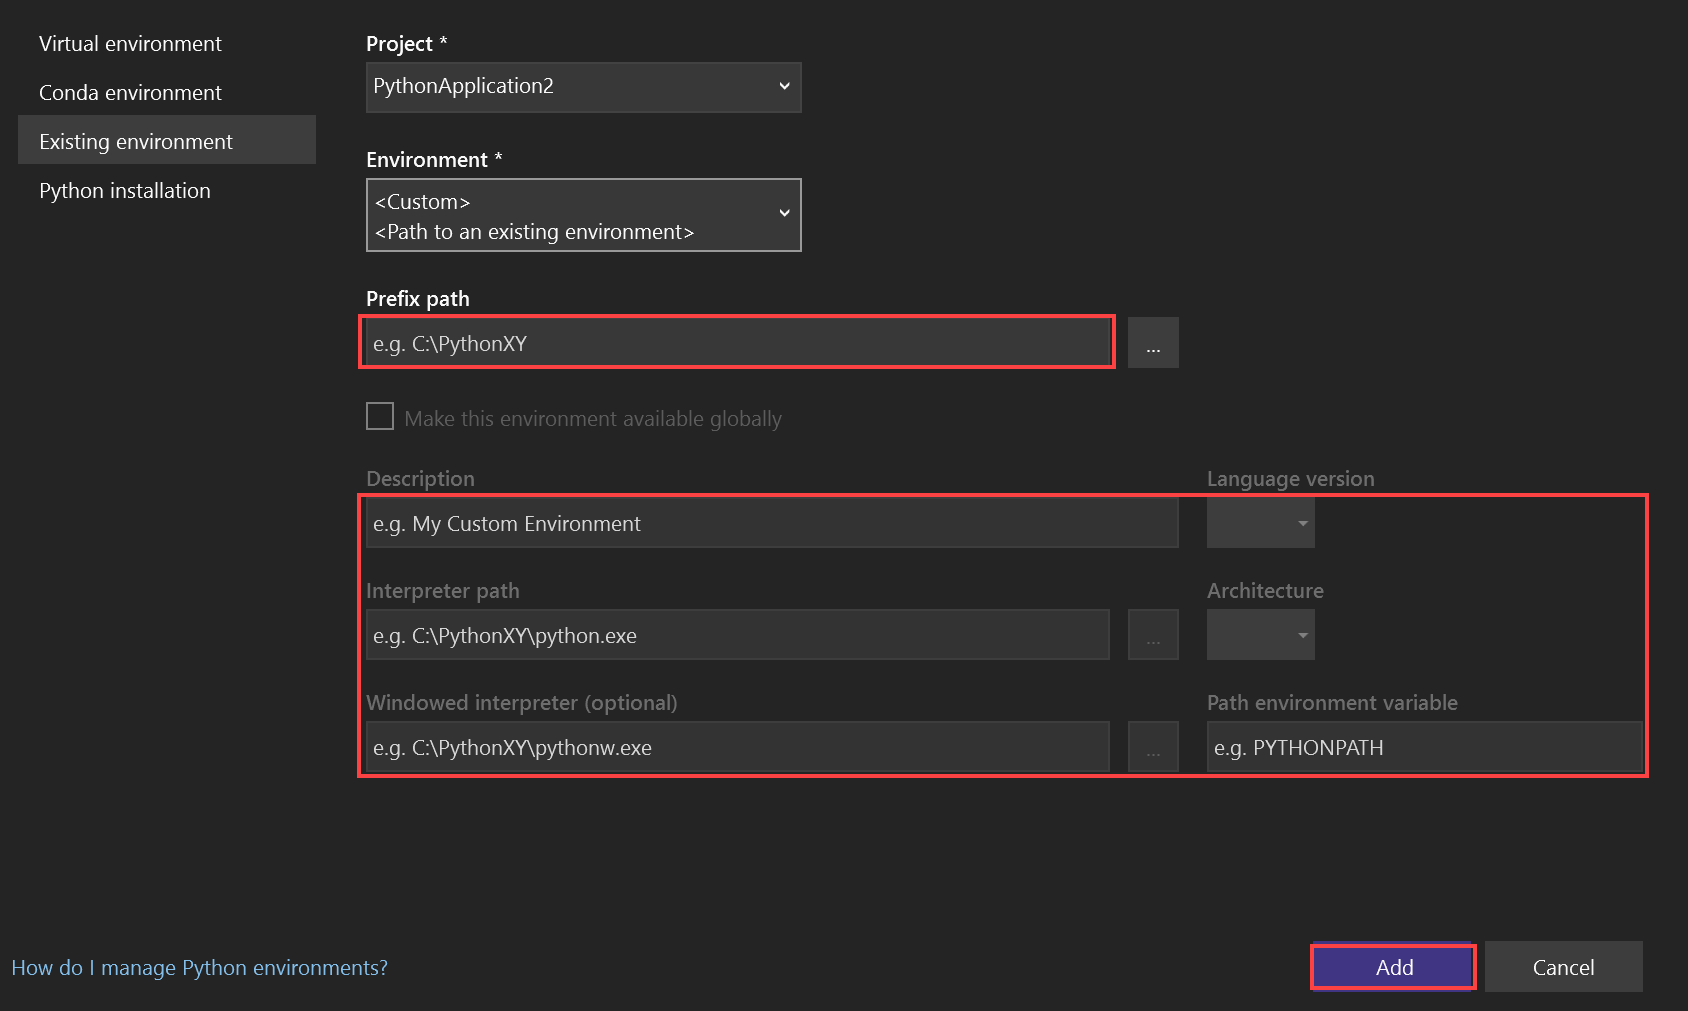
After you select the <Custom> value, more fields are added to the dialog.
- Set the Prefix path field to the path of the interpreter. You can set the field by browsing (...) to the path location.
- After you select the path, the remaining fields are populated. Review the values and modify as needed. When you're ready, select Add.
You can also review and modify details of the environment at any time in the Python Environments window.
In the Python Environments window, select the environment, and then select the Configure tab.
After you make changes, select the Apply command.
You can also remove the environment by using the Remove command. For more information, see Configure tab. This command isn't available for autodetected environments.
Fix or delete invalid environments
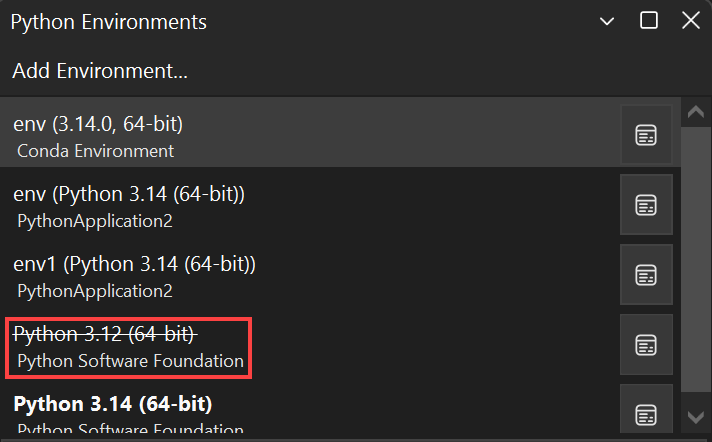
If Visual Studio finds registry entries for an environment, but the path to the interpreter is invalid, then the Python Environments window shows the environment name in a strikeout font format as shown in the following image:
To correct an environment that you want to keep, first try using the environment installer's Repair process. Most installers include a repair option.
Modify the registry to correct an environment
If the Python environment doesn't have a repair option, or you want to remove an invalid environment, you can use the following steps to modify the registry directly. Visual Studio automatically updates the Python Environments window when you make changes to the registry.
Run the regedit.exe executable to open the registry editor.
Browse to the environment folder that corresponds to your configuration:
Python version Folder 64-bit version HKEY_LOCAL_MACHINE\SOFTWARE\Python or HKEY_CURRENT_USER\Software\Python 32-bit version HKEY_LOCAL_MACHINE\SOFTWARE\WOW6432Node\Python IronPython IronPython Expand the distribution and version node structure for your environment:
Distribution Node CPython PythonCore > <Version node> Anaconda ContinuumAnalytics > <Version node> IronPython <Version node> Inspect the values under the InstallPath node:
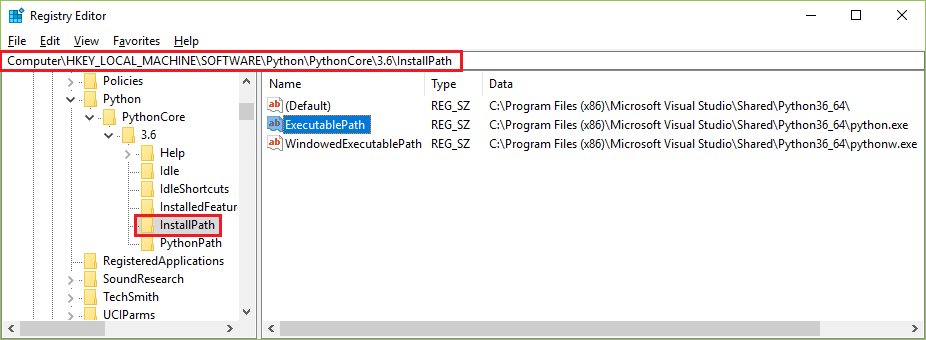
- If the environment still exists on your computer, change the value of the ExecutablePath entry to the correct location. Also correct the values for the (Default) and WindowedExecutablePath entries, as necessary.
- If the environment no longer exists on your computer and you want to remove it from the Python Environments window, delete the version number parent node of the InstallPath node. You can see an example of this node in the preceding image. In the example, this node is 3.6.
Caution
Invalid settings in the HKEY_CURRENT_USER\SOFTWARE\Python key override the settings in the HKEY_LOCAL_MACHINE\SOFTWARE\Python key.
Delete or remove a Python environment
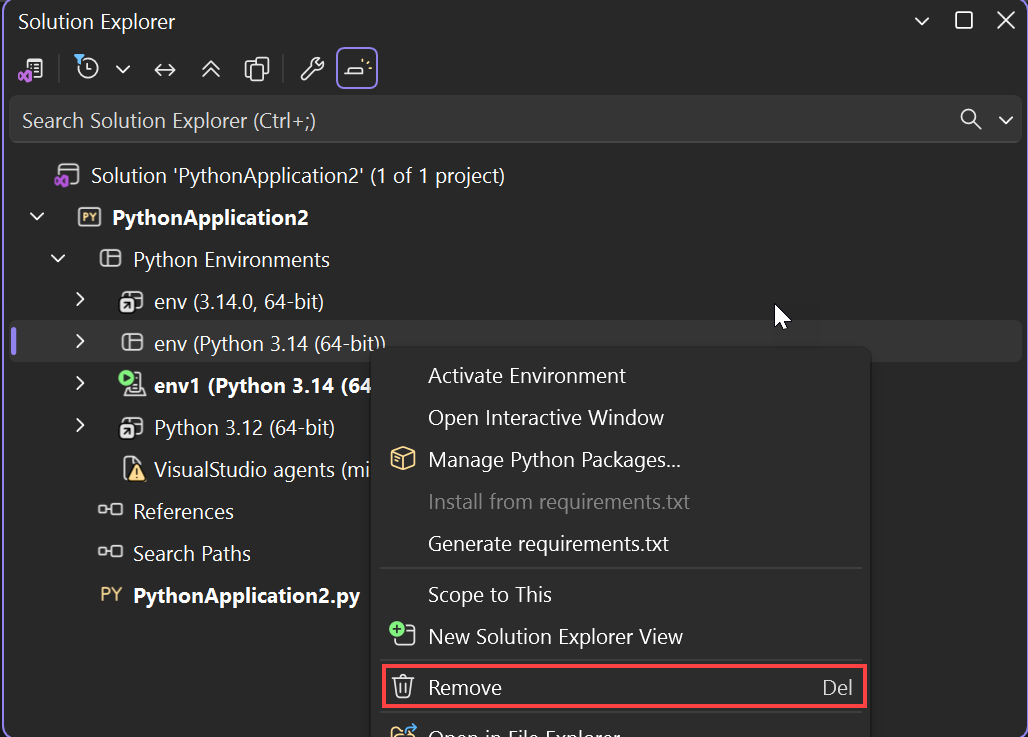
To remove a Python project, browse to the Python environment in Solution Explorer. Right-click the Python environment that you want to remove, and select Remove.
If you want to keep the Python environment but remove it from your project, select Remove. If you want to delete the environment permanently, select Delete.
