Tutorial: Share a Docker app with Visual Studio Code
This tutorial is part two of a four-part series introducing Docker for use with Visual Studio Code (VS Code).
In this tutorial, you learn how to:
- Update the code and replace the container.
- Share your image.
- Run the image on a new instance.
Prerequisites
This tutorial continues the previous tutorial, Create a Docker app with Visual Studio Code. To continue here, you'll need the running todo list manager from part 1.
Update the code and replace the container
Let's make a few changes and learn about managing your containers.
In the
src/static/js/app.jsfile, update line 56 to use this new text label:- <p className="text-center">No items yet! Add one above!</p> + <p className="text-center">You have no todo items yet! Add one above!</p>Save your change.
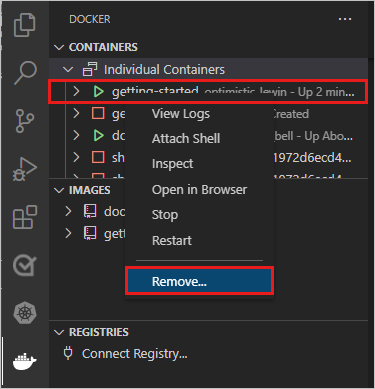
Stop and remove the current version of the container. More than one container can't use the same port.
Right-click the getting-started container and select Remove.
Or, from the command line, use the following command to get the container ID.
docker psThen stop and remove the container:
docker stop <container-id>
docker rm <container-id>
Build the updated version of the image. In the file explorer, right-click Dockerfile, then select Build Image.
Or, to build on the command line, change directory to the folder that contains the Dockerfile, and use the same command you used before.
docker build -t getting-started .Start a new container that uses the updated code.
docker run -dp 3000:3000 getting-startedRefresh your browser on
http://localhost:3000to see your updated help text.
Share your image
Now that you've built an image, you can share it. To share Docker images, use a Docker registry. The default registry is Docker Hub, which is where all of the images we've used have come from.
To push an image, first, you need to create a repo on Docker Hub.
Go to Docker Hub and sign in to your account.
Select Create Repository.
For the repo name, enter
getting-started. Make sure that the Visibility is Public.Select Create.
On the right of the page, you'll see a section named Docker commands. This section gives an example command to run to push to this repo.

In VS Code, in the Docker view, under REGISTRIES, click the plug icon, to connect to a registry, and choose Docker Hub.
Enter your Docker Hub account name and password.
In the Docker view of VS Code, under IMAGES, right-click the image tag, and select Push. Enter the namespace and the tag, or accept the defaults.
To push to Docker Hub by using the command line, use this procedure.
Sign in to the Docker Hub:
docker login -u <username>Use the following command to give the getting-started image a new name.
docker tag getting-started <username>/getting-startedUse the following command to push your container.
docker push <username>/getting-started
Run the image on a new instance
Now that your image has been built and pushed into a registry, try running the app on a brand new instance that has never seen this container image. To run your app, use Play with Docker.
Open your browser to Play with Docker.
Sign in with your Docker Hub account.
Select Start and then select the + ADD NEW INSTANCE link in the left side bar. After a few seconds, a terminal window opens in your browser.

In the terminal, start your app.
docker run -dp 3000:3000 <username>/getting-startedPlay with Docker pulls down your image and starts it.
Select the 3000 badge, next to OPEN PORT. You should see the app with your modifications.
If the 3000 badge doesn't show up, select OPEN PORT and enter 3000.
Clean up resources
Keep everything that you've done so far to continue this series of tutorials.
Next steps
Congrats. You've completed part 2 and learned how to update your code and run your image on a new instance.
Here are some resources that might be useful to you:
Next, try the next tutorial in this series:
Feedback
Coming soon: Throughout 2024 we will be phasing out GitHub Issues as the feedback mechanism for content and replacing it with a new feedback system. For more information see: https://aka.ms/ContentUserFeedback.
Submit and view feedback for