Compile TypeScript code (ASP.NET Core)
Use the TypeScript NuGet package to add TypeScript support to your ASP.NET Core projects. Starting in Visual Studio 2019, it is recommended that you use the NuGet package instead of the TypeScript SDK. The TypeScript NuGet package provides greater portability across different platforms and environments.
For ASP.NET Core projects, one common usage for the NuGet package is to compile TypeScript using the .NET Core CLI. In .NET scenarios, the NuGet package is the preferred option, and it's the only way to enable TypeScript compilation using .NET Core CLI commands such as dotnet build and dotnet publish. Also, for MSBuild integration with ASP.NET Core and TypeScript, choose the NuGet package.
Important
For projects based on the JavaScript Project System (JSPS), or .esproj projects, use the npm package instead of NuGet to add TypeScript support.
Add TypeScript support with NuGet
The TypeScript NuGet package adds TypeScript support. When the NuGet package for TypeScript 3.2 or higher is installed into your project, the corresponding version of the TypeScript language service gets loaded in the editor.
If Visual Studio is installed, then the node.exe bundled with it will automatically be picked up by Visual Studio. If you don't have Node.js installed, we recommend you install the LTS version from the Node.js website.
Open your ASP.NET Core project in Visual Studio.
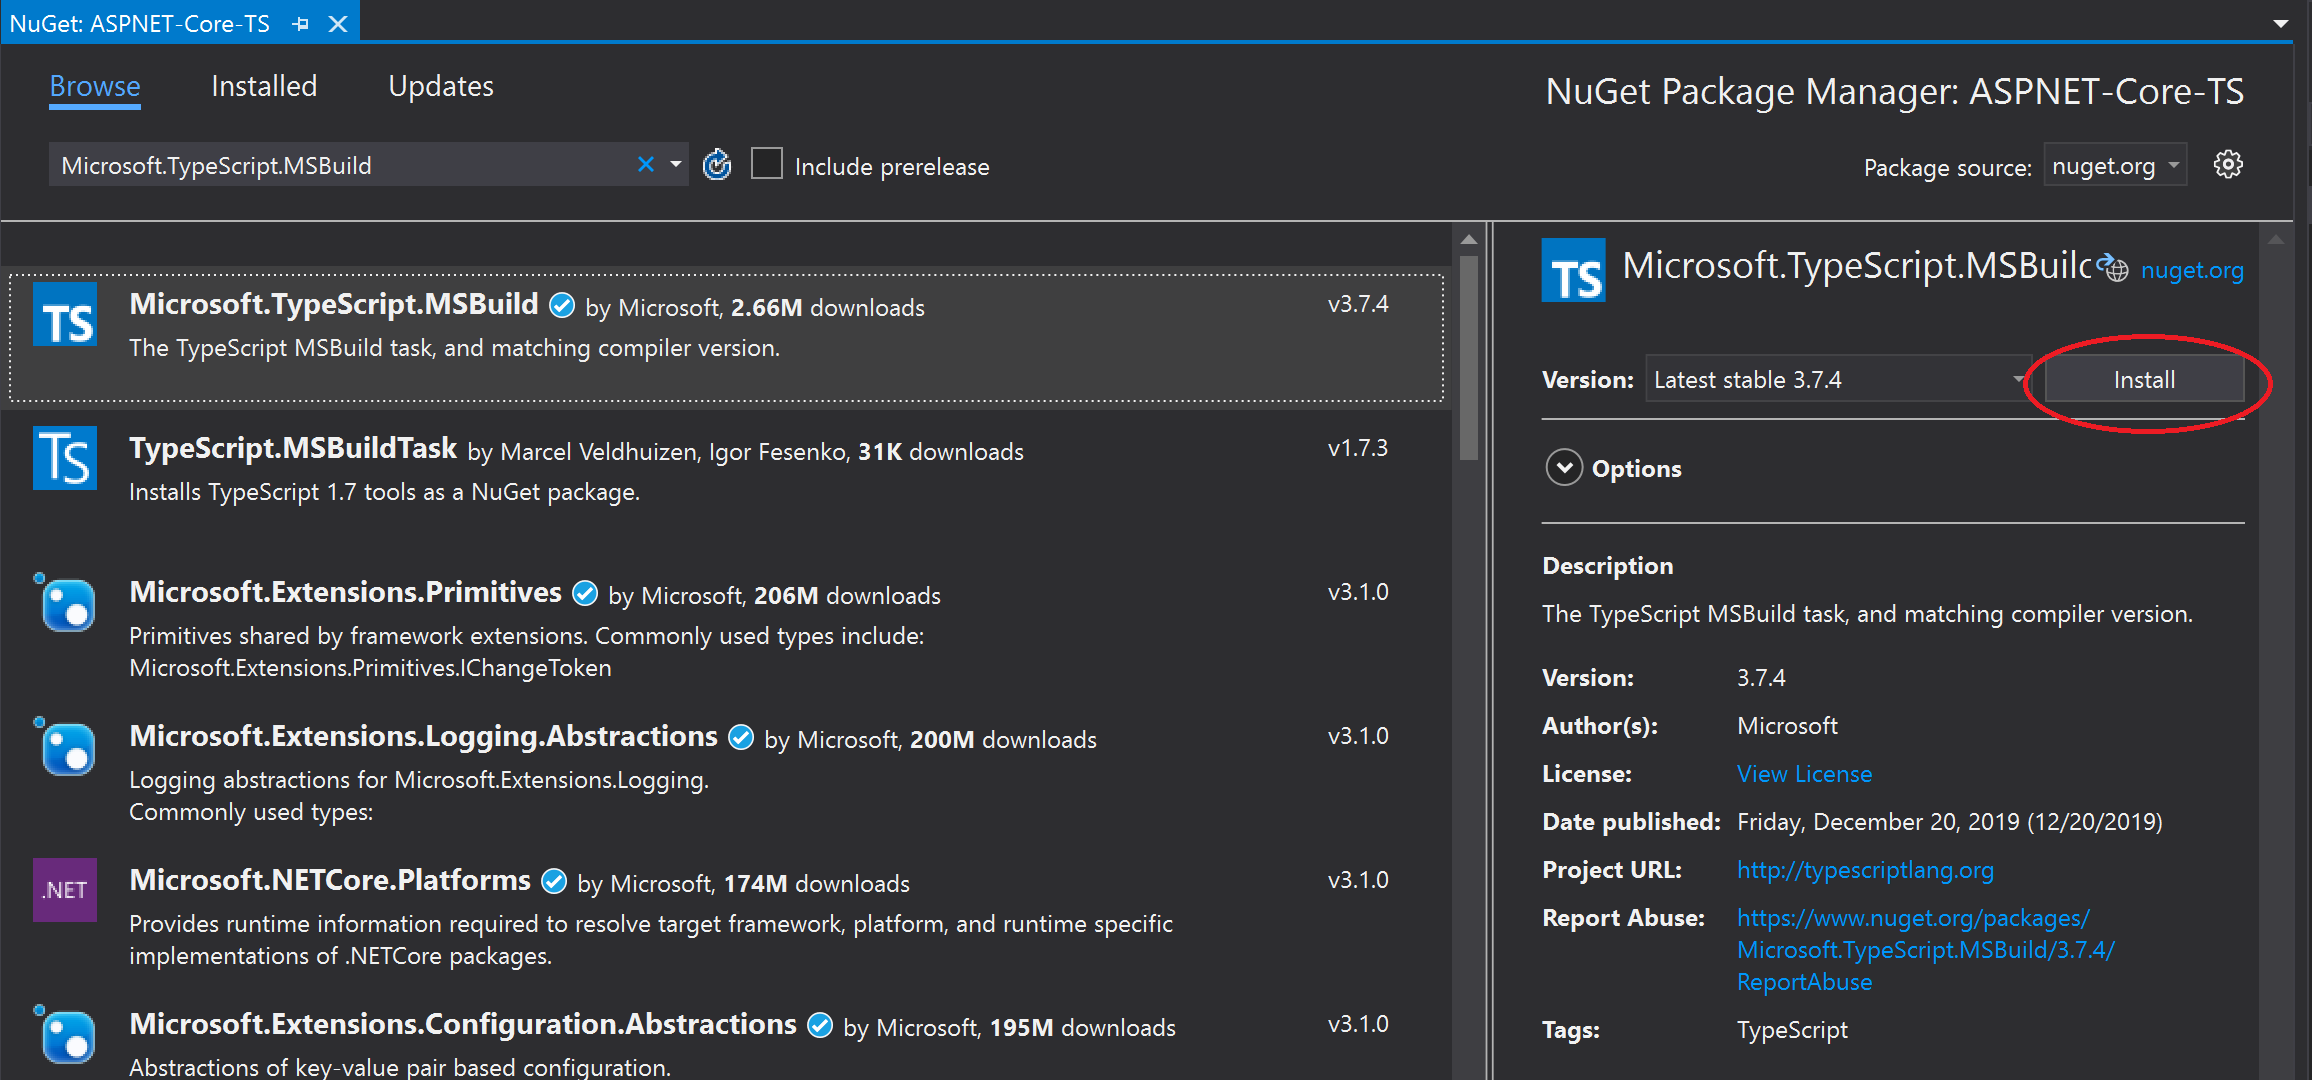
In Solution Explorer (right pane). right-click the project node and choose Manage NuGet Packages. In the Browse tab, search for Microsoft.TypeScript.MSBuild, and then click Install to install the package.
Visual Studio adds the NuGet package under the Dependencies node in Solution Explorer. The following package reference gets added to your *.csproj file.
<PackageReference Include="Microsoft.TypeScript.MSBuild" Version="3.9.7">
   <PrivateAssets>all</PrivateAssets>
   <IncludeAssets>runtime; build; native; contentfiles; analyzers; buildtransitive</IncludeAssets>
</PackageReference>
Right-click the project node and choose Add > New Item. Choose the TypeScript JSON Configuration File, and then click Add.
If you don't see all the item templates, choose Show All Templates, and then choose the item template.
Visual Studio adds the tsconfig.json file to the project root. You can use this file to configure options for the TypeScript compiler.
Open tsconfig.json and update to set the compiler options that you want.
The following is an example of a simple tsconfig.json file.
{
  "compilerOptions": {
    "noImplicitAny": false,
    "noEmitOnError": true,
    "removeComments": false,
    "sourceMap": true,
    "target": "es5",
    "outDir": "wwwroot/js"
  },
  "include": [
    "scripts/**/*"
  ]
}
In this example:
- include tells the compiler where to find TypeScript (*.ts) files.
- outDir option specifies the output folder for the plain JavaScript files transpiled by the TypeScript compiler.
- sourceMap option indicates whether the compiler generates sourceMap files.
The previous configuration provides only a basic introduction to configuring TypeScript. For information on other options, see tsconfig.json.
Build the application
Add TypeScript (.ts) or TypeScript JSX (.tsx) files to your project, and then add TypeScript code. For a simple example of TypeScript, use the following:
let message: string = 'Hello World';
console.log(message);
If you are using an older non-SDK style project, follow instructions in Remove default imports before building.
Choose Build > Build Solution.
Although the app builds automatically when you run it, we want to take a look at something that happens during the build process:
If you generated source maps, open the folder specified in the outDir option and you find the generated *.js file(s) along with the generated *js.map file(s).
Source map files are required for debugging.
If you want to compile every time you save the project, use the compileOnSave option in tsconfig.json.
{
   "compileOnSave":  true,
   "compilerOptions": {
   }
}
For an example of using gulp with the Task Runner to build your app, see ASP.NET Core and TypeScript.
If you run into issues where Visual Studio is using a version of Node.js or a third-party tool that is different than what the version you expected, you may need to set the path for Visual Studio to use. Choose Tools > Options. Under Projects and solutions, choose Web Package Management > External Web Tools.
Run the application
Press F5 or select the Start button at the top of the window.
NuGet package structure details
Microsoft.TypeScript.MSBuild.nupkg contains two main folders:
build folder
Two files are located in this folder. Both are entry points - for the main TypeScript target file and props file respectively.
Microsoft.TypeScript.MSBuild.targets
This file sets variables that specify the run-time platform, such as a path to TypeScript.Tasks.dll, before importing Microsoft.TypeScript.targets from the tools folder.
Microsoft.TypeScript.MSBuild.props
This file imports Microsoft.TypeScript.Default.props from the tools folder and sets properties indicating that the build has been initiated through NuGet.
tools folder
Package versions prior to 2.3 only contain a tsc folder. Microsoft.TypeScript.targets and TypeScript.Tasks.dll are located at the root level.
In package versions 2.3 and later, the root level contains
Microsoft.TypeScript.targetsandMicrosoft.TypeScript.Default.props. For more details on these files, see MSBuild Configuration.Additionally, the folder contains three subfolders:
net45
This folder contains
TypeScript.Tasks.dlland other DLLs on which it depends. When building a project on a Windows platform, MSBuild uses the DLLs from this folder.netstandard1.3
This folder contains another version of
TypeScript.Tasks.dll, which is used when building projects on a non-Windows machine.tsc
This folder contains
tsc.js,tsserver.jsand all dependency files required to run them as node scripts.Note
If Visual Studio is installed, then the NuGet package automatically picks up the version of node.exe bundled with Visual Studio. Otherwise, Node.js must be installed on the machine.
Versions prior to 3.1 contained a
tsc.exeexecutable to run the compilation. In version 3.1, the executable was removed in favor of usingnode.exe.
Remove default imports
In older ASP.NET Core projects that use the non-SDK-style format, you may need to remove some project file elements.
If you are using the NuGet package for MSBuild support for a project, the project file must not import Microsoft.TypeScript.Default.props or Microsoft.TypeScript.targets. The files get imported by the NuGet package, so including them separately may cause unintended behavior.
Right-click the project and choose Unload Project.
Right-click the project and choose Edit <project file name>.
The project file opens.
Remove references to
Microsoft.TypeScript.Default.propsandMicrosoft.TypeScript.targets.The imports to remove look similar to the following:
<Import
   Project="$(MSBuildExtensionsPath32)\Microsoft\VisualStudio\v$(VisualStudioVersion)\TypeScript\Microsoft.TypeScript.Default.props"
   Condition="Exists('$(MSBuildExtensionsPath32)\Microsoft\VisualStudio\v$(VisualStudioVersion)\TypeScript\Microsoft.TypeScript.Default.props')" />

<Import
   Project="$(MSBuildExtensionsPath32)\Microsoft\VisualStudio\v$(VisualStudioVersion)\TypeScript\Microsoft.TypeScript.targets"
   Condition="Exists('$(MSBuildExtensionsPath32)\Microsoft\VisualStudio\v$(VisualStudioVersion)\TypeScript\Microsoft.TypeScript.targets')" />
Feedback
Coming soon: Throughout 2024 we will be phasing out GitHub Issues as the feedback mechanism for content and replacing it with a new feedback system. For more information see: https://aka.ms/ContentUserFeedback.
Submit and view feedback for