Note
Access to this page requires authorization. You can try signing in or changing directories.
Access to this page requires authorization. You can try changing directories.
Organization dashboard
Snapshot
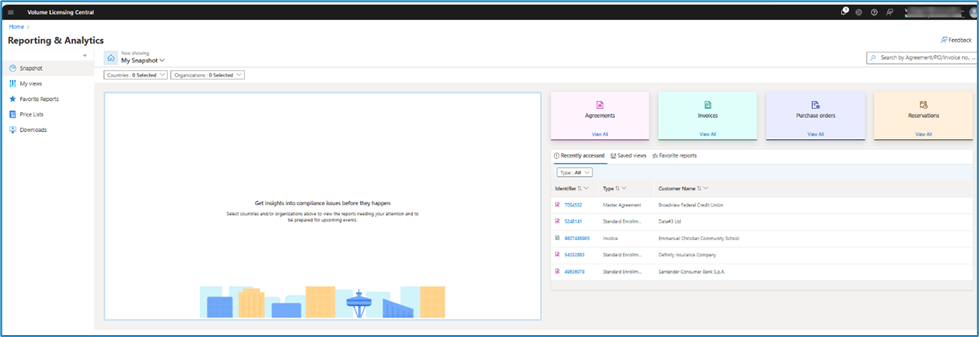
On the Reporting & Analytics home page, select your country/ies, and/or your end customer organization(s) to view snapshot data for your selected customers. You can also do a quick search and select your customer organization(s). Take note that a country selection would narrow down the organization list to only the selected country/ies.

Once selected, you can then select Save Snapshot to save your organization selection.

Enter the name of the dashboard. Set as home if you'd like this dashboard to be the default dashboard when landing on the Reporting & Analytics workspace. Select Save.

The snapshot is now saved. You can find your saved snapshots under the dropdown menu.
Choose which one to set as home by selecting the home icon.
Choose the snapshot you want to see and select Show.


Note: A saved snapshot is the equivalent of a saved dashboard. A saved snapshot can be set as the default snapshot to show up on the landing page every time you sign in to the Reporting & Analytics workspace.
Update or modify snapshot
Choose a saved snapshot and select Show.

Modify the organization and/or region. Notice that the dashboard name changes to <Saved name> (Unsaved).

Select either Update existing or Save as New. If you select Save as New, a new prompt to select a new name appears. Set it as home if you want to change your landing snapshot to this new saved snapshot. Select Save.

The new snapshot will appear under Saved snapshots.


Note: When a saved snapshot is opened, it shows all organizations and regions associated with the user, but the selected ones for this saved snapshot are shown on top of the dropdown list.
Save snapshot
Select countries from the dropdown menu under My snapshot.

Select organizations from the dropdown menu under My snapshot.

Select Save snapshot.

If you select Save snapshot, a prompt to select a snapshot name will appear. Check Set as home if you want to change your landing snapshot to this saved snapshot. Select Save.


Note: When a saved snapshot is opened, it shows all organizations and regions associated with the user, but the selected ones for this saved snapshot are shown on top of the dropdown list.
Snapshot organization summary
Select a single organization to view the organization summary.
Select View Organization contacts to show the contacts in the selected customer organization.

Contacts in the selected organization appear, including the following details:
- Role type
- Name
- Email address
- Phone number


Note: When a single organization is selected, all key information, including address and contact information, is displayed under the Organization Summary card on the bottom-right dashboard.
Needs your attention
On the Reporting & Analytics home page, select your country or countries, and your organization(s). You can also do a quick search and select your organization(s).

Once your organization(s) are selected, you can see Needs your attention for any late true-ups with the report name and for which customer it is. You can filter for the following possible events using the Type dropdown menu:
- Late True-ups/Annual Order
- Invalid Order
- Order Rejected

Select the report link to view the details of Needs your attention.

Upcoming events
On the Reporting & Analytics home page, select your country or countries, and your organization(s). You can also do a quick search and select your organization(s).

Once your organization(s) are selected, you can see the upcoming events that might affect your business and take the necessary action. You can use the Type dropdown list to filter for the following possible events:
- Upcoming true-up or annual order
- Upcoming renewal
- Upcoming billing
- Reservations due reconciliation

Select the report link to view the details of upcoming events.

Quick access widgets and My views
- On the Reporting & Analytics home page, select one of the four following widgets to directly take you to the desired reports:
- Agreements
- Invoices
- Purchase orders
- Reservations
- Underneath the widgets, there are three sections to open several views:
Recently accessed – you can see your top 15 recently accessed reports.
Saved views – filter down any My views report, choose the columns you need, and save the view to refer to the customized view later.
Favorite reports – mark a report as a favorite if you need to access it repeatedly.
Reports can open in a new page/tab.
Agreement overview
The agreement overview offers sections on all relevant agreement information, including:
- Agreement title – Agreement type and number
- View agreement summary – List of key fields or properties of the agreement
- View agreement offerings – Offerings that are part of the agreement
- View agreement participants – Participants of the agreement and their contact information
- View agreement comments – Any comments added to the agreement
- View needs your attention section – Any call-to-action related to the agreement that warrants the user’s immediate attention
- View true-up history – History of yearly true-ups submitted for the agreement
- View year-on-year revenue – Summary of year-on-year revenue for each year of the agreement
Additional sections available as appropriate for the agreement

Summary
The agreement overview shows sections on all relevant agreement information.
Timeline of the agreement with the current state
List of key fields or properties of an agreement
Select View more for more information
Quick links to additional sections relevant to the agreement
Option to copy to clipboard for key fields


Offerings
View offerings that are included as part of the agreement.
Select column headers to sort data (applicable to all sections)
Option to Export to Excel (applicable to all sections)


Channel price sheet (CPS) history
View CPSs created to lock in prices for the agreement.
For sections with more than ten records, select View All to go to a new page and view all records (applicable to all sections).

CPS history – View all
View all records of created CPSs to lock in prices for the agreement.
Select Export to Excel to export the data into an Excel sheet.
Use the Columns option to select the columns you need, Filter to filter the data, and Search to look up information.


Special pricing
View special pricing locked in for the agreement.

Participants
View participants of the agreement (includes indirect and/or direct partners and customers) and their contact information.
Participant cards for key participants (divided into customer and partner type) with primary contact information

Amendments
View amendments applied to the agreement during its term.

Benefits
View benefits offered as part of the agreement.

Incidents
View incident history of tickets raised for the agreement.

Actionable insights, true-ups, and year-on-year revenue
View the Needs your attention section for any call to action related to the agreement that warrants the user’s immediate attention.

View the True-up section for a history of yearly true-ups submitted for the agreement.

View the Year-on-year revenue section for a summary of year-on-year revenue for each year of the agreement.

Agreement financial reporting
Agreement financial reporting tab
This tab presents key information for a particular agreement's financial transactions such as the invoice and PO details.
(List of key fields or properties of an agreement)

Summary
This summary presents key information for a particular agreement's financial transactions such as the invoice and PO details.
The tabs available and their corresponding views are the following:
Summary – View of POs and invoices associated with each PO (In the Summary tab, the PO information is available by default. Select > to expand the PO and view associated invoices)
Invoices – Invoice information and view of products within each invoice
POs – PO information and view of products that have been purchased by a customer within each PO
Billing schedule – Future billing information such as scheduled bill date, price, quantity, and covered dates
Reservations


Invoice details
The View invoice details section houses key information about the invoices, billing dates, line items, and other fields. Select the Invoices tab to view invoice information and details of associated line items under each invoice.
Select > for an expanded view of a specific invoice instance.
Select Columns to select the column information to be displayed.
Select Filter to filter invoices based on the criteria selected.


PO details
The PO details section houses key information about the orders, line items, status of PO, usage date, and other fields. Select the Purchase Order tab to view PO information and details of line items within each PO.
Select > for an expanded view of specific PO details.
Select Columns to select the column information to be displayed.
Select Filter to filter invoices based on the criteria selected.


Billing schedule
The Billing schedule details tab shows information about the purchase orders with the future bill on the date for an agreement. It also houses key information such as the PCN, bill-on date, coverage start/end dates, price, and quantity.
Select the Billing Schedule tab to view details on future billings.
Users can check the bill-on date and all the related information on billing schedule enrollments.
Considering an annual pricing model for a three-year agreement, the three sales order line items (SOLIs) are created, and the invoice is generated on the SOLIs’ bill-on date.
Customers are then given 30 or 60 days to make the payment for the generated invoice created on the bill-on date.
The scheduled bill date and the sales order line item status will help the user understand the current status of the billing schedule enrollments.
Select > for an expanded view of a specific billing schedule instance.
Select Columns to select the column information to be displayed.
Select Filter to filter invoices based on the criteria selected.


Reservations
The Reservations section shows information about the licenses that have been reserved by the customer as part of the enrollment. This data is used to view the reservation reconciliation status and verify that the agreement is compliant.
Select the Reservations tab to view details on reservations and reconciliation status.
Customers can place orders from Volume Licensing Service Center (VLSC) for reservations. A partner needs to reconcile reservations by placing reconciliation orders.
As soon as the reservation order is placed, it is marked as invoiced with 0 price and with 0 invoice number.
The Reconciliation status helps a user understand whether the order has been fully/partially reconciled or not reconciled.
Select > for an expanded view of a specific reservation instance.
Select Columns to select the column information to be displayed.
Select Filter to filter invoices based on the criteria selected.


| Reservation status | Logic |
|---|---|
| Reconciled | If all line items are reconciled |
| Partially reconciled | If at least one line item is reconciled |
| Not reconciled | No line item is reconciled |
Agreement license information
View license information
Licenses can be managed to view more information under Columns or filtered based on specific criteria under Filters.
The search bar can be used to find a specific item on the license.
On a particular agreement instance, select the License Information tab to view information such as existing or expiring licenses and order quantities.

Price lists
View price list report
On the Reporting & Analytics home page, select Price Lists on the navigation pane.

Select a country, channel, and date to prompt a price list to open.

Price lists can be managed to view more information under Columns or filtered based on specific criteria under Filters.

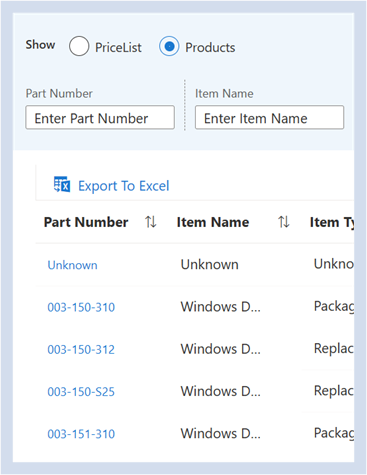
View product details, report, and export info
Go to the Price Lists option on the left pane.
Select the Products filter to view Microsoft products and the associated price list relevant to each.
To export all sections of a product report, select Export to Excel to download an Excel file containing relevant part information.
Select a specific part number to open the product details of an individual SKU.
View Lead Status
'Display to Public' (Lead status) column is now available in VLC price list report.

Generic search
Search history, saved views, and favorite reports
Recent searches, recent saved views, and recent favorite reports are shown as default when a user selects a search box.
Three characters initiate a search. The search string is supported for the following:
- Customer name
- PCN
- Agreement number
- PO number
- Invoice number


Search results
The search results are returned in the following order:
Agreements
Purchase order
Invoices
Customers


The top five results by category are listed (as appropriate). Users can select View all for the complete results.

Search results – Details
View all provides a list that you can filter by category (as applicable).

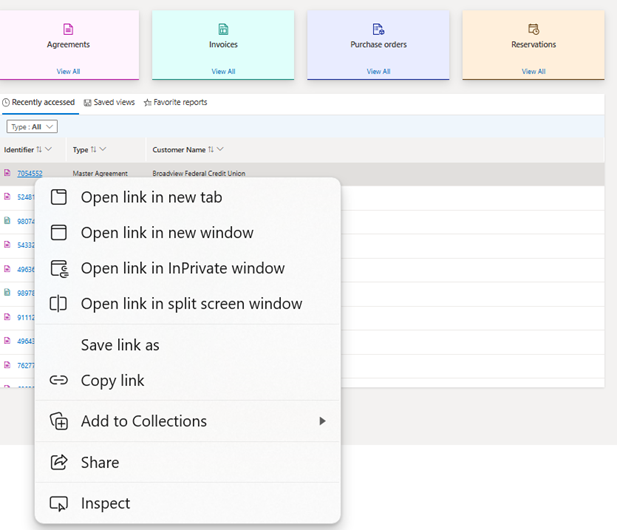
The ellipsis next to each line item gives the user the option to copy a link to the report or open it in a new tab.


Search results – Scenario details
Exact result

No result

Exact result and related entries
For a search with an agreement number, the results will also include related entities for the agreement, such as:
- Related customers
- Related POs
- Related invoices
Similarly, for a search with either an invoice number, PO number, PCN, or customer name, related entities will also appear.

Favorite reports
Mark as favorite
Go to the Favorite Reports screen. For users who signed in for the first time, the Favorite section will be empty.

Select My views on the left navigation pane.

You can also select Agreements or any report icon on the right navigation pane to see the corresponding view.

Select the report associated with any specific agreement.

Mark the report as a favorite using the Mark as favorite button on top of each report.


Favorites page
Go to the Favorite Reports screen to show all the Favorite reports for a signed in user.
Selecting a favorite report opens the Overview tab by default and not the specific tab where Mark as favorite was selected.
To “unfavorite,” select the star icon. Take note that a favorite isn’t removed from the list until either the page is refreshed, the session times out, or the user goes to a different screen and returns.
A user can also “unfavorite” the opened favorite report by selecting Mark as favorite.


Deal book – Export to Excel
Location
On the Overview page for any agreement, hover over the ellipsis and select the Export to Excel icon on the top-right corner of the report screen.

Note: A user can export all the reports under an enrollment, that is, all reports under overview, license information, and financial reporting. This feature is different from exporting a single section or all sections within the page.
Edge or error case
In case some report APIs fail (due to a time-out/or any other error):
- The Excel file will be available with the report.
- The panel will show an error message mentioning the reports that failed to export.
A user should still be able to work and have this operation in the background, and the panel can be closed by the user while the download continues. Once the export is complete, this message will appear: "You will be notified once export is complete. You can close the panel."
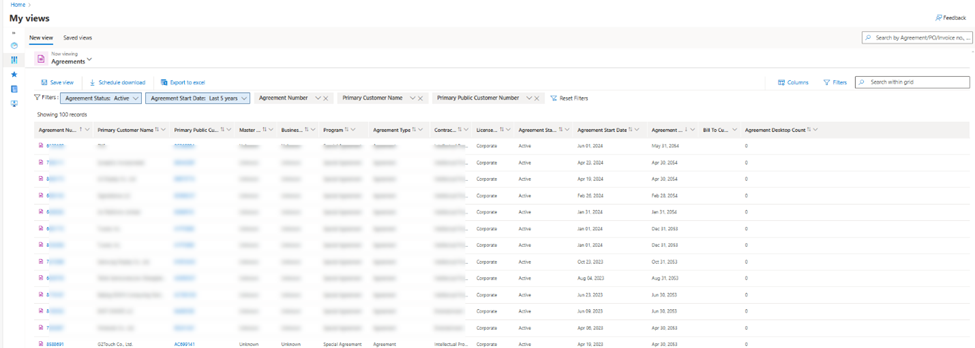
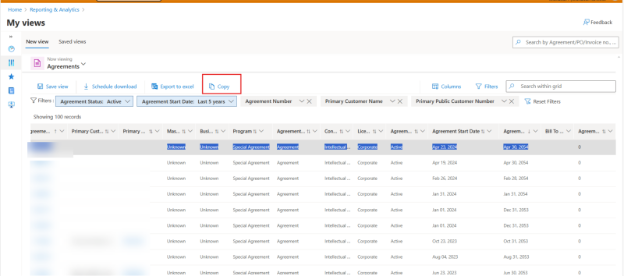
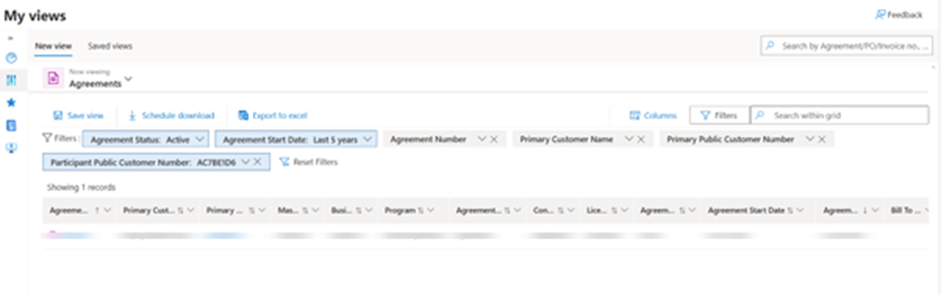
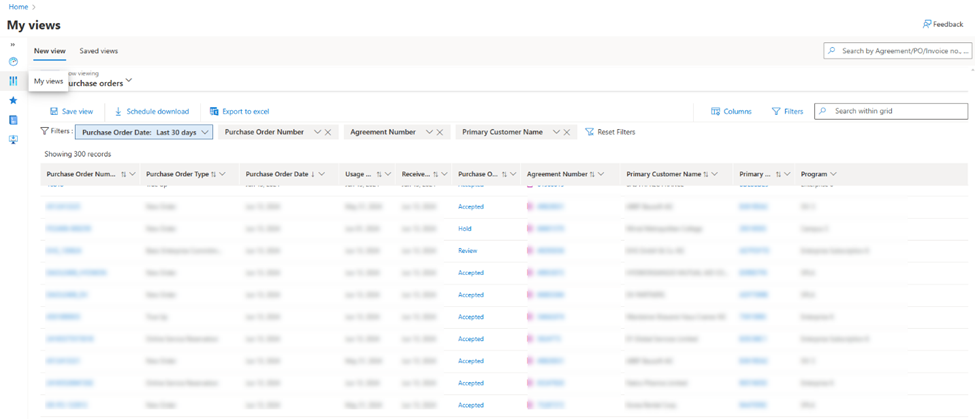
My views
Location
Select My Views or the associated icon on the left navigation pane to go to My Views. You may also select among the report icons on the right navigation pane.
Navigation
- Category dropdown menu; default category type is Agreements
- Actions available:
- Save view
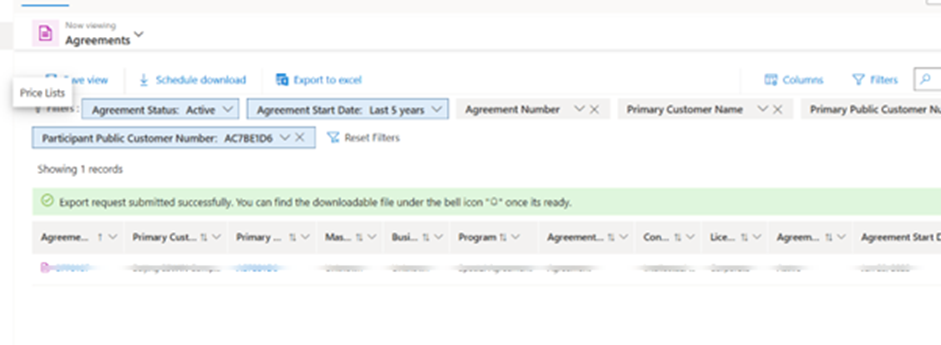
- Export to Excel
- Options for customizing view
- Columns
- Filter
- Search
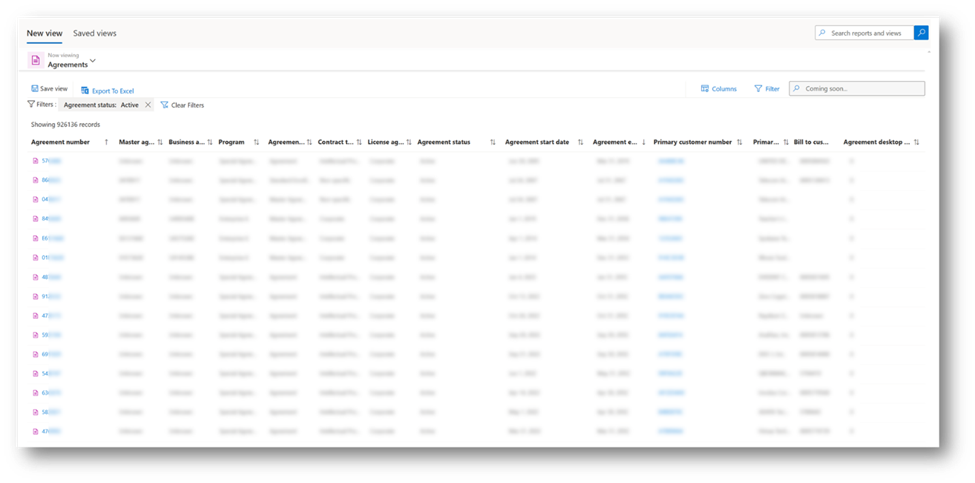
New filter experience
- Default filters – Applicable to the default view; can be edited
- Suggested filters
- Reset filters – Resets to default view
New filter experience: Multiple ID search
Search with multiple, comma-separated IDs
Improved grid search


New filter experience: List of default and suggested filters

Saved views
Select Save view.
After saving the view, select Save views to see the list of views saved.
Give the view name and select Save.


The Save views section lists a user’s saved views.
The available menu can be filtered by category.
Select the ellipsis for additional view options.


Invoice details
- Select the invoice number anywhere highlighted in the Reporting & Analytics workspace. For instance, in My views, select Invoice report, or under the Summary or Invoice tab, select Overview Financial reporting.
- These selections will direct you to the Invoice details page.
- Can export to Excel
- Apply filters and select columns

Customize
The dropdown menu contains all My Views categories with associated icons.

Columns and Filter links have nested menus that provide additional view customization options.

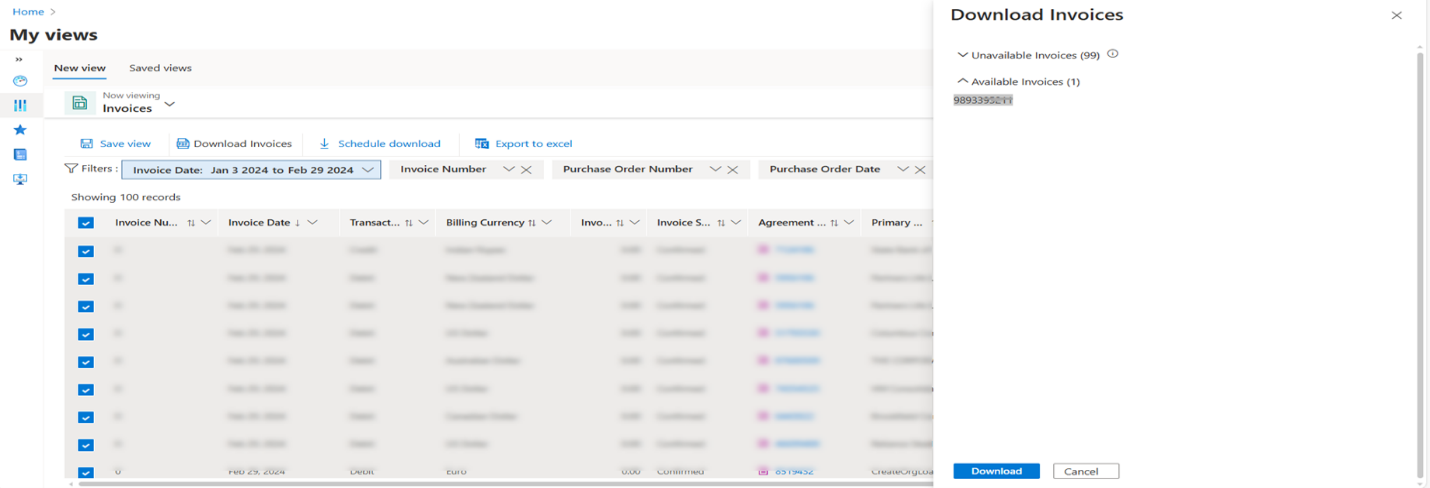
Download Invoice
‘Downloaded Invoice’ will be disabled when no items are selected. When you select one or multiple items from the list, ‘Download Invoice’ will be enabled, and users can download invoices.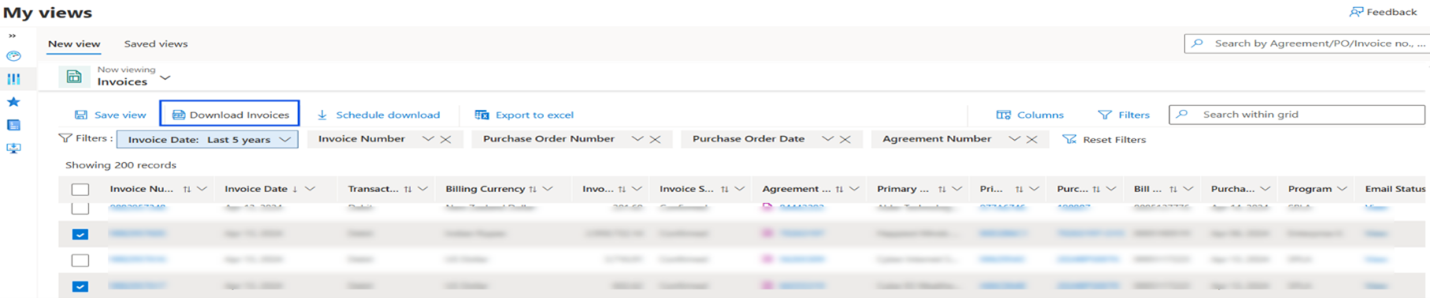
- When you click ‘Downloaded Invoice’ it will open a new pane.
- From Download Invoices pane, available invoices can be downloaded.
- ‘Download’ will download the Invoice.
- ‘Cancel’ will cancel the action.
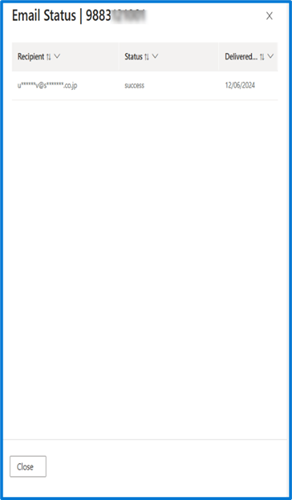
Email audit trail
‘Email Status’ will display the email audit status.
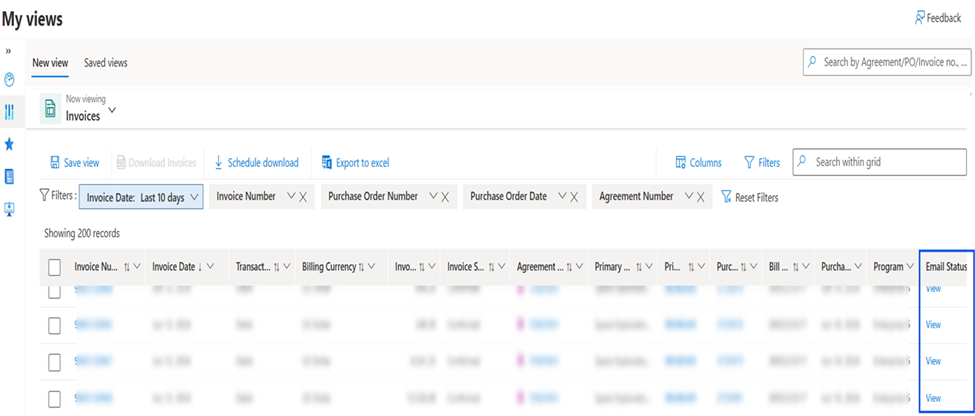
When you click on ‘view’ it will open new pane for email status.
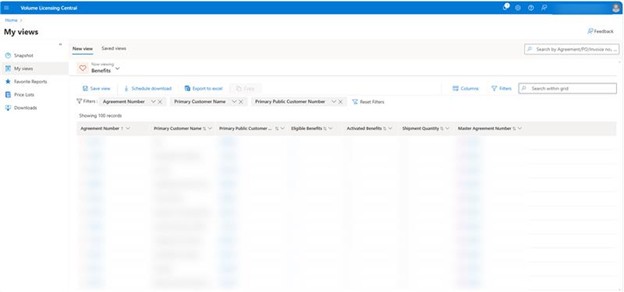
Benefits
The Benefits view presents detailed information regarding all available benefits. This feature offers users the ability to:
View all details in a straightforward table format
Obtain results based on criteria that extend beyond the confines of the Agreement and Master Agreement.
User can locate Benefits under My Views Benefits.
User can click on "eligible benefits" to see all details grouped by benefits.
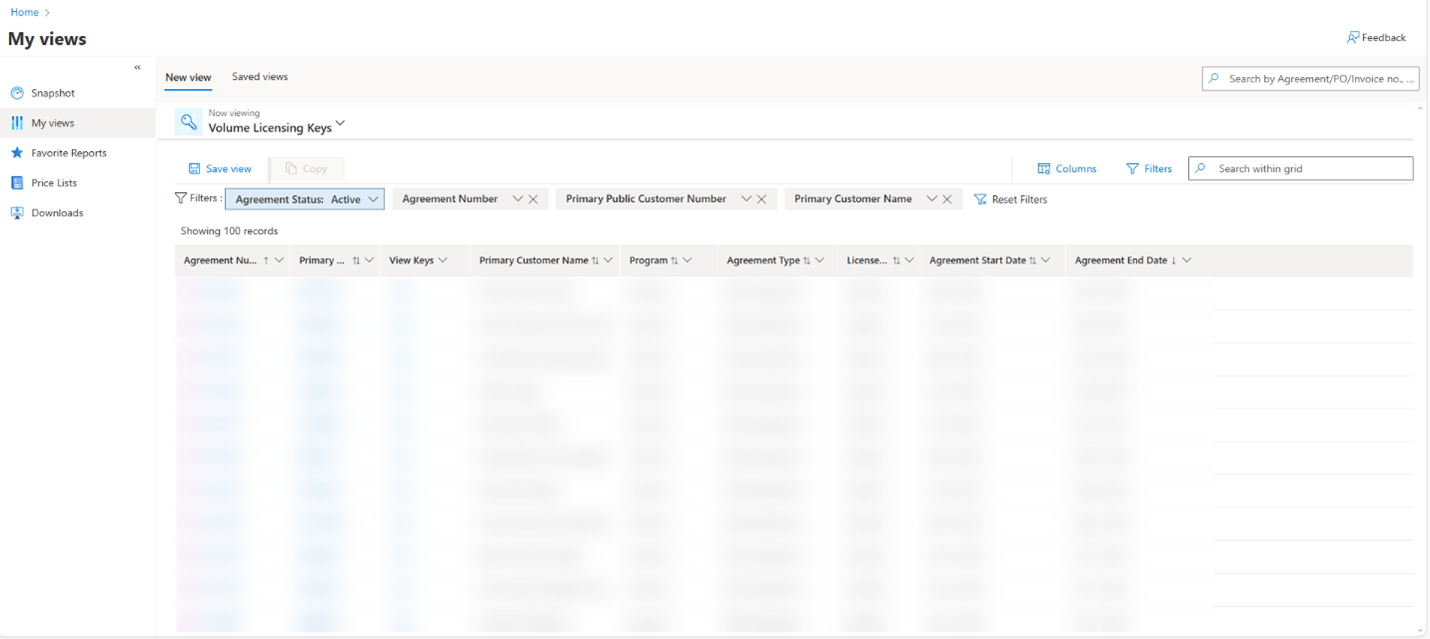
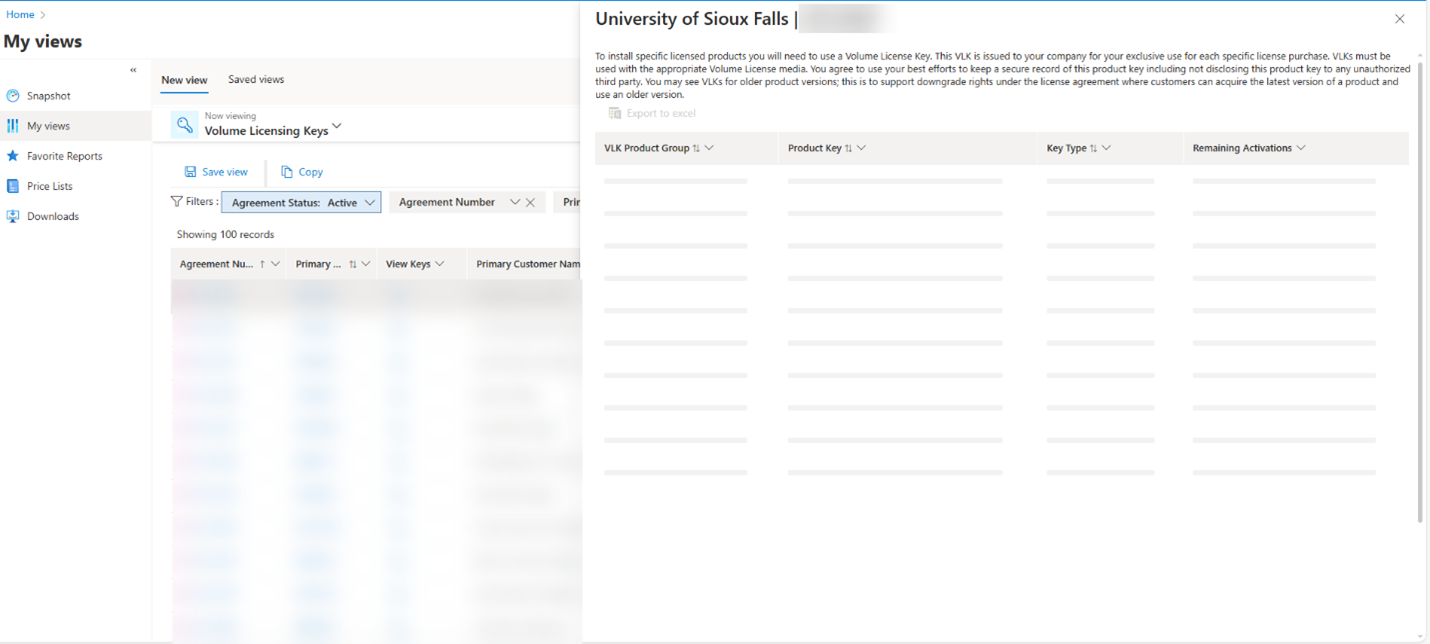
VL Keys
The VL Keys report serves as a resource for partners to access the product keys that are allocated to them in accordance with their agreements.
Users have the option to click on the link located in the 'View Keys' column corresponding to any of their agreements listed in this report, allowing them to view the keys associated with that specific agreement.
Messages
Message preview
- Clicking on Message ID opens the message (email) preview in a right pane.
- Message preview pane, enter one or more email addresses and re-send the email.
- Click On Resend, User will receive email in their inbox.
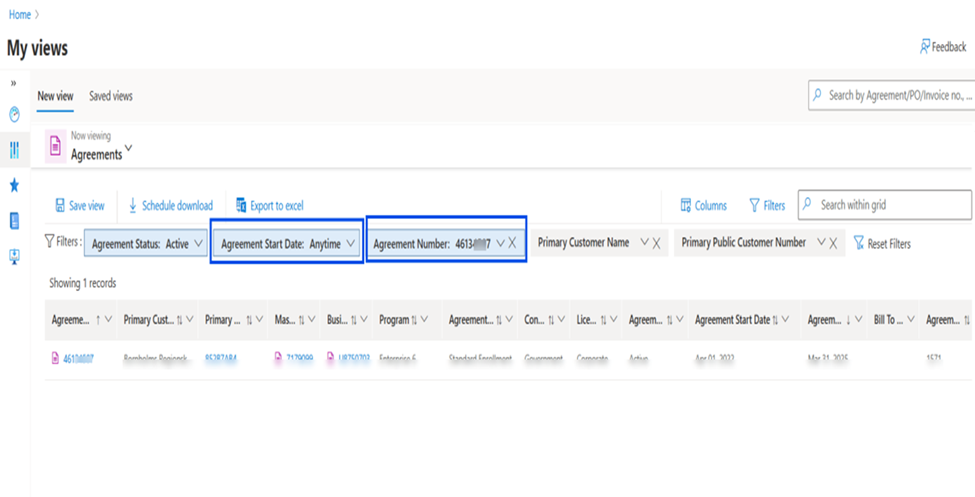
Anytime filter
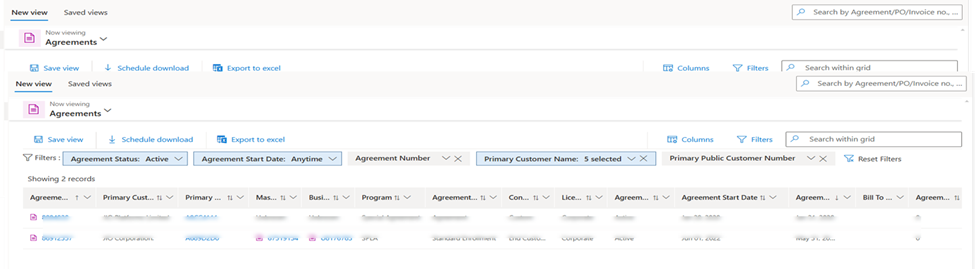
On applying either Agreement number or Primary Customer name filters, the date value changes to 'Anytime' by default, allowing for unrestricted access to all data for the selected Agreement or Customer.
Anytime - Selected Date Filter
- Select Agreement number/Customer Name from suggested filter click apply.
- Agreement start date will automatically change to Anytime.
Anytime - Custom Date Filter
Select Agreement number/Customer Name from custom date filter and click on apply.
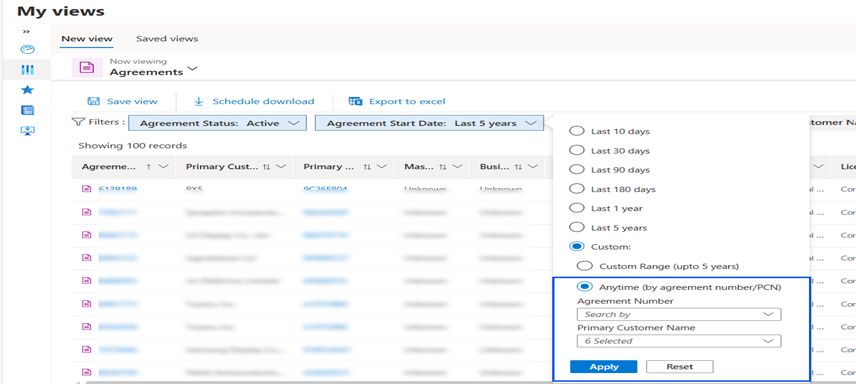
Agreement number/Customer Name will be selected, and date will select as Anytime.
Copy data
Users can copy specific data from reports by dragging to select any text or row and copy it from any My Views report
Copy button
Users can now select and copy rows by clicking on the “copy” button. This feature is applicable for all My Views and can be used for one or multiple rows. The button will enable once the user selects the grid.
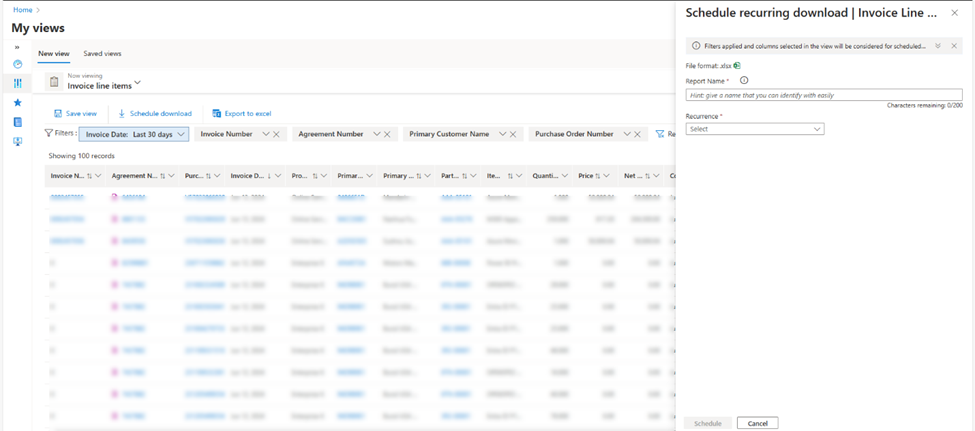
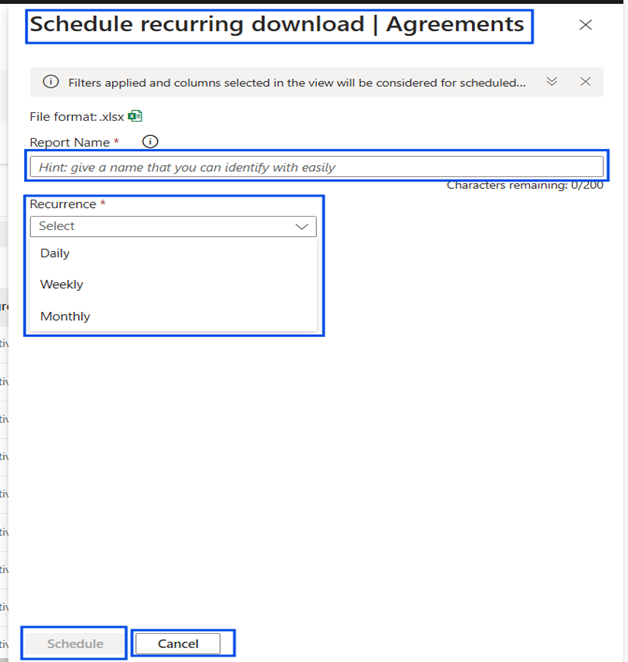
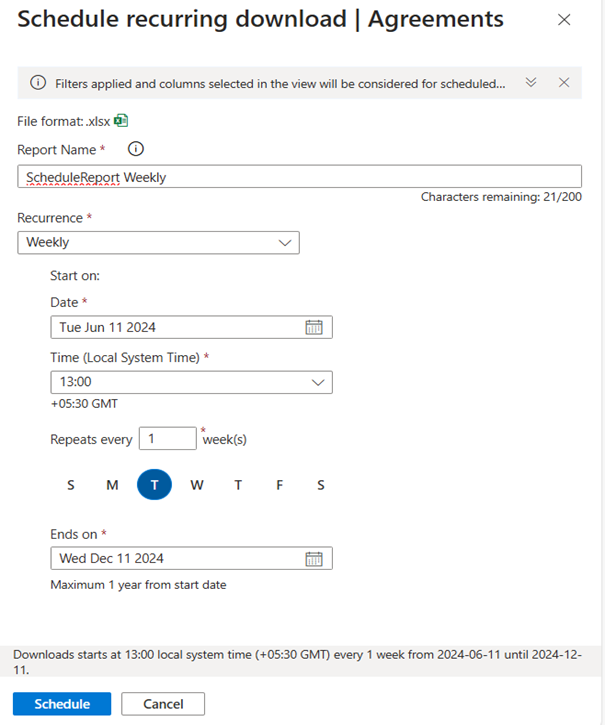
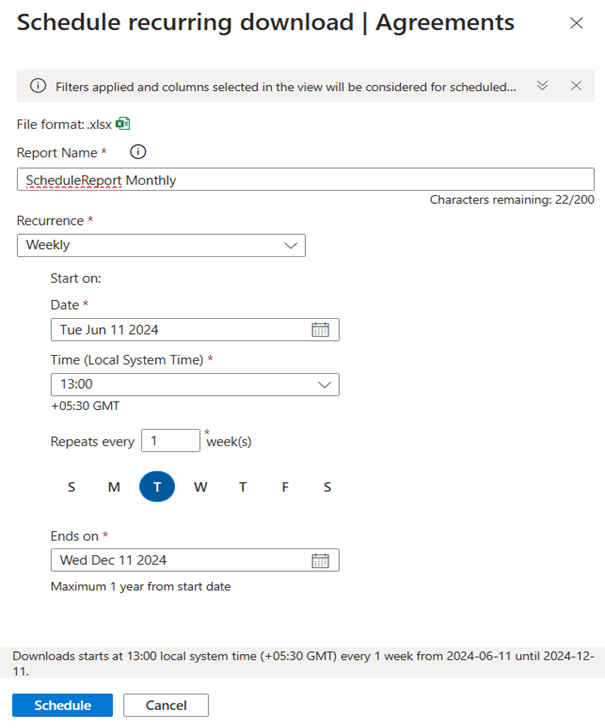
Schedule download
How to schedule downloads?
Users can now schedule reports to download at a daily, weekly or monthly recurrence by specifying the filters and columns needed for any My views report.
Note
All previous Explore.ms users are requested to migrate their existing download schedules to VL Central by re-creating the same report schedule in VL Central.
Click on the 'Schedule download' button. It will open scheduling pane.
Schedule Download Pane.
Scheduling pane allows you to input scheduling details
Schedule' button will schedule
'Cancel' will cancel the scheduling
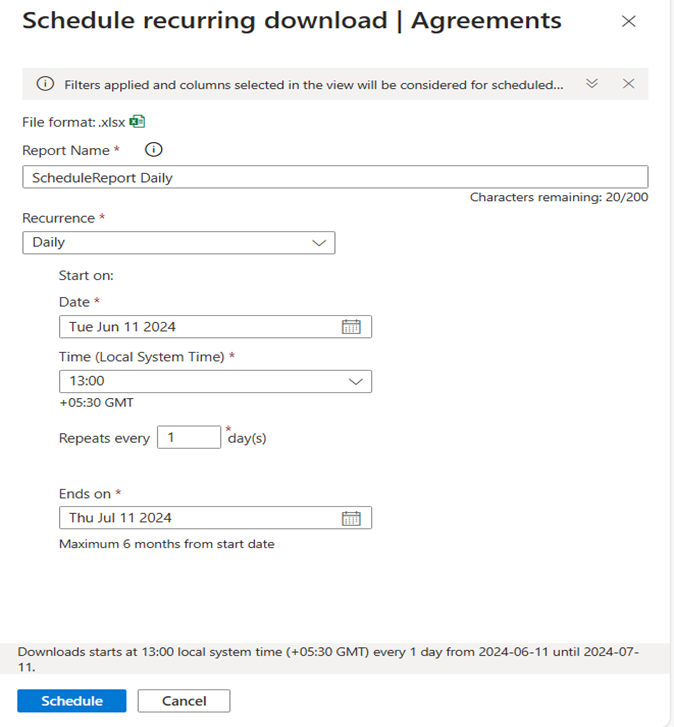
- Add recurrence details
User can schedule report for download based on Daily/Weekly/Monthly recurrence and provide details on schedule.
Daily
Weekly
Monthly
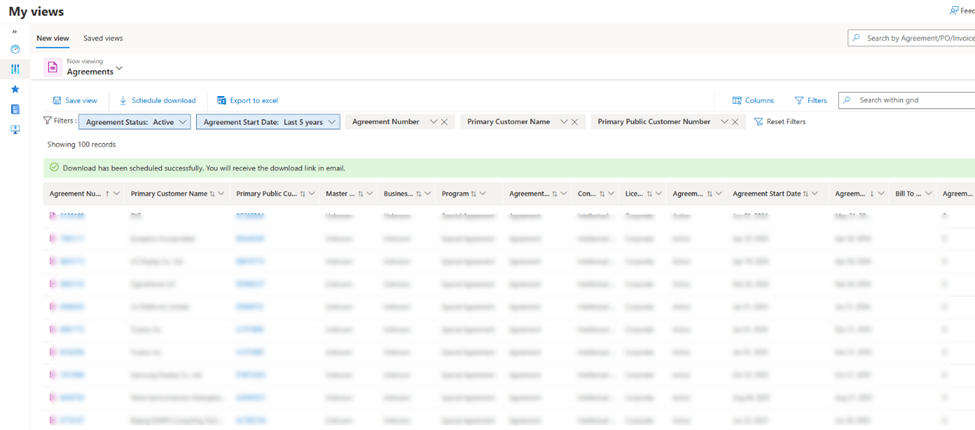
- User can view success message once download is scheduled.
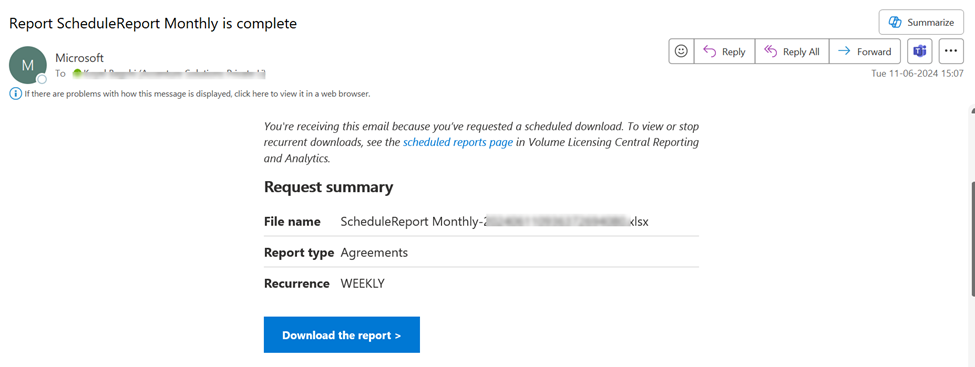
- Users will receive an email when scheduled download report is ready and can click on 'Download report' link to visit VL Central and download the report.
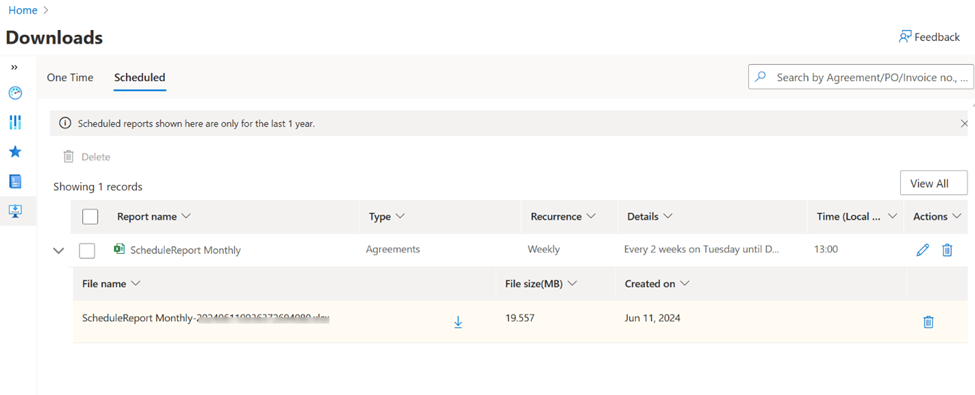
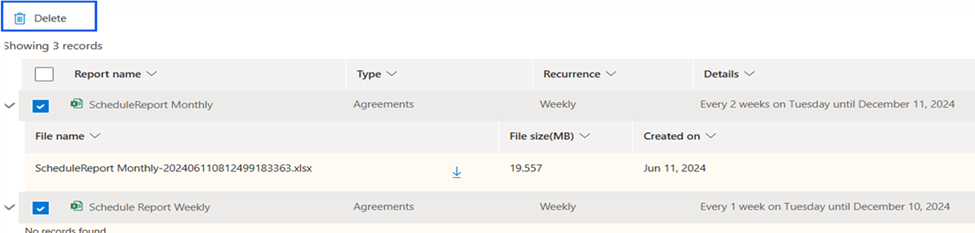
View, download, modify and delete reports
Under downloads page, user can view/ download/modify/ delete reports, which are already scheduled.
View

Download
User can download reports by simply clicking on the download icon.

Modify
User can modify the schedule for report download as required:
1.Click on modification icon.
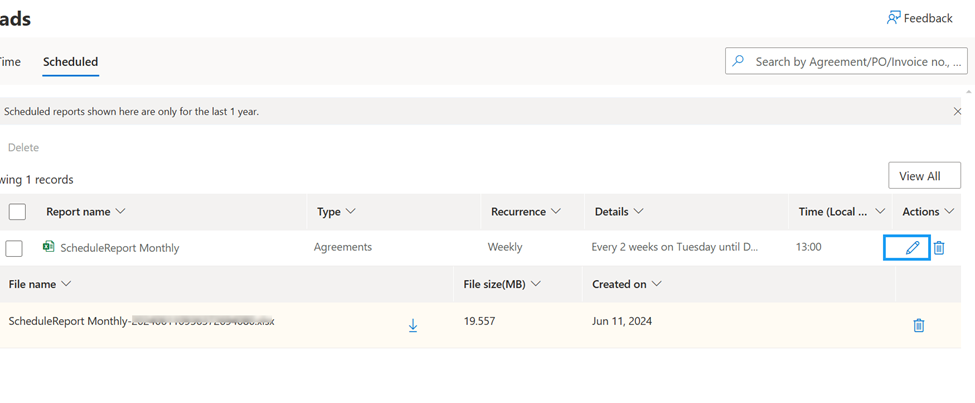
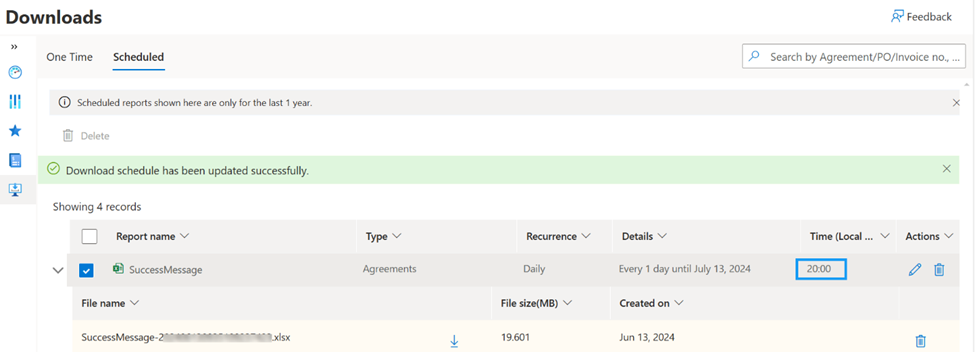
2.Modification pane will open, and you can modify any data (example: time) and click on update.
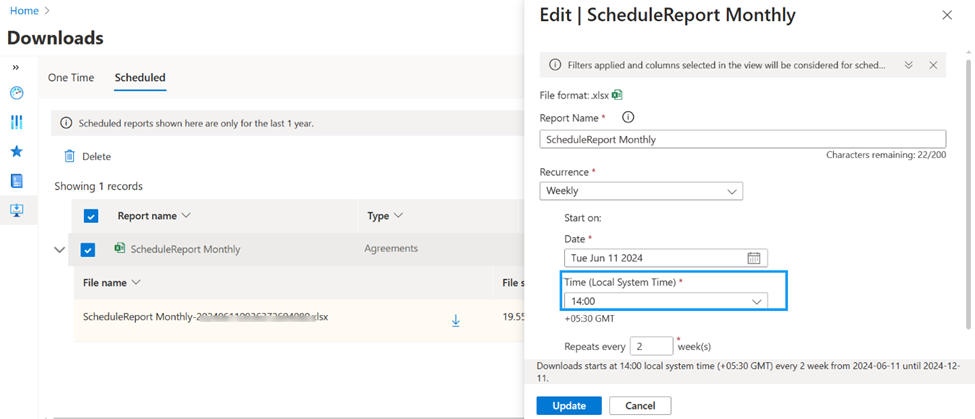
3.Record will be modified with a success message.
4.Modification pane, if user click on ’Cancel ‘, will cancel the action.
Delete
- Select delete report in the 'Actions' column.

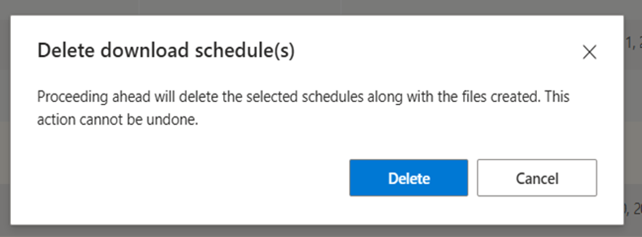
- File level deletion and delete confirmation message.

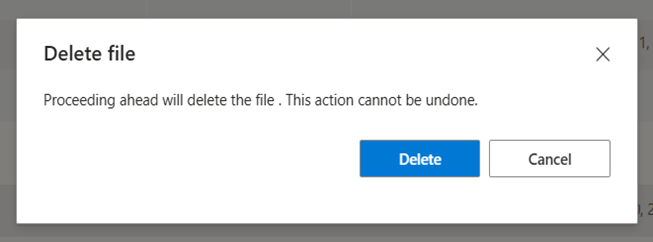
- Bulk Delete and confirmation message.

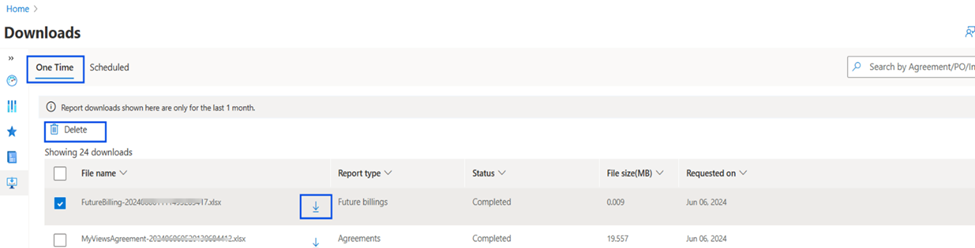
One-time reports
1.All one-time reports would be visible.
2.Allows report deletion.
3.Allows Report Download.
Participant PCN Filter
This allows user to search Agreements/Sale Order line items by partner PCN or any agreement participant PCN from the filter panel by providing complete PCN in Participant PCN filter.
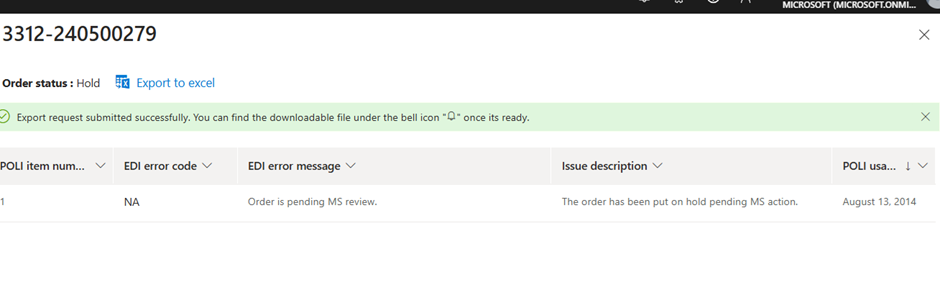
Purchase Order Status
Click on PO status in the PO entity report, the right pane should show the information around the error message when status (Rejected, Pending, On-hold etc.).
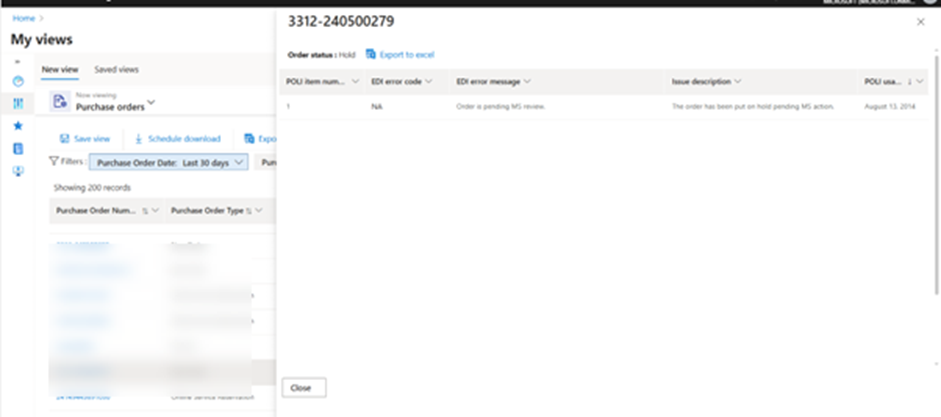
User can export to excel from error screen as well.

Change of Purchase Order
Change of Purchase Order is located in the Reporting & Analytics workspace.
For existing invoices:
1.Locate the Purchase Order number in the Financial Reporting tab.
2.Select the Purchase Order tab to view PO information and details of line items.
3.Select the Invoice tab and review the 'Billing purchase order number' column.
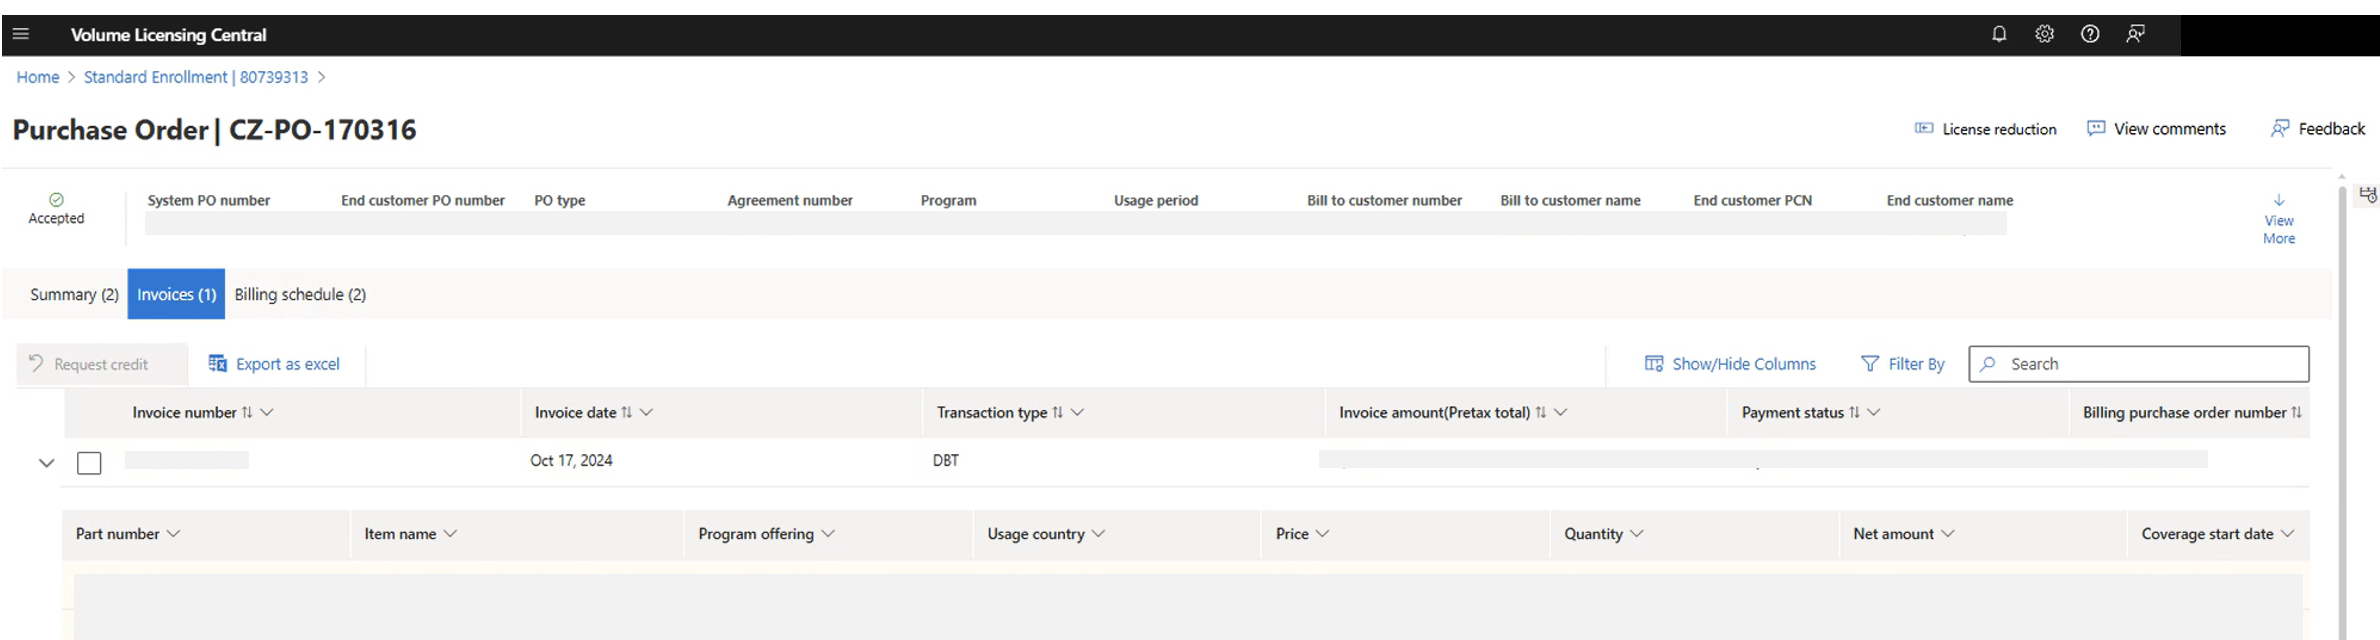
4.Select the pencil beside the 'Billing purchase order number'. A new box appears to 'modify billing PO number’.
5.Add your new billing PO number & submit.
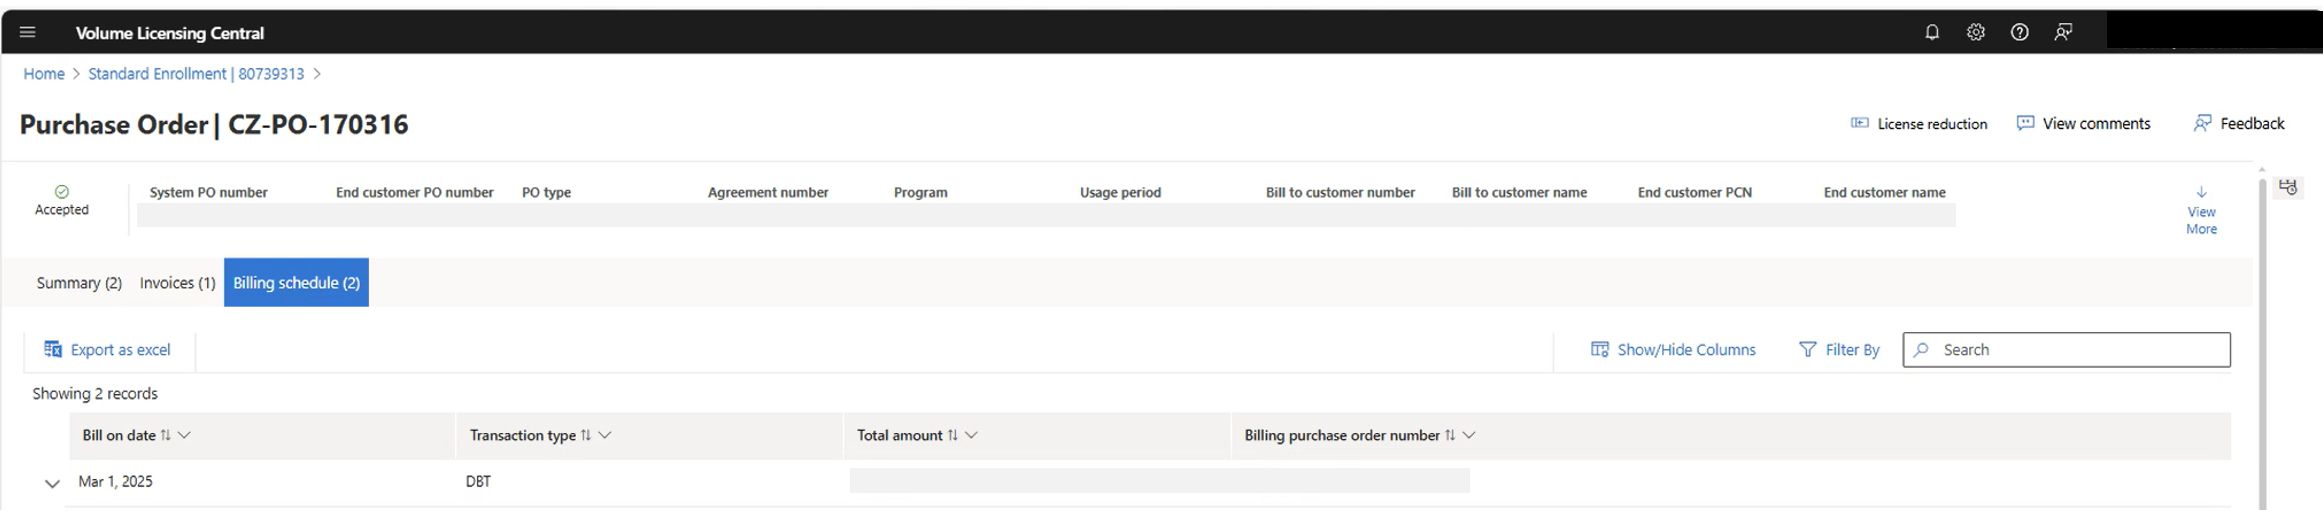
Note: For Future Billing, select the Billing schedule tab and follow the steps above.
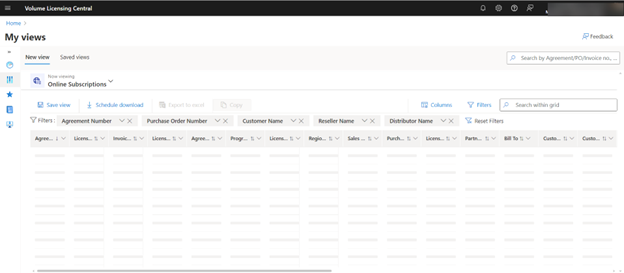
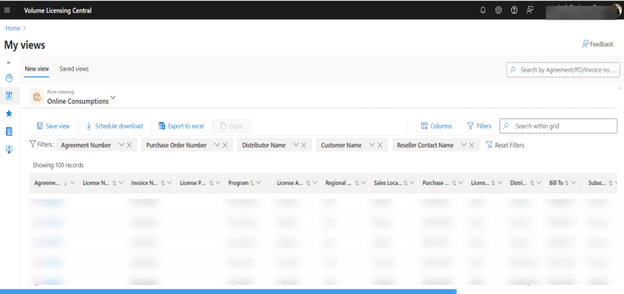
Online Subscriptions & Online Consumptions
User can locate the fulfilment details pertaining to Online Subscriptions and Online Consumptions.
Locate under My views Dropdown menu.
Export to excel functionality also available along with schedule downloads, saved views.
Documents & Templates
- Documents & Templates sections can be accessible from below places under homepage.
From Quick links
From GoTo section
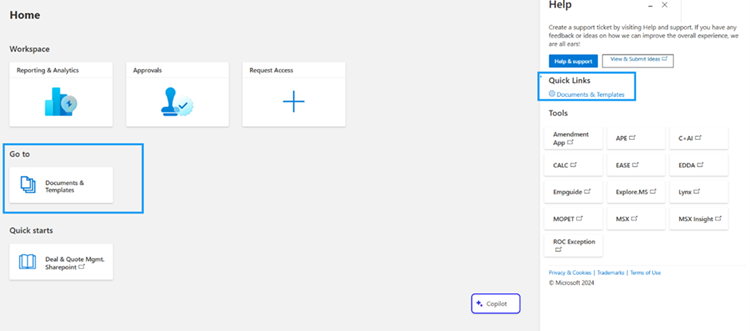
- Click on hyperlink (Documents & Templates) from quick link and GoTo, it will navigate to Document management page.
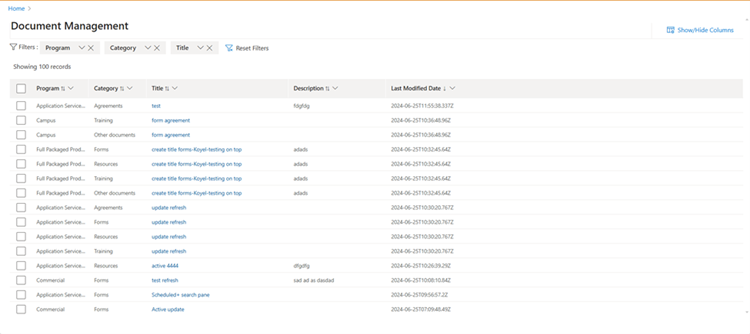
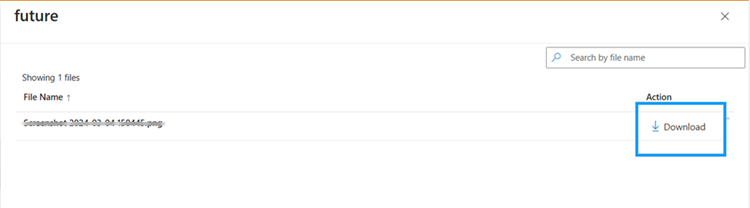
3.Click on the hyperlink for the title to allow users to view the document and download it.
Change Log
| Date | Change |
|---|---|
| 06/28/2024 | New lines added to My Views: Messages, Download invoice, Email audit trail. |
| 06/28/2024 | New section added for Anytime option in 'My Views', Schedule Download, Participant PCN Filter. |
| 06/28/2024 | New section added for Purchase Order Status. |
| 07/22/2024 | New section added for Documents & Templates. |
| 10/25/2024 | New section added for Change of Purchase Order, Copy data & Online Subscriptions & Online Consumptions. |
| 10/25/2024 | New section added for VL Keys, Benefits |